Monday, June 30, 2014

Every Year Knowing You- A Clean and Layered Sketch :-)

Hi Again Stampers!

I have one more Clean and Layered (CAL) card to share that I created using the FMS142 Freshly Made Sketches Challenge

Again, I hope you will take the time (if you have not done so already) to visit their site to check out all of the other Design Team entries as well as the gallery- great inspiration from all :-)

I decided to use an image from My Digital Studio (MDS) to create this CAL card:
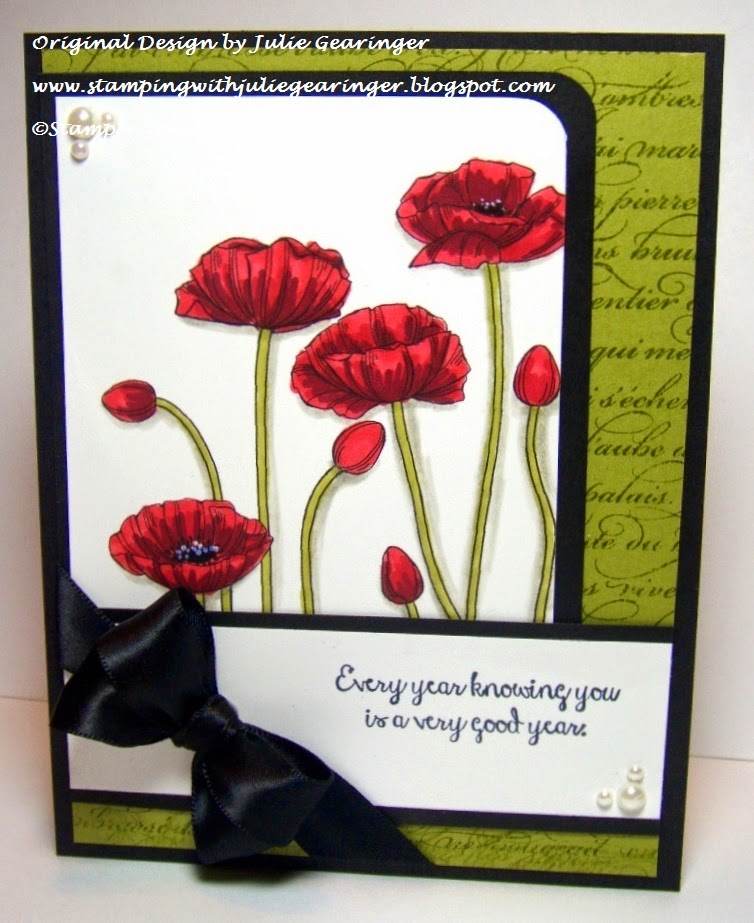
Open a blank 8.5’ x 11” document in MDS, insert the Pleasant Poppies stamp image, enlarge and print out onto Whisper White cardstock.

Color using the Cherry Cobbler and Old Olive Stampin’ Blendabilities™ Collection , adding shadows with the Stampin’ Write Sahara Sand marker and floral centers using the Stampin’ Write Basic Black marker. Add a few highlights to the flower centers using the Chalk Marker.

Round the corner of the colored floral image using the Envelope Punch Board, layer onto a piece of Basic Black cardstock (rounding the corner with the Envelope Punch Board as well).

Mount onto a piece of Old Olive cardstock (stamped with the retired En Francais background stamp using Old Olive Classic Ink) and adhere the entire panel to the Basic Black card base.

Stamp the image from Bloom with Hope using Memento™ Tuxedo Black Ink onto Whisper White cardstock and mount onto a piece of Basic Black cardstock.   Mount onto the card front and add the 5/8” Black Satin Ribbon bow.

Add a few Pearls to the upper left hand and lower right hand corners to finish off the card.

Stamp Sets: Pleasant Poppies, Bloom with Hope, En Francais

Ink:  Memento™ Tuxedo Black Ink, Old Olive, Printer Ink- Black, Stampin’ Blendabilities- Cherry Cobbler and Old Olive Collection, Stampin’ Write markers- Basic Black, Sahara Sand, Chalk Marker

Paper: Basic Black, Whisper White, Old Olive

Accessories: 5/8” Basic Black Satin Ribbon, Pearls


Thanks again for taking stopping by- I will be posting a few more cards later today.  Have a wonderful Monday! 

Sunday, June 29, 2014

CAS Every Year Knowing You...

Hi Again Stampers!

I decided to create one more Clean and Simple (CAS) card this evening for the AW19 Around the World “Square” Challenge.

I hope you will take the time (if you have not done so already) to visit their site to check out all of the other Design Team entries as well as the gallery- wonderful inspiration from all!!

To create this card:

Use the 1" Square Punch to punch out squares from each piece of the Back to Black Designer Series Paper (DSP).  

Adhere the squares to a piece of Whisper White cardstock, trim and mount onto a piece of Basic Black cardstock, trim again and mount onto a piece of Whisper White cardstock.  

Stamp the butterfly from Papillon Potpourri using EncoreSilver Ink onto Basic Black cardstock, punch out using the Elegant Butterfly Punch and mount onto another butterfly punched from Basic Black cardstock (using the Elegant Butterfly Punch).  

Ink the sentiment from Bloom with Hope with MementoTuxedo Black ink onto Whisper White cardstock.  Trim and create the banner points with the Hexagon Punch, layer a piece of Basic Black cardstock behind the sentiment (also punched with the Hexagon Punch). 

Mount the sentiment to the card front using Stampin' Dimensionals  and add the 5/8" Silver Satin Ribbon double bow.  

Adhere the entire panel to  the Basic Black card front using Stampin' Dimensionals™.    

Add the Rhinestones to the center of the butterfly to finish off the card :-)


Stamp Sets: Bloom with Hope, Papillon Potpourri

Ink:  Memento™ Tuxedo Black Ink

Paper: Basic Black, Whisper White, Back to Black DSP

Accessories: Punches- 1 “ Square, Hexagon, Elegant Butterfly; 5/8” Silver Satin Ribbon, Rhinestones


Thanks again for taking the time to visit- have a great week! 

Vintage Butterflies for Three Challenges :-)


Hi Stampers! 

I had a chance to play around in the craft room again today and created this card using the Create with Connie and Mary CCMC309 Sketch Challenge, the PP202 Paper Players “Tic Tac Toe” Challenge (two different sets of three elements in a row- Ribbon, Blue, Birthday and Blue, Designer Series Paper, Pearls) and the Stampin’ Royalty SR234 Inspiration Photo.  

If you have not had a chance to do, I hope that you will take a moment to visit all of the challenge sites- so many wonderful Design Teams samples and entries!

I decided to utilize My Digital Studio (MDS) with traditional card making techniques for this “hybrid” card:

Open MDS and insert the butterfly stamp images from Flores Suaves into a blank 8.5x11 document and print out onto Whisper White cardstock.  

Color the wings using the Daffodil Delight and Coastal Cabana Stampin’ Blendabilities™, darken the black areas on the wings with the Basic Black Stampin’ Write marker, color the body of the butterfly with the Crumb Cake Stampin’ Write marker, add a few shadows with the Sahara Sand Stampin’ Write marker and finally, add a few white highlights to the wings using the Chalk Marker. 

Use a sticky note or scrap paper to create a mask, mask over the butterflies and stamp the script stamp from retired Notable Notions using Crumb Cake Classic Ink.  Remove the masks and add additional distressing with the splatter stamp from Gorgeous Grunge and Crumb Cake Classic Ink.

Distress the edges using the Distressing Tool and with a Sponge Dauber, sponge additional Crumb Cake Classic Ink over the Whisper White to “antique” the paper and edges.  Adhere to scrap pieces of Basic Black cardstock, distressing the edges as well with the Distressing Tool.

Ink the retired En Francais background stamp using Crumb Cake Classic Ink and stamp onto a piece of Crushed Curry cardstock and Coastal Cabana cardstock. 

Create the banner from the stamped Crushed Curry cardstock using the 1 ¼” Square Punch, distress the edges using the Distressing Tool and mount onto a piece of Basic Black cardstock, again, distressing the edges with the Distressing Tool.

Add the vertical panels of stamped, distressed Coastal Cabana cardstock (mounted onto Basic Black cardstock), along with the scrap, distressed stamped circles of Crushed Curry cardstock.  

Add a distressed piece of Typeset Designer Series Paper (DSP) onto a distressed piece of Basic Black cardstock and adhere the piece of Venetian Crochet Trim to the side along with a piece of retired 5/8” Basic Black Satin Ribbon.

Mount the stamped, distressed piece of Coastal Cabana cardstock onto the Basic Black card base.  Add the banner panel to the card front using Stampin’ Dimensionals®.  

Stamp the sentiment from the retired set, Express Yourself using Memento™ Tuxedo Black ink onto a piece of Whisper White cardstock, trim and create the banner points using the Hexagon Punch, distress the edges with the Distressing Tool.  Add additional distressing using the splatter stamp from Gorgeous Grunge, the script stamp from Notable Notions and a Sponge Dauber- all using Crumb Cake Classic Ink.

Mount the sentiment using Stampin’ Dimensionals® and Pearls to finish off the card. 

Stamp Sets: Flores Suaves (MDS version), En Francais, Notable Notions, Gorgeous Grunge, Express Yourself (2013-2014 Hostess set)

Ink: Crumb Cake, Memento™ Tuxedo Black, Stampin’ Blendabilities- Daffodil Delight, Coastal Cabana; Stampin’ Write Markers- Basic Black, Crumb Cake, Sahara Sand; Chalk Marker

Paper/Cardstock:  Whisper White, Basic Black, Coastal Cabana, Crushed Curry,Typeset DSP

Accessories: Distressing Tool, Sponge Dauber, Punches- 1 3/8” Circle, Hexagon, 1 ¼” Square, Venetian Crochet Trim, retired 5/8” Basic Black Satin Ribbon,  Pearls


Thanks again for stopping by- I hope you have a great evening!

PPA209 Sympathy and Prayers- Blooms and a Banner :-)

Hi Again Stampers! 

I had a great time creating cards the other evening and this one was created using the Pals Paper Arts PPA209 Sketch Challenge along with our new Stampin’ Blendabilities™ :-)

I hope that you will have a chance to visit the Pals Paper Arts site- it is amazing how many interpretations can be created with one sketch!

To create this card:

Ink the images from Blooming with Kindness using Blackberry Bliss Classic Ink and stamp onto Very Vanilla cardstock.   Color the images using the Rich Razzleberry Stampin’ Blendabilities™ Collection. 

Use the Big Shot™ with the Banners Collection Framelits™ to cut out the stamped image as well as the same size banner from a piece of Blackberry Bliss cardstock.

Layer the Blackberry Bliss banner behind the stamped banner and add the Venetian Crochet Trim along with the 3/8” Stitched Blackberry Bliss Satin Ribbon strip and triple ribbon bow.

Ink the Dictionary background stamp using Blackberry Bliss Classic Ink onto the piece of Typeset Designer Series Paper (DSP), trim and mount onto a piece of Blackberry Bliss cardstock. 

Using a Sponge Dauber, lightly sponge Crumb Cake Classic Ink over the edges and add distressing using the Gorgeous Grunge splatter stamps using Crumb Cake Classic Ink.  Mount the panel onto a piece of Pumpkin Pie card base.

Add the banner panel to the front of the card using Stampin’ Dimensionals®. 

Stamp the flowers from Bloom with Hope using Blackberry Bliss Classic Ink onto Very Vanilla cardstock.  Color the floral images using the Daffodil Delight, Coastal Cabana and Pumpkin Pie Stampin’ Blendabilities™ Collections, “fussy-cut” the images and adhere to the banner.

Add the sentiment and Papillon Potpourri butterfly with the Pearls to finish off the card.

Stamp Sets: Bloom with Hope, Blooming with Kindness, Gorgeous Grunge, Papillon Potpourri, Petite Pairs

Ink: Blackberry Bliss, Crumb Cake, Stampin’ Blendabilities- Daffodil Delight, Coastal Cabana, Pumpkin Pie, Rich Razzleberry Collections

Paper/Cardstock:  Very Vanilla, Blackberry Bliss, Pumpkin Pie; Typeset DSP

Accessories: Big Shot™, Banner Collection Framelits™, Sponge Daubers, 3/8” Stitched Blackberry Bliss Satin Ribbon, Venetian Crochet Trim, Punches- Elegant Butterfly, Large Oval; Pearls


Thanks again for stopping by- have a wonderful weekend!

Saturday, June 28, 2014

Summer Silhouette Sympathy- Another CAS with a Fun Color Palette!

Hi Again Stampers!!

Here is another card that I created using one of the background panels from my crafting session the other evening using the colors from the Splitcoaststampers CAS278 Clean and Simple Challenge card using the Color Crawl Palette Challenge(use at least three colors).

Again, I hope you have a chance to visit their site and check out the Design Team samples and other entries- the gallery is full of great designs!

To create this card:

Ink the Positively Chevron background stamp using Sponge Daubers with Coastal Cabana, Island Indigo and Pistachio Pudding Classic Ink.  Lay a piece of Whisper White cardstock over the stamp and press lightly in various areas to achieve a random pattern (repeat with additional pieces of Whisper White cardstock). 

Ink the stem image from World of Dreams using Early Espresso Classic Ink and the sentiment from Love & Sympathy using Island Indigo Classic Ink- stamp both onto the front of the card. 

Use a Stampin’ Spritzer with Water to spritz over the background stamp area (being careful not to allow the ink to spread around the stamped areas). 

Ink the stem image from World of Dreams using Early Espresso Classic Ink and the sentiment from Love & Sympathy using Island Indigo Classic Ink- stamp both onto the front of the card. 

Once dried, mask around the stem area and sentiment using a scrap piece of paper or sticky note and using a Sponge Dauber, apply Coastal Cabana Classic Ink around the masked areas.   

Ink the splatter stamp from Gorgeous Grunge using Island Indigo Classic Ink and randomly stamp over the background.
 
Use the Big Shot™ with the Window Frames Collection Framelits™ to cut out the image along with another framelit™ from Early Espresso cardstock.  

Use the Big Shot™ with the Chevron Textured Impressions™ Embossing Folder to emboss a piece of Whisper White cardstock along with a piece of Early Espresso cardstock. 

Adhere the Whisper White background to the Island Indigo card base and add the vertical strips of embossed Early Espresso cardstock.

Cut the Early Espresso Window Frame in half and adhere behind the stamped image.  Add to the front of the card using Stampin’ Dimensionals®.

Add a few Pearls to finish off the card. 

Stamp Sets: Summer Silhouettes, Love & Sympathy, Gorgeous Grunge, Postively Chevron

Ink: Coastal Cabana, Island Indigo, Pistachio Pudding, Early Espresso

Paper: Whisper White, Early Espresso, Island Indigo

Accessories: Big Shot™, Window Frames Collection Framelits™, Chevron Textured Impressions™ Embossing Folder, Sponge Daubers, Masking Material, Stampin’ Spritzer, Pearls


Thanks again for stopping by- I hope you have a blessed weekend!

Clean and Simple Sympathy- A Color Palette Challenge :-)


Hi Stampers!!

I had fun creating cards the other evening and decided to create a few background panels using the colors from the Splitcoaststampers CAS278 Clean and Simple Challenge card using the Color Crawl Palette Challenge (use at least three colors). 

 I hope you have a chance to visit their site and check out the Design Team samples and other entries- Clean and Simple (CAS) is a difficult style for me but the gallery is full of inspiration!

To create this card:

Ink the Positively Chevron background stamp using Sponge Daubers with Coastal Cabana, Island Indigo and Pistachio Pudding Classic Ink.  Lay a piece of Whisper White cardstock over the stamp and press lightly in various areas to achieve a random pattern (repeat with additional pieces of Whisper White cardstock- I was able to stamp three panels from one inking). 

For this card, use a Stampin’ Spritzer with Water to spritz over the background stamp area (allow the background area to dry).

Ink the stem image from World of Dreams using Early Espresso Classic Ink and the sentiment from Love & Sympathy using Island Indigo Classic Ink- stamp both onto the front of the card. 

Mask around the stem area and sentiment using a scrap piece of paper or sticky note and using a Sponge Dauber, apply Coastal Cabana Classic Ink around the masked areas.   
Ink the splatter stamp from Gorgeous Grunge using Island Indigo Classic Ink and randomly stamp over the background.
 
Trim and mount onto a piece of Early Espresso cardstock, trim again and mount onto Island Indigo cardstock, trim and adhere to the Early Espresso card base.

Stamp Sets: World of Dreams, Love & Sympathy,  Gorgeous Grunge, Postively Chevron

Ink: Coastal Cabana, Island Indigo, Pistachio Pudding, Early Espresso

Paper: Whisper White, Early Espresso, Island Indigo

Accessories: Sponge Daubers, Masking Material, Stampin’ Spritzer


Thanks again for taking the time to visit- I hope you have a great weekend!

Wednesday, June 25, 2014

Birthday Greetings- A Fun Color, Sketch and Theme Challenge


Hi Again Stampers! 

This card was created for few of my favorite bi-weekly online challenges, the Fab Friday using their FabFri44 Color Challenge and Hand Stamped Sentiments using their HSSC188 Sketch Challenge and the Seize the Birthday Anything Goes Challenge :-)

Again,  I hope you will have a chance to visit and check out all of the wonderful Design projects and other entries- great inspiration from all!

To create this card:

Use the Big Shot™ along with the Modern Mosaic Textured Impressions™ Embossing Folder to emboss a piece of Whisper White cardstock, trim and mount onto a piece of Basic Black cardstock, trim again and mount onto the Tangelo Twist card base. 

Ink the sentiment from Wetlands (again, I just love the font used on the sentiments in this set) using Memento™ Tuxedo Black ink onto a piece of Whisper White cardstock and punch out with the XL Oval Punch.   Mount onto another oval punched from Basic Black cardstock using the XL Oval Punch and trim off the lower portion of the oval. 

Using MDS, insert the image from Postage Due into your document, re-size and print out onto Whisper White cardstock (or you could stamp using Basic Black or Memento™ Tuxedo Black ink- I had this image already printed and ready to go from a previous project).  Trim and mount onto Basic Black cardstock.

Create the little banners from the new Moonlight Designer Series stack and Basic Black cardstock using the Banner Punch,  Tangelo Twist cardstock using the Banner Punch and trimming the edges to create a tiny banner and the Lost Lagoon cardstock (stamped with the Dictionary background stamp using Lost Lagoon Classic Ink and the edge inserted into the Banner Punch to create a longer banner).   Here is a tutorial on Splitcoaststampers with the basic steps for the rolled flowers :-)

Adhere to the back of the Postage Due panel and add the panel to the card front using Stampin’ Dimensionals® and add the sentiment to the lower right hand corner. 
Create the rolled flowers from Blackberry Bliss and Tangelo Twist cardstock (use the 2 3/8” and 1 ¾” Scallop Circle Punches- punch the scallop circles, hand cut a wavy spiral from the outside of the scallop circle toward the center, use the retired Crimper Tool to distress a bit, roll up from the outside edge and adhere using Tombow Multi-Purpose Adhesive or a Hot Glue Gun).
Create the leaves from Mossy Meadow cardstock with the Bird Builder Punch and adhere behind the rolled flowers.   Add the flowers to the card front (again, I used a Hot Glue Gun since I had it on my desk and ready to go) and add a few Rhinestones to finish off the card.   
Stamp Sets: Postage Due (MDS Version), Wetlands, Dictionary
Ink: Memento™ Tuxedo Black
Paper/Cardstock:  Whisper White, Basic Black, Blackberry Bliss, Lost Lagoon, Mossy Meadow, Tangelo Twist, Moonlight DSP Stack
Accessories: Big Shot™, Modern Mosaic Textured Impressions™ Embossing Folder, Punches: Banner, XL Oval, Bird Builder, Scallop Circle- 2 3/8”, 1 ¾”, 1 ¼”, Rhinestones

Thanks again for stopping by- I hope all of you have a wonderful Wednesday!!   

You Bring Out the Best in Everyone- An Inspiration Photo and Sketch Challenge :-)


Hi Again Stampers!

Here is another card that I had an opportunity to create last night using the PP201 Paper Players Sketch Challenge along with the Just Add Ink JAI219 Just AddInspiration Photo (although I am too late to link up to the JAI219 Challenge- still struggling to figure out the deadline time in Australia to EST-lol!). 
 
For some reason as I designed this card, I neglected to use a circle for the sentiment- usually you can substitute shapes on a sketch challenge so I hope this banner for the sentiment versus a circle will not disqualify me :-) 

Again, if you have not had a chance to check out both sites yet, I would encourage you to do so- great job by all!!

To create this card:

Using the Embossing Buddy®, de-static a piece of the Back to Black Designer Series Paper (DSP) and stamp the World of Dreams image using Versamark™ ink.  Apply Stampin’ Emboss® Black Embossing Powder and heat with the Heat Tool.     

Trim the DSP panel and mount onto a piece of Basic Black cardstock.  Adhere the panel onto a piece of Whisper White cardstock, trim and adhere to a piece of Basic Black cardstock, trim again and mount onto the Whisper White card base.

Create the banners using strips from Back to Black DSP and Moonlight DSP stack (the Hello Honey color is a scrap from the Moonlight DSP stack that I had previously embossed using the Big Shot™ with the new Zig Zag Textured Impressions™ Embossing Folder and lightly sanded) using the Hexagon Punch and layering each onto Basic Black cardstock (punching the points again with the Hexagon Punch).

Add to the card front using Stampin’ Dimensionals®.  Add a strip of Basic Black cardstock with a few Rhinestones at the top of the banners.

Stamp the sentiment onto Whisper White cardstock using Memento™ Tuxedo Black ink, trim and create banner points using the Hexagon Punch. Mount onto Basic Black cardstock (again I used a scrap piece a bit smaller than the sentiment layer, creating a banner with the Hexagon Punch) and add a few of the embossed scraps from the Hello Honey DSP that I had left over from the banner above.

Add the sentiment to the card front using Stampin’ Dimensionals® and add the strip of Rhinestones to finish off the card.

Stamp Sets: World of Dreams

Ink: Versamark™, Memento™ Tuxedo Black

Paper/Cardstock:  Whisper White, Basic Black, Designer Series Paper- Back to Black, Moonlight DSP Stack

Accessories:  Big Shot™,  Zig Zag Textured Impressions™ Embossing Folder,  Embossing Buddy®, Stampin’ Emboss® Black Embossing Powder, Heat Tool,   Sanding Block, Rhinestones


Thanks again for taking the time to stop by!  I have one more card to share from late night’s crafting session- hope you have a chance to visit again soon!

CCMC308 Sending Love and Sympathy with Rolled Roses

Hi Stampers! 

I had a chance to play in my craft room last night and create several cards for a few online challenges :-)  I love participating in the online challenges since they allow you to work with colors that you may not have thought of to put together yourself and/or sketches (layouts) that again, may not have been something that you would have designed on your own (makes me “think outside the box” :-))  .  
 
This card was created for one of my favorite weekly challenges, Create with Connie and Mary using their CCMC308 ColorChallenge.   I hope you will have a chance to visit and check out all of their wonderful Design projects on their blog hop and other entries- such great inspiration!

To create this Clean and Layered (CAL) card:

Use the Big Shot™ along with the new Lovely Lace Textured Impressions™ Embossing Folder to emboss a piece of Whisper White cardstock, trim and mount onto a piece of Real Red cardstock, trim again and mount onto a piece of Bermuda Bay cardstock and finally onto the Whisper White card base. 

Ink the sentiment from Love & Sympathy (I just love the font on this sentiment- don’t you?) using the Bermuda Bay and Real Red Stampin’ Write markers and stamp onto a strip of Whisper White cardstock (there goes my scraps in use again :-)).  Mount onto a piece of Real Red cardstock and again onto a piece of Bermuda Bay cardstock (I just used strips of these colors from my stash and unless I told you my secret, which I just did, you would never know - lol!).   Trim the sentiment panel and mount onto the card front.
Create the rolled flowers from Real Red and Crushed Curry cardstock (use the 2 3/8”,  1 ¾” and 1 ¼” Scallop Circle Punches- punch the scallop circles, hand cut a wavy spiral from the outside of the scallop circle toward the center, use the retired Crimper Tool to distress a bit, roll up from the outside edge and adhere using Tombow Multi-Purpose Adhesive or a Hot Glue Gun).  Here is a brief tutorial on Splitcoaststampers site using Designer Series Paper under Rolled Flower...
Create the leaves from Bermuda Bay cardstock with the Bird Builder Punch and adhere behind the rolled flowers and add to the card front to finish off the card (again, I used a Hot Glue Gun since I had it on my desk and ready to go :-)).   
Stamp Sets: Love & Sympathy
Ink: Stampin’ Write Markers- Bermuda Bay, Real Red
Paper/Cardstock:  Whisper White, Bermuda Bay, Crushed Curry, Real Red
Accessories: Big Shot™, Lovely Lace Textured Impressions™ Embossing Folder, Punches: Bird Builder, Scallop Circle- 2 3/8”, 1 ¾”, 1 ¼”

Thanks again for stopping by- I will be sharing a few more cards later today.  Have a blessed week, my friends!!

Monday, June 23, 2014

SR233 Nautical Card with Two Versions :-)

Hi Stampers!!

I had a chance to play in my craft room this evening and decided to create a card for the Stampin’ Royalty SR233 Color Challenge.  I love the colors and thought that they would make a great nautical card so I pulled out the new set, Traveler.

I hope you have a chance to visit their site and check out the Design Team samples and other entries- great job by all!

 To create this card:

Version #1
Ink the script stamp from By The Tide using Night of Navy Classic Ink, stamp off and repeatedly stamp over the continents on a piece of I Am Me Designer Series Paper (DSP).  Trim the panel and add a strip of Night of Navy cardstock to the lower part of the DSP.

Punch out banners from the retired Fresh Prints DSP stack (along with a few from a piece of retired Night of Navy DSP) and adhere to the bottom of the panel.

Ink the splatter stamp from Gorgeous Grunge using Night of Navy Classic Ink, stamp off onto a piece of scrap paper and stamp onto the DSP.

Stamp the sentiments from Bravo using Coastal Cabana Classic Ink onto Whisper White cardstock, re-ink the same sentiments with Night of Navy Classic Ink and stamp over the initial stamping (creating a shadow effect).  

Stamp the splatter stamp from Gorgeous Grunge using Night of Navy Classic Ink, stamp off onto a piece of scrap paper and stamp over the sentiment area.
 
Add the vertical strip of Night of Navy and Real Red cardstock (I used scraps for this layer).  Adhere the map panel to the upper part of the Whisper White layer, trim and mount onto Coastal Cabana cardstock, trim and mount onto Night of Navy cardstock, trim and adhere to the Real Red card base.

 Ink the ship stamp from Traveler using Night of Navy Classic Ink and stamp onto Whisper White cardstock, add a few highlights using the Real Red Stampin’ Write marker and punch out using the 2 ½” XL Circle Punch.
Version#2- "Stepped Up" with brads :-)

Using the 2 ½” XL Circle Punch, punch out one circle from Night of Navy, Real Red and Whisper White cardstock, cut each circle in half and adhere in a rotating pattern around the ship image.

Mount the ship onto the card front using Stampin’ Dimensionals®.

To “step” up the card, adhere the three retired Star brads to finish off the “stepped-up” version of the card :-)

Stamp Sets: Traveler, By The Tide, Gorgeous Grunge, Bravo

Ink: Night of Navy, Coastal Cabana, Real Red Stampin’ Write marker

Paper: Whisper White, Coastal Cabana, Night of Navy, Real Red, retired Fresh Prints DSP stack, Retired Night of Navy DSP (hostess set)

Accessories: Punches- 2 ½” Circle, Banner, retired Star brads


Thanks again for taking the time to visit- I hope you have a great week!

Saturday, June 21, 2014

True Friend- Another Packing Tape Strip for the PPA208 Sketch :-)

Hi Again Stampers!!


Here is my third card that I created yesterday using my Gelli Arts® Gel Printing Plate and the Packing Tape Technique (see this post for the steps to create thetape strips). 

This card uses the Pals Paper Arts PPA208 Sketch along the Splitcoaststampers MIX73 Round and Round Challenge- again, I hope you have the time to check out both challenge sites- so much inspiration!

To create this card:

Use one of the packing tape layers to create the banner and adhere to a piece of Basic Black cardstock. 

Use the Big Shot™ with the Chevron Textured Impressions™ Embossing Folder to emboss a piece of Bermuda Bay cardstock, trim and mount onto a piece of Basic Black cardstock. 
Trim a piece of Moonlight Designer Series Paper (DSP) and mount onto a piece of Basic Black cardstock.

Add the Bermuda Bay embossed panel along with the packing tape banner.   

Using retired Black Hemp Twine, insert into a retired Silver Button and add to the card front.

The sentiment is from a previously printed MDS image from Simple Friendship- punch out using the retired small Oval Punch and layer onto two pieces of Basic Black cardstock ovals (also punched from the retired small Oval Punch).

Use the Triangle Punch and punch out two Basic Black triangles along with one from a previously embossed piece of Rich Razzleberry cardstock and Silver Foil. 
A close-up of the Packing Tape Strip  
Layer the triangles and adhere to the Bermuda Bay layer- add the sentiment using Stampin’ Dimensionals® .

Offset mount onto the Rich Razzleberry card base to finish off the card. 

Stamp Sets: Gorgeous Grunge, Simple Friendship- MDS version

Ink: Printer Ink- Black , Acrylic Paints- Metallic Titanium Teal, Light Village Green, Metallic Green Patina, Soft Black, Soft White, metallic Crown Red Velvet  

Paper: Whisper White, Basic Black, Bermuda Bay, Rich Razzleberry

Accessories: Big Shot™, Chevron Textured Impressions™ Embossing Folder, Gelli Arts® Gel Printing Plate, Brayer, Punches- retired small Oval. Triangle, retired Black Hemp Twine, retired Silver button


Thanks again for stopping by- I hope you have enjoyed this series of cards using the Packing Tape Technique :-)  I know it is a departure from my normal style but that is what I love about challenges- you get "outside of your box"!! 

I hope all of you have a wonderful weekend- God Bless!!  
Related Posts Plugin for WordPress, Blogger...