Pages

Monday, September 26, 2011

Manly Fall Birthday


Hi Stampers! 

I needed to create a more masculine Fall Birthday card and the FM25 Sketch It Square and Manly Friday MashUp Challenge was a perfect one to motivate me to do so!  If you have the time and haven’t visited with them yet this week, they have some great ideas for masculine cards using this 
sketch:-) 

Since I had my embossing gun out for a previous card, I decided to use heat embossing on this card as well along with the colors from the previous Splitcoast CC339 Challenge(Always So Crazed)- love this combination for fall cards! 


To create this card:

Use the Big Shot™ and emboss a piece of Always Artichoke with the Herringbone and Stripes Textured Impressions™ Embossing Folders (I embossed two separate pieces).  Layer onto So Saffon cardstock and adhere the satin ribbon to hide the pieced edge.

Use the Big Shot™ with the 3 ½” Circle Originals™ Die to cut a circle from Very Vanilla cardstock.  De-static the cardstock with the Embossing Buddy® , stamp the deer image and leaves from the tree around the edge of the circle with Versamark™ ink, apply the Stampin’ Emboss® Gold Powder and emboss with the Heat Tool. 

Follow the same steps as above for the individual larger leaves from French Foliage.  Carefully cut around the embossing and adhere to the edge of the stamped circle image.  Attach the brad and mount the focal image onto the card front.

Adhere the sentiment (I kept this simple so it would not compete with the embossed image) and layer the entire card front onto Cajun Craze and again onto So Saffron.

Stamp Sets:  Nature Silhouettes, French Foliage, Sincere Salutations
 Ink: Versamark™, Cajun Craze
Cardstock:  Very Vanilla, Always Artichoke, So Saffron, Cajun Craze
Accessories:  Big Shot™, Herringbone and Stripes Textured Impressions™ Embossing Folders, 3 ½” Circle Originals™ Die, Embossing Buddy®, Stampin’ Emboss®  Gold Embossing Powder, Heat Tool, Antique Brad, 2 ½’ Circle Punch, 5/8” Satin Ribbon (from my stash)

Thanks again for stopping by- I hope all of you have a wonderful week stamping and creating!  

Another Fall Birthday with Day of Gratitude!


Hi Stampers! 

I created this card using the CCMC168Sketch at Create with Connie and Mary and for a second submission to the SUO28 Fall Challenge.  Again, I cannot emphasis enough, how great the other entries and Design Team samples are at both sites- check them out! :-)

To create this card:

Use the Big Shot™ with the Square Lattice Textured Impressions™ Embossing Folder to  emboss a piece of the Spice Cake Designer Series paper and with the Vintage Wallpaper Textured Impressions™ Embossing Folder to emboss a piece of Pool Party cardstock. 

This picture shows the texture of the background Spice Cake DSP
Use a Sponge Dauber with Soft Suede ink to distress the Pool Party pieces and cut for the horizontal layers on the sketch.

Ink the large medallion from Day of Gratitude with Pool Party Classic Ink and pounce Soft Suede Classic Ink onto the stamp (over the Pool Party) with a Sponge Dauber.   Stamp the image onto Very Vanilla cardstock and carefully cut around the edges of the medallion.  Sponge more Soft Suede around the edges of the medallion and also sponge the edges of the Pool Party card front.

Spray the background DSP, medallion image and sentiment with Champagne Mist Shimmer Paint spray (mixed with 70% alcohol).  Once the paint spray dries, adhere the layers to the DSP, mount the medallion (with SU! Dimensionals), the Soft Suede Taffeta Ribbon, sentiment and add the pearls to finish off the card.  

You can see the Shimmer Paint a bit better in this one :-)


Stamp Sets: Day of Gratitude, Sincere Salutations
Cardstock: Pool Party, Very Vanilla
Ink: Pool Party, Soft Suede
Accessories: Big Shot™, Vintage Wallpaper and Square Lattice Textured Impressions™ Embossing Folders, 3/8” Soft Suede Taffeta Ribbon, Large Oval Punch, Sponge Daubers, Champagne Mist Shimmer Paint,  Pearls

Thanks again for stopping by- have fun stamping and God Bless!

Fall Challenge- Three in One!


Hi Stampers! 

I hope all of you had a great weekend!  I was able to create three new cards and will be posting the other two tomorrow evening, but wanted to share this one with you before one of the challenge deadlines.

I recently found another sketch challenge site, SunnyChallenges, and decided to combine their sketch with the Hand Stamped Sentiments HSSTC85 “Impress Us”  and the SUO28 Fall Color Challenge.  The entries and Design Teams at each site have created some fabulous projects- again, if you have the time, check them out for inspiration!

Since the SunnyChallenges SC009/11 Sketch Challenge was a Sketch plus Heat Embossing and the Hand Stamped Sentiments was an Embossing Challenge as well, I decided to use one of my favorite Heat Embossing techniques, Emboss Resist, along with Dry Embossing to create this card.

To create this card:

Use the Embossing Buddy® to de-static a piece of Very Vanilla cardstock and stamp the a few leaf images with Versamark™ ink.  Apply Stampin’ Emboss Clear Powder and heat with the Heat Tool.  Once the embossing powder has cooled, apply More Mustard and Pumpkin Pie ink with Sponge Daubers.   

De-static again with the Embossing Buddy® and repeat the steps above to stamp and emboss additional leaves over the recently inked More Mustard/ Pumpkin Pie.  Again, with the Sponge Dauber, apply Cherry Cobbler ink over the most recently stamped leaves.


Follow the above steps once more to stamp more leaves, heat emboss with Clear EP and apply the final coat with a Sponge Dauber using Early Espresso ink.  Gently wipe off the excess ink with a slightly moistened paper towel.   Trim to size and mount onto Early Espresso cardstock.

Use a brayer and apply Early Espresso ink to the smooth interior side of the Vintage Wallpaper Textured Impressions™ Embossing Folder and use the Big Shot™ to emboss a piece of Cherry Cobbler.

Assemble the layers on the card, use the Word Window and Modern Label Punch to frame the sentiment and attach the 5/8” Early Espresso Sating Ribbon (retired) to finish off the card.  Since I will definitely be mailing this card, I decided not to add any brads or pearls (but may add something near the sentiment prior to mailing- it is hard not to add pearls these days :-))

Stamp Sets:  French Foliage, Teeny Tiny Wishes
 Ink: Versamark™, Cherry Cobbler, More Mustard, Pumpkin Pie, Early Espresso
Cardstock: Cherry Cobbler, Early Espresso, Very Vanilla
 Accessories:  Big Shot™, Vintage Wallpaper Textured Impressions™ Embossing Folder, Word Window, Modern Label and Lace Ribbon Border Punches, Embossing Buddy™, Heat Tool, Stampin’ Emboss ® Clear Embossing Powder,  5/8” Early Espresso Satin Ribbon (retired)

Thanks again for stopping by and I hope all of you have a fantastic Monday- God Bless! 

Friday, September 23, 2011

Belated Birthday- Three in One!


Hi Stampers!  

I have so many birthdays in September that I am having a hard time keeping up, so I decided to create a “belated” birthday card, just in case…:-)


This card incorporates the bright fun colors of this week’s ColourQ CQC103 Challenge along with the Freshly Made FMS3Sketch Challenge ( as you can see, I flipped the sketch and moved the embellishments to the left for balance:-)).  

Also,  since it has flowers it qualifies for The PaperPlayers PP64 Animals or Plants Challenge. 

If you have the time, check out the links above to each site, the samples are gorgeous!

To create this card:

Use the Big Shot™ and emboss a piece of Wisteria Wonder with the Finial Press Textured Impressions™ Embossing Folder and a piece of Poppy Parade with the Petals—A-Plenty Textured Impressions™ Embossing Folder.

Use Stampin’ Write markers in Pear Pizzazz, Wisteria Wonder and Calypso Coral to color the flower image and stamp the image onto Whisper White cardstock (I colored a few of the flowers with Calypso Coral and then added a bit of Wisteria Wonder to tie the two together). 

Trim and mount onto Poppy Parade (not to be confused with how I originally posted this color on Splitcoast and continually try to type it - with one less “p” and an additional “o”-oops, talk about embarrassing!) and then again onto Whisper White cardstock.

Use the Lace Ribbon Border Punch with Whisper White to create the border along the bottom.  Use the 1 3/8” Circle Punch along with the Crimper Tool to create the rolled flowers from Wisteria Wonder and Calypso Coral cardstock.

Adhere all of the layers together, add the sentiment (also using markers to color) and finish off with pearls. 

Stamp Sets:  Just Believe, Happiest Birthday Wishes (hostess set)

 Ink: None- all Stampin’ Write Markers- Calypso Coral, Pear Pizzazz, Poppy Parade, Wisteria Wonder

Cardstock:  Whisper White, Calypso Coral, Pear Pizzazz, Poppy Parade, Wisteria Wonder

Accessories:  Big Shot™, Finial Press Textured Impressions™ Embossing Folder, Petals—A-Plenty Textured Impressions™ Embossing Folder, Punches- Decorative Label, 1 3/8” Circle, Lace Ribbon Border, Bird Builder, Crimper Tool, Pearls

So what do you think?  I personally tend to gravitate more to the burgundy hue of red versus the orange, but I must admit, the more I use Poppy Parade and combine it with other colors, the more it is starting to “grow” on me.  I believe it looks crisp with the Wisteria Wonder and White- so is it starting to “grow” on you too?

Thanks again for stopping by!   I hope all of you have a wonderful, relaxing weekend!

Wednesday, September 21, 2011

A 15 Minute Card, plus Three Challenges?


Hi Stampers! 

I wanted to "challenge" myself to create a card within 15 minutes- including design time (I know, this may be long for some of you but generally the design time takes me longer than that- I am slow :-))

Anyway, I decided to use the colors from this week’s CC341 Splitocast Color Challenge (dessert option is leaves) along with the SSC221 Sketch Challenge at Stamping411 (flipped the side for the embellishments on the sketch) and since this is a CAS card with leaves it also qualifies for the Splitcoast CAS136 Leaves challenge.

Although the CC341 colors- Tempting Turquoise, Pumpkin Pie and Old Olive are complimentary colors, they can be quite bold and a bit out of my comfort zone, so this was definitely a challenge for me!

I started the “clock” after I pulled the cardstock, inkpads and accessories together, so to create this card:

Use the Big Shot™ and emboss a piece of Tempting Turquoise with the Vintage Wallpaper Textured Impressions™ Embossing Folder ( I used a brayer and applied Pumpkin Pie  Classic Ink to the smooth side of the interior of the folder prior to embossing). 

On a piece of Very Vanilla,  use the Rock-n-Roll technique to stamp the leaves in Pumpkin Pie, then Old Olive and/or Tempting Turquoise and stamp around the outside of the cardstock.  Stamp the background stamp with Tempting Turquoise Classic Ink (stamp off first) and repeatedly stamp the interior area.  Sponge the edges with Pumpkin Pie and Tempting Turquoise. 

Adhere the bow to the corner (I had this already bow tied and ready to go in my stash- is that cheating?:-)).  Use the Rock-n-Roll technique again to stamp the sentiment (first in Pumpkin Pie, then Tempting Turquoise) and punch out with the Decorative Label Punch.

Sponge the edges of the sentiment and adhere to the front with Stampin’ Dimensionals. 
Mount the focal image onto the embossed panel and mount the entire card front onto Pumpkin Pie.  Spray with Champagne Mist Shimmer Paint to finish off the card.

Clean and Simple and under 15 minutes!

 Stamp Sets:   French Foliage, Blessings from Heaven
Ink:  Pumpkin Pie, Tempting Turquoise, Old Olive
Cardstock:  Very Vanilla,  Pumpkin Pie, Tempting Turquoise
Accessories:  Big Shot™, Vintage Wallpaper Textured Impressions™ Embossing Folder, Brayer,  Decorative Label Punch , 5/8”  Pumpkin Pie Satin Ribbon (retired), Champagne Mist Shimmer Paint Spray (mixed with 70% alcohol), Sponge Daubers, Stampin' Dimensionals 

Thanks again for stopping by and for all of your encouragement!  

Tuesday, September 20, 2011

Another Fall Birthday Card (and a New Challenge)


Hi Stampers! 

I needed to create some more Fall Birthday cards and decided to use the FM24 Friday MashUp Challenge along with the CS48TCreative Sketch Challenge (a new challenge site for me:-).  Again, both sites have wonderful inspiration for all- if you have the time, check them out!

The Friday MashUp Challenge is to create a Fall Card or create a card using Orange and Yellow, or "Mash It Up" and do both in one card. Although, Orange and Yellow are not normally the first colors that I gravitate towards, after working with them this past week, I will have to make an effort to use them more often:-).

Even though this card has flowers versus leaves, I believe that the fall colors remind me of a late summer/fall day in the garden and all of the items are Stampin' Up! with the exception of a piece of lace that I had in stock (from my sewing stash :-)).  


To create this card:

Use the Big Shot™ and emboss a piece of More Mustard  with the Vintage Wallpaper Textured Impressions™ Embossing Folder ( I used a brayer and applied Tangerine Tango ink to the smooth side of the interior of the folder prior to embossing).  With a Sponge Dauber, apply Soft Suede ink on the edges and over the embossed images to “antique” the paper. 

On Very Vanilla cardstock, use Early Espresso Classic Ink to stamp the En Francais background stamp and the main floral image from Elements of Style.  Also, stamp the sentiment from Sincere Salutations with Early Espresso ink and a few flowers from the floral image onto another piece of Very Vanilla.  Emboss this piece with the Big Shot™ and the Designer Frames Textured Impressions™ Embossing Folder. 

Use Stampin’ Write Markers in More Mustard, Pumpkin Pie, Old Olive and Cajun Craze (for the centers) to color the flowers.  Sponge the edges of all with Soft Suede ink and spritz using the Color Spritzer Tool and the Soft Suede Stampin’ Write Marker. 

Mount the focal image layers onto Pumpkin Pie cardstock (carefully trim around the Designer Frame prior to mounting to the cardstock and trim the Pumpkin Pie to "frame"the die cut).  Sponge more Soft Suede ink to distress and tone down the brightness of the Pumpkin Pie. 

Spray each layer with Champagne Mist Shimmer Paint (mixed with 70% alcohol- this does not show up in photo very well but the card looks "dazzling" in the light :-)).  

Layer the lace, focal images. ribbon, bow and add the pearls to finish off the card. 

Stamp Sets:  Elements of Style, Sincere Salutations, En Francais
 Ink: Early Espresso, Tangerine Tango, Soft Suede, Stampin’ Write Markers- More Mustard, Pumpkin Pie, Old Olive, Cajun Craze, Soft Suede
Cardstock:  Very Vanilla, More Mustard, Pumpkin Pie
Accessories:  Big Shot™, Vintage Wallpaper and Designer Frames Textured Impressions™ Embossing Folder, Sponge Dauber, Color Spritzer Tool, Brayer, Pearls, 5/8” Pumpkin Pie Satin Ribbon (retired),  Lace (from my sewing stash)

Thanks again for stopping by- I hope all of you have a wonderful week stamping and creating!  

Sunday, September 18, 2011

Fall Themed Birthday- Three in One!


Hi Stampers! 

I decided to create another card this evening (well, now morning) and decided to use the colors from the CC339 Always So Crazed Splitcoast Challenge and incorporate the SFF091611 Sketch Friday Frenzy Sketch and the HSSFTC584 Fall Theme (since the colors remind me of fall). 

I have a few friends that have birthdays in the fall and thought these colors would be perfect  for a fall themed card (I know, a bit non-traditional since it does not focus on leaves, but I hope you think it qualifies as well :-)). 

If you have a chance to check out the site links above, you will find so much inspiration- it never ceases to amaze me on how many different interpretations can be created from one sketch or one color challenge! 

To create this card:

Use the Big Shot™  with the Ovals Die and cut large ovals from Very Vanilla, So Saffron and Always Artichoke cardstock.  Stamp the bee image from Nature’s Pace with Cajun Craze ink and color with Stampin’s Write Markers in Always Artichoke, So Saffron and Cajun Craze.

Use the Color Spritzer Tool with the Always Artichoke and Cajun Craze marker and spritz the image, Sponge both colors around the edge of the oval as well.

Layer onto the So Saffron and Always Artichoke oval die cuts ( I cut the ovals in half so you could create a layer).  Adhere a piece of Cajun Craze punched with the Decorative Label Punch  and embossed with the Vintage Wallpaper Textured Impressions™ Embossing Folder (actually from my scraps and also cut in half) to both ends (bonus- this will hide the split on the oval layers:-)).

Emboss a piece of So Saffon with the Vintage Wallpaper Textured Impressions™ Embossing Folder (I used a brayer to ink the folder first with So Saffron ink on the smooth interior side of the folder).  Attach the focal image with Stampin’ Dimensions, layer the satin ribbon bow and adhere the panel to the Always Artichoke card base. 

Stamp the sentiment with Cajun Craze, "huff" onto the bee image to re-moisten the Cajun Craze ink and stamp the leaf areas over the sentiment.  Punch the sentiment out with the Large Oval Punch, spritz and sponge as noted above and layer onto a Modern Label Punch and Decorative Label Punch to create the embellishment.

Add pearls to finish off the card.

Stamp Sets:   Nature’s Pace, Sincere Salutations 

Ink:  Cajun Craze, So Saffron

Cardstock:  Very Vanilla, Always Artichoke, So Saffron, Cajun Craze

Accessories:  Big Shot™, Vintage Wallpaper Textured Impressions™ Embossing Folder, Ovals Die,, Punches-  Large Oval Punch, Modern Label, Decorative Label , Color Sprtizer Tool, Sponge Daubers, Pearls, 5/8” Satin Ribbon (from my stash)

Thanks again for stopping by- I hope all of you have a great week creating for the ones you love! 

Saturday, September 17, 2011

Happiness Shared- A Sketch and Color Challenge


Hi Stampers! 

I just love the PPA111 sketch this week at Pals Paper Arts and decided to combine it with the CQC102ColourQ Challenge. The designers and submissions at both site are fabulous- again, if you have the time, check them out and leave them some stamping “love”!

Once I decided on the design, this was a quick, easy card and can you believe it, I did not use an embossing folder (although I still had to use my Big Shot™- I cannot make a card without it now :-))?

To create this card:

Use the Big Shot™ along with the Bigz™ Top Note Die to cut a piece of Whisper White  and Basic Gray cardstock.  Cut both shapes in half and trim the edge off the Whisper White piece and sand the rough edges with the Sanding Block.

Ink the blossom stamp from Happiness Shared with Basic Gray Classic Ink and stamp the image onto the Top Note shape.  Color with Stampin’ Write Markers in Certainly Celery and Poppy Parade.  Use the Color Spritzer Tool with the Basic Gray marker to spritz the image.

Ink the Hello, Doily background stamp with Tempting Turquoise and stamp onto a piece of Tempting Turquoise cardstock.  Layer with the Top Note focal image, adhere the 5/8” satin ribbon bow and mount onto Whisper White and again onto Basic Gray. 

Stamp the sentiment from Teeny Tiny Wishes in Basic Gray, punch out with the Word Window Punch and mount onto a piece of Basic Gray punched with the Modern Label Punch.

Add the Pearls and spritz again with the Color Spritzer Tool and Basic Gray Stampin’ Write Marker to finish off the card.

Stamp Sets:  Happiness Shared, Hello, Doily, Teeny Tiny Wishes
 Ink: Basic Gray, Stampin’ Write Markers- Basic Gray, Certainly Celery, Poppy Parade
Cardstock:  Basic Gray, Tempting Turquoise, Whisper White
Accessories:  Big Shot™, Bigz™ Top Note Die, Color Spritzer Tool, Word Window and Modern Label Punch, Pearls, Satin Ribbon (from my stash)

Thanks again for stopping by and blessing my life! 

Gifts of Christmas- New Sketch Challenge!


Hi Stampers! 

I created this card using the CCMC167 colors at Create with Connie and Mary along with the FMS2 sketch at a new challenge site, Freshly Made Sketches.  The Design Teams at both sites have done a marvelous job, check them out when you get a chance!

The Freshly Made Sketch Challenge is similar to a Clean and Simple card- clean lines but you can elaborate on the embellishments.  I did not elaborate too much, since this card will need to be reproduced in multiples for mailing at Christmas…

To create this card:

Using the Stampin’ Write markers in Old Olive, Cajun Craze and Basic Gray, color the dove stamp from Gifts of Christmas (omitting the greeting) and the poinsettia single stamp. Stamp both onto Whisper White, trim the dove image to size and punch the poinsettia out with the 1 ¼” Circle Punch.  


Layer the images onto Basic Gray and Cajun Craze.

Color the sentiment with the Cajun Craze marker, stamp onto Whisper White, trim and layer in the same manner as above.

Use the Big Shot™ with the Petals-A-Plenty Textured Impressions™ Embossing Folder and emboss a piece of Old Olive Designer Series Paper. 

Layer as designed on the sketch and add the pearls to finish off the card.

Stamp Sets: Gifts of Christmas, Christmas Greetings
Cardstock: Basic Gray, Cajun Craze, Whisper White, Old Olive DSP (retired)
Ink: None- Stampin’ Write markers- Basic Gray, Cajun Craze, Old Olive
Accessories: Big Shot™ , Petals-A-Plenty Textured Impressions™ Embossing Folder,  Punches- 1 ¼” Circle, 1 3/8” Circle and 1 ½” Circle, Pearls

This card was quick and easy- I could get used to the “Clean” style :-)

Thanks again for stopping by and  I hope all of you have a fantastic weekend! 

Friday, September 16, 2011

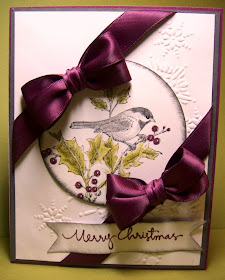
Beautiful Season- Three in One!


Hi Stampers! 

Are you behind on your Christmas cards?  I know that I feel that I am and Christmas will be here before we know it :-)

I love the colors of this week's The Paper Players PP63 Challenge  (you should see what the Design Team came up with!) and they seemed perfect for a Christmas card, so I decided to create a Clean and Simple (CAS) card  using these colors and combined them with two other challenges-  the SUO27 Ribbons and Bows  Challenge and the CCC11 Splitcoast Stampers Christmas Card Challenge.


To create this card:

Use the Big Shot™ and emboss a piece of Whisper White with Northern Flurry Textured Impressions™ Embossing Folder.  Use the 3” Circle Originals Die to cut a circle from Whisper White.

Ink the bird stamp with Basic Gray and stamp onto the die cut circle.  Color the berries with a Rich Razzleberry Stampin’ Write marker (I still have not located that ink pad yet) and leave a few white areas as reflections of light.

Use the Blender Pen with Old Olive and Basic Gray ink to color the leaves and bird image.  With a Basic Black Stampin’ Write marker, darken the eye (again leave a white area for the reflection) and sponge Basic Gray around the edges with a Sponge Dauber. 

Adhere the circle to the embossed card front along with two ribbon bows on a diagonal. 
Use the Rich Razzleberry Stampin’ Write marker (or ink pad if you have one) to ink the sentiment and trim to the banner shape.  Adhere at the bottom of the card front, mount onto Basic Gray and again onto Rich Razzleberry to finish off the card.

Stamp Sets:  Beautiful Season, Christmas Greetings

Ink: Basic Gray, Old Olive and Stampin’ Write Markers- Rich Razzleberry and Basic Black

Cardstock:  Whisper White, Basic Gray, Rich Razzleberry

Accessories:  Big Shot™, 3” Originals™ Circle Die, Northern Flurry Textured Impressions™ Embossing Folder, Sponge Dauber, Blender Pen

Thanks again for stopping by- I hope all of you have a blessed week and have a chance to have some fun stamping! 

Wednesday, September 14, 2011

Sympathy- Kitty Best Friend


Hi Stampers! 

For those of us who have pets in our lives, their loss can be devastating.  The companionship and unconditional love that they give us is so comforting and recently I saw a saying on a frame for a pet  “God gave us an angel disguised in fur to show us His love”. This saying definitely applies to my two “girls” (of which one is named Angel), so when I heard about the loss of the beloved kitty of one of my friends, I knew that I wanted to create a special card for her.    

 I decided to use the CCMC166 sketch challenge at Create with Connie and Mary for the layout of the card (the Design Team has done a fabulous job, as always, and if you have a chance, stop by to visit them). 


To create this card:

Use the Embossing Buddy® to de-static a piece of Basic Black cardstock.  Ink the background stamp, Hello Doily with Versamark® , apply Stampin’ Emboss® White  and emboss with the Heat Tool.  Once cooled, carefully cut out the doily and with a Paper Trimmer cut the doily in half. 

Follow the same procedure to emboss the cat image with Stampin’ Emboss® Black on a piece of Whisper White.   Mount this layer on Basic Black and apply a small Rhinestone for the collar name tag.

Ink a Brayer with River Rock, apply the ink to the smooth inside panel of the Finial Press Textured Impressions™ Embossing Folder, insert a piece of River Rock cardstock into the folder and emboss using the Big Shot™ .

Stamp the sentiment with Basic Black Classic ink and punch out using the Medium Oval Punch (retired).  Layer onto a Large Oval (punched from the background layer – under the area where the doily will cover) and two Basic Black ovals punched with the Large Oval as well.  Again, all of my sentiment layers are generally created from cardstock that is punched out from the background or hidden layers on the cards (you cannot see that this was done unless you hold the card up to a bright light).  This helps the weight and bulk of the card for mailing, not to mention stretching the budget:-)

Layer the pieces and add the 5/8” Black Satin Ribbon bow to finish off the card.

Stamp Sets: C is for Cat, Hello Doily, D is for Dog (sentiment)
Cardstock: Basic Black, River Rock, Whisper White
Ink: Basic Black, River Rock, Versamark®
Accessories: Big Shot™ , Finial Press Textured Impressions™ Embossing Folder,  Brayer, Heat Tool, Embossing Buddy®, Stampin’ Embosss® White and Black EP, Rhinestone, Large Oval Punch, retired Medium Oval Punch, 5/8” Black Satin Ribbon

Thanks again for stopping by and if you have any “furry” friends, give them an extra hug today!  Have a great time stamping and God Bless!

Monday, September 12, 2011

Praying for You- Three in One!


Hi Stampers!  

I wanted to share with you this card that I created for the Just Add Ink JAI84 Color Challenge along with the HandStamped Sentiments HSSCSC83 Clean and Simple Challenge and the SC348 SplitcoastStampers SC348 Sketch Challenge.  

 If you have the time to visit the links for each site, you will find an abundance of wonderful ideas and inspiration!   

Since this was a Clean and Simple Challenge using one color other along with white, I chose Rich Razzleberry.  I love the deep, dark rich color and started to panic a bit since I could not locate my ink pad, but no problem- I have the Stampin' Write marker :-) ! 

I used the marker on the various leaf images for French Foliage and the sentiment. Add an  embossing folder, a few layers, punched sentiment and the satin bow and the card is finished!  

Stamp Sets:  French Foliage, Blessings from Heaven

 Ink: Stampin’ Write marker- Rich Razzleberry

Cardstock:  Whisper White, Rich Razzleberry

Accessories:  Big Shot®, Snow Burst Textured Impressions™ Embossing Folder, Decorative Label Punch, 5/8” Rich Razzleberry Satin Ribbon (retired) 

Thanks again for stopping by- have a great week creating! Now off to find that lost ink pad- tomorrow....:-)

Sunday, September 11, 2011

Sad Anniversary- Prayers for our Country


My thoughts and prayers are with the families of those who were impacted by the events of 9-11 ten years ago.   

Time goes by so fast, it just seems like it happened yesterday and I remember exactly what I was doing at that fateful moment.

May we never forget those who lost their lives in the attack, the bravery and courage of the first responders and those who continue to serve and sacrifice themselves for our country. 

May we bless God in our country and may God Bless America!