Pages

Saturday, May 30, 2020

Create In Me A Pure Heart


Hi Friends!

I am sharing a card this evening that was designed using a digital image from Power Poppy by Marcella that was hand colored with watercolor pencils along with water-based markers.

I decided to participate with the Power Poppy “Rule of Thirds” Challenge, the Simon Says Wednesday “Anything Goes” Challenge and The House That Stamps Built M1320 Tic-Tac-Toe Challenge (left column down - Die Cut or Punch-Embossing- Ribbon or Twine).

To create this card:

Import the digital image from Power Poppy into a Word document or Photo Editing Software (I used the retired My Digital Studio from Stampin’ Up!). Resize the image, print out onto white cardstock and color with watercolor pencils and water-based markers.

Add a bit of shimmer with a clear glitter pen to the flower petals.

De-static the lower left corner of the panel with an embossing powder tool, stamp the sentiment from Stamp Simply with Versafine™ Onyx Black ink, apply clear embossing powder and heat set with a heat tool.

Die cut the floral panel and a piece of designer paper with stitched horizontal strip dies.

Mount onto a piece of black cardstock,  and trim close to edge.  Add the strips of black twine and finish off with the looped bow and taupe button.

Stamp Sets: Sunshine of My Life (digital Power Poppy by Marcella), Words of Encouragement (Stamp Simply)

Ink/Mediums: Printer Ink, Versafine™ Onyx Black, Derwent™ Watercolor Pencils, Stampin’ Write Markers- Crushed Curry, Daffodil Delight, Early Espresso, Wild Wasabi, Granny Apple Green, Flirty Flamingo, Pool Party, Bermuda Bay; Spectrum Noir™ Clear Glitter Pen

Cardstock/Paper:  Whisper White, Basic Black, retired Stampin’ Up! Designer Paper

Accessories: Gemini, Jr.™,  My Favorite Things Stitched Horizontal Strip Dies, AquaPainter™, Black Hemp Twine, retired Stampin’ Up! button

Thanks again for taking the time to visit- I hope all of you have a safe and healthy week!

Wednesday, May 27, 2020

TCC136 Bright Blooms


Hi Friends!


I love the texture of the tiled background as well as all of the beautiful, bright blossoms and I was inspired to create a fairly clean Mixed Media card! 

I am also participating with the Simon Says Monday "Going Around in Circles" Challenge along with the Word Art Wednesday #440-#441 "Anything Goes" Challenge and the Retro Rubber Challenge Blog #135 Tic-Tac-Toe Challenge (top across Watercolor-Circles- Die Cut and diagonal Watercolor-Embossing- Bright Colors). 


I used the retired SU! set, Choose Happiness which is several years old as well as the older digi set, Tulips in Hobnail Pitcher (this is at least two years old).  

To create this card:

Print out the Tulips in Hobnail Pitcher (Power Poppy by Marcella) onto white cardstock.  Color the image using watercolor pencils, water-based markers and water soluble graphite pencils.

Die cut the image with a stitched circle die and using distress oxide ink, lightly stencil the background.

Mount the circle onto a die-cut black circle. Apply shimmer with a clear shimmer pen to the petals and a green shimmer pen to the leaves.

On a piece of watercolor paper, use turquoise watercolor powder along with distress oxide inks and distress stains to add color to the background.  Dry with a heat tool and emboss with a  3D Tin Tile embossing folder.

Add additional color with distress stain, dry with the heat tool and once you are satisfied with the color, apply pearl texture paste to add shimmer.  Distress the edges with a distressing tool and mount onto a piece of black cardstock.

Adhere the background panel to a white card base, add the focal image with dimensional foam and add the embossed sentiment to finish off the card.

Stamp Sets: Tulips in Hobnail Pitcher (digi image-Power Poppy by Marcella), Choose Happiness (retired Stampin’ Up!)

Ink/Mediums: Black Printer Ink, Versafine™ Onyx Black, Derwent™ Watercolor Pencils and Water-Soluble Graphite Pencil, Stampin’ Write Markers-Crushed Curry, Poppy Parade, Tangerine Tango, Pool Party, Tempting Turquoise, Wild Wasabi; Brushos® Turquoise Watercolor Powder, Tim Holtz™ - Tumbled Glass, Broken China and Peacock Feathers Distress Oxide, Picket Fence and Peacock Feathers Distress Stain; Faber-Castell® Texture Luxe™ Pearl Texture Paste, Wink of Stella™ Clear and Green Glitter Pen

Cardstock/Paper: Whisper White, Basic Black; Watercolor

Tools/Accessories: Gemini, Jr™, My Favorite Things Stitched Circle STAX Dies, Sizzix™ Circles Dies; 3D Tin Tile Embossing Folder, Memory Box™ Distressed Tula Stencil, Stencil Brush, Embossing Buddy®, White Embossing Powder, Heat Tool, AquaPainter™

Thanks again for taking the time to stop by!  I hope I have inspired you to create your own card based on our {Bright Florals} photo and link up to our gallery at The Card Concept- we would love to see what inspired you! The challenge is open until June 8th at noon EST.

Wednesday, May 13, 2020

TCC135 God Bless the USA


Hi Friends!


I just love patriotic décor and was inspired by all of the stars and stripes to create a Shabby and Vintage Memorial Day card!

I decided to pull out of my favorite retired stamp sets from Stampin’ Up!. Courage and used the main Armed Forces image for the focal image panel.

I paired the Courage image with paper and a sentiment from Divinity Designs- the sentiment is from Heat & Soul and the papers are from the Patriotic Collection Paper Pad.

I decided to use the Splitcoaststampers SC792 Sketch Challenge for the layout and am also participating in the Cardz for Guyz #244 “Vintage” Challenge.

To create this card:

Ink the Courage image with Versafine™ Onyx Black ink and stamp onto white cardstock. Heat set the ink with a heat tool before coloring with water-based markers and distress ink (see colors listed below).

Die cut the panel with a stitched square die, mount onto navy cardstock, trim and mount onto red cardstock.

Emboss a piece of the navy paper from the Patriotic Collection Paper Pad with a 3D Star Embossing Folder, lightly sand the embossing. 

Using a water brush, dilute and add a bit of brushed corduroy distress ink around the edge of a piece of white cardstock trim and mount the embossed blue background onto the panel.  Mount the entire panel onto a piece of red cardstock, trim and adhere to a white card base.

Dilute brushed corduroy distress ink and apply to the patriotic paper to “antique” the paper, die cut into a banner and mount onto red cardstock.

Adhere the banner to the card front and mount the layered focal image using dimensional foam or chipboard.

Stamp the sentiment from Heart & Soul with Versafine™ Onyx Black ink onto white cardstock, heat set with a heat tool and use diluted brushed corduroy paper to “antique”.  

Trim and mount onto navy cardstock, trim and mount onto red cardstock.

Add the sentiment to the card front to finish off the card.

Stamp Sets:  Courage (retired Stampin’ Up!), Heart & Soul (Divinity Designs)

Ink/Mediums: Versafine™ Onyx Black, Stampin’ Write Markers-Night of Navy, Real Red, Soft Suede; Tim Holtz™ Brushed Corduroy Distress Ink

Cardstock/Paper: Whisper White, Night of Navy, Real Red; Patriotic Collection (Divinity Designs)

Tools/Accessories: Gemini, Jr™, My Favorite Things Dies- Stitched Square STAX, retired Jumbo Fishtail Banners; Darice™ 3D Stars Embossing Folder, AquaPainter™, Heat Tool


Thanks again for taking the time to visit!  I hope I have inspired you to create your own card based on our {Red, White and Blue} photo and link up to our gallery at The Card Concept- we would love to see what inspired you! The challenge is open until May 25th at noon EST.

Tuesday, May 12, 2020

Just Believe- My Grace is Sufficient


Hi Friends!

I am finally having a chance to upload some of the cards that I designed recently and this card uses a set by Altenew, Just Because and a verse from the retired Verve stamp set, Scripture Medley 4.  

I am still working on inking up stamps that I have not inked before- this is only the second card that I have created with this image from the Just Believe stamp set and I do not recall ever inking up this particular verse sentiment from the Verve set.

This was a very simple card to design- I stamped all of the images in a black archival ink and colored the florals with alcohol markers.  

Once I was satisfied with the colors, I used a clear glitter pen on the petals of the flowers and an extra fine white paint pen to add highlights.

Trimmed the panel and mounted onto black cardstock before adhering to a white card base- quick and easy!  Compared to my normal layering, distressing, etc. style, this is Clean and Simple (CAS) for me.

I wanted to participate with a few online challenges so I am linking this card to the Retro Rubber Blog Challenge #134 “Spring Flowers” and the CAS on Friday #179 “Use Your Fav Flower Stamp”- this Altenew floral stamp set is fast becoming one of my favs and the main floral panel is all one layer :-)

The Retro Rubber Challenge Blog requires that you use stamps that are at least a year or more older- the Altenew, Just Because set is from 2018 and the Verve Scripture Medley 4 stamp set is from 2017.

Stamp Sets: Just Because (Altenew), Scripture Medley 4 (retired Verve Stamps)

Ink/Mediums: Versafine™ Onyx Black, Spectrum Noir™ Alcohol Markers- OR1, LG3, CG1, CG3, DP2, DP3, VB2, AP2, BGR1; Spectrum Noir™ Glitter Pen, Extra Fine White Paint Pen

Cardstock/Paper:  Whisper White, Basic Black

Accessories: MISTI™ Stamping Tool

Thanks again for taking the time to visit- hugs and I hope you have a blessed week!

Monday, May 11, 2020

Give Thanks- Seasonal Shelves


Hi Friends!

Today I am sharing a card that I designed with the retired Stampin’ Up! Seasonal Shelves along with some satin ribbon and metallic paper from my stash .

I have had this stamp set for almost twenty years and still love the images - a timeless set for sure!

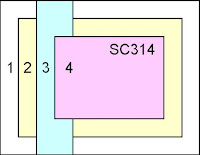
As mentioned in my previous posts, in addition to making an effort to ink up stamps and use papers, etc that I have not used in a while, I am also working on creating a card for each of the Splitcoaststampers’ (SCS) Sketch Challenges (now at 800) and this card uses the SC314 Sketch for the layout.

I love to participate in challenges, so I am also linking this card to the Addicted to Stamps and More #388 “Holiday” Challenge and the Word Art Wednesday #438-#439 “Anything Goes” Challenge.

This card was very easy to create- stamp the main image with black embossing ink onto vanilla cardstock and heat emboss with clear embossing powder.  Watercolor the image with water-based markers and distress inks, fussy cut the image and mount onto black cardstock (trimming close to the edge).

Emboss the metallic paper with the Tin Tile 3D Embossing Folder, die cut with a stitched rectangle die, mount onto black cardstock.

Die cut a piece of vanilla cardstock with a stitched rectangle die, mount onto black cardstock.  Adhere the die cut/embossed metallic panel and add the strips of black and copper satin ribbon (wrapping the ends behind the panel).

Mount the entire panel onto a white card base.

Adhere the focal image panel with dimensional foam or chipboard to finish off the card.

Stamp Sets: Seasonal Shelves (retired Stampin’ Up!)

Ink/Mediums: Versafine™ Onyx Black, Stampin’ Write Markers- Cajun Craze, Early Espresso, Smoky Slate, Soft Suede; Early Espresso; Tim Holtz™ Distress Ink- Antique Linen, Tea Dye; Spectrum Noir™ Glitter Pen, Extra Fine White Paint Pen

Cardstock/Paper:  Very Vanilla, Basic Black; metallic Champagne paper (Die Cut with a View)

Accessories: Gemini, Jr.™, My Favorite Things Stitched Rectangle STAX A2 Set 1 Dies, Stampin' Up! Tin Tile 3-D Embossing Folder, AquaPainter™, Black and Copper Satin Ribbon from my stash

Thanks again for stopping by- I hope all of you have a wonderful and healthy week!

Kitty Love You


Hi Friends!

Today I am sharing a card that I designed using the Simon Says Furry Kisses stamp set along with a sentiment from the retired Stampin’ Up! set, Short and Sweet.

I love this sweet kitty image from Simon Says Stamp and thought that this card could be used as a Valentine or a general "love you"/"thinking of you" card.  

I am working my way through the over 800 sketch challenges at Splitcoaststampers and this card uses the SC443 Sketch for the layout. This sketch was from 2013 and again, I am so thankful that they do not expire :-)

I am also linking this card to the Simon Says Wednesday “Dies and/or Punches” Challenge (I used the SSS   Open Heart Dies and a retired banner die for this card) and the 2 Crafty Critter Crazies May “AnythingGoes” Challenge.

This was a quick and easy card- heat emboss the kitty images using clear embossing powder and watercolor with water-based markers. Fussy-cut the image and mount onto a die-cut rectangle. Mount the panel onto espresso cardstock, trim close to the edge.

Stamp the sentiment and heat emboss in the corner of the panel. 

Emboss a piece of white cardstock with a pawprint embossing folder, trim and mount onto espresso cardstock.

Create a few banners from designer paper, mount onto espresso cardstock, add to the background panel and mount onto a white card base.

Adhere the main kitty panel with dimensional foam (or, I prefer, chipboard).

Die cut and adhere a few layered hearts to the kitty panel.  Use a clear glitter pen to add shimmer to the kitty images (of course, this would be optional) :-)

Add a few rhinestones to finish off the card.

Stamp Sets: Furry Kisses (Simon Says Stamp), Short ‘n Sweet (retired Stampin’ Up!)

Ink/Mediums: Versafine™ Onyx Black, Stampin’ Write Markers-Soft Suede, Early Espresso; Clear Glitter Pen

Cardstock/Paper:  Whisper White, Basic Black, Cherry Cobbler, Early Espresso, retired Pretty in Pink; retired Stampin’ Up! Sending Love Designer Series Paper

Accessories: Gemini, Jr™,  Dies- My Favorite Things Stitched Rectangle A2 STAX Set 1, Simon Says Stamp Open Heart; Darice™ Pawprints Embossing Folder, Embossing Buddy®, Clear Embossing Powder, Heat Tool, AquaPainter™, Rhinestones

Thanks again for taking the time to visit my blog- I hope all of you are staying healthy and safe- hugs, sweet friends!

Sunday, May 10, 2020

My Grace is Sufficient


Hi Friends!

I designed this card using a stamp set that I purchased on clearance over a year ago- Everlasting (Kaisercraft) and this is the first time I have had a chance to ink it up.  I decided to pair the birds with a sentiment from another stamp set that has been un-inked lately- The Vine (Unity Stamp Co).   

I am making a dedicated effort to try to use stamps and paper that I already own (although I do still purchase a few)- I find it so difficult to resist those 40-50% off or more sales- don't you? 

I am also challenging myself to work my way through all of the Splitcoaststampers’ Sketch Challenges (now at 800) that I have not used yet so I incorporated the SC160 Sketch layout into the design of this card.  This sketch was from 2009 (the SCS challenges do not expire) and I thought it would be a good layout for the branch image.

I enjoy participating with online challenges as well and will be linking this card to the Simon Says Monday “Spritz and Splatter” Challenge along with the A Bit More Time to Craft #115  “Anything Goes” Challenge.

Since the Simon Says Monday Challenge was "Spritz and Splatter", I decided to create a Shabby Chic/Vintage Mixed Media card.  


To create this card:

Apply distress ink to the inside of a woodgrain embossing folder, insert a piece of white cardstock and emboss the panel.  Spritz the panel to allow the ink to spread a bit and also use a water brush to apply additional brown distress ink as needed (see all of the colors used below).

Trim the panel and mount onto a piece of black cardstock. Adhere the background panel to a white card base.

Ink the background stamp (Chalkboard Vine) with the same brown distress ink (, lightly stamp over the designer paper before cutting the paper into three panels.  Mount onto black cardstock and add directly to the card front.

Ink the birds on the branch image (from Everlasting) with Versafine™ Onyx Black ink, stamp onto a piece of white cardstock,  apply clear embossing powder and heat set with a heat tool.  Once the image has cooled, water color with brown distress ink along with brown and gray water-based markers.

Apply the distress ink directly around the edges of the image and stamp with a texture splatter stamp to achieve additional distressing and “antiquing”.  Die cut the panel with a stitched rectangle die and mount onto black cardstock.

Stamp the sentiment from The Vine (Unity Stamp Co) with embossing ink (I used the Versafine™ Onyx Black since my Versamark™ was not nearby), apply white embossing powder and heat set with a heat tool.  Trim the sentiment (I used a scrap piece of black paper and it was not trimmed evenly so I had to cut into the area where the “M” would be cut-off, therefore, I fussy-cut around the “M”).  Mount the sentiment onto the bird panel.

Adhere the bird panel to the card front using chipboard or dimensional foam (I prefer chipboard for extra stability, plus I have a lot of chipboard on hand, lol!).

To finish the card, use an extra fine white paint pen to add a highlight to each bird’s eye.

Stamp Sets: Everlasting (Kaisercraft), The Vine (Unity Stamp Co), Chalkboard Vine (Divinity Designs, LLC), Timeless Textures (Stampin’ Up!)

Ink/Mediums: Versafine™ Onyx Black, Stampin’ Write Markers-Gray Granite, Soft Suede; Tim Holtz™ Brushed Corduroy Distress;   Extra Fine White Paint Pen

Cardstock/Paper:  Whisper White, Basic Black, Prima Lifetime Collection Designer Paper

Accessories: Gemini, Jr™, My Favorite Things Stitched Rectangle A2 STAX Set 1 Dies, retired Stampin’ Up! Woodgrain Embossing Folder, Embossing Buddy®, Clear and White Embossing Powder, Heat Tool, AquaPainter™

I am so thrilled that you took the time to visit my blog- I hope all of you are staying healthy and safe during the worldwide pandemic!

I am planning on posting a few more cards this week and, if you have the time, please stop  by again soon!  Hugs, sweet friends!