Pages

Saturday, August 27, 2022

This is the Day


Hi Friends!

Today I am sharing a vintage style card designed with the Stamp Simply Clear Stamps- Floral Clusters Fall Clusters and Give Thanks, the Stamp Simply Floral Clusters & Sprigs Dies, along with the Memory Box Woodsy Plaid 6x6 Paper Pad and a few other supplies all from Stamp Simply


The Memory Box Woodsy Plaid 6x6 Paper Pad is perfect for masculine cards but I thought it would be perfect for this fall feminine card. 

As many of you know that follow my blog, I enjoy participating with online challenges and am playing along with the  Addicted to Stamps & More #436 “Make Your Mark” Challenge, the 
Festive Friday #116 Grandparent’s Day Challenge (Lace, Plaid, Pearls) and the Word Art Wednesday #557-#558 “Anything Goes” Challenge.

If you have not already had a chance to do so, I hope you visit the Stamp Simply blog to see all of the inspiration from the rest of the Stamp Simply Design Team as well as the rest of the challenge sites- terrific galleries from all!

To create this card:


De-static several pieces of white cardstock with an embossing powder tool, ink the floral image from the  Stamp Simply Clear Stamps- Floral Cluster- Fall Flowers  onto one panel and the verse sentiment from Stamp Simply Clear Stamps- Give Thanks onto the other panel with Versafine Onyx Black ink, apply clear embossing powder and heat set with a heat tool.

Once the heat embossing has cooled, watercolor the floral image with water-based markers and die cut with the coordinating die from the Stamp Simply Steel Dies- Floral Cluster & Sprigs Dies

Die cut the sentiment from the medium rectangle die from the Spellbinders Celebrations Die- Pierced Rectangles


Layer the die cut rectangle onto rust cardstock, trim close to the edge of the rectangle.

Trim a piece of the denim plaid paper from the Memory Box Woodsy Plaid 6x6 Paper Pad to approx. 4” x 5 ¼”.  Layer onto a piece of white cardstock, trim close to the edge.

Mount onto a piece of 4 ¼” x 5 ½” rust cardstock .

Add the strip of Venise Lace 1.75” Gabriella- 1 yd- White and cover the raw edge of the lace with a piece of the olive seam binding from the Patina Seam Binding Sampler (wrapping the ends of the ribbon behind the panel).

Add the layered sentiment panel and floral die cut with dimensional foam .

Adhere the olive green seam binding bow to the bottom of the rectangle die cut.


Use a white paint pen to add highlights to the floral centers and finish off the card with pearls in the upper left hand corner of the card front and the lower right hand corner of the sentiment panel. 

Stamp Sets: Floral Cluster- Fall Flowers, Give Thanks  (Stamp Simply)

Ink/Mediums:  Versafine Onyx Black
, Stampin’ Write Markers- Cajun Craze, Tangerine Tango, Summer Starfruit, Crushed Curry, Mossy Meadow, Granny Apple Green, Extra Fine White Paint Pen

Cardstock/Paper: White, Rust, Memory Box Woodsy Plaid 6x6 Paper Pad

Accessories/Tools: Gemini, Jr., Stamp Simply Steel Dies- Floral Cluster & Sprigs Dies, Spellbinders Celebrations Die- Pierced Rectangles, Seam Binding Sampler- Patina- 30 yards, Venise Lace 1.75” Gabriella- 1 yd- White, Kaisercraft Self Adhesive Pearls- Pearl Embossing Powder Tool, Clear Embossing Powder, Heat Tool

Thanks again for taking the time to visit- I hope all of you have a wonderful week!

Saturday, August 20, 2022

Gather Together


Hi Friends!

Today I am sharing a Clean and Layered fall card designed with the Stamp Simply Clear Stamps- Seasonal Wreaths, Fall/Winter Bundle along with the Carta Bella Welcome Autumn 6x6 Paper Pad and a few other supplies all from Stamp Simply.


I was able to incorporate another one of the Splitcoaststampers’ Sketch Challenges into the design (SC912)if you follow my blog, you know that I have a personal goal to create a card for each of the over 919+ sketches – I have created cards for over half of them now, but have not had time to post all to my blog!  Never enough time, it seems- lol!


I am also linking this card to the Tic-Tac-Toe #175 Featured Designer Claire Challenge (Middle Row Across  Embellishments- Die Cuts- Leaves), the Just Add Ink #617 Choose Two (Gingham-Dots and even Die-Cuts) and the Word Art Wednesday #557-#558 “Anything Goes” Challenge.


If you have not already had a chance to do so, I hope you visit the Stamp Simply blog to see all of the inspiration from the rest of the SS Design Team as well as the rest of the challenge sites- gorgeous galleries from all!


To create this card:

De-static several pieces of white cardstock with an embossing powder tool, ink the pumpkin, sentiment and wreath image from the Seasonal Wreaths- Fall/Winter bundle with Versafine Onyx Black ink, apply clear embossing powder and heat set with a heat tool.


Once the heat embossing has cooled, die cut each the pumpkin and wreath image with the coordinating die

Watercolor the pumpkin image with water-based markers.

Trim a piece of the Carta Bella Welcome Autumn 6x6 Paper Pad to 4” x 5¼”.

Add a piece of .75” Venise White Lucia Lace onto the panel on an angle, add the angled green gingham panel (also from the Carta Bella Welcome Autumn paper pad), trim the edges and mount to a piece of 4⅛” x 5⅜” white cardstock.

Add a strip of rust seam binding (from the Patina Bundle), wrap the ends behind the panel and mount onto a piece of black cardstock.


Mount the panel onto a white card base.

Mount the die-cut wreath onto the circle with the embossed sentiment, mount onto the card front with dimensional foam.

Adhere the pumpkin image with dimensional foam and finish off the card with split pea rhinestones.

Stamp Sets: Seasonal Wreaths, Fall/Winter Bundle (Stamp Simply)

Ink/Mediums:  Versafine Onyx Black, Stampin’ Write Markers- Cajun Craze, Tangerine Tango, Summer Starfruit, Crushed Curry; Arteza Fine-liner Pens- Lime Green, Brown

Cardstock/Paper: White, Black, Carta Bella Welcome Autumn 6x6 Paper Pad

Accessories/Tools: Gemini, Jr., Dies from Seasonal Wreaths, Fall/Winter Bundle , Seam Binding Sampler- Patina- 30 yards, .75” Venise Lace Lucia- 1 yd- White, Kaisercraft Self-Adhesive Round Rhinestones- Split Pea,  Embossing Powder Tool, Clear Embossing Powder, Heat Tool

Also, don't forget to check out the  Flower of the Week Floral Clusters sale starting today at Stamp Simply


Thanks again for taking the time to stop by- I hope you all have a wonderful weekend, sweet friends!

Saturday, August 13, 2022

God Bless The USA


Hi Friends!

Today I am sharing a center step gift card designed with stamps, dies and supplies from Stamp Simply

I love all things patriotic and absolutely love the Stamp Simply Clear Stamps- Old Glory Bundle, Patriotic Bundle Trio, The Red, White and Blue and Patriotic Sentiments stamp sets/die bundles and used all of them in this card.


I used the
Center Step Gift Card Tutorial at Splitcoaststampers to create the base for this card from navy cardstock. The inside flap has a pocket that you can fit a gift card for the recipient- love this twist on the center step!  

If you have not already had a chance to do so, I hope you visit the Stamp Simply blog to see all of the inspiration from the rest of the SS Design Team as well as the other challenge galleries- gorgeous galleries from all!

To create this card:

After you create the base from navy cardstock, emboss a panel of white cardstock with the Sizzix 3D Lumber Embossing Folder , trim and adhere to the front of the center step card.


Create the banners from the Echo Park Let Freedom Ring 6x6 Paper Pad and navy cardstock using the Fishtail Sentiment Banners Dies.

Add the striped designer paper along the front of the step card and adhere the stamped sentiment banner over the edge.

Watercolor the USA flag country image with watercolor pencils, die cut with the coordinating die (also die cut two additional dies from white cardstock), layer behind the colored image and mount onto the card from using dimensional foam.


Add the navy twine bow and red rhinestones, finish off the bow with a red button.


For the inside: Ink the subway background stamp from The Red, White and Blue stamp set with navy ink, stamp onto a piece of white cardstock.

 Trim and add to the inside of the step card, add a strip of the star patterned designer paper (only adhering at the sides to create a pocket).

Die cut a few stars from the designer paper and navy cardstock, add to the inside and cut a panel of white cardstock for the upper part of the inside to finish off the card. 

Stamp Sets: Old Glory Bundle,  Patriotic Bundle Trio, The Red, White and Blue, Patriotic Sentiments  (Stamp Simply)

Ink/Mediums: Versafine Onyx Black, Watercolor Pencils- Navy, Red, Black

Cardstock/Paper: White, Navy, Echo Park Let Freedom Ring 6x6 Paper Pad

Accessories/Tools: Gemini, Jr., Stamp Simply Clear Stamps- Old Glory Bundle, Patriotic Bundle Trio; Stamp Simply Steel Dies- Fishtail Sentiment Banners, Kaisercraft Self-Adhesive Round Rhinestones- Red , May Arts Burlap String- 400 yd spool- Navy, Sizzix 3D Texture Fades A6 Embossing Folder- Lumber , Craft Knife

Also, today is the start of this week’s Flower of the Week Seasonal Wreaths sale at Stamp Simply!  


Thanks again for taking the time to visit! I hope all of you have a fabulous weekend!

Saturday, August 6, 2022

The Light of the World


Hi Friends!

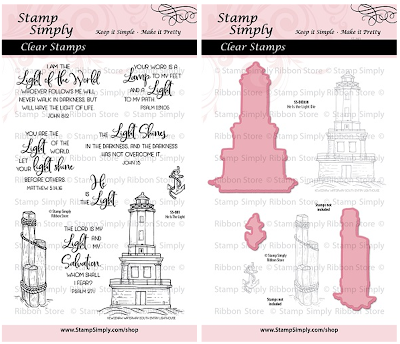
Today I am sharing a quick Clean and Layered card that was designed using the StampSimply Clear Stamps- He is the Light Bundle along with the CraftConsortium Ink Drops- Ocean 6x6 Paper Pad and a few other supplies all from Stamp Simply


 I think that the Ocean Ink Drops paper pairs perfectly with the He is the Light Bundle, don't you?


I was able to incorporate another one of the Splitcoaststampers’ Sketch Challenges into the design (SC304)- woohoo! FYI-  I have a personal goal to create a card for each of the over 916+ sketches – I have created cards for over half of them now, but have not had time to post all to my blog!  Never enough time, it seems- lol!

Also, I enjoy playing along with online challenges and am linking this card to one of my favorite challenges- the Word Art Wednesday #555-#556 “Anything Goes” Challenge.

If you have not already had a chance to do so, I hope you will take the time to visit the Stamp Simply blog to see all of the inspiration from the rest of the SS Design Team as well as the WordArt Wednesday and Splitcoaststampers sites- fabulous galleries from all!

To create this card:

Trim a piece of the Craft Consortium Ocean Ink Drops 6x6 paper to 4 ” x 5 ¼”, mount onto a piece of white cardstock, trim close to the edge and mount onto a piece of black cardstock.


Repeat the above steps for the small top horizontal layer (I used the scrap piece that I had cut from the panel used above as well).  This panel is approx. 1 ¾” x 4 ½”.

Emboss a 2 ¼” x 4 ¾” piece of blue cardstock with the Sizzix 3D Lumber Embossing Folder, mount onto a piece of white cardstock, trim close to the edge and mount onto a piece of black cardstock.

Layer the two panels onto the background panel.

De-static a two pieces of white cardstock with an embossing embossing powder tool. 

Stamp the verse sentiment from the Stamp Simply Clear Stamps- He is the Light Bundle  onto one piece of the white cardstock with Versafine Onyx Black ink, apply clear embossing powder and heat set with a heat tool.

Once the embossing has cooled, die cut the sentiment with the medium oval die from the Spellbinders Amazing Grace- Hemstitch Ovals Dies. 

 Die cut another oval from black cardstock (not using the medium oval outer die only from the Hemstitch Oval Dies) and mount behind the sentiment.

On the other white cardstock panel, stamp the lighthouse from the Stamp Simply Clear Stamps- He is the Light Bundle  using Versafine Onyx Black ink, apply clear embossing powder and heat set with a heat tool.

Once the embossing has cooled, watercolor the image with water-based markers and die cut using the coordinating die from the He is the Light Bundle. Die cut two additional lighthouse pieces from white cardstock to mount behind the stamped/embossed image.


Adhere the oval panel to the card front, add a strip of the dark purple seam binding from the Blues/Purples Seam Binding Sampler, and mount the entire panel onto a white card base.

Finish off the card with the dark purple bow  and lighthouse image (mounted with thin chipboard).

Stamp Sets: He is the Light   (Stamp Simply)

Ink/Mediums: Versafine Ink Pad- Onyx Black,  Stampin’ Write Markers- Lost Lagoon, Pool Party, Smoky Slate

Cardstock/Paper:  White, Black; Craft Consortium Ocean Ink Drops 6x6 paper

Accessories/Tools: Gemini, Jr., Stamp Simply Steel Dies- He is the Light, Spellbinders Amazing Paper Grace- Hemstitch Ovals Dies, Seam Binding Sampler- Blues Purples- 30 yards,  Embossing Powder Tool, Clear Embossing Powder, Heat Tool


Also, just a reminder that there is free shipping on all orders over $100 and this week's Flower of the Week sale is on the He Lives-Daffodil or Happy Day Iris 


Thanks again for taking the time to visit- I hope all of you have a great weekend and stop by again soon!