Pages

Saturday, July 27, 2024

Stamp Simply July 2024 Boho Fall Release- Grateful


Hi Friends!

This week we have been sharing cards using the brand new Boho Fall Release sets at Stamp Simply


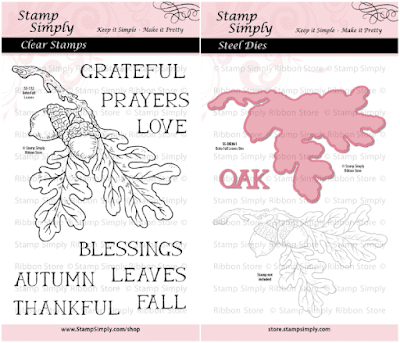
Today I am sharing a card designed with the brand new Boho Fall Leaves Bundle and other supplies (all from Stamp Simply)


This card was fairly easy to create- plus minimal layering and the large leaf image and sentiment are fairly flat as well for mailing.


To create this card:

On a piece of 4” x 5 ¼” piece of white cardstock, score three lines on the diagonal in the upper right hand area of the panel and the lower left hand area (using the score lines for the layers on the Splitcoaststampers Sketch SC1003 for the layout).

Mount the scored panel onto a piece of black cardstock, trimming close to the edge.

Wrap a few strips of bakers twine around the upper right hand corner and adhere the panel to a white card base.

De-static a piece of black cardstock with an embossing powder tool, stamp the “Grateful” sentiment with Versamark ink onto the prepared cardstock, apply white embossing powder and heat set with a heat tool.

Die cut the sentiment with the Fishtail Sentiment Banners dies ( die- cutting an additional black die cut shape to layer behind the sentiment) and adhere to the card front with dimensional foam.

De-static a piece of white cardstock with an embossing powder tool, ink the leaf image from the Boho Fall Leaves Bundle with Versafine Onyx Black ink and stamp onto the prepared white cardstock.  Apply clear embossing powder and heat set with a heat tool.


Watercolor the leaf image with distress inks and watercolor pencils.

Once satisfied with the coloring, die cut the leaf with the coordinating die (cutting an additional leaf from white cardstock to layer behind the colored die-cut image).

Mount the layered leaf die cut onto the card front with dimensional foam.

Add a strip of designer paper into the inside of the card base on the left hand side (I like to do this to use up some of my paper scraps) and adhere the bakers twine bow to finish off the card.

I enjoy playing along with online challenges and in addition to the Splitcoaststampers SC1003 Sketch Challenge, I will be participating with the Simon Says Monday “Add A Sentiment” Challenge, the Tic-Tac-Toe #252 “Featured Designer Betty” Challenge (Middle Row Down- Die-Cuts, Free, Sentiment) and the Word Art Wednesday #657-#658 “Anything Goes” Challenge.

If you have not had a chance to check out the rest of my Sister Design Team cards on the Stamp Simply blog, or the other challenge sites yet, I hope you take the time to do so- fabulous inspiration from all!

Stamp Sets: Boho Fall Leaves Bundle (Stamp Simply)

Ink/Mediums: Versafine Black Onyx, Versamark,  Tim Holtz Distress Inks- Fossilized Amber, Candied Apple, Ground Espresso, Spiced Marmalade, Walnut Stain; Derwent Watercolor Pencils- Browns, Oranges, Black

Cardstock/Paper: White, Black, Doodlebug Design Pumpkin Spice 6x6

Accessories/Tools: Gemini, Jr., Stamp Simply Steel Dies-Boho Fall Leaves Bundle, Fishtail Sentiment Banners Dies; Embossing Powder Tool, Heat Tool, Clear and White Embossing Powder, May Arts Baker’s Twine- 110 Yard Spool- Orange

 Don’t forget to stop by and check out the new Boho Fall release at Stamp Simply!


Thanks again for visiting and I hope you have a great week! 


Saturday, July 20, 2024

Stamp Simply July 2024 Release- Seed Packet Dahlias


Hi Friends!

Today I am sharing another card designed with the brand new Vintage Seed Packet Bundle along with the Delightful Dahlias Bundle and other supplies (all from Stamp Simply)


The new Vintage Seed Packet Release coordinates well with all of the current floral stamps that Stamp Simply has to offer- what a way to “stretch” those stamps for multiple uses!

To create this card:


De-static two pieces of white cardstock with an embossing powder tool, ink the Vintage Seed Packet image and the Delightful Dahlias image with Versafine Onyx Black ink and stamp each one onto a piece of the prepared white cardstock. 

Apply clear embossing powder and heat set with a heat tool.

Carefully cut around the edges of the Vintage Seed Packet background and use the oval die from the Vintage Seed Packet Ovals and Twigs dies (part of the Vintage Seed Packet Bundle) to cut out the oval in the center of the seed packet image.

De-static another piece of white cardstock with an embossing powder tool, stamp the “Sending Hugs” sentiment from Delightful Dahlias with Versafine Onyx Black ink, apply clear embossing powder and heat set with a heat tool.

Trim the sentiment panel a bit and mount behind the oval die cut area on the Vintage Seed Packet image, adhere the entire layered panel onto a piece of purple designer paper from the Craft Consortium Ombré 6x6 paper pad.

Mount onto black cardstock (approx. 4” x 5 ¼”) and adhere to a white card base.

After coloring the Delightful Dahlia image with water-based markers and watercolor pencils, die cut the coordinating die, trim off the stems a bit and adhere to the front of the card panel.


Add the purple seam binding bow and a few pearls to finish off the card.

I enjoy playing along with online challenges and will be participating with one of my favorite challenges. Word Art Wednesday #657-#658 “Anything Goes”.  

If you have not had a chance to check out the rest of my Sister Design Team cards on the Stamp Simply blog, or the Word Art Wednesday site yet, I hope you take the time to do so- gorgeous inspiration from all!


Stamp Sets: Vintage Seed Packet Bundle , Delightful Dahlias Bundle (Stamp Simply)

Ink/Mediums: Versafine Black Onyx, Stampin’ Write Markers-Wisteria Wonder, Lavender Lace, Gorgeous Grape, Heather Highland, Mossy Meadow, Granny Apple Green; Watercolor Pencils- Purples, Greens

Cardstock/Paper: White, Black; Craft Consortium Baroque 6x6 Paper Pad; Echo Park Farmers Market 6x6 Paper Pad

Accessories/Tools: Gemini, Jr., Stamp Simply Steel Dies- Vintage Seed Packet Bundle, Delightful Dahlias Bundle  Embossing Powder Tool, Heat Tool, Clear Embossing Powder, Seam Binding Sampler- Blues Purples, Melissa Frances Self-Adhesive Round Pearls- Cream

Don’t forget to stop by and check out the new release at Stamp Simply!

Thanks again for visiting and I hope you have a wonderful week! 


Saturday, July 13, 2024

Stamp Simply July 2024 Release- Seed Packet Peony


Hi Friends!

Today I am sharing a card designed with the brand new Vintage Seed Packet release, Vintage Seed Packet Bundle and the Vintage Peony Bundle (all from Stamp Simply). 


To create this card:

De-static a piece of white cardstock and a piece of gray patterned designer paper (from the Craft Consortium Baroque 6x6 paper pad) with an embossing powder tool.


Ink the Vintage Peony image and the Vintage Seed Packet background stamp using Versafine Black Onyx ink.  Stamp the peony image onto the white cardstock panel and the background image onto the gray designer paper.

Apply clear embossing powder to both images and heat set with a heat tool.

Die cut the oval from the center of the background image using the Vintage Seed Packet Bundle dies and die cut the peony image with the coordinating Vintage Peony die.

Watercolor the peony using distress inks and watercolor pencils.

De-static a piece of black cardstock with an embossing powder tool, ink the sentiment from Vintage Peony with Versamark ink, apply white embossing powder and heat set with a heat tool.

Die cut the sentiment with the Fishtail Sentiment Banners Die and layer behind the peony image.

Trim the background stamp image close to the edge of the image, mount onto white cardstock (leaving the lower edge of the die cut oval unattached for the moment).

Trim the white cardstock, mount onto black cardstock, trim and mount onto poppy cardstock.


Insert the colored/die cut peony into the oval die cut area (trimming off the stem to allow it to fit) and adhere to the interior of the oval.

To finish off the card, add a bit of dimensional foam under the sentiment die cut and a strip of the gingham Echo Park Farmers Market designer paper to the inside left hand panel.  

I enjoy playing along with online challenges and will be participating with one of my favorite challenges. Word Art Wednesday #655-#656 “Anything Goes”.  

If you have not had a chance to check out the rest of my Sister Design Team cards on the Stamp Simply blog, or the Word Art Wednesday site yet, I hope you take the time to do so- wonderful inspiration from all!

Stamp Sets: Vintage Seed Packet Bundle , Vintage Peony Bundle  (Stamp Simply)

Ink/Mediums: Versafine Black Onyx, Versamark, Distress Inks- Abandoned Coral, Peacock Feathers; Stampin’ Write Markers-Poppy Parade, Conté ά Paris Pastel Pencils- Red and Turquoise, Derwent Watercolor Pencils- Reds, Aqua

Cardstock/Paper: White, Poppy Parade, Black; Craft Consortium Baroque 6x6 Paper Pad; Echo Park Farmers Market 6x6 Paper Pad

Accessories/Tools: Gemini, Jr., Stamp Simply Steel Dies- Vintage Peony Bundle, Vintage Seed Packet Bundle, Fishtail Sentiment Banners,  Embossing Powder Tool, Heat Tool, Clear and White Embossing Powder

Don’t forget to stop by and check out the new release at Stamp Simply!

Thanks again for visiting and I hope you have a great week!

Friday, July 5, 2024

Proud To Be An American


Hi Friends!

For those of you in the United States, I hope you had a great Independence Day!  I am sharing another card designed using the brand new release stamp set, Patriotic Background along with The Red, White & Blue Bundle and Patriotic Sentiments (all from Stamp Simply)


This card is very similar to my last post and once the coloring was finished, it is fairly easy to assemble and relatively flat for mailing.


To create this card:

De-static a piece of white cardstock and a piece of light kraft cardstock with an embossing powder tool, ink the Patriotic Background stamp using Versafine Black Onyx ink and stamp onto one of the panels and repeat the same process with the flag image from The Red, White & Blue Bundle on the other panel. 


De-static the lower part of the shield panel, ink the “Happy Independence Day” sentiment from the Patriotic Sentiments stamp set using Versafine Black Onyx ink at the bottom of the background stamped panel.  Apply clear embossing powder and heat set with a heat tool.

Apply clear embossing powder to both panels and heat set with a heat tool.

Once the embossing has cooled, color the background and flag image with water-based markers and watercolor pencils.


Use a gold metallic paint pen to fill in around the shield and stars on the background and the star on the flag pole.

Once you are satisfied with the coloring, de-static the middle area of the background with an embossing powder tool, ink the “Proud to Be An American” sentiment from The Red, White & Blue Bundle with Versafine Black Onyx Ink, stamp onto the prepared area and apply clear embossing powder. 

Heat set the embossing powder and once cooled, trim close to the edge of the background perimeter and layer onto a 4” x 5 ¼” piece of white cardstock.  

Mount the background panel onto a 4 ⅛”x 5 ⅜”  piece of red cardstock and adhere to a 4 ¼” x 5 ½” white card base.  

Die cut the flag image with the coordinating die (also die cutting a second flag image to layer behind the colored image).

Mount the flag onto the card front with dimensional foam.

To finish off the card. add a strip of star designer paper to the inside left hand part of the card base (I like to use up my scraps this way).   

I enjoy playing along with online challenges and will be participating with the Color Throwdown #800 Red, Blue and Kraft Challenge , the Simon Says Wednesday “Stars and/or Stripes” Challenge, the Colorful Options "July 2024 Flags" Challenge and the Word Art Wednesday #655-#656 “Anything Goes” Challenge.


If you have not had a chance to check out the rest of my Sister Design Team cards on the Stamp Simply blog, or the above challenge sites yet, I hope you take the time to do so- gorgeous inspiration from all!


Stamp Sets: Patriotic Background, The Red, White & Blue Bundle, Patriotic Sentiments  (Stamp Simply)

Ink/Mediums: Versafine Black Onyx, Stampin’ Write Markers-Poppy Parade, Raspberry Ripple, Night of Navy; Derwent Watercolor Pencils- Navy, Red, Black; Gold Metallic Paint Pen


Cardstock/Paper: White, Poppy Parade, Sahara Sand; Carta Bella The Fourth of July 6x6

Accessories/Tools: Gemini, Jr., Stamp Simply Dies- The Red, White & Blue Bundle, Embossing Powder Tool, Heat Tool


Don’t forget to stop by and check out the current specials at Stamp Simply!

It is not too late for our Fourth of July sale (use code JULY20)!


Thanks again for visiting and I hope you have a wonderful week!