Pages

Wednesday, March 30, 2011

Strength and Hope- Two Challenges in One!

Hi Stampers!
I wanted to create a card with the new stamp set, Strength and Hope (available in April) and decided to use two challenges-

 the SSC196 sketch from Stamping 411(http://www.stamping411.blogspot.com 
and the colors from this week’s  ColourQ CQC78 (http://colourq.blogspot.com/ ). 


 The Design Teams from both sites have truly outdone themselves, if you have time, check them out!
 To create this card:
Stamp the Very Vintage Jumbo Wheel with Early Espresso ink and roll onto Whisper White.  Color with SU! Watercolor pencils and sponge Crumb Cake and Early Espresso ink to tone down the Whisper White.  Stamp the butterfly with Early Espresso ink onto Whisper White and color with the Pink Pirouette marker.  Use 2-Way Glue and Dazzling Diamonds to highlight the butterfly wings, punch the border with the Pinking Hearts Border Punch. 
Use the Big Shot with the Vintage Wallpaper EF to emboss the Certainly Celery background and sponge Early Espresso ink over the embossed areas. Add the 5/8” Early Espresso Satin Ribbon and mount onto Early Espresso.  
Stamp the sentiment and punch out with the Modern Label Punch.  Add the pearls and mount the butterfly with Dimensionals to finish off the card.
Stamp Sets:  Strength and Hope, Teeny Tiny Wishes, Very Vintage Jumbo Wheel
Ink:  Early Espresso, Crumb Cake
Cardstock: Whisper White, Certainly Celery, Early Espresso
Accessories:  Big Shot, Vintage Wallpaper EF, Sponge Daubers, Pearls, Dazzling Diamonds, 5/8” Early Espresso Satin Ribbon, Pinking Hearts Border and Modern Label Punch, SU! Pink Pirouette Marker
Thank you for visiting me today- I hope all of you have a wonderful week!

Tuesday, March 29, 2011

With Sympathy- Three Challenges in One

Hi Stampers!         
I created this card for three challenges- the CCMC143 Create with Connie and Mary Sketch Challenge (http://www.createwithconnieandmary.com), the Pals Paper Arts PPA86 Embossing Challenge (http://www.palspaperarts.com/ ) and the Splitcoast Stampers CC315 Saffron  Pear Roses Color Challenge. 

If you have time, check out all of the samples at each of these sites- there are so many variations and beautiful cards! 

FYI- This card really sparkles IRL and was difficult to photograph (it seems to me that pinks and reds do not photograph as well as I would like):-)
To create this card:
Stamp the butterfly image with Basic Black onto Whisper White.  Punch out one butterfly with the 2 1/2” XL Circle Punch and two butterflies with the XL Tag Punch. Color the butterflies with SU! Markers in So Saffron, Regal Rose and Basic Black and sponge the edges and throughout the entire image to tone done the white with a SU! Crumb Cake marker.  Use the Color Spritzer Tool with the Crumb Cake and Regal Rose to further “antique” the images and apply 2-Way Glue and Dazzling Diamonds.  Mount onto Basic Black layers punched with the same punches as above.
Use the Big Shot and emboss a piece of Pear Pizzazz DSP with the Finial Press EF and a piece of Regal Rose with the Vintage Wallpaper EF.  Lightly sand the DSP layer with the Sanding Block to expose the white core.  
Punch the lower edge of the Basic Black layer with the Scallop Trim Border Punch and adhere pearls.  Layer the embossed DSP, mount the butterfly images with dimensionals and attach the 5/8” Basic Black Satin Ribbon.
Stamp Sets:  Flores Suaves, Teeny Tiny Wishes
Ink:  Basic Black, SU! Markers- Basic Black, Regal Rose, So Saffron
Cardstock: Whisper White, Basic Black, Regal Rose, Pear Pizzazz DSP
Accessories:  Big Shot, Finial Press and Vintage Wallpaper EF, Sanding Block, Sponge Daubers, Pearls, Dazzling Diamonds, 5/8” Basic Black Satin Ribbon, 2 1/2” XL Circle, XL Tag and Curly XL Punches
Thanks again for stopping by – have a blessed week!

Sunday, March 27, 2011

Birthday Wishes- Four Challenges

This week’s Just Add Ink JAI61 Challenge
is to create a card with just stamps and cardstock- no punches, dies, designer paper, embellishments or ribbon!  Since I am so used to using all of my “tools” (the Big Shot, embossing folders, ribbon, punches, brads, etc.) this was a definitely a challenge!  
I decided to combine the JAI61 challenge with three others- the colors from this week’s  ColourQ CQC77 Challenge (see http://colourq.blogspot .com ),
the sketch from Sketch  Frenzy Friday #SFF032511 (see http://www.sketchfrenzyfriday.blogspot.com/ ) and the
theme from the HSSTC60 Challenge from Hand Stamped Sentiments (http://handstampedsentiments.blogspot.com/ ).

To create this card:
Use a brayer and apply Bashful Blue onto Whisper White followed by Kiwi Kiss and Bermuda Bay in a random pattern.  Next, stamp the background stamp, En Francais with Bashful Blue over the brayered background. 
Next, stamp the floral image from Elements of Style with Concord Crush and sponge the edges with Concord Crush and Bermuda Bay. Mount onto Concord Crush and Kiwi Kiss.
Stamp En Francais with Bashful Blue onto Whisper White, tear the bottom edge by hand and
stamp the sentiment from Sincere Salutations in Concord Crush.  Using Sponge Daubers, apply ink to the edges and over the center area with Bermuda Bay and Kiwi Kiss to tone down the Whisper White, sponge the edges with Concord Crush and Bermuda Bay.

Stamp Sets: En Francais, Elements of Style, Sincere Salutations
Ink: Bashful Blue, Concord Crush, Bermuda Bay and Kiwi Kiss
Cardstock: Whisper White, Concord Crush, Kiwi Kiss
Accessories: Sponge Daubers, Brayer

I hope you like this card- I did have fun getting back to basics but I am not ready to give up my ribbon and Big Shot yet.

Thanks again for visiting- have a blessed week!

Wednesday, March 23, 2011

CAS Best Wishes

Hi Stampers!
This week the Create with Connie and Mary CCMC142 Challenge (http://www.createwithconnieandmary.com ) is “Go Green” and I decided to create a CAS card for The Paper Players PP39 Clean and Simple challenge (http://thepaperplayers.blogspot.com ) using green:-).  Again, the design team samples and other entries at both sites are so beautiful- I hope you will have a chance to stop by and visit them.

To create this card:
Use the Big Shot and emboss Whisper White with the Vintage Wallpaper EF and emboss a piece of Old Olive with the Finial Press EF. 
The flowers were created from Whisper White with the Scallop Punches and the Crimper Tool.  Cut the punched shapes into a spiral, wrap and glue- quick and easy! 

Assemble the layers, add the flowers, ribbon, pearls and sentiment and you are finished! 
Stamp Sets:  Short and Sweet
Ink: Old Olive
Cardstock:  Whisper White, Old Olive, retired DSP
Accesories:  Big Shot, Finial Press and Vintage Wallpaper EF, SU! Scallop Punches,  Curly Label XL Punch, 5/8" White Satin Ribbon, Pearls
Thanks again for stopping by and I hope you are having a great week! 

Tuesday, March 22, 2011

With Sympathy- Two Challenges!

Hi Stampers! 
I wanted to create another quick and easy card for the Pals Paper Arts PPA85  Sketch Challenge (see http://www.palspaperarts.com/ ) and decided to use the colors from this week’s Just Add Ink JAI60 Challenge (see http://just-add-ink.blogspot.com/ ).  Don’t forget to check out their sites for the inspiration from the Design Teams and the many other talented artists !   Since I still had the Nature Walk set out, I decided to use this one again (I hope you are not growing too tired of this set- if you have not guessed yet, it is one of my favorites:-))

To create this card:
Using the SU! Crumb Cake marker, ink up the floral image and stamp onto Whisper White cardstock.  Repeat the process using the “stamping off” technique.  Color the images with Rich Razzleberry and Old Olive markers and sponge the edges with Crumb Cake.  It is hard to see in the photo, but use the Color Spritzer Tool with the Crumb Cake marker to add additional distressing.
Use the Big Shot with the Vintage Wallpaper EF and the Square Lattice EF to emboss the Rich Razzleberry and Crumb Cake layers.  Punch the edge of the Crumb Cake using the Eyelet Border Punch.
Layer onto Old Olive, add the 5/8” Rich Razzleberry Satin Ribbon and pearls.  Add the tag sentiment along with the Vintage Brad to finish off the card.
Stamp Sets:  Nature Walk, Teeny Tiny Wishes
 Ink:  SU! Markers-Crumb Cake, Old Olive and Rich Razzleberry
Cardstock:   Crumb Cake, Old Olive, Rich Razzleberry¸Whisper White
Accessories:  Big Shot, Square Lattice and Vintage Wallpaper EF, XL Tag, Eyelet Border and Pinking Hearts Border Punches, Sponge Daubers, Color Spritzer Tool,  5/8” Rich Razzleberry Satin Ribbon, Pearls, Vintage Brad
Thanks again for stopping by and I hope you have a wonderful week! 

Sunday, March 20, 2011

Praying for You- Two Challenges

Hi Stampers! 
I wanted to create a card for this week’s ColourQ CQC76 challenge (see http://colourq.blogspot.com ) using the
wonderful Stamping411 SSC195 Sketch (http://www.stamping411.blogspot.com ). 

 I hope you will be able to take the time to visit
their websites and see all of the great Design Team
projects along with all of the other entries-
they are so inspiring!


To create this card:
Ink the floral image from Nature Walk with Early Espresso and double stamp onto Whisper White cardstock.  Color the flowers with a Daffodil Delight marker and the leaves with an Old Olive marker. Stamp the birdcage with Early Espresso over the flowers.  Use the Color Spritzer tool with the Early Espresso marker and sponge the edges.  Mount onto Early Espresso. 
Stamp the background stamp from Flores Suaves with Early Espresso onto Whisper White cardstock.  Run through the Big Shot with the Vintage Wallpaper EF and sponge with Early Espresso and Old Olive.  Spray with Frost White Shimmer Paint and mount onto Early Espresso cardstock.
Use the Big Shot with the Framed Tulips EF and emboss a piece of Designer Paper (retired Kiwi Kiss).  Use the Sandpaper Block to lightly sand the tulips.
Assemble the card, attach the 5/8” Early Espresso Satin Ribbon and add the embellishment and sentiment.
Stamp Sets:  Nature Walk, Flores Suaves, Thoughts and Prayers MDS Brush Stamp Set
Ink: Early Espresso, Old Olive, SU! Markers- Daffodil Delight, Early Espresso and Old Olive
Cardstock:  Early Espresso, Whisper White, retired Kiwi Kiss DSP
Accessories:  Big Shot, Framed Tulips and Vintage Wallpaper EF, 1”, 1 ¼”, 1 3/8” Circle and Scallop Circle Punches, 5/8” Early Espresso Satin Ribbon, Vintage Brad, Color Spritzer Tool, Sponge Daubers
Thanks again for stopping by and I hope you have a blessed week! 

Friday, March 18, 2011

PP38 Strength and Hope Sneak Peek

Hi Stampers! 
I wanted to create a quick easy card for The Paper Players PP38 Ann’s Color Choice Challenge- see http://thepaperplayers.blogspot.com for the great Design Team projects and all of the other inspirational entries! 
I also wanted to give you a sneak peek of the new MDS stamp brush set, Strength and Hope (I love the images in this set!) 
To create this card:
Print the butterfly image and background script stamp on Very Vanilla cardstock.  Color the butterfly with a SU! Baja Breeze marker, trim and sponge Early Espresso along the edges and mount onto Early Espresso cardstock.  Apply 2-Way Glue and Dazzling Diamonds to the butterfly (it is hard to capture on film but the butterfly appears to have gossamer wings).
Use the Big Shot with the Finial Press EF and emboss a piece of Blushing Bride cardstock.  Sponge lightly with Early Espresso ink (also sponge the edges of the script background piece).

Create a bow with 5/8” Early Espresso Satin Ribbon and finish off the card.    
Stamp Sets: Strength and Hope Brush Set (MDS)
 Ink:  SU! Markers-Baja Breeze, Classic Ink
Cardstock: Blushing Bride, Early Espresso, Very Vanilla
Accessories:  Big Shot, Finial Press EF, Sponge Daubers, Dazzling Diamonds, 5/8” Early Espresso Satin Ribbon
Thanks again for stopping by and I hope you have a great weekend! 

Tuesday, March 15, 2011

One Card- Three Challenges!

Hi Stampers!
It has been a very busy week and I have not had as much time to stamp just for fun :-) but I wanted to create a card using the colors from this week’s Create with Connie and Mary CCMC141 Challenge (http://www.createwithconnieandmary.com/ )  along with the sketch from Just Add Ink JAI59 Challenge (see http://just-add-ink.blogspot.com/ ) and the inspiration challenge PPA84 from Pals Paper Arts (http://www.palspaperarts.com/ ). 


If you have a chance, check out all of the great Design Team samples as well as all of the other entries- the inspiration each week is so wonderful! 

To creat this card:

On So Saffron cardstock, stamp the Very Vintage Jumbo Wheel in Real Red Classic Ink.  Emboss with the Framed Tulips EF and sponge Crumb Cake ink on the edges and over the center of the stamped area.

Also "wheel" Real Red over Whisper White and punch the edge with the Eyelet Border Punch and crimp with the Crimper Tool.  Sponge with Crumb Cake ink and layer onto Real Red (also punched with the Eyelet Border Punch). 

Using scraps from the Whisper White layer above, stamp the sentiment from Elements of Style and the bee from Nature Walk in Real Red.  Punch out with the XL Tag Punch and layer onto Real Red. 

Create a scallop flower from Real Red (Scallop Circle Punch and Crimper Tool)- spritz with Frost White Shimmer Paint.

Ink up the floral image from Nature Walk with SU! Markers in Crumb Cake and Real Red, stamp onto Whisper White.  Stamp the birdcage in Real Red along with a few bees.  Lightly sponge Crumb Cake ink over the images to "antique" and spritz with a Crumb Cake marker. 

Use the Photo Corner Punch XL to cut out two corners in Real Red and emboss with the Big Shot (line up on the Framed Tulips EF). 

Assemble card and add  5/8" Real Red Satin Ribbon to finish off the card.

Stamp Sets:  Jumbo Very Vintage Wheel, Nature Walk, Elements of Style
Ink:  Real Red, Crumb Cake
Cardstock:  So Saffron, Whisper White, Real Red, Crumb Cake
Accessories:  Big Shot, Framed Tulips EF, Eyelet Border, XL Tag and Photo Corners XL Punches, Crimper Tool, SU! Markers- Real Red, Crumb Cake, Spritzer Tool, 5/8" Real Red Satin Ribbon, Frost White Shimmer Paint, Sponge Dauber, Brad

Thanks again for stopping by- God Bless!

Monday, March 7, 2011

Good Friend- Two Challenges in One Card!

Hi Stampers! 
I wanted to create a card for The Paper Players PP37 Spring Has Sprung Challenge (see http://thepaperplayers.blogspot.com ) and colors from this week’s HSSCS57 Color Challenge at Hand Stamped Sentiments (see www.handstampedsentiments.blogspot.com ).


To create this card:

Below is a link from Splitcoast Stampers for the rolled flowers http://www.splitcoaststampers.com/resources/tutorials/rolledflowers/.  I used cardstock instead of DSP and "scrunched" the cardstock before cutting the spiral. 
Cut several squares from Blushing Bride and Poppy Parade to create the rosettes:
Blushing Bride- one- 2 ½” x 2 ½”  and one- 3 ¼” x 3 ¼”
Poppy Parade- one- 2 ½” x 2 ½”

Using the Pear Pizzazz DSP (Hostess Level I), cut the center strip and punch the edges with the Scallop Trim Border Punch. 
Using the Big Shot with the Square Lattice EF, emboss a piece of Whisper White cardstock.   Layer over Pear Pizzazz and Poppy Parade. 
Add the 5/8” Whisper White Satin Ribbon and Rosettes.  On Whisper White, use SU! Markers in Pear Pizzazz and Poppy Parade to color the sentiment and punch out the sentiment using the Decorative Label XL Punch.  Punch one more out of Poppy Parade and layer under the Whisper White label to finish off the card. 
Stamp Sets: Great Friend
 Ink:  SU! Markers- Pear Pizzazz, Poppy Parade
Cardstock: Blushing Bride, Pear Pizzazz, Poppy Parade, Whisper White, Hostess Level I DSP
Accessories:  Big Shot, Finial Press EF, Scallop Trim Border Punch, Decorative XL Label Punch, 5/8” White Satin Ribbon
Thanks again for stopping by and I hope you like this card :-) Have a wonderful week stamping!

Sunday, March 6, 2011

Another Card with CQC74 Colors and SSC193 Sketch


Hi Again Stampers! 
I decided to create another card using the same colors from the CQC74 Challenge (http://colourq.blogspot.com/ ) along with the Stamping411 Sketch Challenge SSC193 (http://www.stamping411.blogspot.com/ ).  If you get a chance, check out all of the Design Team samples as well as the other cards submitted for both challenges.
To create this card:
Using My Digital Studio (MDS) print out the bird image from Nature on Whisper White cardstock.  Mount onto Early Espresso.  Stamp the sentiment onto Whisper White using Early Espresso and punch out with the Medium Oval Punch. 


Adhere the focal image and sentiment onto Pear Pizzazz. 
Using the Big Shot with the Framed Tulips EF, emboss a piece of Baja Breeze.  Emboss a piece of Tangerine Tango DSP (retired) with the Vintage Wallpaper EF.  Lightly sand the Tangerine Tango with the Sanding Block.  Adhere the two together and attach the 5/8’ Early Espresso Satin Ribbon. 
Add  Pearls, Antique Brad and scraps of ribbon.

Stamp Sets:  Nature MDS, Teeny Tiny Wishes
Ink:  Early Espresso, Printer Ink
Cardstock:  Baja Breeze, Early Espresso, Pear Pizzazz, Whisper White, Tangerine Tango DSP (retired)
Accessories:  Big Shot, Framed Tulips and Vintage Wallpaper EF, Antique Brad, Pearls, 5/8" Early Espresso Satin Ribbon, Medium Oval Punch

 Thanks again for stopping by and I hope you are enjoying your weekend! 

Saturday, March 5, 2011

CQC74 and CCMC140- Get Well Soon

Hi Stampers! 
I wanted to have a few extra Get Well cards on hand so I created the first card using the colors from this week’s  ColourQ CQC74 challenge (see http://colourq.blogspot.com/ ) and create another card with the CCMC140 sketch from Create with Connie and Mary (http://www.createwithconnieandmary.com). The Design Team samples from both sites are gorgeous and so inspirational!


To create this card:
Using Sponge Daubers, “pounce” Baja Breeze, Tangerine Tango and Pear Pizzazz onto the Medallion background stamp, punch out with the 1 ¾” Circle Punch.  Punch a Scallop Circle using the 2 3/8” XL Scallop Punch.  Adhere the Medallion circle to the Scallop Circle and emboss using the Big Shot and the Square Lattice EF.
Emboss a piece of Baja Breeze with the Square Lattice EF and a piece of Pear Pizzazz with the Elegant Lines EF (I used scrap pieces for the Tangerine Tango). 
Stamp the sentiment and assemble the layers on the card.  Add the 5/8” Early Espresso Satin Ribbon and Pearls to finish off the card.
Stamp Sets:  Medallion Background, Sincere Sentiments
Ink:  Baja Breeze, Tangerine Tango, Pear Pizzazz
Cardstock: Early Espresso, Baja Breeze, Pear Pizzazz, Tangerine Tango, Whisper White
Accessories:  Big Shot, Square Lattice and Elegant Lines EF, 1 3/8” Circle and 2 3/8” XL Scallop Punch, Pearls, 5/8” Early Espresso Satin Ribbon, Sponge Daubers

 Thanks again for stopping by and I hope you like this card! 

Friday, March 4, 2011

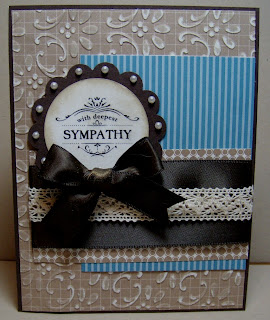
With Sympathy- One Card, Two Challenges!

Hi Stampers! 
It seems as though I need quite a few sympathy cards lately and I decided to create this card for The Paper Players PP38 Fabric Challenge (see http://thepaperplayers.blogspot.com/ ) and the CCMC140 sketch challenge from Create with Connie and Mary (see http://www.createwithconnieandmary.com/ ).
I have not had a chance to order the new set Thanks for Caring yet, so I decided to use My Digital Studio (MDS) again.  One advantage is that you can resize the image and I was able to reduce the size of the sentiment so I could cut the circle with the 1-3/8” Circle Punch.


To make this card:
Emboss the Crumb Cake DSP (from the retired hostess set) with the Finial Press EF, lightly sand with the Sanding Block.  Mount onto Early Espresso cardstock.

Print the image from MDS onto Whisper White Cardstock and punch out with the 1-3/8" Circle Punch.  Sponge Crumb Cake ink to lightly distress the image.  Punch the scallop from Early Espresso Cardstock using the 2-3/8" Scallop Circle Punch. 

Layer the ribbon and lace over the Crumb Cake DSP and mount onto the Marina Mist DSP. 

Add the pearls and bow to finish the card.

Stamp Sets:  MDS- Thanks for Caring
Ink:  Crumb Cake, Printer Ink
Cardstock: Early Espresso, Whisper White, Marina Mist DSP, Crumb Cake DSP (retired Hostess Set)
Accessories:  Big Shot, Finial Press EF, 1 3/8” Circle and 2 3/8” XL Scallop Punch, Pearls, 5/8” Early Espresso Satin Ribbon, 5/8” Victoria Crochet Trim, Sanding Block
Thanks again for stopping by and I hope you have a blessed weekend! 

Wednesday, March 2, 2011

SSC192 Get Well Wishes

Hi Stampers! 
I created a quick CAS card using this week’s Stamping 411 Sketch Challenge SSC192 (see http://www.stamping411.blogspot.com/ )- if you have a minute to check out the site, the Design Team projects as well as the other submissions are truly gorgeous!
Stamp Sets:  Nature Walk, Teeny Tiny Wishes
Ink:  SU! Markers- Basic Black, Cajun Craze, Daffodil Delight, Tangerine Tango
Cardstock: Very Vanilla, Cajun Craze
Accessories:  Big Shot, Elegant Lines EF, XL Tag, Modern Label and Word Window Punch, Pearls and ribbon from my stash
Thanks again for stopping by and I hope all of you have a wonderful week! 

Christmas in March- Part 2?

Hi Stampers! 
This is the second card for my 2011 Christmas card collection http://www.splitcoaststampers.com/forums/christmas-cards-f47/ccc11-february-t514100.html).  Again, the goal is to create 10 cards each month through November.
I used My Digital Studio again for the focal image and the sentiment- “mirrored” the image (the couple is skating toward the right versus the left).
I punched the image out with the 2 ½” circle punch and used the Circle Cutter Plus to cut a 3” circle from Cherry Cobbler.  I distressed the image with Crumb Cake ink¸spritzed with a Cherry Cobbler marker and mounted onto retired SU! Christmas DSP.

The snowflake is Whisper White cardstock cut from the Northern Flurry Die with an Antique Brad (distressed with Crumb Cake ink).  My Digital Studio (MDS) allowed me to reduce the size of the Heard from The Heart sentiment and “distressed” this piece with Crumb Cake as well.   A bit of Victoria Crochet Trim and Cherry Cobbler Seam Binding finish off the card. 
I hope you like this as well--  I still have to design March (hopefully we will see this one before April).

Christmas in March?

Hi Stampers! 
This is the first card for my 2011 Christmas card collection (I signed up for the Splitcoast Stampers Christmas Card Challenge this year - http://www.splitcoaststampers.com/forums/christmas-cards-f47/ccc11-january-thread-t514091.html).  The goal is to create 10 cards each month so by November you will have created 110 cards  (then you can concentrate on mailing the cards, baking cookies and other fun Christmas activities and not the stress of making all of your cards at once)!  Here it is March and I have just finished my January and February.  We will see how I progress…
This card was created using My Digital Studio- I know, I have not forsaken stamping but it is so easy to resize the images and also, in this case, “mirror” the image (the cardinal is facing toward the right versus the left).  And when you are making multiples, need I say more??   If you haved not invested yet, now would be a good time with Sale-Bration:-)
After I colored the image with SU! Markers in Cherry Cobbler, Real Red and Wild Wasabi, I distressed it with Sponge Daubers using Crumb Cake and Early Espresso ink.     After the distressing, I used the Color Spritzer Tool with the Crumb Cake marker and then sprayed the image with Frost White Shimmer Paint spray.  I touched up the eye and the top of the berries with the White Gel Pen (did not photograph well). 
The Very Vanilla piece was embossed using the Big Shot with the Square Lattice EF. lightly sponged with Early Espresso ink and the center patterned piece is a scrap of fabric that a friend of mine had discarded- of course, I had to rescue it and I have enough for the 10 cards! 
The Cherry Cobbler embossed and punched panel was from my stash (already spritzed and embossed) and the sentiment is also from MDS (used the Medium Oval and Modern Label punch).  Of course, had to add the pearls to finish off the card. 
I hope you like this card- I will be posting February shortly and will have to start on March.

Thanks again for looking-I hope each of you have a wonderful  week!  Don’t forget, Christmas is right around the corner (Oh no!  I did not just say that, did I? :-)