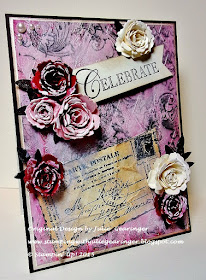
It is time for the
new Card Concept #42 Color Inspiration "Autumn Beauty" Challenge- this is a gorgeous combination for the
upcoming holiday season!
I also decided to incorporate
the Splitcoaststampers’ Mix-Ability MIX131 “Love It” Challenge into the design-
I love using texture paste, stencils and dies in my mixed media designs :-) as well as the F4A289 "Happy Birthday To Me" (create a card in the style that you would like for your birthday) :-)
The Card Concept is a
bi-weekly challenge that has an inspiration photo along with a number of design
styles that you can choose from to create your card- Clean and Simple, Clean
and Graphic, Clean and Layered, Shabby Chic, Freestyle Collage, Classy and
Elegant and Mixed Media.
To create this card:
Apply Gesso® to a
piece of Whisper White cardstock and allow to dry (Gesso® dries quickly but you
could use a Heat Tool to speed up the process).
Using a palette
knife, apply Wendy Vecchi® Crackled Texture Paste over The Crafters Workshop™ Designs
by Jamie™ Mini Harlequin Stencil and allow to dry (I did use my Heat Tool but
very carefully since I have found that my Heat Tool will “bubble up” the
texture paste and the crackle effect is not as pronounced if too much heat is
applied).
Once dried, apply Metallic
Gold Champagne, Iced Cherry, Light Pink Gelatos® (spritzing with water and
allowing to run), Ranger® Tim Holtz® Distress Stains- Worn Lipstick, Seedless
Preserves, Fired Brick , Picked Raspberry and Picket Fence (last layer to tone
down the colors).
The Distress Stain
layers are created by applying the ink to a craft mat, spritzing water onto the
stain, laying the panel into the stains and allowing the inks to run and merge
by twisting the panel and continuing to repeat the steps until the desired color
is achieved (carefully using the Heat Tool between layers).
Ink the retired
background stamp, Bella Toile using Early Espresso Classic Ink and stamp over the
prepared panel. Trim the panel and mount
onto Very Vanilla cardstock, trim again and mount onto the Early Espresso card
base. Sponge Ranger® Tim Holtz® Tea Dye
Distress Ink over the edges to “antique” the paper a bit.
Ink the Graphic45®
Botanicals stamp using Early Espresso Classic Ink and stamp onto a piece of
Whisper White cardstock. “Antique” the
paper by sponging Ranger® Tim Holtz® Tea Dye Distress Ink over the entire
panel, crumple the paper by hand and apply more ink.
Adhere the “antiqued”
stamped panel to the card front and using your finger, apply Gesso® over the
background and stamped panel.
Use the Big Shot™
with the My Favorite Things™ (MFT) Mini Royal and Royal Rose Dies to cut the
flowers from Very Vanilla, Blushing Bride and Cherry Cobbler cardstock.
Use a Bone Folder to
curl the edges and roll the roses up (adhering in the center with adhesive- I prefer
Hot Glue for this step).
Stamp the sentiment
from the Graphic45® Time to Flourish stamp set onto Very Vanilla cardstock
using Early Espresso Classic Ink, create the banner points with the Hexagon
Punch and lightly sponge Ranger® Tim Holtz® Tea Dye Distress Ink over the edges.
Mount the sentiment
onto the card front using Stampin’ Dimensionals® and add the roses along with
leaves from Early Espresso cardstock (using the Martha Stewart® Leaf Punch)
using Hot Glue (or your preferred adhesive).
Use your finger to
apply Gesso® over the petals and leaves and add a few Pearls to the corner to
finish off the card.
Stamp Sets:
Bella Toile (retired Stampin’ Up! background), Botanicals and Time To
Flourish (G45)
Ink: Early
Espresso, Gelatos®- Metallic Gold
Champagne, Iced Cherry, Light Pink; Ranger®
Tim Holtz® Distress Stains- Worn Lipstick, Seedless Preserves, Fired Brick , Picked
Raspberry, Picket Fence; Ranger® Tim Holtz® Tea Dye Distress Ink
Paper: Whisper
White, Very Vanilla, Blushing Bride, Cherry Cobbler, Early Espresso
Accessories: Big
Shot™, MFT Royal Rose and Mini Royal Rose Dies, Gesso®, Punches- Hexagon, MS
Leaf, Palette Knife, Wendy
Vecchi® Crackled Texture
Paste, Sponge Dauber, Pearls
For some reason I could not seem to get a good photograph of this card- the pinks seemed to bright in the photo (in real life it is more on the soft Blushing Bride side of the color scale) :-)
Thanks again for stopping
by- I hope you have a fantastic week and come play along with us at The CardConcept!


goodness the texture just jumps off the page! Such a wonderful card full of rich colours and beautiful detail x
ReplyDeleteOh my, so love this card, the flowers are sooo gorgeous!!
ReplyDeleteWow, beautiful flowers and LOVE the background!
ReplyDeleteHi Julie! What an awesome card! I just love seeing what you create each challenge. So pretty!
ReplyDeleteThe texture on this is just amazing!! Love!
ReplyDeleteI love these terrific layers of color and texture! You have used so many wonderful elements and bring them all together beautifully! Very pretty!
ReplyDeleteTake Care!
Michele
So much details and texture = LOVE!
ReplyDeleteDeanne :)
Stunning card! Absolutely beautiful. You are such a talented cardmaker - I love your designs. :)
ReplyDeleteThis is gorgeous! Love the textures!
ReplyDeleteLilian TCC DT
The Leaf Studio