Wednesday, November 29, 2017

SC673 Merry Christmas


Hi Friends!

It’s Wednesday and time again for the weekly sketch at Splitcoaststampers! Allison is our sketch artist this week for the SC673 Challenge and I thought this layout would be perfect for a Christmas card!

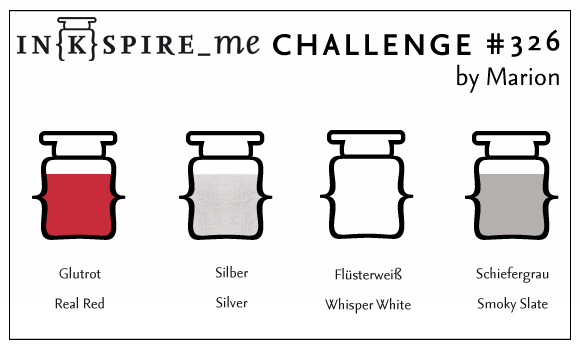
I decided to play along with the As You Like It “Favourite Christmas Colour andWhy?” Challenge (I love deep dark reds with green, white and silver at Christmas- a home style Christmas color combination that reminds me of my childhood) plus the Hand Stamped Sentiments  #278 Inspiration Challenge and the Global Design Project #115 “Christmas Joy” Theme  Challenge into the design.

If you have not had a chance to visit the SC673 Splitcoaststampers’ Sketch gallery or the other challenge sites yet, I hope you will do so- fabulous inspiration from all!

This card is primarily die-cutting and was very easy to create:

1). Using the Our Daily Bread Designs (ODBD) Elegant Embellishments Dies, die cut a base ornament from Real Red cardstock and another from Whisper White cardstock.

2). With the ODBD Elegant Embellishments Dies intricate ornament dies, die cut one of each from Silver Foil and layer onto the base ornaments from Step #1.

3). Position the ODBD Pierced Circle Die on a 4” x 5 ¼” piece of Whisper White cardstock and die cut.  Remove the circle from the panel and emboss the panel with a lace brocade embossing folder.  Mount onto a piece of Real Red cardstock, trim and mount onto the white card base.  Score a 1” strip of Real Red cardstock and add to the right hand side of the card (per the sketch).

4). Re-insert the die cut circle into the panel and adhere to the card front.

5). Using various green cardstock, die cut pieces of pine and other greenery with the ODBD Lovely Leaves Dies and mount to the center of the circle (per the sketch).

6). Add a bit of silver cord to each ornament.  Mount the white ornament directly to the card front (covering up the ends of the foliage) and mount the red ornament with dimensional foam.

7). With Versafine™ Onyx Black Ink, stamp the sentiment from ODBD Mini Tag Sentiments stamp set onto Whisper White cardstock, trim and create the fish tail banner by hand.  Mount onto the card with dimensional foam.

8). To finish off the card, add a few Rhinestones to the centers of the ornaments and use a clear glitter pen to add shimmer to the foliage.

Stamp Sets: Mini Tag Sentiments (Our Daily Bread Designs)

Ink/Mediums: Versafine™ Onyx Black; Spectrum Noir™ Clear Glitter Pen

Paper: Whisper White, Real Red, Always Artichoke, Old Olive, Wild Wasabi; Silver Foil

Accessories/Tools: Big Shot™, ODBD Dies- Pierced Circles, Elegant Embellishments, Fancy Foilage; retired Lacy Brocade Textured Impressions™ Embossing Folder, Scoring Tool, Silver Cord, Rhinestones


Thanks again for stopping by to visit! If you have time, come join us at Splitcoaststampers for this week’s sketch challenge!  Hugs and I hope all of you have a wonderful week, sweet friends!

Monday, November 27, 2017

Warm Winter Hugs- For The Birds


Hi Friends!

I hope all of you in the United States had a very blessed Thanksgiving week!  After having a quiet Thanksgiving dinner with my husband as well as a wonderful, relaxing Thanksgiving weekend (with I have to admit, many yummy leftovers- lol!) I had a chance to retreat to my craft room to create a few cards -)

I decided to pull out this cute set For the Birds  from Sweet ‘n Sassy Stamps  and design a winter scene that could be sent anytime during the winter months:-)  

Plus this is one of the sets that you could possibly win during our last weekly give-away for our SNSS 10th Birthday Celebration (we are still celebrating- see details here on our FB page).  

This set has several fun bird images, a branch plus several sentiments that are perfect for an encouragement to anyone during the long, cold winter months!

As you know, I love to play along with online challenges and incorporated the Just Us Girls #421 Photo Week Challenge (I was inspired by the colors),  the Word Art Wednesday #310-#311 “Anything Goes” Challenge and the Retro Rubber #076 “Anything Goes” Challenge (this stamp set is over two years old:-)) into the design.

If you have not had a chance to visit the above challenge sites or the SNSS Blog/FB Page yet, I encourage you to do so- wonderful inspiration from all!


To create this card:

1). Create a mask from scrap cardstock for the “snow” bank and lay the mask onto the bottom part of a piece of white cardstock.  Use a sponge dauber to apply Tim Holtz® Broken China and Picked Raspberry Distress Oxide Inks onto the upper portion of the cardstock for the sky.  Once you are satisfied with the shading, lightly spritz with water to create the illusion of snow and heat set with a heat tool to dry the remaining ink.

2). De-static the lower portion with an embossing powder tool, stamp the sentiment from For the Birds with Versafine™ Onyx Black ink, apply clear embossing powder and heat set with the heat tool.

3). Die cut the panel with a stitched rectangle die, mount onto a piece of white cardstock that has been embossed with a snowflake die and adhere the entire panel to the white card base.

4). Ink the bird and branch images from For the Birds with archival ink, stamp onto another piece of white cardstock, apply clear embossing powder and heat set with the heat tool.  Color the images with water-based markers.  FYI- I used the retired matching dies to die cut the images but you could fussy-cut or use an electronic cutter.    

5). Mount the birds along with the branch using dimensional foam to the card front. 

6). Finish off the card by using the Sharpie® Extra Fine White Paint Pen to add snowflakes to the sky and a clear glitter pen to add shimmer to the snow.


Ink/Mediums: Versafine™ Onyx Black, Tim Holtz® Distress Oxide Inks-Broken China, Picked Raspberry; Tim Holtz® Festive Berries Distress Marker; Stampin’ Write Markers- Cherry Cobbler, Pumpkin Pie, Smoky Slate, Wild Wasabi; Sharpie® Extra Fine White Paint Pen, Clear Glitter Pen

Paper/Cardstock: Whisper White

Acessories/Tools: Big Shot™, MFT Die-namics™ A2 Stitched Rectangle STAX Set 2 Dies, Embossing Buddy®, Clear Embossing Powder, Heat Tool, Sponge Dauber, AquaPainter™


Thanks again for taking the time to stop by- hugs and I hope you have a blessed week, sweet friends!

Thursday, November 23, 2017

Yuletide Deer


Hi Friends!

I hope all of you are having a wonderful week so far! I am still making Christmas cards and wanted to create a card for the November 2017 STAMPlorations™ Theme and Sketch Challenge. 

This Clean and Simple (CAS) Mixed Media card was designed with a new to me stamp set, STAMPlorations™ Yuletide Deer.  I love the images in this set and decided to use the deer with the patterns:-)


If you have not had a chance to check out the challenge sites yet, I hope you will take the time to do so- gorgeous inspiration from the Design Teams as well as their galleries!

To create this card:

1). Using a craft mat, apply a bit of hickory smoke and festive berries distress ink, spritz lightly with water and press a piece of white cardstock into the ink to create a splatter effect.  Dry the panel with a heat tool and die cut with a rectangular cross-stitch die.

2). De-static the die cut panel with an embossing powder tool, ink the Yuletide Deer image with archival ink (I used Versafine™ Onyx Black), apply silver embossing powder and heat set with the heat tool.  Once the embossing has cooled, color the image with a red and slate marker and add a bit of shimmer with a clear glitter pen.

3). Mount the entire panel onto a piece of slate cardstock, trim close to the edge and mount onto a piece of red cardstock.  Adhere the entire card front to a white card base.

4). Stamp the sentiment with archival black ink onto a piece of slate cardstock, create the fishtail banner and mount onto the card front with dimensional foam.

5). Add a few red and silver drops along with the rhinestones on the sentiment to finish off the card.

Stamp Sets: Yuletide Deer (STAMPlorations™)

Ink/Mediums: Versafine™ Onyx Black, Tim Holtz® Distress Ink- Festive Berries., Hickory Smoke, Stampin’ Write Markers- retired Poppy Parade, Smoky Slate; Spectrum Noir™ Clear Glitter Pen, Nuvo™ Festive Berries and Silver Crystal Drops

Cardstock/Paper: Whisper White, Smoky Slate, Real Red (SU!)

Accessories: Big Shot™, Cross Stitch Rectangle Dies (Gina Marie), Rhinestones


Thanks again for visiting- I hope all of you have a very blessed Thanksgiving week!

Tuesday, November 21, 2017

SC672 Frosted Medallion Thanksgiving


Hi Friends!

It’s Wednesday and time again for the weekly sketch at Splitcoaststampers! Allison is our sketch artist this week and I thought this sketch would be perfect for a holiday card!

Since we are celebrating Thanksgiving this week in the United States, I decided to create a non-traditional Thanksgiving card using Stampin’ Up! stamp sets- retired Frosted Medallions for the main image and the current Painted Harvest for the sentiment. 


If you have not had a chance to visit the SC672 Splitcoaststampers’ Sketch gallery or the other challenge sites yet, I hope you will do so- gorgeous inspiration from all!

To create this card:

1). De-static a piece of Whisper White cardstock with the Embossing Buddy®, stamp the medallion image with Versamark™ ink onto the prepared panel, apply Gold Embossing Powder and heat set with the heat tool.  Once the powder has cooled, color with Stampin’ Write Tempting Turquoise and Chocolate Chip markers.

2). Die cut the image with a stitched circle die. Die cut a piece of Chocolate Chip cardstock with a nesting circle die (just a bit larger than the stitched die) and die cut a piece of Tempting Turquoise cardstock with the same size nesting circle die.  Layer the Chocolate Chip die cut circle behind the embossed image and split the Tempting Turquoise die cut in half before layering one half behind the upper part of the Chocolate Chip circle.

3). Emboss a piece of Whisper White cardstock with the Woodgrain Textured Impressions™ Embossing Folder, trim and mount onto a piece of Chocolate Chip cardstock, trim and mount onto a piece of Tempting Turquoise cardstock.  Mount the entire background panel onto the white card base.

4). Trim off a bit of the Frosted Medallion circle before adding to the card front with dimensional foam.

5). Stamp the sentiment from Painted Harvest with Chocolate Chip Classic Ink onto a scrap piece of Whisper White cardstock.  Create the fishtail banner points (I used the retired Hexagon Punch), mount onto Chocolate Chip cardstock, trim to match and mount onto Tempting Turquoise cardstock (trimming again to match the layers).

6). Mount the sentiment with dimensional foam and add a Pearl to the center of the medallion image to finish off the card.

Stamp Sets: Frosted Medallions, Painted Harvest (Stampin’ Up!)

Ink/Mediums: Versamark™; Chocolate Chip Classic Ink, Stampin’ Write Markers- Chocolate Chip, Tempting Turquoise

Paper: Whisper White, Chocolate Chip, Tempting Turquoise

Accessories/Tools: Big Shot™, MFT Pierced Circle STAX Dies, retired SU! Circle Framelits™, retired Woodgrain Textured Impressions™ Embossing Folder, Pearl, Embossing Buddy®, Gold EP, Heat Tool, retired Hexagon Punch


Thanks again for taking the time to visit- if you have time, come join us at Splitcoaststampers for thisweek’s sketch challenge!  Hugs and I hope all of you have a blessed Thanksgiving week, sweet friends!

November 21- Power Poppy Hues to Use Challenge Guest Designer


Hi Friends!!

Woohoo!! I am the Guest Designer for the Power Poppy "Hues to Use"Challenge for the week of November 21st!!  

In addition to the monthly Power & Spark Challenge at Power Poppy, the "Hues to Use" Challenge is a weekly color challenge which does not have a link up expiration date, so you can play anytime!! One of the benefits of playing along is that you may be asked to be a Guest Designer in the future- which is such an honor and very exciting!!

I am so excited since I absolutely love Power Poppy by Marcella Hawley images and own several of her clear stamp sets as well as quite a few digital sets.  

I know, many of you may cringe at the thought of digital stamps and feel that digital images are too intimidating, but trust me, they are so easy to use!! You can import them into photo editing software (I generally use the retired Stampin’ Up! My Digital Studio™ program or Word) or you can use another word processing program.  

Also, what I love about digital images is that you can enlarge or reduce the image, flip it and/or crop it, then print it out on cardstock, watercolor paper or other paper.  Then you just color as you would a stamped image.  It is so easy to create different looks with just one image plus another major benefit for me is that they do not take up space in my stamping studio :-)

This week’s "Hues to Use" neutral palette is perfect for so many different types of cards and with the celebration of Thanksgiving this week here in the States, I decided to use the main image from the Olive and Oak digital stamp set and the sentiment from the Bittersweet Wreath digital stamp set.


If you have not had a chance to do so, I hope you will find the time to check out the rest of the challenge gallery at Power Poppy (as well as their other challenge sand blog posts).  Their Design Team is amazing and gorgeous inspiration from all!

To create this card:

1). Open an 8 ½” x 11” document in your word processing/photo software program, import or insert the Olive & Oak image into the blank document (I enlarged it a bit) and import the sentiment from Bittersweet Wreath into another area of the document.  I positioned them both on the same page but made sure I had enough room to cut out the main image panel and that the sentiment would be the correct size for the 4 ¼” card (again, this is what I love about digital images!!).  Print the images using black printer ink onto white cardstock. FYI- you can use watercolor paper or other colored cardstock as well – just as long as your printer will handle the weight.  I tend to use an 80lb weight white cardstock that has a very smooth surface. 

2). Use a water brush with antique linen distress ink, watercolor the entire image.  Use a heat tool to speed up the drying and continue to color the image using watercolor pencils, distress ink and markers and shadows with a water soluble graphite pencil until you are satisfied with the results.  I also used an alcohol marker for the background (to try to achieve an antique paper look).  Use a stencil with antique linen distress ink to lightly stencil in the background.

3). Die cut the image with a rectangle stitched die, mount onto rust cardstock, trim close to the die cut edge and mount onto espresso cardstock. Create the photo corners using a square punch from rust cardstock and trim the edges for the photo corner. Add the chocolate brads in the corners and mount the entire panel onto a piece of rust cardstock. 

4). Using a tutorial from Splitcoaststampers for an easel card (see tutorial here), I cut a piece of espresso cardstock to 4 ¼” x 11” and scored at 5 ½” and 8 ¼”.  I folded on the score lines to create the easel.

5). Hand trim the sentiment to approx. 3 ¾” wide, watercolor with the antique linen distress ink and watercolor pencils for a wash over the sentiment panel and stencil around the edges with the same stencil as used above for the main image panel.  Mount the sentiment onto rust cardstock, trim and mount onto espresso cardstock, trim and mount onto rust cardstock again for the layers.

6). On a separate piece of espresso cardstock (approx. 4 ¼” wide by 5” tall), add the crochet lace and chocolate ribbon. Wrap the ribbon ends behind this panel and adhere the panel to the lower portion of the easel card.  Mount the sentiment with dimensional foam (this is the part of the card that will help keep the easel portion open).

7). Adhere the front panel onto the small flap of the easel card, test out the easel movement to make sure that it will work smoothly.

8).To finish off the card, add shimmer to the main oak leaf with a clear shimmer pen.


Ink/Mediums: Inkjet Printer- Black Ink,  Tim Holtz® (TH) Antique Linen Distress Ink, TH Gathered Twigs Distress Marker, Stampin’ Up! (SU!) Markers- Cajun Craze, Early Espresso, Rexel Derwent® Watercolor Pencils-#53 Sepia, #57 Brown Ochre, #62 Burnt Sienna, #64 Terra Cotta; Derwent® Water Soluble Graphite Pencil- HB Light Wash; Spectrum Noir™ GV1 Alcohol Marker & Clear Glitter Pen

Cardstock/Paper: Whisper White, Cajun Craze, Early Espresso (all Stampin’ Up!)

Accessories: Big Shot™, MFT Stitched Rectangle STAX Dies, AquaPainter™, Ivory Crochet Lace, Chocolate brads, 1” Satin Ribbon from my stash


Thanks again for taking the time to stop by!  I hope I have inspired you today and that you will be able to join us for the Power Poppy “Hues to Use” Challenge!

SUO188 Star of Light


Hi Friends!   

It’s time for the #188 “Celebrate Winter Holidays!” Challenge at SU-Only Challenges and since I still need a few more Christmas cards, I chose to create a quick card using the Star of Light stamp set with the coordinating Starlight Thinlit™ Dies.    

I have owned this stamp set with the dies since last year and this is the first time I had a chance to create a card- pitiful, I know :-)  I have so many stamps and so little time!! I love the intricate cuts on the inner star and think that this set may become one of my new favorites!! :-)


If you have not had a chance to stop by the SU-Only Challenge site to check out the rest of the Design Team’s samples or the other challenge sites yet, I encourage you to do so- fabulous inspiration from all!

To create this card:

1). De-static a piece of Whisper White cardstock with an Embossing Buddy®, stamp the flourish image along with a few of the miscellaneous small star images from the Star of Light stamp set with Versamark™ ink, apply Stampin’ Emboss® Silver Embossing Powder and heat set with the Heat Tool. 

2). Once the embossing has cooled, use largest circle from the Stitched Shapes Framelits™ to die cut the circle element.  Use the Simply Scored™ Tool to score a few vertical lines along the left hand side of the remaining panel, trim to 4” x 5 ¼” and mount onto a piece of Perfect Plum cardstock. Mount the entire card front onto the Extra Thick Whisper White card base.

3). Die cut a circle from Perfect Plum cardstock using the retired Circle Framelits™ and mount behind the circle cut in the above step.  Adhere the layered circle onto the card front (lining up the flourish image) using Stampin’ Dimensionals®.

4). Using the Starlit Thinlits™, die cut the open star from Perfect Plum cardstock and the large intricate star from Silver Foil.  Layer the two together and set aside.

5). De-static a scrap of Whisper White cardstock with an Embossing Buddy®, stamp the sentiment from the Star of Light stamp set with Versamark™ ink, apply Stampin’ Emboss® Silver Embossing Powder and heat set with the Heat Tool.  Trim and create the flag banner points by hand (I used the retired Hexagon Punch). Mount onto Perfect Plum cardstock, trim and adhere to the card front with Stampin’ Dimensionals®. 

6). Add the layered die cut star and finish off the card with a Rhinestone in the center of the star image. 

Stamp Sets: Star of Light, Painted Harvest

Ink/Mediums: Versamark™

Paper: Whisper White, Perfect Plum, Silver Foil, Extra Thick Whisper White

Accessories/Tools: Big Shot™, Stitched Shapes Framelits™ , Starlit Thinlits™,  Framelits™, retired Circle Framelits™,  Embossing Buddy®, Stampin’ Emboss® Silver Embossing Powder, Heat Tool, Simply Scored™ Tool, Rhinestone,

Thanks again for taking the time to stop by and I hope that you will create your own Stampin’ Up! Only project and join us for our “Celebrate Winter Holidays!” challenge!
Related Posts Plugin for WordPress, Blogger...