Friday, March 15, 2013

Happy Easter- Playing with The Paper Players


Hi Stampers!!

I had another chance to stamp this evening (one of my favorite things to do :-)) and to create an Easter card using the fabulous spring colors in the PP136 Challenge at The Paper Players and this also qualifies for the Stampin' Up! Only SUO66 Challenge- Easter Parade:-) 

I believe that both of these sites, The Paper Players and SUO Challenges have very talented design teams,  and if you have not had a chance to visit their sites yet, I highly encourage you to do so (trust me, you will not be disappointed :-)).

**** 03/28/13**** This card also qualifies for the StillADDinktive Spot that Easter Stamp Easter - this challenge site allows you to back link projects that you have created oor create a new project.  I am not sure if I will have the time to stamp another Easter card before Sunday so I decided to share this one:-)  

I decided to use Crosses of Hope and while I love and own the stamp set, the cross was not as large as I wanted, so I utilized My Digital Studio to create this “hybrid” card :-) 

To create this card:

Open the My Digital Studio program and using a blank page, insert the stamp brush from Crosses of Hope, size to your preference and change the color to Early Espresso (or if you prefer, stamp the cross using Early Espresso Classic Ink).  Print out onto Whisper White cardstock.

Color the flowers and leaves using Stampin’ Write Markers in Pool Party, Regal Rose and Lucky Limeade.  Carefully cut out the cross image and set aside.

Cut a panel of Pool Party and Regal Rose cardstock and overlap in the center (my panel is 3" x 4 1/4") and mount this panel onto Early Espresso cardstock.  Emboss a piece of Vellum using the Big Shot™ and the Lacy Brocade Textured Impressions™ Embossing Folder and layer over the 3" x 4 1/4" Pool Party/Regal Rose panel (I used a thin layer of Two-Way Glue to adhere the Vellum- dries clear and works great!).

Add the embossed lace paper border (this was a previously embossed piece from my scraps using the Big Shot™ , Large Scallop Edgelit™ and the Delicate Designs (Lace) Textured Impressions™ Embossing Folder).  Add the ½” Pool Party Seam Binding Ribbon to cover the paper lace layer where it overlaps (right under the top of the horizontal parts of the cross).

Adhere the cross to the panel with Stampin’ Dimensionals® and add Pearls to the lower right hand corner and to the flowers on the cross.

Emboss a piece of Vellum with the Big Shot™ and Framed Tulips Textured Impressions™ Embossing Folder.  Layer this Vellum panel onto a piece of Regal Rose Designer Series Paper (I used the striped layer but it is a bit difficult to see the stripes in the photo) and adhere this embossed Vellum panel to an Early Espresso card front, add the layered cross panel with Stampin’ Dimensionals®.

Stamp the sentiment using an Early Espresso Stampin' Write marker (so you can omit part of the sentiment to split the words).  Punch out using the Jewelry Punch, add to card front under the area where the bow will be placed using Mini Glue Dots, add the 1/2” Pool Party Seam Binding Ribbon Bow with the Antique Brad to finish off the card.

Stamp Sets: Crosses of Hope (MDS), Teeny Tiny Wishes

Ink:  Printer Ink- Early Espresso, Stampin’ Write Markers- Early Espresso, Lucky Limeade, Pool Party, Regal Rose

Paper: Early Espresso, Pool Party, Regal Rose, Whisper White, Regal Rose Designer Series Paper, Vellum

Accessories:  Big Shot™, Textured Impressions™ Embossing  Folders- Lacy Brocade,  Framed Tulips, Delicate Designs (Lace), Large Scallop Framelit™, Jewelry Tag Punch, ½” Pool Party Seam Binding Ribbon, Antique Brad, Pearls, Stampin' Dimensionals®, Mini Glue Dots, Two-Way Glue

Thanks again for stopping by!  I hope all of you have a wonderful week and God Bless!

Wednesday, March 13, 2013

CAS- Four Stamp Sets and One Punch!


Hi Stampers!

I hope all of you are having a fabulous week so far!  I was able to spend a few minutes in my craft room this evening and decided to use the colors from this week’s CAS-Colours and Sketches #15 Challenge and throw together a Clean and Simple card.  

This is a new challenge site for me and they rotate sketches and color challenges- if you have not had a chance to do, stop by and check them out!!

To create this card:  
                              
Repeatedly stamp onto Pretty In Pink Designer Series Paper (DSP) the floral image from Creative Elements using Rich Razzleberry Classic Ink and when finished,  cut a strip for the center panel.  Mount the strip onto Rich Razzleberry cardstock (** Hint**- I used strips from my scraps versus an entire piece of Rich Razzleberry cardstock to save on cardstock and mailing weight- you would never know  :-)).  

On Whisper White cardstock, use Certainly Celery Classic Ink to stamp the circular lacy image from Lacy & Lovely across the panel and stamp the sentiment from Best of Everything with Rich Razzleberry Classic Ink on the lower lacy border.

Add the layered floral panel over the lacy border and adhere the entire card front onto Rich Razzleberry cardstock and again onto the Whisper White card base.

Stamp the butterfly from Papillon Potpourri using Rich Razzleberry Classic Ink, use the  Elegant Butterfly Punch to punch out the image and fill in the white cardstock using the Aqua Painter and Pretty In Pink Classic Ink (my Aqua Painter still had a bit of Frost White Shimmer Paint on the bristles and that was perfect for the wings).  

Add a few pearls to butterfly body to finish off the card.

Stamp Sets:  Creative Elements, Lacy & Lovely, Best of Everything, Papillon Potpourri

Ink: Rich Razzleberry, Certainly Celery, Pretty in Pink

Paper: Whisper White, Rich Razzleberry, Pretty in Pink Designer Series Pack

Accessories:  Elegant Butterfly Punch, Aqua Painter, Pearls

Clean and Simple- I may have to make a few more of these as thank you and/or birthday  cards!   Or modify the panel for Christmas....so many possibilities when you allow yourself to try CAS :-)

Thanks again for stopping by to visit- I am so glad that you did :-)   Enjoy the rest of the week and God Bless!
Tuesday, March 12, 2013

Triple Stamping- A New Technique for Me :-)


Hi Stampers!!

I hope all of you are doing well!  I wanted to create a card for the new Splitcoaststampers’ You CanDo It Challenge #10 Triple Stamping (see tutuorial here) and decided to use the lovely Pals Paper Arts PPA154 Colors plus this card also qualifies for the Splitcoaststampers’Try A New Technique TLC388 Triple Stamping/Seamless Layers.
   
If you have a chance, check out the Design Team Samples at the Pals Paper Arts- they are spectacular, not to mention all of the wonderful entries for the challenge!!  Plus the Triple Stamping Gallery at Splitcoaststampers shows you the variety that this technique allows- great examples and inspiration!

To create this card:

 I wanted to create an A2 card so I used layers of Whisper White cut 2” x 3”, 3’ x 4” and 4” x 5”.    Cut the Whisper White cardstock layers and using a removable adhesive, adhere the layers together in a graduating format. 

Using a Brayer, first layer Crumb Cake Classic Ink randomly over the graduated Whisper White layers and follow with Calypso Coral Classic Ink.  Ink the splatter stamp from French Foliage using Crumb Cake and randomly stamp over the layers, then ink the chosen stamps with Calypso Coral and again, randomly stamp the images. 

Using Raspberry Ripple Classic Ink, stamp the background from French Foliage over the layers and follow with the various stamps from the set to achieve the desired effect.

Close-Up of the layered effect- difficult to photograph the Shimmer Paint
Remove the layers and mount onto Crumb Cake cardstock.  Re-mount the layers and spray the entire panel with Champagne Shimmer Paint (paint mixed with 70% alcohol).  Adhere the entire panel onto a Raspberry Ripple card front.

Add the sentiment stamped onto Vellum (from my stash already with the deckle edge from years ago:-)), use the 1” Square Punch to create the banner points, add the ½” Crumb Cake Seam Binding Ribbon bow along with the Raspberry Ripple Dahlia accents to finish off the card.

I had fun with this technique- if you have the time, give it a try!  Limited supplies are needed so this technique is great for beginners as well as the experienced stamper!

Stamp Sets: French Foliage, Blessings from Heaven

Ink:  Crumb Cake, Calypso Coral, Raspberry Ripple

Paper: Whisper White, Crumb Cake, Raspberry Ripple, Vellum

Accessories: Brayer, ½” Crumb Cake Seam Binding Ribbon, Raspberry Ripple Dahlias, 1” Punch (for banner points), Champagne Shimmer Paint,  Deckle Edge Scissors (retired)

Thanks again for stopping by- I hope you have a great week!

Saturday, March 9, 2013

Going Green- March Monochromatic Christmas!


Hi Stampers!!

Here is my first design for the March 2013 Splitcoaststampers CCC13 Christmas Card Challenge- I decided to use a monochromatic green color scheme for the SUO65 Stampin’ Up!Only Going Green! Challenge and the HSSSC154 Hand Stamped Sentiments Sketch- again, if you have not had a chance to visit their sites yet, I hope you will take the time to do so!! 


To create this card:
Ink the large pine tree from the stamp set, Lovely As A Tree image with Certainly Celery Classic Ink onto Whisper White cardstock, stamp a few times (stamp off as well), ink again with Gumball Green Classic Ink and finally with Garden Green Classic Ink. 

Cut a 3” Circle using the Big Shot™Originals™ Circle Die Cut and cut an additional circle of Garden Green cardstock and cut in half to frame behind the circle. 

Use the Big Shot™ with the Lacy Brocade Textured Impressions™ Embossing Folder, emboss a piece of Whisper White and Garden Green cardstock. 

Cut two pieces of Whisper White cardstock with the Big Shot™ and the Large Scallop Edgelit™ .  Line up with the scallop edge and and emboss with the Delicate Designs (snowflake) Textured Impressions™ Embossing Folder.  Also emboss with the snowflake folder a piece of Certainly Celery DSP (lighly sand the snowflake embossing on the Certainly Celery DSP layer). 

Adhere two strips of Garden Green cardstock behind the Certainly Celery DSP.  Arrange per the sketch and add the 3/8” Gumball Green Stitched Satin Ribbon, Pearls and sentiment to finish off the card.

Stamp Sets:  Lovely As A Tree, Teeny Tiny Wishes

Ink: Certainly Celery, Gumball Green, Garden Green  

Paper: Whisper White, Garden Green, Certainly Celery DSP (retired Hostess Pack I)

Accessories:  Big Shot™,  Delicate Designs (Snowflake) and Lacy Brocade Textured Impressions™ Embossing Folders, Originals™ 3” Circle Die, Large Scallop Framelits™, 3/8” Gumball Green Stitched Satin Ribbon, Pearls

Thanks again for stopping by- I hope you have a wonderful weekend! 

Thursday, March 7, 2013

Imagine Spring!! Three Challenges in One :-)


Hi Stampers!!

I hope all of you are having a great week so far!!  We were very fortunate today- they were calling for 10” to 15” of snow and we barely received a few inches and none of it struck to the road!!  We need the moisture for the spring and summer,  but I am thankful that the roads stayed clear:-).

I wanted to create a card using the Dynamic Duos DD42 Colors and decided to use the Fab Friday FabFri13 Sketch and create a Clean and Simple card for the SR166 Stampin' Royalty Challenge.  All three sites have wonderful Design Teams and numerous entries to give you inspiration for weeks- if you have not already done so, check them out!!


To create this Clean and Simple (CAS) card:

Ink the Daydream Jumbo Wheel with Garden Green Classic Ink and stamp onto a piece of Whisper White (*** Tip*** this is one wheel that I have un-mounted from the wheel and use directly on a clear block for stamping :-)). 

Trim the stamped area and use the 1 ¼” Square Punch to create the banner points.
Mount  the banner to a piece of Whisper White cardstock that has been embossed using the Big Shot™ with the Lacy Brocade Textured Impressions™ Embossing Folder (luckily I had this piece already embossed in my scrap pile- love those scraps :-)).

Stamp the sentiment using Garden Green Classic Ink onto a piece of Vellum.  Position the vellum sentiment on top of a piece of the Floral District DSP and cut using the Big Shot™ and the Apothecary Accents Framelits™.   Also cut a piece of Garden Green cardstock with the same frame from the Apothecary Accents Framelits™.- cut his one in half horizontally to use as a layer behind the vellum sentiment

Adhere the vellum sentiment layer over the Floral District DSP layer using brads and the 5/16" Handheld Punch.  Cut the Garden Green “frame” in half, and layer behind the sentiment.  Adhere a Tea Lace Paper Doily behind the sentiment (I used ½ of the doily).   using Mini Glue Dots and mount entire frame unit onto the banner.   

Adhere the entire card front onto Garden Green cardstock and again onto the Whisper White card base.

Stamp the butterflies onto Daffodil Delight cardstock with Garden Green Classic Ink and punch out using the Elegant Butterfly Punch.  Add to the card front using Mini Glue Dots, attach the ½” Daffodil Delight Seam Binding Triple Ribbon bow with the Garden Green rolled rose in the center and add the Pearls to the center of the butterfly body and rose to finish off the card:-).

Stamp Sets: Daydream Jumbo Wheel, Word Play

Ink:  Garden Green  

Paper: Whisper White, Daffodil Delight, Floral District DSP, Vellum  

Accessories:  Big Shot™. Lacy Brocade Textured Impressions™ Embossing Folder, Apothecary Accents Framelits™,  Tea Lace Paper Doily, Punches- 1 ¼” Circle, Elegant Butterfly, 5/16" Handheld, 1 ¼” Square; ½” ” Daffodil Delight Seam Binding Ribbon,  Pearls, Mini Glue Dots, Brads (retired)

Thanks again for stopping by!  The colors on this card are a bright and remind me that spring is just around the corner- have a great week!

Monday, March 4, 2013

Nantucket Brayer Background- CAS and Simple!


Hi Stampers!!

I had a great weekend spending time with friends stamping and sharing techniques- one of my favorite things to do!!  

Both ladies are fairly new to stamping so I decided to show them a quick, easy technique using brayers to create their own background paper.   We created a card similar to a previous post (but it does not have as much layering and details since our time was limited) :-)
  
To create the basic elements for this card:


Using a brayer (I use three so I do not have to clean between layers) with Classic Ink, layer the color onto a 4 ¼” x 5 ½” piece of Whisper White cardstock as follows: first Pool Party, Marina Mist and finally Island Indigo (do not press too hard and leave some "white" spaces).  

Remember- You do not have to be perfect with this brayering step, in fact, the brayered colors on the cardstock will appear a bit contemporary with some of the hard edges showing but do not despair- you will not notice this once the card is finished :-)


Stamp the fish and shell image using Night of Navy Classic Ink onto a sticky note and/or thinner paper (computer paper works great) and carefully cut around the image to create a mask. 

Re-ink the fish and shell images with Night of Navy and stamp onto your brayered background, cover with the mask and stamp the coral over the masked images (also inked with Night of Navy Classic Ink).  

Stamp Nantucket image, seahorse and coral (you do not necessarily need to mask the seahorse since it has more detail and the coral does not show up on the image as well as it would on the shell and fish).    Make sure that you leave space between all of these images for cutting and mounting.

Use the 1” Square Punch to punch out the Nantucket image and layer onto a piece of Night of Navy punched with the 1 ¼” Circle Punch.  

With the Paper Trimmer, trim the other images to size and layer all onto Night of Navy cardstock.  Wrap small pieces of knotted Hemp Twine around the corners to add interest.

Use the Big Shot™ with the Woodgrain Textured Impressions™ Embossing Folder to emboss a piece of Whisper White cardstock- trim to 4” x 5 ¼” and layer onto Night of Navy.  Layer this entire panel onto your Whisper White card base (or use Night of Navy and line interior with a lighter color).

Add the images and sentiment with Stampin’ Dimensionals (optional- brush on Frost White Shimmer Paint with an Aqua Painter to give iridescence to the images).

Stamp Sets:  By The Tide, Short and Sweet

Ink: Pool Party, Marina Mist, Island Indigo, Night of Navy

Paper: Whisper White, Night of Navy

Accessories:  Brayer, Big Shot™, Woodgrain Textured Impressions™ Embossing Folder,  Punches-1” and 1 ¼” Square, Word Window, Hemp Twine (retired), optional- Frost White Shimmer Paint, Aqua Painter

Thanks again for stopping by- hope all of you had a wonderful weekend as well!

Thursday, February 28, 2013

Feb13 Christmas- Card #3- Clean and Simple "Hybrid"


Hi again, Stampers!!

Here is my third design for the February 2013 Splitcoaststampers CCC13 Christmas Card Challenge- I will complete the entire set later this evening but wanted to post before February was officially over but I had a bit of an issue with my computer so I am a few minutes late :-)  

As I mentioned in a previous post, this challenge is basically a commitment to yourself to complete your Christmas cards early (so you can mail them in November).  Last year, I did not have enough cards to mail, so I am re-committing myself in order to be able to start to mail in late November this year and I will need over 200 cards!

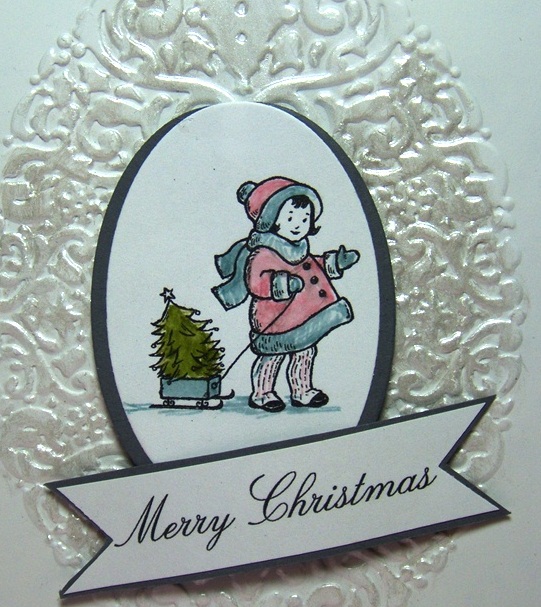
This is another Clean and Simple (CAS) card and although I have the stamp sets, I decided to utilize My Digital Studio (MDS) to print the images and create a “hybrid” card.

To create this card:

Using MDS, insert the stamp brush images and arrange the layout to fit onto one page and print onto a piece of 8.5” x 11” Whisper White cardstock. 

 Use Stampin’ Write Markers in Baja Breeze, Pretty In Pink and Lucky Limeade to color in the image and take an Aqua Painter to soften the colors.

Use the Big Shot™ with the Oval Framelits™ to cut out the images of the little girl and cut another oval the same size out of Basic Gray cardstock to layer behind the image (cut this oval in half to just peek out on the sides).

Close-up of Shimmer Paint
Also with the Big Shot™ and the Holiday Frame Textured Impressions™ Embossing Folder, emboss a piece of Whisper White cardstock for the background.  Use the Aqua Painter with a little bit of Frost White Shimmer Paint to brush over the raised image of the embossing.

Finished set of cards- yea!
Adhere the focal image along with the sentiment (also layered onto Basic Gray and using the 1” Square Punch to create the banner points) and layer the entire panel onto Basic Gray cardstock before mounting onto the Whisper White card base.

Another quick and easy card- I promise I will finish the other five cards :-)

Stamp Sets:  Greeting Card Kids, Come to Bethlehem (both MDS)

Ink: Stampin’ Write Markers- Baja Breeze, Pretty In Pink, Lucky Limeade  

Paper: Whisper White, Basic Gray


Accessories:  Big Shot™,  Holiday Frame Textured Impressions™ Embossing Folder, Oval Framelits™, Aqua Painter, Frost White Shimmer Paint

Thanks again for stopping by- I hope you enjoy the rest of your week!

Feb13 Christmas- CAS with More Old Muse


Hi Stampers!!

Oh no, I am getting a bit behind on my own commitment to create 20-24 Christmas cards a month :-) !!  It is the last day in February and I will get these cards finished, I will get these cards finished :-) !!


To create this Clean and Simple (CAS) card:

Use Stampin’ Write Markers in More Mustard, Old Olive and Midnight Muse to color in the bird image from Gifts of Christmas (one of my favorite retired Christmas stamp sets) and stamp the image onto Whisper White cardstock. Trim and mount onto More Mustard cardstock.

Use the Midnight Muse Stampin' Write Marker to ink the sentiment and stamp onto Whisper White cardstock, trim and mount onto More Mustard cardstock as well.

Here is the entire lot of six :-)
Use the Big Shot™ with the Petals-A-Plenty Textured Impressions™ Embossing Folder to emboss a piece of Whisper White cardstock.  Adhere the focal image and sentiment to the embossed background, add the triple satin bow and mount the entire panel onto More Mustard and then onto the Whisper White card base to finish off the card.

Quick and easy- now off to finish a few more designs for February.

Stamp Sets:  Gifts of Christmas, More Merry Messages

Ink: Stampin’ Write Markers- More Mustard, Old Olive, Midnight Muse  

Paper: Whisper White, More Mustard

Accessories:  Big Shot™,  Petals-A-Plenty Textured Impressions™ Embossing Folder, Gold Satin Ribbon from my stash

Thanks again for visiting- I hope you have a great week and God Bless!
Related Posts Plugin for WordPress, Blogger...