Wednesday, June 19, 2013

Thinking of You and A Lesson Learned Long Ago:-)

Hi Stampers!!

This card was created for the Hand Stamped Sentiments HSSSC162 Sketch Challenge and I decided to use to combine two of my favorite new stamp sets, Wetlands along with Notable Notions. 

Again, if you have the time, check out the Hand Stamped Sentiments site- their Design Team outdid themselves!!

The Canadian Goose and I have a "history"- let me just say, do not try to feed a nesting pair of geese...the male is very protective :-)  This stamp reminds me of this very humorous lesson I learned years ago :-)

To create this card:

Use a sticky note to create the circular image for the “moon” and sponge Cool Cabana Classic Ink onto Whisper White cardstock.  Ink the script stamp with Basic Gray Classic Ink and stamp over the sponged sky area.

Remove the mask and stamp the Canadian Goose image using Basic Gray Classic Ink and use the AquaPainter™ with Smoky Slate Classic Ink to watercolor the feathers and Pistachio Pudding for the grass area. 

Use the Color Spritzer Tool with the Stampin’ Write Basic Gray marker to add a bit of distressing.

Adhere this focal image onto Basic Black and then again onto Whisper White cardstock.

Stamp the sentiment using Basic Gray Classic Ink onto Whisper White and adhere to the bottom of the focal image.  Mount the entire panel onto Basic Gray cardstock.

Add the banners to the side (I used scrap pieces of DSP of which a few were embossed) and the photo corners were created with the retired Photo Corner Punch and hand cut to a smaller size.

Add the Basic Black cardstock layer onto the Whisper White card base- stamp the script from Notable Notions using the Illuminate ink pad, add the embossed Whisper White panel along with the ½” Pool Party Seam Binding Ribbon.

Add the Pearls to the photo corners to finish off the card.

Stamp Sets:  Wetlands, Notable Notions

Ink: Cool Cabana, Strawberry Slush, Island Indigo, Basic Black Basic Gray, Pistachio Pudding, Illuminate, Stampin’ Write Basic Gray marker

Paper: Whisper White, Basic Black, Basic Gray, retired Designer Series Paper  

Accessories:  Big Shot™, Argyle and Square Lattice Textured Impressions™ Embossing Folders, Sponge Dauber, Pearls, AquaPainter™, Color Spritzer Tool (retired),  Photo Corner Punch (retired), Stampin’ Dimensionals®. Sticky Note for masking


Thanks again for stopping by- I hope you  have a wonderful Wednesday!!

Tuesday, June 18, 2013

Above & Beyond- A CAS Fish for Two Challenges :-)


Hi Stampers!!

This card was created for the Just Add Ink JAI169 Inspiration Photo and the CASology #49 Fish Challenge

 I hope you have the time to visit both sites- such wonderful Design Teams and loads of inspiration!


To create this Clean and Simple (CAS) card:


Use sticky notes to create the rectangular background area and using Sponge Daubers, apply Cool Cabana ad Strawberry Slush Classic Ink. 

Ink the script stamp from By The Tide with Midnight Muse Classic Ink and stamp off once before stamping over the sponged area. 

Ink the coral stamp using Basic Black Classic Ink and then stamp again, this time inking with Strawberry Slush Classic Ink.

Ink the sentiment from One in A Million using Island Indigo Classic Ink onto Whisper White and mount the background panel onto the Whisper White card base using Stampin’ Dimensionals® (I cannot stamp directly onto a cad base without smudging the ink :-))

Ink the fish image with Basic Black and stamp onto Whisper White cardstock.  Carefully cut out the fish and using Sponge Daubers, apply Strawberry Slush and Island Indigo Classic Ink.

Mount the sponged sea panel onto the card front using Stampin’ Dimensionals® along with the fish image to finish off the card.

Stamp Sets:  By The Tide, One in A Million

Ink: Cool Cabana, Strawberry Slush, Island Indigo, Basic Black

Paper: Whisper White

Accessories:  Sponge Daubers, Stampin’ Dimensionals®. Sticky Notes for masking


Thanks again for stopping by- I hope you enjoy this fishy card!!

Birthday Wishes- Watercolor Flower Shop :-)

Hi Stampers! 

I hope all of you are having a great week so far!   While I had all of the new 2013-2015 In Colors out to create a card for the Fab Friday FabFri20 Challenge, I decided to create one more card for the challenge with bits of pieces that had been created during the initial card design process – again, if you have a chance, stop by the Fab Friday site  for fabulous inspiration!

Originally this card started out as a watercolor background but I was not happy with the results so I modified it to create the finished card…

To create this card:

Using Baked Brown Sugar, stamp the floral images onto Whisper White cardstock.  Use the AquaPainter™ and pick up ink from Crisp Cantaloupe and Strawberry Slush Classic Ink Pads to fill in the blossoms of the flowers.  Use the Stampin’ Write Early Espresso marker to darken and add a bit of texture to the middle of the flowers.  

FYI- Originally I had masked the flowers and stamped off for the lighter colors and had a watercolor background of Cool Cabana behind the flowers- I was not pleased with the result so I decided to fussy-cut the flowers out and adhere to the card.   This is another example of how a mistake can be used later in another way :-) 

Use the Big Shot™ with the Framed Tulips Textured Impressions™ Embossing Folder to emboss a piece of Basic Black cardstock.  Adhere to a piece of Strawberry Slush cardstock and mount onto the Whisper White card base.

Add the embossed Whisper White panel (using the Large Scallop Framelit and Delicate Designs "Lace"Textured Impressions™ Embossing Folder) and the embossed Pistachio Pudding panel. 

Stamp the script image from Notable Notions using Cool Cabana Classic Ink onto a piece of Whisper White cardstock.  Create the leaves from Pistachio Pudding cardstock with the Bird Builder Punch and add along with the watercolored flowers to the focal panel.

Stamp the sentiment from Wetlands using Cool Cabana Classic Ink onto Whisper White cardstock and punch out with the Large Oval Punch.  Layer Strawberry Slush cardstock behind the sentiment and add to finish off the card.

Stamp Sets:  Flower Shop, Notable Notions, Wetlands

Ink: Baked Brown Sugar, Cool Cabana, Crisp Cantaloupe, Strawberry Slush, Stampin’ Write Early Espresso marker

Paper: Whisper White, Basic Black, Strawberry Slush, Pistachio Pudding

Accessories:  Big Shot™, Framed Tulips, Fancy Fan and Delicate Designs (Lace) Textured Impressions™ Embossing Folders, Large Oval Punch  

Thanks again for stopping by- I hope all of you have a wonderful day!

SUO73 Patriotic Sunflower

Hi Stampers! 

The Stampin’ Up! Only Challenges theme for the SUO73 Challenge is Patriotic Projects and I decided to create my own flag using the Sunflower Background stamp.  I hope you can take the time to check out all of the details and the other Design Team creations and play along with us!

To create this card:

Use the Big Shot™ with the Woodgrain Textured Impressions™ Embossing Folder to emboss a piece of Whisper White and Midnight Muse cardstock for the background layers.  Using a Sponge Dauber, apply Sahara Sand Classic Ink onto the Whisper White embossed layer.  

Add the layers to a piece of Cherry Cobbler cardstock and adhere to the Whisper White card base.   Add a strip of Cherry Cobbler cardstock over the rough edges of the embossed panels. 

Using Stampin’ Write Markers color the flag image directly onto the Sunflower Background Stamp – Midnight Muse, Cherry Cobbler and Sahara Sand.  Stamp the image onto Whisper White cardstock and carefully cut out the Sunflower image.

Stamp the sentiment using Midnight Muse Classic Ink onto Whisper White cardstock, sponge a bit of Sahara Sand Classic ink onto the edges and punch out with the 1 ¾” Circle Punch.  Layer onto Cherry Cobbler cardstock (create the layer by punching another circle with the 1 ¾” Circle Punch, cut in half and layer so the edges peek out from the original circle). 

Adhere the sentiment layer to the center of the Sunflower image, adhere to the card front and add the 3/8” Midnight Muse Satin Ribbon bow along with the Pearls to finish off the card.

Stamp Sets:  Sunflower (background), Trust God

Ink: Sahara Sand, Midnight Muse; Stampin’ Write Markers- Sahara Sand, Cherry Cobbler, Midnight Muse

Paper/Cardstock: Whisper White, Cherry Cobbler, Midnight Muse

Accessories:  Big Shot™, Woodgrain Textured Impression ™ Embossing Folder, 1 ¾” Circle Punch, 3/8” Midnight Muse Stitched Satin Ribbon, Pearls


Thanks again for visiting!  I hope you will take the time to join us for the Patriotic Project Challenge at SUO Challenges!!

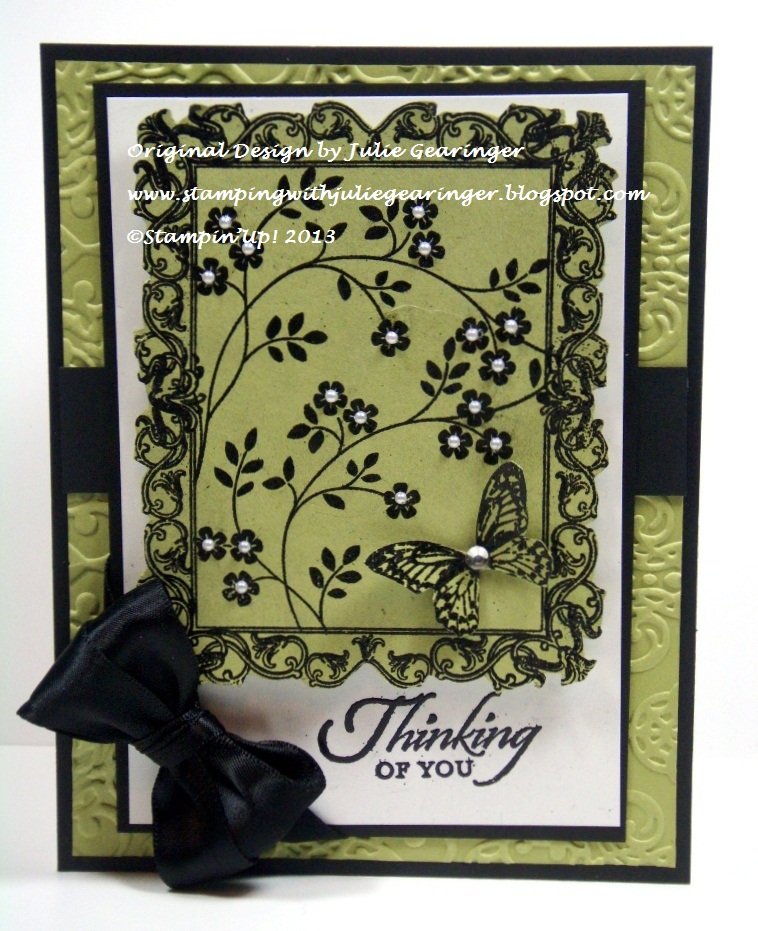
Thinking of You- Two Challenges in One


Hi Stampers!

I wanted to create a card for this week’s DD57 Dynamic Duos Color Challenge and The Paper Players PP150CAS Add the Bling Challenge.  I love both of these weekly challenge sites and if you have not had a chance to do so, plan to visit each of them to see their wonderful Design Team samples as well as the other entries!

To create this card:

Using the Embossing Buddy®, de-static a piece of Pear Pizzazz cardstock and stamp the frame image and butterfly (on a separate piece of cardstock) from Papaya Collage using Versamark™ ink.  Apply Stampin’ Emboss® Black Embossing Powder and heat with the Heat Tool.   

Once cooled, mask the frame with sticky notes and repeat the above process with the floral spray image from Thoughts and Prayers.

On a piece of Whisper White cardstock, de-static and emboss the sentiment using the above steps as well.

Carefully cut out the frame and mount above the sentiment using Stampin’ Dimensionals®.

Add the fussy-cut butterfly along with the Rhinestone and Pearls to the center of the flowers.

Adhere the entire panel onto Basic Black cardstock and add the 5/8” Basic Black Satin Ribbon bow.

Use the Big Shot™ to emboss a piece of Pear Pizzazz cardstock with the retired Lacy Brocade Textured Impressions™ Embossing Folder and layer onto Basic Black cardstock.  Add the vertical Basic Black cardstock panel and the main focal image to finish off the card.

Stamp Sets: Papaya Collage, Thoughts & Prayers, Wetlands
Ink: Versamark™
Paper/Cardstock:  Whisper White, Basic Black, Pear Pizzazz
Accessories:  Big Shot™,  Lacy Brocade Textured Impressions™ Embossing Folder (retired), Embossing Buddy®, Stampin’ Write® Black Embossing Powder, Heat Tool, Pearls, Rhinestone, 5/8” Basic Black Satin Ribbon (retired)

Thanks again for visiting- I hope all of you have a wonderful Tuesday!!

Monday, June 17, 2013

2013-2015 In Colors- A Quick, Easy Card :-)


Hi Stampers!!

Here is another card that I created this past weekend using the FabFri20 Color Challenge- all of the 2013-2015 In –Colors along with three neutrals- Smoky Slate (also new this year), Basic Black and Whisper White. 

If you have the time, check out the Fab Friday site - they have a terrific Design Team not to mention, all of the other gorgeous entries using these fabulous colors!!


To create this card:

Ink the small panel stamp from Lovely Romance with all of the new 2013-2015 In Colors- Brown Sugar, Cool Cabana, Crisp Cantaloupe, Pistachio Pudding and Strawberry Slush  onto Whisper White cardstock. 
Carefully cut each panel out with a trimmer or by hand and mount using Stampin’ Dimensionals® onto a piece of embossed Whisper White cardstock (I used the Big Shot™ and the Square Lattice Textured Impressions™ Embossing Folder that I had in my scrap bag :-)).

Mount this panel onto a piece of Cool Cabana and again onto a piece of Whisper White cardstock and then onto Basic Black cardstock.

Add the 5/8” Basic Black Satin Ribbon bow and adhere using Stampin’ Dimensionals® onto a piece of embossed Smoky Slate cardstock (I had also previously embossed this panel with the Fancy Fan EF).

Mount the entire panel onto Basic Black cardstock and then onto the Whisper White card base.  Add the sentiment with the Pearls to finish off this quick, easy card!

Stamp Sets:  Lovely Romance, Teeny Tiny Wishes

Ink: Brown Sugar, Cool Cabana, Crisp Cantaloupe, Pistachio Pudding, Strawberry Slush

Paper: Whisper White, Cool Cabana, Smoky Slate, Basic Black

Accessories:  Big Shot™, Square Lattice and Fancy Fan Textured Impressions™ Embossing Folders, Word Window and Modern Label Punches, Pearls, 5/8” Basic Black Satin Ribbon (retired)


Thanks again for visiting- I hope you enjoy this card using our wonderful new In-Colors!!

Blessing My Life- A CAS Sketch with a bit of Romance :-)

Hi Stampers!!

I was able to spend quite a bit of time stamping this weekend but was unable to finish the cards until late last night :-).   For this card, I decided to use the #28 Sketch from CAS Colours and Sketches (check out their site and the other entries- great inspiration!) along with some of our new In-Colors.   

To create this card:

Ink the small panel stamp from Lovely Romance with Brown Sugar Classic Ink and stamp a few of the images onto Whisper White cardstock.  Repeat the steps using Crisp Cantaloupe, Pistachio Pudding and Strawberry Slush Classic Ink. 

Cut the “panels” out and adhere onto Baked Brown Sugar cardstock for the vertical and horizontal parts of the sketch layout.  Add the Pistachio Pudding strips to clean finish the edges and emboss with the Big Shot™ and the Square Lattice Textured Impressions™ Embossing Folder.

Create the Crisp Cantaloupe flower- created with the Blossom Punch, Pansy Punch and the Rolled Flower (from the 1 ¼” Scallop Circle Punch) with a Pearl in the center. I had a scrap piece of Crisp Cantaloupe cardstock that had been previously stamped with the floral spray image from Blooming with Kindness and used that cardstock for the Pansy Flower layer.

Stamp the sentiment using Strawberry Slush Classic Ink onto Vellum, cut the banner points by hand and adhere to the card front.  Add the punched flower and layer the entire card front onto the Pistachio Pudding card base to finish off the card.

Stamp Sets:  Blessings from Heaven, Lovely Romance, Blooming with Kindness

Ink: Brown Sugar, Crisp Cantaloupe, Pistachio Pudding, Strawberry Slush

Paper: Whisper White, Brown Sugar, Crisp Cantaloupe, Pistachio Pudding, Vellum

Accessories:  Big Shot™ , Square Lattice Textured Impressions™ Embossing Folder, Punches- Blossom, Pansy, 1 ¼” Scallop Circle, Pearl.


Thanks again for stopping by- if you have a chance to visit again soon, I will be posting a few more cards throughout the day!!  I hope you have a fabulous Monday- God Bless!!!

Thinking of You- A Day at the Beach


Hi Stampers!!


I wanted to use the new stamp set, Wetlands to create a card using the CCMC256 Create withConnie and Mary Color Challenge along with Freshly Made Sketches FMS90Challenge (if you have a chance, take the time to visit each site and check out their great designs)!!


This card was fairly quick to create:

Using the 1 ¼” Circle Punch, punch out a mask from scrap paper and position the circle portion onto a piece of Whisper White cardstock (for the moon/sun).   Use the AquaPainter™ to pick up some ink from the Summer Starfruit Classic Ink pad and loosely apply to the sky portion, add a bit of Island Indigo for the ocean and just a hint of Early Espresso (very diluted) for the sand area.

Blot the wet ink dry with a paper towel and allow to scene to dry completely before stamping the sentiment and bird image using Early Espresso Classic Ink. Use the Early Espresso Stampin’ Write marker to add a few flying birds by hand and also add a bit of spritzing with the retired Color Spritzer Tool to give the illusion of the beach.

Adhere the entire panel onto Early Espresso cardstock and add the photo corners using the retired Photo Corner Punch, along with the Vintage Trinket Brad in the corner.

Create the background Designer Series Paper (DSP) panel by adhering a piece of the Subway Soho Designer Series Paper (I used the NY Map image) onto a piece of Early Espresso cardstock, mount onto a layer of Island Indigo cardstock and then again onto another Early Espresso cardstock layer before adding to your card base.

Create the vertical panel of using Early Espresso cardstock with a strip of the Summer Starfruit and Island Indigo DSP from the Soho Subway DSP pack- I love these designs in this DSP- great for masculine or feminine cards!!

Ink the starfish and sand dollar image from By The Seashore with Early Espresso and stamp onto Whisper White cardstock.  Carefully cut out and sponge Summer Starfruit and Island Indigo Classic Ink onto each image.

Adhere the focal image along with the starfish with the sand dollar images using Stampin’ Dimensionals® to finish of this quick, easy card!

Stamp Sets:  Wetlands, By The Seashore

Ink: Early Espresso, Island Indigo, Summer Starfruit, Stampin’ Write Marker- Early Espresso

Paper: Whisper White, Early Espresso, Island Indigo, Soho Subway Designer Series Paper

Accessories:  AquaPainter™, Color Spritzer Tool (retired),  1 ¼” Circle Punch (for mask), retired Photo Corner Punch, Vintage Trinket Brad, Sponge Daubers


Thanks again for stopping by – I will be posting more cards later today and hope you visit again soon!! 
Related Posts Plugin for WordPress, Blogger...