Thursday, November 13, 2014

MIX93 Friend to Friend- Together Again

 Hi Stampers!!

This has been another busy doctor appointment week for my hubby and I – my hubby had his first chemo treatment on Tuesday, and so far, so good (he has not had adverse side effects yet- Praise the Lord!)

Recently I have been experimenting with mixed media, so I decided to play with some of my new “goodies” last night and created two different cards using a similar color palette.  

I will be posting the two projects in separate posts and I was inspired by the Mix-Ability MIX93 Challenge at Splitcoaststampers- we were encouraged to check out France Papillon's site to be inspired :-)
  
I hope you have a chance to check out all MIX93 gallery- such inspiration from all!

The panels for both cards were created using similar colors and techniques- here are the steps to create both background panels:

On your piece of cardstock, apply a coat of Gesso and allow it to dry completely (you can use a Heat Tool to speed up the drying process).  

NOTE- I used a cardstock that is quite a bit heavier than Whisper White and it has a bit of a sheen to the finish- I received a large amount of this cardstock free from my last employer (it was "Over" from an old print job) and do not know the name of the manufacturer… I would definitely recommend Watercolor Paper or Natural White  (versus Whisper White) due to the amount of water used throughout the background process…

Once the Gesso has dried, apply Faber-Castell Gelatos™ to your craft mat (I used Cotton Candy and Guava)- spritz  water onto the Gelatos™ and mix together with your fingers (yes, this is a messy project but oh, so much fun)! 

Lay the Gesso background onto the mat and pull up- allow the Gelatos™ to spread around and dry with the Heat Tool.

Clean your craft mat and apply Ranger® Tim Holtz® Distress Stains to the craft mat- I used Chipped Sapphire, Salty Ocean, Peacock Feathers and Dusty Concord (I applied them to the mat close together but separate).  Spritz with water and lay the background panel onto the colors, twisting and picking up.  Again, allow the stains to swirl around, laying the panel down again for more color as needed- dry with Heat Tool.

Add some dimension with stencils and Gesso – dry with the Heat Tool (this layer will not be evident except when you look at the card from different angles). 

Add drops of Adirondack® Jim Holtz® Alcohol Inks directly to the background- I used Eggplant, Latte, Denim, Mixative Copper and Mixative Silver- spritz with water and rotate the background panel to allow the inks to swirl and merge together, dry with the Heat Tool (the ink will spread a bit more with the air from the Heat Tool), apply more drops and keep building up the background as desired. 

Once you are satisfied with the background layer (I wanted to mimic a stone wall), ink the retired background stamp, French Script with Elegant Eggplant Classic Ink.  Lay the panel onto the background stamp (with the background stamp face up on the table) and lightly press certain areas onto the stamp to give a sporadically stamped appearance.

Use the stencil with Gesso (I used my finger) and apply Gesso to a few areas with the various stencils and dry with the Heat Tool.

Use the Distressing Tool to distress the edges and sponge Ranger® Tim Holtz® Tea Dye Distress Stain over the edges to “antique” the white part of the paper.

To create the first card:

Use the Distressing Tool to distress a piece of Blackberry Bliss cardstock, mount onto the card base (again, I used the same heavier weight of cardstock that was used for the background panel) and use a Sponge Dauber to add Ranger® Tim Holtz® Tea Dye Distress Stain to the white areas of the card base.

Mount the distressed, ink background panel to the card front.
Using My Digital Studio (MDS), insert the Postage Due and Teeny Tiny Wishes stamp brush images into a blank document and resize (I had both of these already pre-printed in my stash).  I printed both of these out onto the same type of cardstock as noted above for the background panel.

Color the Postage Due using Ranger® Tim Holtz® Distress Stains – again, apply to the craft mat and lay the image into the stains, lift and dry with the Heat Tool.  Apply a bit of the Adirondack® Jim Holtz® Alcohol Inks – Mixative Copper, distress the edges and sponge Ranger® Tim Holtz® Tea Dye Distress Stain over the edges to “antique” the white part of the paper.

Mount the panel onto a piece of Blackberry Bliss cardstock, distress the edges of the Blackberry Bliss using the Distressing Tool and add the 3/8” Blackberry Bliss Stitched Satin Ribbon with the metal “Together” Embellishment (this was part of a scrapbooking kit from years ago- again in my stash).

Add the Postage Due focal image to the card front using Stampin’ Dimensionals®, insert the Paper Studio clock embellishment below the ribbon detail on the focal image and mount the lower part of the clock using Stampin’ Dimensionals®. 

Create the rolled flowers using Blackberry Bliss cardstock and Scallop Circle Punches-one each using the 2 ⅜” , 1 ¾” and 1 ¼” Scallop Circle Punches.  Hand cut a spiral from the outside edge of the scallop toward the center of the cardstock, scrunch the cardstock to break up the fibers and hand roll the flowers and adhere to the center of each scallop (I used Hot Glue to hold the flowers together)- here is a basic tutorial using Designer Series Paper (DSP)- I have found that cardstock makes a sturdier flower :-)

 Using your finger, lightly apply Gesso to the flowers and use the Faber-Castell™ Pitt Copper 252 Artist Pen to the petals to add a bit of metallic and mount the flowers onto the card front (again, I used Hot Glue).

Cut the sentiment apart, sponge a bit of Ranger® Tim Holtz® Tea Dye Distress Stain to distress the paper and mount to the card front using Stampin’ Dimensionals® to finish off the card.

Stamp Sets:  Postage Due, Teeny Tiny Wishes- both MDS versions, French Script (retired background)

Ink: Faber-Castell Gelatos™, Faber-Castell Pitt Pen- Copper 252, Ranger® Tim Holtz® Distress Stains, Adirondack® Jim Holtz® Alcohol Inks

Paper: Blackberry Bliss, misc. cardstock (from my stash)

Accessories: Gesso, Stencils, Distressing Tool, Sponge Dauber, Craft Mat, 3/8” Blackberry Bliss Stitched Satin Ribbon, Metal Embellishments- Clock- Paper Studio, Together- not sure of manufacturer, Scallop Circle Punches- 2 ⅜”, 1 ¾”, 1 ¼”


Thanks again for taking the time to visit- you are all such an encouragement to me!!  I will post the second card along with a few more of the HYCCT challenge cards later this evening – have a fabulous Friday!!

Tuesday, November 11, 2014

HYCCT1411 Friendship is A Journey

Hi Stampers! 

Here is another card that I created for the Hope You Can Cling To Challenge (HYCCT)  atSplitcoaststampers this past week. 

This card was created for the HYCCT1411 philsmom aka Fran’s  “Chicks Stick Together”  Challenge - (see the gallery here and the details here) along with the Splitcoaststampers SC450 Sketch (I love this versatile sketch). 
 

To create this card:

Ink the main stamp from Friendship’s Journey using Memento™ Tuxedo Black Ink onto Whisper White cardstock and color using the AquaPainter™ with Stampin’ Up! Watercolor pencils.

Add distressing using a Sponge Dauber with Baked Brown Sugar Classic Ink and also stamp the large splatter stamp from Gorgeous Grunge using Baked Brown Sugar Classic Ink.  Use the Distressing Tool to distress the edges of the panel.
 
Sew the stamped panel onto a piece of Elegant Eggplant cardstock and distress the edges of the Elegant Eggplant layer with the Distressing Tool.

Use the Distressing Tool to distress the card base layer of Elegant Eggplant and a piece of retired Domestic Goddess Designer Series Paper (DSP).  Use the sewing machine to adhere the layers together and add the 1 ½” Satin Ribbon.  

Mount the sewn background layer onto the Whisper White card base and add “antiquing” using a Sponge Dauber with Baked Brown Sugar Classic Ink along the edges
Distress the So Saffron DSP panel from the retired Tea Party DSP and sew onto a panel of Elegant Eggplant cardstock.  Distress the Elegant Eggplant layer as well and sponge Baked Brown Sugar Classic Ink over the edges and paper to add a bit of “antiquing”.

Adhere the So Saffron panel to the card front and add the stamped focal image using Stampin’ Dimensionals®. 

Stamp the image using Memento™ Tuxedo Black Ink onto Whisper White cardstock, create the banner points using the Hexagon Punch and add distressing using a Sponge Dauber with Baked Brown Sugar Classic Ink as well as the splatter stamp from Gorgeous Grunge.

Add the sentiment to the card front using Stampin’ Dimensionals® and mount the retired Elegant Eggplant button to finish off the card.

 Stamp Sets: Friendship’s Journey, Gorgeous Grunge

Ink: Memento™ Tuxedo Black Ink, Baked Brown Sugar; Stampin’ Up! Watercolor Pencils

Paper: Whisper White, Elegant Eggplant, retired DSP- Domestic Goddess and Tea Party

Accessories: Distressing Tool, Sponge Dauber, AquaPainter™, Sewing Machine, retired Elegant Eggplant button, 1 ½” Wide Satin Ribbon (from my stash)

 Thanks again for looking- my husband will be having his first chemo treatment tomorrow, so I am planning on sharing a few more of the HYCCT challenge cards tomorrow evening (as well as throughout the next few weeks).  I hope you have a fabulous Tuesday!!

Monday, November 10, 2014

HYCCT1410 I’m Here For You

Hi Again Stampers!

Here is another card created for the Splitcoaststampers HopeYou Can Cling To Annual Card drive- this Clean and Simple (CAS) card was created for HYCCT1410 Ashjoy aka Joyce’s  “Something’s Missing”  Challenge - (see the gallery here and the details here).

I used the reverse image of the die cut, plus no stamps since the sentiment was from My Digital Studio (in my stash). 

To create this card:

Use the Big Shot™ with the Leafy Branch Die (non SU!)  to cut a piece of Basic Black cardstock.

Add the ¾” Black Satin Ribbon strip at the top of the card front and mount the entire panel onto the Whisper White card base.

Add the sentiment (previously printed from My Digital Studio) to the card front.

Add the double ribbon Gingham bow to finish off the card.

Stamp Sets: Friends 24-7 (MDS version)

Ink: Printer Ink- Black

Paper: Whisper White, Basic Black

Accessories: Big Shot™, Leafy Branch Die (Impression Obsession), 1 3/8” Circle Punch, Satin and Gingham Ribbon (from my stash)

Thanks again for stopping by to visit- I will be sharing more of the HYCCT Challenge cards throughout the next few weeks :-)

HYCCT1409 Stressed is Dessert Spelled Backwards :-)


Yea- I was able to create one card per challenge for the Splitcoaststampers Hope You Can Cling To (HYCCT) Annual Card drive!   It was so much fun to pull out quite a few of my retired sets and give them some “love” for such a worthy cause:-)


This card was created for HYCCT1409 CAKath aka Kathy’s  “Laughter is the Best Medicine”  Challenge - (see the gallery here and the details here) along with The Splitcoaststampers SC450 Sketch.
  
To create this card:

Ink the focal image using Memento™ Tuxedo Black Ink onto Very Vanilla cardstock. 
Color the image using the Stampin’ Up! watercolor pencils along with the AquaPainter™.  Trim the panel and mount onto Chocolate Chip cardstock.

Use the Big Shot™ along with the Fancy Fan Textured Impressions™ Embossing Folder to emboss a piece of Blushing Bride Designer Series Paper (DSP) and mount onto the Chocolate Chip card front.

Create a vertical panel from Blushing Bride DSP onto Chocolate Chip cardstock and mount onto the card front.

Ink the sentiment using Stampin’ Write markers- Chocolate Chip and Cherry Cobbler.  Trim the panel, mount onto Chocolate Chip cardstock, mount onto a piece of Cherry Cobbler DSP and mount onto a scrap piece of Chocolate Chip cardstock.

Mount the sentiment flush onto the card front and add the focal image using Stampin’ Dimensionals®.

Add the small strip of Blushing Bride cardstock to the center of a retired Cherry Cobbler button- add to the card front to finish off the card.

 Stamp Sets: Hang In There

Ink:  Memento™ Tuxedo Black Ink; Stampin’ Write Markers- Cherry Cobbler, Chocolate Chip; Stampin’ Up! Watercolor Pencils

Paper: Very Vanilla, Chocolate Chip, retired Cherry Cobbler Designer Series Paper

Accessories: Big Shot™, Fancy Fan Textured Impressions™ Embossing Folder, retired Cherry Cobbler button


Thanks for visiting- I will be posting more of the HYCCT Challenge cards over the next few weeks :-)  Hope you have a wonderful week and stop back again soon!! 

Saturday, November 8, 2014

VSNDEC14MINI2 Merry Christmas Deer

Hi Again Stampers!

This card was created for the VSNDEC14MINI2 Challenge for the mini Virtual Stamp Night “Frozen” at Splitcoaststampers.  One of the rules is that you only have one hour to complete your project and you need to be a Splitcoaststampers Fan Club member (this helps to support the best website for stampers) :-) !

To create this card:

Ink the branch image from Beauty of the Season using Memento™ Tuxedo Black Ink and stamp repeatedly onto a piece of Whisper White cardstock.  Darken the branches and color with berries with a Stampin’ Up! Watercolor Pencil. 

Use the Basic Black Stampin’ Write marker to color the dear and tree line on the main deer stamp from the retired set, Noble Deer and stamp near the branches previously stamped in the above step. 

Add a bit of shadows to the snow area with the Black Stampin’ Up! Watercolor pencil and dilute slightly with the AquaPainter™.

Use the Basic Black Stampin’ Write marker to add the horizon line and additional pen lines for the fur on the deer.

Use the Big Shot™ to cut out the image with the Ovals Collection Framelits™ also cutting the same size oval from Cherry Cobbler and Basic Black cardstock.  Cut both the Cherry Cobbler and Basic Black ovals in half and adhere behind the focal image.
Use the Big Shot™ with the Northern Flurry Textured Impressions™ Embossing Folder to emboss a piece of Whisper White cardstock, trim the panel and mount onto a piece of Cherry Cobbler cardstock, trim and mount onto the Basic Black card base and add the focal image using Stampin’ Dimensionals®.

Stamp the sentiment using Memento™ Tuxedo Black Ink onto Whisper White cardstock and create the banner points using the Hexagon Punch.  Layer onto a piece of Cherry Cobbler cardstock, trim and create the points with the Hexagon Punch- repeat the steps again with Basic Black cardstock.

Add the sentiment along with the Rhinestones to finish off the card.

Stamp Sets: Noble Deer, Christmas Greetings

Ink:  Memento™ Tuxedo Black Ink; Stampin’ Up! Black and Burgundy Watercolor Pencil

Paper: Basic Black, Cherry Cobbler, Whisper White

Accessories: Big Shot™, Northern Flurry Textured Impressions™ Embossing Folder, Ovals Collection Framelits™, Hexagon Punch, AquaPainter™, Rhinestones    

Thanks again for visiting- I hope you have a wonderful weekend!!

Friday, November 7, 2014

VSNDEC14MINI1 Have a N-ICE Day!!

Hi Stampers!

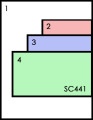
This card was created for the mini Virtual Stamp Night “Frozen” VSNDEC14Mini1 Challenge to use ice cubes at Splitcoaststampers and I decided to incorporate the Splitcoaststampers SC441 Sketch.  

To create this card:

I do not own any ice cube stamps, so I improvised by drawing a quick ice cube image by hand, scanned and saved the image as a pdf, then inserted the photo into My Digital Studio (MDS).  I add the Cute Cat stamp brush image and placed it on top of the ice cube, then typed the sentiment using a standard font.


Stamp Sets: Cute Cats, Ice Cube (original art), sentiment using Text in MDS

Ink:  Printer Ink- Black; Stampin’ Up! Black Watercolor Pencil

Paper: Basic Black, Basic Gray, Whisper White, All is Calm Specialty DSP

Accessories: Rhinestones

Thanks again for visiting- I hope you have a N-ICE day and weekend!!

Thursday, November 6, 2014

HYCCT1408 My Hero, My Husband :-)

Hi Stampers!

Woohoo!!  It was alot of work (since I started on October 31st vs. October 1st) but I have finished all of the 35 of the Splitcoaststampers Hope You Can Cling To Challenges (HYCCT) to promote Breast Cancer Awareness and create cards to encourage those with cancer and their families. 

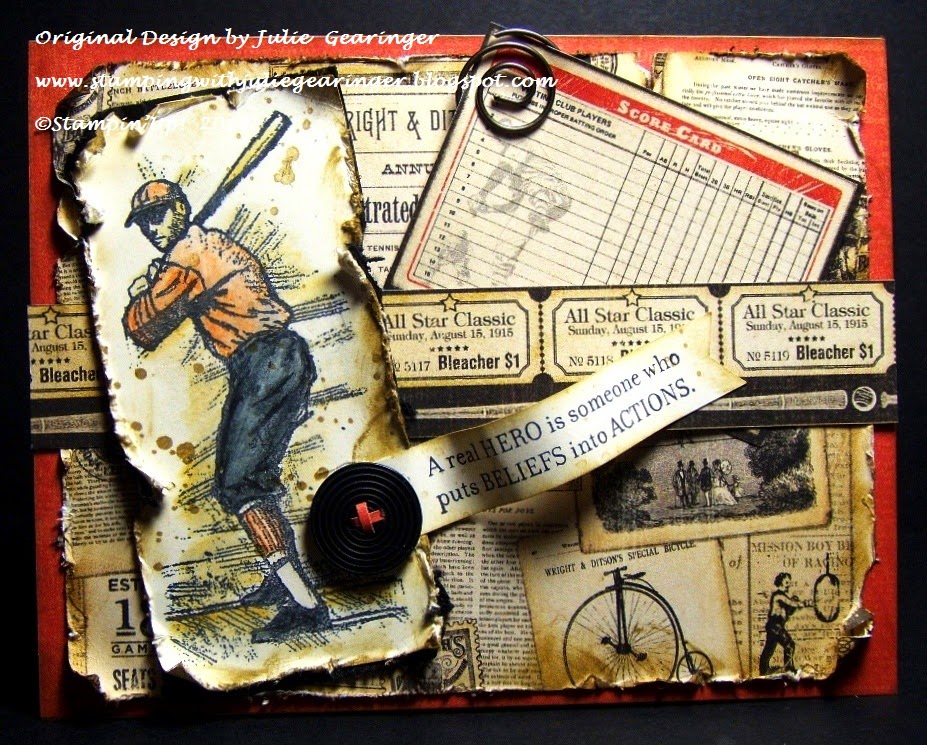
This card was created for bkfinlay aka Bridget’s HYCCT1408 “My Hero” Challenge - (see the gallery here and the details here) along with The Paper Players PP220 Vintage challenge.  

I have many “heroes” in my life- first and foremost for me is my Lord and Savior, Jesus Christ! I can never forget, or be thankful enough, for His sacrifice on the cross for my sins and the free gift of salvation.   I also feel that the men and women who serve our country in the armed forces are heroes along with our police, fire, doctors, pastors, nurses, teachers and others in public service.  Of course, I cannot forget my parents (my Mother has been with the Lord for over 20 years and I am fortunate that my Father is still alive), but I chose to make this card in honor of my "hero" husband, Dave. 

Dave and I have been together almost 32 years and he still loves me unconditionally (amazing, huh? :-))  He is the best husband in the world, faithful to the Lord, his wife and his job (he has been with the same company for 43 ½ years – through two mergers in the last nine years) and starting next week, he will have to undergo chemotherapy for a rare form of non-Hodgkin’s lymphoma.

Dave loves sports, especially baseball (the Orioles and Nationals-he is a “hometown boy”) so I decided to pull out one of my favorite masculine retired sets, Take Me Out to the Ballgame along with paper from Graphic 45's Good Ol' Sport Collection to create this card in Dave’s honor.

Again, I hope you will find the time to check out the links above- the Splitcoaststampers HYCCT "Hope You Can Cling To" Challenge is a yearly one and next year, I hope I can start creating when the challenge starts on the 1st of the month (versus waiting until the end of the month- it could not be helped this year due to the tests, etc. that Dave had to have in October). 

To create this card:

Ink the batter image using Memento™ Tuxedo Black Ink onto a piece of Very Vanilla cardstock.   Color the image using Stampin’ Up! watercolor pencils and dilute using an AquaPainter™.

Use the Distressing Tool to distress the edges and use a Sponge Dauber to apply Baked Brown Sugar Classic Ink to “antique” the paper and edges.  Stamp the Gorgeous Grunge splatter stamp using Baked Brown Sugar to add additional distressing.

Mount the distressed panel onto a piece of Basic Black cardstock and use the Distressing Tool to distress the edges and “match” the stamped image.

Mount a piece of Graphic45 Good Ol’ Sport background paper (I used an Orange piece for the Orioles theme) to the Basic Black card base. 

Distress the edges of the Good Ol’ Sport newsprint paper with the Distressing Tool (be careful, the tool can tear the paper a bit too much) and use the Baked Brown Sugar Classic Ink in the same manner as the focal image to add a bit more distressing.  

Mount the distressed newsprint panel onto the card front and add the ticket stub strip (adhering the ticket stub strip on the ends only).

Stamp the sentiment from Service and Sacrifice using Memento™ Tuxedo Black Ink onto Very Vanilla cardstock, create the banner points using the Hexagon Punch and sponge the edges with Baked Brown Sugar Classic Ink .

Insert the Graphic45 cut-a-way along with the retired Antique Pewter Hodgepodge Hardware spiral clip (this comes out of the band and I adhered a little note on the back as well as milestones for us on the front:-)).

Add the focal image to the card front and mount the sentiment along with the Basic Black button (retired Neutrals Collection).

Stamp Sets: Take Me Out to the Ballgame, Courage and Sacrifice, Gorgeous Grunge

Ink:  Baked Brown Sugar, Memento™ Tuxedo Black Ink; Stampin’ Up! Watercolor Pencils

Paper: Very Vanilla, Basic Black; Graphic 45 Good Ol’ Sport

Accessories: Distressing Tool, Sponge Dauber, Hexagon; retired Basic Black button

In order to make the deadline for the HYCCT uploads to the Splitcoaststampers gallery, I will be posting the cards to my gallery at Splitcoaststampers (here) and will update my blog later this week/weekend (I have 27 more cards to post and describe:-)).


Thanks again for visiting- you are all a blessing to me!!   I hope you have a chance to  personally thank the "heroes" in your life!!

Tuesday, November 4, 2014

SUO109 Count Your Blessings Blossom

Hi Stampers! 

This card was created for the new SUO109 “Thanks for Anything”Challenge and I decided to create a Clean and Simple (CAS) card that could easily be duplicated for any occasion. 

I hope that you will visit us at SUO-Challenges to check out the rest of the Design Team projects and join in on in on the fun with your Stampin’ Up! Only creations!

To create this CAS card:
Ink the Chalk Lines stamp using Bermuda Bay Classic Ink and stamp onto Whisper White cardstock. 
Stamp the sentiment from Gratitude for Days using Cajun Craze Classic Ink.
Trim the panel and mount onto Bermuda Bay cardstock, trim again and mount onto  the Cajun Craze card front.
Ink the flower stamp from Mixed Bunch using Cajun Craze Classic Ink and stamp onto Whisper White cardstock and punch out using the Blossom Punch.
Stamp the floral center using Crushed Curry Classic Ink onto Whisper White cardstock and punch out using the ¾” Circle Punch.  Adhere the center to the flower
and mount the flower onto the card front using Stampin’ Dimensionals®.
Add the Pearls to finish off the card.
Stamp Sets: Mixed Bunch, Gratitude for Days
Ink: Bermuda Bay, Cajun Craze, Crushed Curry
Paper/Cardstock:  Whisper White, Bermuda Bay, Cajun Craze
Accessories:  Punches- Blossom, ¾” Circle; Pearls

Thanks again for taking the time to stop by –I hope you have a chance to join in on our “Thankful forAnything” Challenge- have a wonderful week!!
Related Posts Plugin for WordPress, Blogger...