Showing posts with label Old-Fashioned Christmas (SNSS). Show all posts

Saturday, July 23, 2016

Christmas In July- One Layer Old Fashioned Christmas

Hi Friends! 

I hope all of you are having a great week so far!  We are still celebrating 
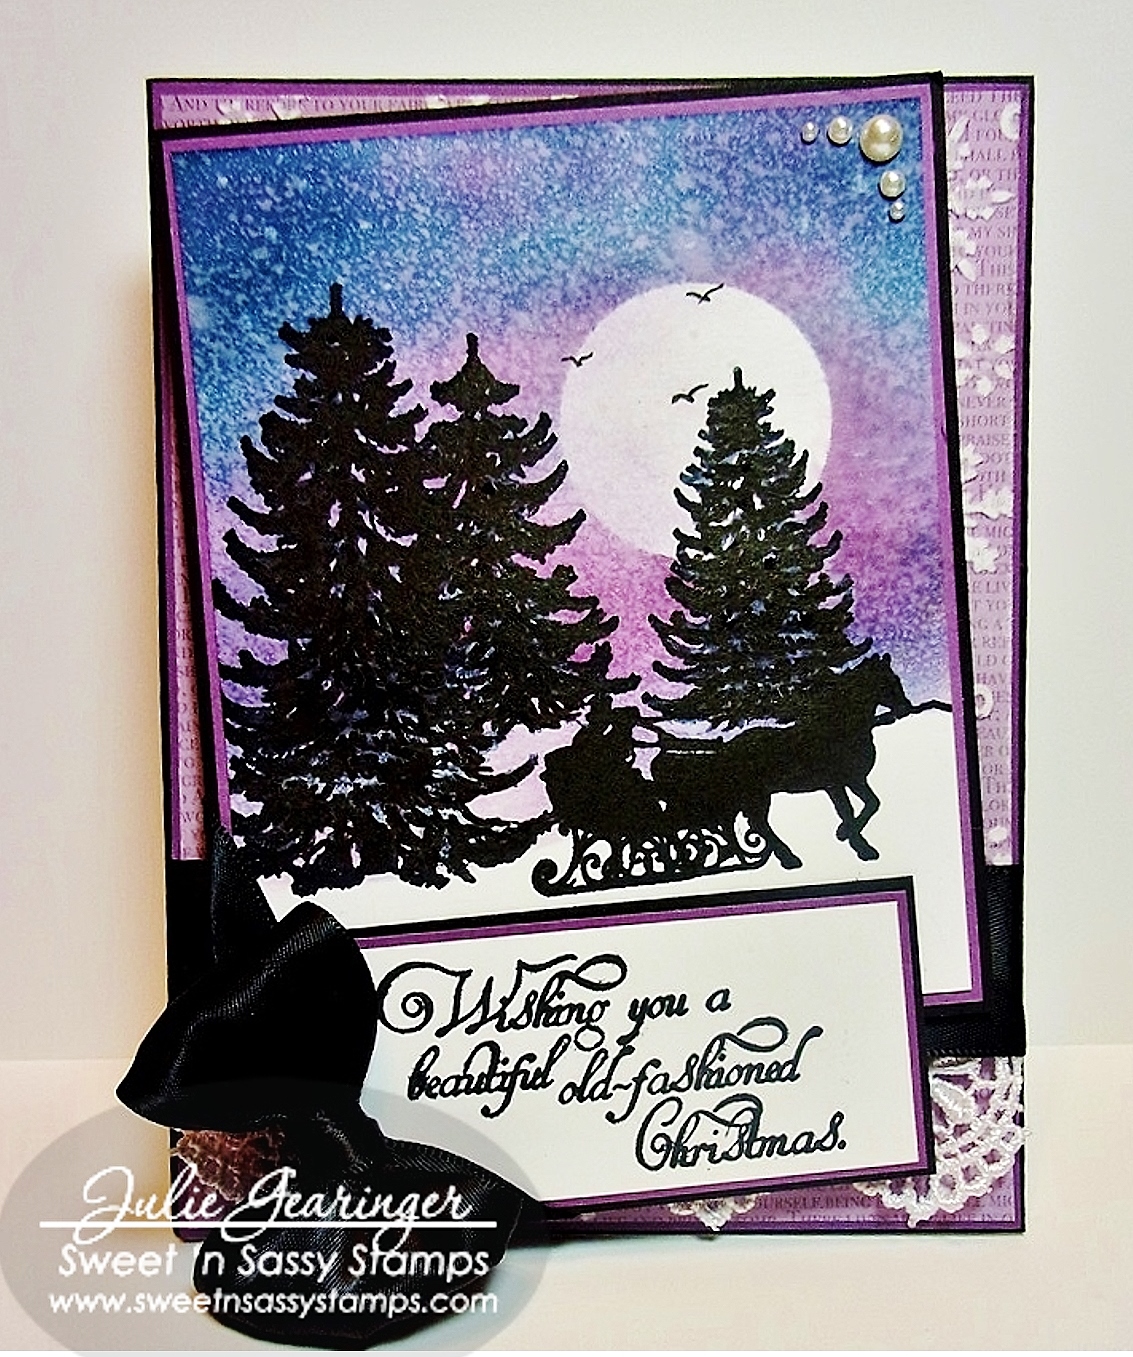
Christmas in July with Sweet ‘n Sassy Stamps blog hop and sale so I decided to try a One Layer Mixed Media card (in contrast to the vintage style card I posted yesterday) using the same stamp set,  Old-Fashioned Christmas.

I am linking this card to the One Layer Simplicity #OLS29 Christmas In July Challenge as well as the Splitcoaststampers  F4A355 “Christmas In July” Challenge.

 I love the versatility of the wonderful image and sentiments in the Old-Fashioned Christmas stamp set and by omitting the horse and carriage for this card, I was able to achieve a completely different look-don’t you agree?  

I also have been inspired by Heather Telford and Michele “Mimi” Jourdain over the years and tried a few of their techniques for this card.

To create this card:

Score and fold a piece of 4 ¼” x 11” white cardstock in half, create a mask from scrap or sticky note paper for the snow bank on the horizon and sponged Tim Holtz® (TH) Picked Raspberry and Chipped Sapphire Distress Ink onto the “sky” area.

Remove the mask and re-positioned to sponge a bit of TH Chipped Sapphire Distress Ink for the foreground snow banks (using a water brush to blend the color).

Ink the trees only from the Old-Fashioned Christmas clear stamp set with TH Peeled Paint Distress Ink, stamp onto the sponged panel, re-ink the same trees again using TH Forest Moss Distress Ink and re-stamp over the first image (I used my MISTI® Tool for this step).

Use a water brush to blend some of the ink on the trees, add shadows with TH Stormy Sky Distress Ink along with a Speedball® Elegant Writer® Black Pen.

Using a Faber-Castell® Pitt Pen White Marker, add a few snowflakes over the background and add additional snowflakes with a fine paint brush and Titanium White Acrylic Paint.

Use an Embossing Buddy® to de-static the sentiment area, ink the sentiment from Old-Fashioned Christmas with Versamark™ Ink  and stamp onto the prepared surface. 

Apply Pewter Embossing Powder to the sentiment and heat set with the Heat Tool to finish off the card.

Stamp Sets:  Old-Fashioned Christmas (Sweet ‘n Sassy Stamps)

Ink: Versamark™, TH Distress Inks- Picked Raspberry, Chipped Sapphire, Stormy Sky, Peeled Paint, Forest Moss; Faber-Castell® White Pitt Pen Marker, Speedball® Elegant Writer® Black Pen

Paper/Cardstock: Extra Heavy Whisper White

Accessories/Tools: Sponge Applicators, Sticky Note Paper, AquaPainter™, Fine Tip Paintbrush, Embossing Buddy®, Pewter Embossing Powder, Heat Tool, MISTI®

I hope I have inspired you to start your Christmas cards and again, if you have not had a chance to join us yet, checkout our “Christmas In July” blog hop and sale!


Thanks again for stopping by- hugs and have a blessed week, my friends!


Friday, July 22, 2016

Old Fashioned Christmas in July


Hi Sweet Friends!

Woohoo!  Today we are celebrating “Christmas In July” with Sweet ‘n Sassy Stamps!  We have a fabulous blog hop for you with examples from our wonderful SNSS Creative Team showcasing some of the great Christmas stamps from Sweet ‘n Sassy Stamps!

I have included all of the participating SNSS Creative Team blogs at the end of this post- just simply click on their name to “hop” along in the blog hop. This same list will be on each person's blog, so no need to hit the back button. Just look for the next blog in the line-up and off you go!

Also, if you have the time, please be sure to leave a comment on each blog along the way ( in other words, give us some “love” :-)) and Sweet ‘n Sassy Stamps will be drawing a winner from all of the blog comments and that person will receive a FREE Christmas stamp set (in stock) of their choosing from the Sweet ‘n Sassy Stamps line!

And to make this weekend even sweeter, Sweet ‘n Sassy Stamps will be offering all of their Christmas stamps at 15% off through the weekend – when shopping, please add the code CMASJULY when you check out for the discount.

So woohoo!!  Time to celebrate Christmas in July and we hope we have inspired you to start on your Christmas cards :-)


I am using Old-Fashioned Christmas for the main images along with Parisian Postcard, Light of Christmas and Winter Blessings as well as the Ticket Dies for the tag sentiment.  

I think that the Old-Fashioned Christmas clear stamp is perfect for a "shabby chic"/vintage style cards as well as Clean and Simple cards and will share a simpler card in the future.  

To create this card:

Stamp the main focal image from Old-Fashioned Christmas onto vanilla cardstock using Walnut Stain Distress Ink, mask the snow banks with scrap paper and lightly sponge Tea Dye Distress Ink onto the “sky” area.

Ink and sporadically stamp the Light of Christmas stamp set with Walnut stain as well as the Parisian Postcard images and Winter Blessings snowflakes (masking the stamp image from Parisian Postcard before stamping the snowflakes).

Distress the edges with a distressing tool and ink, mount onto espresso cardstock (distressing the edges as well).

Add a bit of Clear Wink of Stella® to the snow banks (difficult to see in the photograph).

Ink the sentiment from Old-Fashioned Christmas along with snowflakes from Winter Blessings with Walnut Stain Distress Ink, stamp onto vanilla cardstock, die cut with the Ticket Dies and sponge with Tea Dye Distess Ink (also cut a Ticket Die from espresso cardstock, split in the middle and mount behind the stamped tag).

Add the tag to the distressed panel with dimensional foam, adhere the triple satin ribbon bow along with the ribbon and lace in the corner.

Mount onto the layered card front to finish off the card.

That's all there is to this card :-)  Alright, maybe not as simple as some but I did have a great time creating it!  Now, off to the blog hop- have a great time!!


Saturday, November 21, 2015

Wishing You An Old-Fashioned Christmas


Hello Friends!


If you have not already checked out the CAS-ual Chic CCC05 Challenge or Splitcoaststampers' CCC15 Christmas Card galleries yet, I would encourage you to do so- fabulous inspiration from all!

To create this card:

Use the Embossing Buddy® to de-static a piece of Very Vanilla cardstock, ink  the main  image from Old-Fashioned Christmas using Versamark™ Ink and stamp onto the prepared cardstock.

Apply Stampin’ Emboss® Gold Embossing Powder and heat set with the Heat Tool.

Once the embossing powder has cooled, ink the Winter Blessings stamp set using Ranger® Tim Holtz® Old Paper Distress Ink and stamp over the image.

Lightly wipe off the ink from the embossed image using a paper towel and add additional Ranger® Tim Holtz® Old Paper Distress Ink over the entire image to “antique the paper, trim and mount onto retired More Mustard cardstock, trim and mount onto Cherry Cobbler cardstock. 

Add the burgundy triple ribbon bow to the corner of the panel and adhere the Snowflake Elements wooden snowflake to the center of the bow (I “painted” the snowflake using a Metallic Gold Sharpie®).
Repeat the same steps as above for embossing and layering the sentiment panel.

Ink the Winter Blessings stamp set using Ranger® Tim Holtz® Old Paper Distress Ink and stamp onto another piece of Very Vanilla cardstock, add the strips of designer paper, distress the edges with a Distressing Tool and sew the panel with a zigzag stitch onto a piece of More Mustard cardstock.

“Antique” the panel with Ranger® Tim Holtz® Old Paper Distress Ink and mount the stitched panel onto the Cherry Cobbler card base.
Mount the focal image along with the sentiment using dimensional foam and add the Pearls to the center of the wooden snowflake and edges of the sentiment to finish off the card.

Ink: Versamark™, Ranger® Tim Holtz® Old Paper Distress Ink, Metallic Gold Sharpie® Marker

Paper: Very Vanilla, Cherry Cobbler, retired More Mustard; Misc. Designer Paper (from my stash)

Accessories:  Sewing Machine, Thread, Distressing Tool, Sponge Daubers, Embossing Buddy®, Heat Tool, Stampin’ Emboss® Gold Embossing Powder, 5/8” Burgundy Wired Ribbon (from my stash), Snowflake Elements, Pearls

Thanks again for taking the time to visit- hugs and have a blessed week, my friends!

Saturday, November 14, 2015

Old-Fashioned Christmas

Hello Friends!

We are still celebrating Sweet ‘n Sassy Stamps’ 8th Birthday all month long in November with lots of fun surprises!  You can check out all the details HERE!  

Don't forget to follow along on Instagram (@sweetnsassystamps) and Facebook for daily inspiration plus a few giveaways throughout the month!

This card was created with the Old-Fashioned Christmas stamp set featured as today’s "throwback" stamp set on the Sweet ‘n Sassy Stamps (SNSS) blog.

This is a very easy card to create using a masking technique- please see the step by step instructions on the SNSS blogpost.

Stamp Sets:  Old Fashioned Christmas

Ink: Versamark™, Stampin’ Up!- Perfect Plum, Wild Wisteria, Midnight Muse

Paper: Stampin’ Up! Whisper White, Basic Black, Perfect Plum; Perfect Plum Designer Series Paper (retired)

Accessories:  Big Shot™, Darice® Snowflake Embossing Folder, MISTI™, Sanding Block, 5/8” Black Satin Ribbon, Pearls, Micron™ Pen, Titanium White Acrylic Paint

Thanks again for stopping by- have a blessed weekend, my friends!
Related Posts Plugin for WordPress, Blogger...