Showing posts with label Ornamental Pine. Show all posts

Friday, December 15, 2017

The Curtain Call- December 15 {Pines}


Hi Friends!

Woohoo! Today I am the Guest Designer for the12/15 Curtain Call “Pines” Inspiration Challenge!   I am so honored to have won their recent Acorn Challenge and part of winning, you are invited to Guest Design.  

Also, this is the final challenge at The Curtain Challenge- I hope you will be able to join in on the fun!

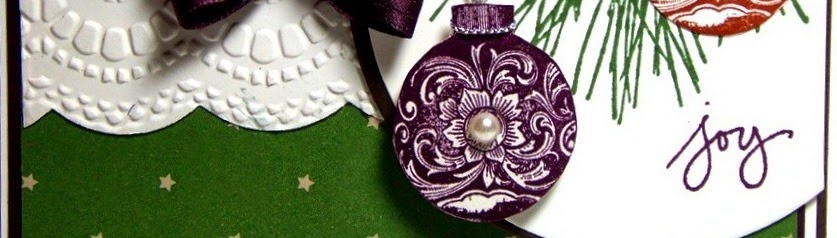
I decided to create a Clean and Simple (CAS) Mixed Media Christmas card- I love Christmas and did not have a chance to create a card this season with the retired Ornamental Pine stamp set (Stampin’ Up!).  

The Ornamental Pines stamp set is one of my favorite sets and I paired it with the retired Greetings of the Season stamp set (also SU!).


 If you have not had a chance to check out the Curtain Call or other challenge sites yet, I hope you will take the time to do so- gorgeous inspiration from the Design Teams as well as their galleries!
To create this card:

1). Ink the Ornamental Pine image using distress inks- Walnut Stain for the branch, Peeled Paint and Forest Moss for the pine needles, spritz lightly with water before stamping onto a piece of Whisper White cardstock.  Repeat the process for the pine needles on the corner and sprinkle a bit of water over the image. 

2). Once the stamped image has dried, die cut with the MFT Jumbo Stitched Fishtail STAX Dies.  Add additional pine needles using the edge of a bone folder using Peeled Paint Distress Ink along with a few branches using watercolor pencils.

3). De-static the die cut focal image with an embossing powder tool, stamp the sentiment from the Greetings of the Season stamp set with archival black ink (I had this ink on my desk, you could use Versamark™), apply gold embossing powder and heat set with a heat tool.

3). Die cut a piece of Whisper White cardstock using the largest die from the MFT Stitched A2 Rectangle STAX Set 1 Dies, mount onto a white card base.

4). Die cut a piece of designer paper with the MFT Horizontal Strip Dies, cut the die in half before mounting onto the card base.

5). Add the looped gold cord to the card front before mounting the die cut focal image panel with dimensional foam.

6). Finish off the card by adding “snow” with an extra fine white paint pen, a few clear sequins (with a hint of pink) and a few drops of white gloss Nuvo™ Crystal Drops.

Stamp Sets: Ornamental Pine, Greetings of the Season (both retired Stampin’ Up!)

Ink/Mediums: Versafine™ Onyx Black, Tim Holtz® Distress Ink- Walnut Stain, Peeled Paint, Forest Moss; Dark Green Watercolor Pencils, Sharpie® Extra Fine White Paint Pen, Nuvo™ White Gloss Crystal Drops

Cardstock/Paper: Whisper White, This and That Epic Day DSP (retired SU!)

Accessories: Big Shot™, MFT Dies- Jumbo Stitched Fishtail STAX, Stitched A2 Rectangle STAX Set 1, Horizontal Strip Dies; Gold Cord, Clear Sequins

Thanks again for visiting- I hope all of you have a very blessed week and Merry Christmas!

Thursday, July 23, 2015

CAS Ornamental Pine Christmas- Peace on Earth


Hi Stampers! 

I had a chance to create a quick Clean and Simple (CAS) card last night using the CAS(E)This Sketch #132 Challenge along with the Stampin' Royalty SR287 "Keep It Simple", the Splitcoaststampers’ CC539 Color Challenge (see details here and gallery here) as well as the CCC15 Christmas Card Challenge (see gallery here).
 
I hope you will find the time to visit the above sites and check out all of the inspiration from their Design Teams as well as their galleries!

To create this card:

Using an Acrylic Block- place it directly onto the Soft Sky Classic Ink pad (making sure that it is fully covered with ink) and stamp onto a piece of Whisper White cardstock.

Color the Ornamental Pine stamp using Stampin’ Write Markers- Early Espresso for the branches and Wild  Wasabi for the needles...”huff” onto the stamp to re-moisten the ink and stamp onto the acrylic block panel.

Create shadows using the Sahara Sand Stampin’ Write marker for the branches as well as a bit for the needles.

Stamp the pinecones using Early Espresso Classic Ink onto Whisper White cardstock and carefully fussy-cut the images.

Ink the sentiment with Perfect Plum Classic Ink and stamp onto the panel.

Trim the panel and mount onto the Perfect Plum card base.

Add the pinecones using Stampin’ Dimensionals® and the Rhinestones near the sentiment to finish off the card.

Stamp Sets: Ornamental Pine, Greetings of the Season

Ink: Early Espresso, Soft Sky, Perfect Plum; Stampin’ Write Markers- Early Espresso, Wild Wasabi, Sahara Sand

Paper: Whisper White, Perfect Plum

Accessories: Acrylic Block, Rhinestones


Thanks again for visiting- I hope all of you have a terrific Thursday!

Tuesday, December 16, 2014

SUO112 Christmas Wishes- Bow and Stars

Hi Stampers! 

This card was created for the new SUO112 “Merry and Happy” Challenge along with the AW31 Photo Inspiration Challenge.

I hope you will find the time to check the rest of the Design Team projects at both sites as well as the gallery submissions- great inspiration from all!

To create this card:

Stamp the large star from Bright & Beautiful with Mossy Meadow Classic Ink and stamp the medium star using Cherry Cobbler Classic Ink onto Whisper White cardstock.

Using the Big Shot™ with the appropriate size Star Collections Framelits™,  cut out each star.  

Emboss a piece of Whisper White cardstock using the Beautifully Baroque Textured Impressions™ Embossing Folder, trim and mount onto a piece of Cherry Cobbler cardstock, trim and mount onto the Mossy Meadow card base.

Attach ½ of a White Tea Lace Paper Doily to the card base, adhere both the large and medium star using Stampin’ Dimensionals® ( large star overlapping the top of the doily a bit and medium star on an angle).

Use the new Bow Builder Punch to create a bow from Cherry Cobbler cardstock and adhere to the top of the Cherry Cobbler star.

Stamp the sentiment from Ornamental Pine with Cherry Cobbler Classic Ink onto Whisper White cardstock, trim and create the banner points using the Hexagon Punch.

Use a Bone Folder to curve the sentiment and add to the card front over the two stars.

Adhere the Pearls to the edges of the sentiment and center of the Cherry Cobbler star to finish off the card.

Stamp Sets:  Bright & Beautiful, Ornamental Pine
Ink: Cherry Cobbler, Mossy Meadow
Paper/Cardstock:  Whisper White, Cherry Cobbler, Mossy Meadow
Accessories:  Big Shot™, Star Collection Framelits™,  Beautiful Baroque Textured Impressions™ Embossing Folder, Punches- Bow Builder and Hexagon, Pearls, ½ White Tea Lace Doily

Thanks again for taking the time to stop by – I hope that you will join in on in on the fun with your Stampin’ Up! Only creations and create your own “Merry and Happy” project!

Thursday, October 23, 2014

CAS Christmas Wishes in Silver and Gold :-)


Hi Stampers!

Here is one more card that I created using the Ornamental Pine stamp set- again, I hope you are not growing tired of seeing this set yet…it has been on my desk for almost a week now and I am still having fun with it!
 
I decided to use Vellum for the AW27 Around the World Product Challenge as well as play along with The Paper Players PP218 Clean and Simple (CAS) Silver or GoldChallenge (had to use both- I could not resist:-)), and of course, another card for the CCC14 Splitcoaststampers Christmas Card Challenge (which is really a challenge you set for yourself to keep creating Christmas cards all year long). 

Again, if you have not had a chance to check out the above sites yet, I would encourage you to do so- great inspiration from all!

To create this CAS card:

Using the Embossing Buddy®, de-static a two pieces of Vellum.  

Ink the large pine leaf stamp using Versamark™ ink and stamp onto one of the prepared  pieces of Vellum.  Apply Stampin’ Emboss® Silver Embossing Powder and heat with the Heat Tool.  

Ink the pine cone image using Versamark™ ink and stamp onto the other piece of Vellum (repeat for three images).   Also ink and stamp the sentiment onto this piece of Vellum as well (stamping in an area where you can trim the sentiment without interfering with the pine cones). 

Apply Stampin’ Emboss® Gold Embossing Powder to the pine cones and sentiment and heat with the Heat Tool. 

Carefully “fussy cut” each pine cone around the embossed image- mount onto the embossed pine images using Stampin’ Dimensionals® (placing the Dimensionals® behind the embossing so you cannot see them).

Trim the Vellum panel and adhere to a piece of Whisper White cardstock (I used Tombow™ Multi Liquid Glue and applied the glue to the back along the pine needles).

Add the sentiment layer (again, I used a thin line of Tombow™ and I cannot see the adhesive at all).

Add the panel to the Whisper White card base using Stampin’ Dimensionals® to finish off the card- "Easy, Peasy" as one of my fellow demonstrators likes to say :-)  but I truly had to restrain myself from adding Pearls- lol!!

Stamp Sets: Ornamental Pine

Ink: Versamark™

Paper/Cardstock:  Whisper White, Vellum


Accessories:  Embossing Buddy®, Stampin’ Emboss® Gold and Silver Embossing Powder, Heat Tool


Thanks again for visiting- have a fabulous Thursday!!

Monday, October 20, 2014

Festive Pines- Christmas Wishes to You and Yours :-)


Hi Stampers!

I still had the Ornamental Pine set on my desk (and decided to create one more card using the Pals PaperArts PPA224 Sketch along with the Festive Friday FFC42 Inspiration Photo and another October design for the CCC14 Christmas Card Challenge at Splitcoaststampers.  Hopefully you  are not tired of this set yet- I love it! :-) 

If you have not already visited the challenge sites, I encourage you to do so- fantastic Design Team samples as well as their galleries!

To create this card:

Using the large branch stamp from Ornamental Pine, ink the image using Always Artichoke Classic Ink.  Wipe the branch portion off with a baby wipe and color the branch with the Early Espresso Stampin’ Write marker and stamp the image onto Whisper White cardstock. 

Re-ink the needle area and stamp at the lower corner of the panel.

Add a few highlights with the White Gel Pen, trim the stamped panel and mount onto Cherry Cobbler cardstock, trim again and mount onto Early Espresso cardstock.

Ink the pine cones using Early Espresso Classic Ink (or the Stampin’ Write marker) and stamp onto Whisper White cardstock.  If needed, darken some of the areas with the marker and carefully cut out my hand (“fussy-cut”) and add the pine cones to the focal image panel using Stampin’ Dimensionals®.

Use the Big Shot™ with the Woodgrain Textured Impressions™ Embossing Folder to emboss a piece of Whisper White cardstock, trim to approx. 3 ¾” x 5 ¼” and mount onto a piece of Cherry Cobbler cardstock, trim and mount onto the Early Espresso card base.

Adhere the strips of Trim the Tree Designer Series Pack (DSP) onto Early Espresso cardstock and add to the card front per the sketch.
Mount the focal image panel onto the card front using Stampin’ Dimensionals®.

Ink the sentiment using Early Espresso Classic Ink (or the Stampin’ Write Early Espresso marker as I did) and stamp onto Whisper White cardstock.  

Punch the sentiment out using the Ticket Duo Punch and mount onto a ticket punched from Cherry Cobbler and another one from Early Espresso (cut the Cherry Cobbler and Early Espresso tickets in half vertically and adhere behind the sentiment so you can see the layers).

Mount the sentiment onto the card front directly onto the panel and using a Stampin’ Dimensional® on the right hand side to attach to the card front.

Add the ½” Always Artichoke Triple Seam Ribbon bow with the Antique Brad along with a few Pearls to finish the card.

Stamp Sets: Ornamental Pine, That’s The Ticket

Ink:  Always Artichoke, Early Espresso; Stampin’ Write Marker- Early Espresso, White Gel Pen

Paper: Whisper White, Cherry Cobbler, Early Espresso, Trim the Tree DSP Pack    
    
Accessories: Big Shot™, Woodgrain Textured Impressions™ Embossing Folder, Ticket Duo Punch,  Pearls, ½” Always Artichoke Seam Binding Ribbon, Antique Brad


Thanks again for stopping by- I will be sharing the new SU-Only Challenge early Tuesday morning…hope you can visit again soon!

Saturday, October 18, 2014

IC463 Ornamental Pine #3- A Vintage Masculine Style :-)

Hi Stampers! 

Here is the third card that I created this weekend using the new Ornamental Pine set from the 2014 Holiday Mini Catalog.  

This card was created for the IC463 Inspiration Challenge at Splitcoaststampers (see the details of the challenge here, the gallery is located at this link and the inspiration for the card is pictured at the right and is located at the Vietri site here), plus it is another one of my October designs for the CCC14 Splitcoaststampers Christmas Card Challenge (see the entire CCC14 gallery here). 

To create this card:

Ink the branch image from Ornamental Pine using Mossy Meadow Classic Ink (remove the ink from the branches using a baby wipe) and color the branch area with an Early Espresso Stampin’ Write marker.
Stamp the image onto a piece of Whisper White cardstock and stamp the pine needles again in the upper and lower right hand corners (re-inking with Mossy Meadow Classic Ink each time before stamping).
Add the vintage touches using a Sponge Dauber with Crumb Cake Classic Ink followed with Baked Brown Sugar Classic Ink.
Trim the panel and mount onto a piece of Early Espresso cardstock and onto the Cherry Cobbler card base. 
Add the vertical strip of Trim the Tree Designer Series Paper (DSP) and distress the paper with a Sponge Dauber using Baked Brown Sugar.   Mount onto a piece of Early Espresso cardstock and again onto Cherry Cobbler cardstock.   Mount the DSP layered panel onto the card front. 
Stamp the sentiment onto a piece of Whisper White cardstock with Early Espresso Classic Ink and cut the square out using the Big Shot™ with the Square Framelits™.  Add the pine needles in the corner (I added additional smaller needles by hand with the Mossy Meadow Stampin’ Write marker) and mount onto the Early Espresso scrap (a bit smaller than the sentiment square) and again onto the Cherry Cobbler scrap. 
Add the sentiment to the card using Stampin’ Dimensionals™.
Stamp the pine cone images (four total images) onto Whisper White cardstock using Early Espresso Classic Ink, “fussy-cut” the images out and add to the card front using Stampin’ Dimensionals®. 
Add the snowflakes using a White Gel Pen and a few Pearls to the sentiment layer to finish off the card.
Stamp Sets: Ornamental Pine
Ink: Baked Brown Sugar, Crumb Cake, Early Espresso, Mossy Meadow; Stampin’ Write Markers- Early Espresso, Mossy Meadow; White Gel Pen
Paper/Cardstock:  Whisper White, Early Espresso, Cherry Cobbler; Trim the Tree DSP Pack
Accessories: Big Shot™, Square Collection Framelits™, Sponge Daubers, Pearls

Thanks again for stopping by! I had a great time designing with this Ornamental Pine set and can see so many other possibilities- this one is definitely a “keeper” 

Ornamental Pine #2- Joy for Two Challenges :-)

Hi Stampers!

Here is the second card I created using the Ornamental Pine set from the 2014 Holiday Mini catalog.  

This card was created for the Creative Challenge Club #17 Sketch Challenge along with another Christmas card for the CCC14 Christmas Card Challenge atSplitcoaststampers.

As always, if you have not already visited the challenge sites, I hope you will find the time to do so- there are so many wonderful examples from the Design Teams and the galleries!

To create this card:

Using the large branch stamp from Ornamental Pine, ink the image using Garden Green Classic Ink.  Wipe the branch portion off using a baby wipe and color the branch with the Early Espresso Stampin’ Write marker.

Use the Big Shot™ with the Circle Collection Framelits™ to cut out the image along with another circle from Early Espresso cardstock.
Carefully cut along the branch to allow an opening for the Silver Cord (retired) used on the ornament.

Ink the sentiment from Endless Wishes using Blackberry Bliss Classic Ink and stamp onto the circle under the branches.

Stamp the ornaments using Blackberry Bliss and Cajun Craze Classic Ink onto Whisper White cardstock.  Carefully cut out (“fussy-cut”) each ornament and wrap the retired Silver Cord around the top of the ornaments.

Adhere the Cajun Craze ornament directly onto the pine branch image and insert the silver cord into the opening cut around the branch.

Mount the Early Espresso cardstock circle behind the pine branch circle.

Mount a piece of Trim the Tree Designer Series Paper (DSP) to a piece of Blackberry Bliss cardstock, trim and mount onto a piece of Whisper White cardstock. 

Add the paper lace (created using the Big Shot™ along with the Large Scallop Edgelit™ and embossed with the Delicate Designs Lace Framelit™) and top with the 3/8’ Blackberry Bliss triple ribbon bow.

Mount the Blackberry Bliss ornament image onto the pine branch circle using Stampin’ Dimensionals® , tuck the silver cord behind the circle and add the circle to the card front. 

Trim the edge of the circle on the card front per the sketch and mount the entire panel onto the Early Espresso card base.

Add a few Pearls to the upper left hand corner to finish off the card.

Stamp Sets: Ornamental Pine, Endless Wishes

Ink:  Blackberry Bliss, Cajun Craze, Garden Green; Stampin’ Write Marker- Early Espresso

Paper: Whisper White, Blackberry Bliss, Early Espresso, Trim the Tree DSP Pack  
     
Accessories: Big Shot™, Circle Collection Framelits™, Large Scallop Edgelit™, Delicate Designs Textured Impressions™ Embossing Folder, Pearls, retired Silver Cord


Thanks again fortaking the time to visit :-) I have one more card to share using this stamp set- I am having so much fun with this one!  

Have a great weekend, my friends!!

Peace On Earth- Two Challenges in One!

Hi Stampers! 

I just love the Ornamental Pine stamp set in the Holiday Mini and decided to take some time to create a few cards and projects to show the versatility of this stamp set.

The first card I created uses a masked background for the Merry Monday #130 Silent Night Challenge as well as one of my Christmas cards for the CCC14 Splitcoaststampers 2014 Christmas Card Challenge.  

I hope you will have the time to check out both challenge sites- great designs and inspiration from all!

To create this card:

Use the 1 3/8” Circle Punch to punch out a circle from a piece of scrap paper and place the actual circle onto a piece of Whisper White cardstock for the moon.

Create a torn mask for the horizon line (to mimic the snowbanks).   Keep the circle mask over the moon area and using a Sponge Dauber, apply Pool Party Classic Ink, followed by Coastal Cabana Classic Ink and lastly by Pacific Point Classic Ink.

 Remove the mask for the moon and sponge a bit of the Coastal Cabana and Pacific Point Classic Inks onto the moon area.

Keep the mask in place for the snowbanks and stamp the tree line images from Lovely As A Tree using Pacific Point Classic Ink.

Remove all masks and place another for the snow banks in the center of the card and apply ink from the Sponge Daubers used on the sky area.

Ink the leaves on the Ornamental Pine branch stamp using Mossy Meadow Classic Ink and use a baby wipe to remove the ink from the branch area.   Use an Early Espresso Stampin’ Write marker to color the branch area and stamp onto the card front and repeat these steps to stamp the second branch.   

Stamp the sentiment using Pacific Point Classic Ink and trim the panel.  

Sponge additional Pacific Point Classic Ink around the edges and mount onto Coastal Cabana cardstock and again onto the Early Espresso card base.

Add the white highlights to the branches and snowflakes using the White Gel Pen.

Ink the pine cone image using Early Espresso Classic Ink (or the Stampin’ Write marker used for the branches) and stamp three pine cones onto Whisper White cardstock.  Carefully cut out each pine cone (“fussy-cut”) and mount onto the card front using Stampin’ Dimensionals®.

Add the Rhinestones under the sentiment to finish off the card.

Stamp Sets: Ornamental Pine, Lovely As A Tree, Greetings of the Season (retired)
Ink: Coastal Cabana, Early Espresso, Mossy Meadow, Pacific Point, Pool Party; Stampin’ Write Marker- Early Espresso, White Gel Pen
 Paper/Cardstock:  Whisper White, Coastal Cabana, Early Espresso

Accessories: Sponge Daubers, scrap paper for masking, Rhinestones


Thanks again for stopping by- I had so much fun playing around with the Ornamental Pine stamp set and wiill share a few more cards during the next few days :-)  Have a great weekend!!
Related Posts Plugin for WordPress, Blogger...