Hi
Stampers!!
I
had a great time yesterday playing around with my Gelli Arts® Gel Printing
Plate and was able to try the Packing Tape Technique for the first time (there is a great
tutorial on their blog). This technique
involves allowing your acrylic paints to do between layers and then lifting off the plate using packing tape.
Since the packing tape is approx. 2”
wide, I had three strips from one printing and was able to incorporate into
three cards (plus a few scraps that I will use to make a fourth card at a later
date).
One thing that I love about the monoprinting is using “found” objects in
a different way along with traditional rubber stamps- so much fun searching the
house for objects to use :-)
Again,
I hope you will take the time to check out the Splitcoaststampers’ sites to see
the fantastic samples of the Design Teams and other entrants.
************************************************************************
The
basic steps to create the tape transfer layers:
Create a few masks with wax paper and apply to the Gelli
Arts® Gel Printing Plate. Put a few
drops of acrylic paint onto the plate and use a brayer to spread out on the
plate- I used some very old acrylics I had on hand and used a few drops of metallic
Titanium Teal, a Light Village Green and a metallic Green Patina.
Once the paint was spread on the plate, I carefully removed
the wax paper and allowed the paint to dry before the next step.
Put put a few drops of Soft Black acrylic paint onto a foam
plate and spread with a paintbrush- I used an old protein shake strainer and
dipped into the paint and “stamped” onto the plate in a few areas (remember
that the design on the plate is what you will receive as the final design on
your project).
Add a few drops of Soft White to the black acrylic and use
the end of a cardboard tube (mine was from the wax paper container since I used
my last sheet of wax paper- lol) Dip
into the paint and press lightly onto the plate in various areas.
Add a drop of metallic Crown Red Velvet acrylic paint onto
another area of the foam plate and dip the end of the paintbrush to apply a few
dots around the design.
Use the paintbrush to paint onto the Gorgeous Grunge stamp
and apply to the plate in a few places (re-applying paint to the stamp each
time).
Allow this layer to dry completely before proceeding to the
next step.
Once the paint is completely dry, apply the strips of
packing tape and burnish onto the plate using a Bone Folder. Carefully peel each layer of tape off the
plate, picking up the paint (great way to clean your plate)- I need help cleaning whenever I can get it- lol!!
Lay the pieces of tape onto a scrap piece of paper with the
sticky side up. Using a dry paint brush,
apply a small bit of Pearl-Ex™ and dust off the excess (I have all of the colors that Stampin’ Up!
used to sell years ago and have never used them- this monoprinting is helping me
use so much of my “stash”) I used a
gold on one, a gold with a bit of bronze on the other and finally silver on the
last strip.
************************************************************************
To create this card:
Apply the tape strip to a piece of Whisper
White cardstock and cut a circle using the Big Shot™ with the Circle Collection
Framelits™ (the circle framelit™ is larger than the tape) and punch out another
circle using the 2” Circle Punch from Whisper White cardstock.
 Add a strip of Basic Black cardstock to the straight edge of
the packing tape circle, round the edges to mirror the edges of the framelit™
and add the banners (the Gold Foil was previously embossed using the Decorative
Dot Textured Impressions™ Embossing Folder).
Add a strip of Basic Black cardstock to the straight edge of
the packing tape circle, round the edges to mirror the edges of the framelit™
and add the banners (the Gold Foil was previously embossed using the Decorative
Dot Textured Impressions™ Embossing Folder).
Adhere onto the 2” punched circle of Whisper White and mount
this entire circle panel onto a 2 ½” Circle from Basic Black cardstock (also
cutting the 2 ½” Circle in half and spreading apart to allow just a bit of the
Basic Black to show).
Use the Big Shot™ with the Large Dot Textured Impressions™
Embossing Folder to emboss a piece of Whisper White cardstock, trim and mount
onto a piece of Basic Black cardstock and adhere this panel to the Whisper
White card base.
Trim a piece of Perfect Plum Designer Series Paper (DSP) and
mount onto a piece of Basic Black cardstock.
Add the vertical panels of the packing tape transfer layers (mounted
onto Basic Black cardstock) and adhere a split circle of Whisper White and
Basic Black to the top and bottom of the strip (the circles are from two 2 ½”
punched pieces- cut in half).
Mount the layered packing tape circle panel onto the card
using Stampin’ Dimensionals®.
Using Gold Encore™ Ink, stamp the butterflies from Papillon
Potpourri onto Basic Black cardstock and punch out using the Elegant Butterfly
Punch. Adhere to another butterfly (also
punched with the Elegant Butterfly Punch from Basic Black cardstock) and mount
the butterflies to the card front.
Add the Pearls to the butterfly centers and top corner of
the Perfect Plum panel to finish off the card.
Stamp
Sets: Papillon Potpourri, Gorgeous Grunge, Banner Blast
Ink:
Encore™ Gold Pigment Ink, Acrylic Paints- Metallic Titanium Teal, Light
Village Green, Metallic Green Patina, Soft Black, Soft White, metallic Crown Red Velvet
Paper: Whisper White, Basic
Black, Perfect Plum DSP (retired Hostess Pack)
Accessories:
Big Shot™, Circle Collection Framelits™, Decorative Dots and Large Dots
Textured Impressions™ Embossing Folder, Gelli Arts® Gel Printing Plate, Brayer,
Punches-
Banner, 2” and 2 ½”
Circle, Elegant Butterfly; Pearls, Pearl-Ex™ powders- Gold, Silver and Bronze
Thanks
again for stopping by- I will share the other two cards created from the
additional packing tape strips shortly.
I hope all of you have a wonderful weekend- I am planning on playing
some more in the craft room!
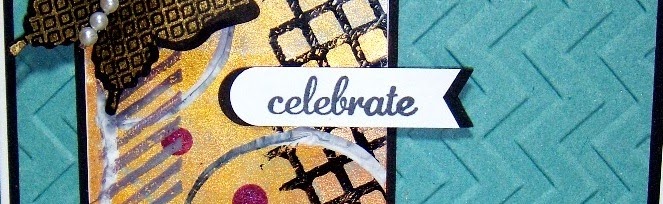
 Here
is my second card that I created yesterday using my Gelli Arts® Gel Printing
Plate and the Packing Tape Technique (see this post for the steps to create the packing tape strips) :-)
Here
is my second card that I created yesterday using my Gelli Arts® Gel Printing
Plate and the Packing Tape Technique (see this post for the steps to create the packing tape strips) :-) Again,
I hope you have the time to check out all of the challenge sites- so many
different interpretations and ideas!
Again,
I hope you have the time to check out all of the challenge sites- so many
different interpretations and ideas! Use
the Big Shot™ with the Chevron Textured Impressions™ Embossing Folder to emboss
a piece of Lost Lagoon cardstock, trim and mount onto a piece of Basic Black
cardstock. Trim and mount onto the
Whisper White card base and add the banner to the card front.
Use
the Big Shot™ with the Chevron Textured Impressions™ Embossing Folder to emboss
a piece of Lost Lagoon cardstock, trim and mount onto a piece of Basic Black
cardstock. Trim and mount onto the
Whisper White card base and add the banner to the card front. 


