Monday, August 18, 2014

Magical Season- A Sneak Peak at Christmas Bauble

Hi Stampers!

I had fun this weekend spending time with my husband (he rarely has a weekend off from work) and when he decided to watch the games and relax, I used the time to create a few cards :-)

This card was designed with the Pals Paper Arts PPA215 Color Challenge in mind as well as the CCC14 Christmas Card Challenge at Splitcoaststampers (which is a monthly commitment you set for yourself to create Christmas cards all year long- I am a bit behind :-))

Again, I hope you will take the time (if you have not done so already) to visit both sites to check out all of the other Design Team entries as well as the galleries- wonderful designs and inspiration from all!!

To create this card:

Stamp the ornament from Christmas Bauble (sneak peek from the upcoming Holiday Catalog) using Memento™ Tuxedo Black Ink onto Whisper White cardstock.  

Color the ornament using a Stampin’ Write Pear Pizzazz (for the leaves and scroll design in the center), a Strawberry Slush marker for the berries and body of the ornament and a Basic Black marker for the top of the ornament.  

Carefully cut out the ornament and use the Basic Black marker to color the edges of the ornament (use the side of the marker to hide the white edges).

Distress the ornament using Ranger® Tim Holtz® Distress Tea Dye Stain and once dried, re-color using the Pear Pizzazz and Strawberry Slush markers.

To tone down the Tea Dye color (it was a bit darker than I expected), apply Ranger® Tim Holtz® Distress Picket Fence Stain, spritz with water and wipe off the stain (to speed up the drying, use the Heat Tool).

Once dried, use a .005 Sakura Pigma Micron™ Pen to go over the black lines and add a bit of highlighting over the light colored portions of the ornament and the berries using the Chalk Marker.  

Punch out the center of the ornament with the 1” Circle Punch and layer onto a circle of Basic Black cardstock (also punched with the 1” Circle Punch, split into two and spread apart a bit to create the border behind the ornament center). 

Use the Embossing Buddy® to de-static a piece of Basic Black cardstock and stamp the sentiment using Versamark™ ink.  Apply Stampin’ Emboss White Embossing Powder and heat with the Heat Tool to melt the powder.  

Use the Big Shot™ with the Northern Flurry Textured Impressions™ Embossing Folder to emboss a piece of Whisper White cardstock, trim the panel and adhere to a layer of Pear Pizzazz cardstock.

Add the sentiment layer onto the bottom of the Pear Pizzazz panel and adhere the crochet lace along with a strip of Pear Pizzazz cardstock to cover up the seam.  Mount the panel onto a Basic Black card base.

Add the Gold Trim around the ornament and mount the ornament using Stampin’ Dimensionals® to the card front.

Punch out the snowflakes from Whisper White cardstock and add to the panels on the card front.

To finish off the card, add the Pearls to the ornament center, strip above the lace and snowflake centers.

Stamp Sets: Christmas Bauble, Magical Season (retired)

Ink:  Memento™ Tuxedo Black Ink, Versamark™, Stampin’ Write markers- Basic Black, Pear Pizzazz, Strawberry Slush;  Chalk Marker; Ranger® Tim Holtz® Distress Stain- Tea Dye and Picket Fence

Paper: Whisper White, Basic Black, Pear Pizzazz

Accessories: Big Shot™, Northern Flurry Textured Impressions™ Embossing Folder, Embossing Buddy®, Stampin’ Emboss® White Embossing Powder, 1” Circle Punch, retired Gold Trim, Pearls, crochet trim from my stash, Martha Stewart snowflake punch


Thanks again for taking stopping by- I will be posting a few more cards late tomorrow evening.   In the meantime, I hope all of you have a marvelous Monday!

Friday, August 15, 2014

A Quiet Life Sympathy- Three Challenges in One!


Hi Stampers! 

I had a glorious day spending time with my husband- 
we were able to sneak away to one of our favorite places, Shenandoah National Park and travel part of Skyline Drive!!  The vistas are gorgeous no matter what the weather (although it was a bit cloudy, it was beautiful today) and whenever we visit, I feel so close to God’s creation, it always inspires me to create something in my craft room when I return :-)


I know some of you have arrived from these challenge sites, but if not, I encourage you to visit the linked pages above and check out the wonderful Design Team projects as well as their fabulous galleries- you will definitely be inspired!


To create this card:
Use the Big Shot™ with the Woodgrain Textured Impressions™ Embossing Folder to emboss a piece of retired Blushing Bride Designer Series Paper (DSP).   Trim to 3 ¾” wide and adhere to top of a piece of 4” wide x 5.25” long Whisper White cardstock.

Add a piece of Moonlight DSP (Hello Honey honeycomb pattern) to the lower portion of the card.   Adhere the die cut border (this was a scrap from a previous project) and add the gray satin ribbon strips to cover the edges. 
Distress the edges by hand (I decided to do this after putting the card together since the Woodgrain folder tends to slightly tear the DSP).   Also add a bit of Dazzling Diamonds to the border area (again, this is to mask the excess adhesive that appeared on the Blushing Bride layer under the border die). 
Mount the entire panel onto a piece of Basic Gray cardstock, trim and adhere to the Whisper White card base.
Stamp the bee image using Basic Gray Classic Ink onto Whisper White cardstock.  Color the image using Stampin’ Write markers- Blushing Bride and Hello Honey plus the Light Calypso Coral and Smoky Slate Blendabilities™ markers.   Cut out the image along the border and add a bit of Dazzling Diamonds to the wings.
Mount a piece of Whisper White cardstock onto a piece of Basic Gray cardstock for the focal image panel per the sketch.
Add the bee image  using Stampin’ Dimensionals® as well as the sentiment (again, the sentiment was already in my scraps- a previously printed image from My Digital Studio (MDS) onto Whisper White cardstock, trimmed and the banner was created with the Hexagon Punch).   Mount the entire panel to the card front using Stampin’ Dimensionals®.   
Create the rolled flowers from retired Blushing Bride and Calypso Coral DSP using the 1 ¾” and 1 ¼” Scallop Circle Punches.   Spiral cut by hand a wavy line from the outside of the scallop toward the center and roll up to create the rose (here is a basic tutorial from Splitcoaststampers).  
Adhere the Basic Gray leaves (from the Bird Builder Punch) along with the rolled roses to the card front (I used Hot Glue for creating the roses and adhering to the card front).
Add the Pearls to the corners to finish off the card.
Stamp Sets: Teeny Tiny Wishes (MDS version), A Quiet Life (retired)
Ink: Basic Gray, Printer Ink- Black, Stampin’ Write Markers- Blushing Bride, Hello Honey; Stampin’ Blendabilities™- Light Calypso Coral, Light Smoky Slate
Paper/Cardstock:  Whisper White, Basic Gray, Moonlight DSP, retired Blushing Bride and Calypso Coral DSP
Accessories: Big Shot™, Woodgrain Textured Impressions™ Embossing Folder, Border Die (ODBD), Punches: Hexagon, Bird Builder, Scallop Circle- 1 ¾”, 1 ¼”;  Dazzling Diamonds Glitter,  Pearls, Gray Satin Ribbon from my stash

Thanks again for stopping by- I hope all of you have a fabulous Friday!!

Tuesday, August 12, 2014

SUO103 Getting Geometric :-)

Hi Again, Stampers! 


It is time for the new SU-Only SUO103 Geometric Challenge- use a geometric shape on your card (circles, squares, triangles, hexagons- anything that is geometric)

I thought a quilt card would be perfect since quilting uses many geometric shapes (see, you thought that geometry would never be used again in real life - lol!!)   The finished card size is 5 1/2" x 5 1/2" square :-)

Again, if you have a chance, check out the rest of our Design Team samples and I hope you will join us in our Stampin’ Up! Only Challenge!
                                                                                               
To create this card:

Use the 1” Square Punch to punch out four squares of Blackberry Bliss, Hello Honey and Smoky Slate from the Moonlight Designer Series Pack (DSP) and four squares from Blackberry Bliss cardstock. 

Hand cut the Blackberry Bliss and Hello Honey patterened squares diagonally to create the triangles. 

Using the Triangle Punch, punch four triangles from the Hello Honey pattern of the Moonlight DSP and also cut a 3” Square piece from the Smoky Slate pattern.

Use a scrap piece of paper (I used the Stampin’ Up! Grid paper) adhere the 3” Square of Smoky Slate DSP to the center of the grid, add the squares along with the triangles to create the pattern around the central square.

Use the Big Shot™ with the Tiny Triangles Textured Impressions™ Embossing Folder to emboss the panel (I had to run it through the Big Shot™ twice lining up the pattern so the second pass would only be one row of the "quilt" and did not run it all the way through the machine).   Use the Sanding Block to lightly sand the DSP. 

Stamp the sentiment from Trust God along with the flowers from Choose Happiness using Blackberry Bliss Classic Ink onto a poece of Vellum.   Color the flowers using the Hello Honey Stampin’ Write marker on the back of the vellum, dry the image using the Heat Tool.

Adhere the vellum sentiment panel to the center, add the scrap strips of Blackberry Bliss cardstock to cover the edges of the Vellum.

Mount the entire panel onto a piece of Whisper White cardstock.

Adhere the 3/8” Blackberry Bliss Stitched Satin Triple Ribbon bow and mount the panel onto the 5 1/2" x 5 1/2" Blackberry Bliss Square Card Base.

Stamp Sets: Choose Happiness, Trust God 

Ink:  Blackberry Bliss, Stampin’ Write Marker- Hello Honey

Paper: Blackberry Bliss, Moonlight DSP, Vellum

Accessories:  Big Shot™,  Triangles Textured Impressions™ Embossing  Folder, 1” Square Punch, Triangle Punch, Sanding Block, 3/8” Blackberry Bliss Stitched Satin Ribbon


Thanks again for stopping by – I hope you have the time to create a Stampin’ Up! Only project for our Geometrics Challenge :-)

Monday, August 11, 2014

CC491 Friendship's Journey

Hi Stampers! 

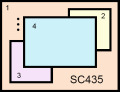
Here is the second card that I created using this week’s CC491 “Blackberry Saffron Bay”colors at Splitcoaststampers along with the SC500 Sketch Challenge (to use one of the sketches from SC400-SC499- I chose SC435 and flipped the sketch upright) :-)

This card also has the has “dessert” to add a sentiment – you have to look close (below the rolled flowers) to see the “love” banner  :-)

If you have not had a chance to do, I hope that you will take a moment to visit the gallery for inspiration, create your own card with this week’s colors and join in on the fun!

To create this card:

Ink the focal using Memento™ Tuxedo Black Ink and stamp onto a piece of Whisper White cardstock. 

Color the images using an AquaPainter™ with Bermuda Bay, Blackberry Bliss and So Saffron Classic Ink and add additional details with the corresponding Stampin’ Write markers. 

Use the Crumb Cake Stampin’ Write marker to add shadows, trim and mount onto a piece of Blackberry Bliss cardstock, trim again and mount onto a piece of Bermuda Bay cardstock.  

Ink the retired background stamp, En Francais using Blackberry Bliss Classic Ink and stamp onto a piece of retired I Am Me Designer Series Paper (DSP).

Use the Big Shot™ with the retired Lacy Brocade Textured Impressions™ Embossing Folder to emboss the stamped DSP panel.  Lightly sand with the Sanding Block, trim and mount onto a piece of Blackberry Bliss cardstock, trim and mount onto the Bermuda Bay card base.

Trim a piece of Park Lane DSP to create two squares and mount onto pieces of Bermuda Bay cardstock and add to the background panel (per the sketch).

Mount the focal image using Stampin’ Dimensionals®.

Create the rolled roses from Blackberry Bliss cardstock using the 2 3/8” and 1 ¾” Scallop Circle Punch – cut a wavy line from the outside of the scallop toward the center.   Use the retired Crimper Tool to crimp the roses and roll up toward the center.  Use a Hot Glue Gun to adhere the outside edges to the center part of the scallop- here is a basic tutorial from Splitcoaststampers.

Stamp the banner from the retired Banner Blast stamp set using Blackberry Bliss Classic Ink, punch out with the Banner Punch , mount onto a banner punched from Bermuda Bay cardstock and add to the card front using Stampin’ Dimensionals®.

Punch the leaves from Bermuda Bay cardstock using the Bird Builder Punch.  Using the Hot Glue Gun, add the leaves with the rolled roses to the front of the card.

Stamp Sets: Friendship’s Journey, Banner Blast (both retired)

Ink: Memento™ Tuxedo Black, Bermuda Bay, Blackberry Bliss, Crumb Cake, So Saffron; Stampin’ Write Markers- Bermuda Bay, Blackberry Bliss, Crumb Cake, So Saffron

Paper/Cardstock:  Whisper White, Bermuda Bay, Blackberry Bliss, So Saffron, Park Lane DSP,  I Am Me DSP (retired)

Accessories: Big Shot™, retired Lacy Brocade Textured Impressions™ Embossing Folder, AquaPainter™, Sponge Dauber, Punches- 2 3/8” and 1 ¾” Scallop Circle, Banner; Pearls


Thanks again for stopping by- I will be posting my design for the new SU-Only Challenge at 3am EST (hope you can stop by again tomorrow to check it out!) 

CC491 To Someone Special- A Botanical Study :-)

Hi Stampers! 

It’s Monday night again and time for a new  CC491 “Blackberry Saffron Bay” color challenge at Splitcoaststampers!!  The luscious colors this week are Bermuda Bay, So Saffron and Blackberry Bliss and the “dessert” is to add a sentiment. 

Whenever I create a card with a color challenge, I normally end up creating two cards- just seems to work out that way :-)

If you have not had a chance to do, I hope that you will take a moment to visit the gallery and join in on the fun!

To create this card:

Ink the images using Memento™ Tuxedo Black Ink and stamp onto a piece of Whisper White cardstock, re-ink the stamps and stamp the second image onto a sticky note or scrap paper.   

Color the images on the Whisper White cardstock using an AquaPainter™ with Bermuda Bay, Blackberry Bliss and So Saffron Classic Ink.    Use the corresponding Stampin’ Write markers to add shadows and definition to the watercoloring and use a Crumb Cake marker to add shadows.    

Apply the masks created in the first step to the images.  Ink the retired background stamp, En Francais using Crumb Cake Classic Ink and stamp over the masked images.  Remove the masks and trim the images to create the individual panel.

Use a Sponge Dauber with Crumb Cake Classic Ink to add additional distressing to the edges and also to “antique” the Whisper White cardstock.  Use the retired Color Spritzer Tool with an Early Espresso Stampin’ Write marker to add a bit more distressing and add a few highlights with the Chalk Marker.

Mount the panels onto Blackberry Bliss cardstock, arrange onto a piece of retired I Am Me Designer Series Paper (DSP), trim and mount onto a piece of Blackberry Bliss cardstock, trim and mount onto a piece of Bermuda Bay cardstock.

Stamp the sentiment onto Whisper White cardstock using Memento™ Tuxedo Black Ink, “huff” onto the background stamp to re-moisten the Crumb Cake Classic Ink and stamp over the sentiment.   

Sponge additional Crumb Cake Classic Ink onto the image to distress a bit and mount onto a piece of Blackberry Bliss cardstock.  Trim and mount onto a piece of Bermuda Bay cardstock and add the Blackberry Bliss photo corners along with the Venetian Crochet Trim at the bottom.

Mount a piece of Blackberry Bliss cardstock to the So Saffron card base, add a piece of So Saffron cardstock and mount the main focal image panel to the card front.

Add the sentiment layer using Stampin’ Dimensionals® . Finish the card off with Pearls on the sentiment layer and in the corners of the focal image panel and the 3/8" Blackberry Bliss Stitched Satin Ribbon Double bow in the corner :-)

Stamp Sets: Botanicals, En Francais (both retired)

Ink: Memento™ Tuxedo Black, Bermuda Bay, Blackberry Bliss, Crumb Cake, So Saffron; Stampin’ Write Markers- Bermuda Bay, Blackberry Bliss, Crumb Cake, Early Espresso, So Saffron ; Chalk Marker

Paper/Cardstock:  Whisper White, Bermuda Bay, Blackberry Bliss, So Saffron, I Am Me DSP (retired)

Accessories: Sponge Dauber, Color Spritzer Tool (retired), Pearls, Venetian Crochet Trim. 3/8" Blackberry Bliss Stitched Satin Ribbon

Thanks again for stopping by- I will be sharing the second card created with this color challenge in a few moments :-)

DTGD14SweetMissDaisy Times and Seasons

Hi Again Stampers!!

This is another card was I created for one of the hostesses at this past week’s DareTo Get Dirty Challenge at Splitcoaststampers.  This is an annual challenge that participants are able to not only have fun creating cards but also the possibility to receive prizes from the member companies :-)

To participate in Dare To Get Dirty, you have to be a Splitcoaststampers Fan ClubMember, and if you are not a Fan Club member, here is the link to learn moreabout joining.    While it is close to the deadline for this year’s challenge, you can always create the cards after the challenge date and next year, participate to possibly win the free prizes!!

While the Splitcoaststampers site is free, there are many benefits to becoming a FanClub member and for the $25.00 a year membership fee (approx. 6.5 cents a day), you can help support this wonderful stamping resource!  I personally visit this site several times a day- so for me it seems to be a terrific bargain!!  And no, I do not receive a commission if you sign up- lol!!, I am just one of their unofficial “cheerleaders” since I love the site so much- between the galleries of wonderful inspiration, free tutorials, forums and challenges- this site has helped me immensely with my journey into the world of papercrafting!

One rule of participation in the Dare To Get Dirty Challenges is that the actual challenge details are secret to all except the Fan Club Members…I can share the card but not the details on the actual challenge (unfortunately, any details on this card will reveal the challenge details, so if you have any questions, please let me know in the comment area).   

Stamp Sets: Times and Seasons (retired)

Ink: Memento™ Tuxedo Black, Crumb Cake, Stampin’ Blendabilities™ Collections- Cherry Cobbler, Daffodil Delight, Night of Navy, Old Olive, Pumpkin Pie, Smoky Slate; Stampin’ Write marker- Crumb Cake

Paper: Whisper White, Really Rust and Ballet Blue (retired); retired Really Rust and Ballet Blue DSP

Accessories: Big Shot™, retired Square Lattice Textured Impressions™ Embossing Folder, Hexagon Punch, Natural Linen Thread, retired Really Rust buttons, Sewing Machine, Gingham Ribbon from my stash


Thanks again for stopping by- I will be a few more cards throughout the day that were created for this past week’s 2014 Dare To Get Dirty Challenge hostess samples… I hope you have a chance to visit again soon!!

DTGD14PattyG Be Still and Know

Hi Stampers!!

This card was created for one of the hostesses at this past week’s Dare To Get DirtyChallenge at Splitcoaststampers.  This is an annual challenge that participants are able to not only have fun creating cards but also the possibility to receive prizes from the member companies :-)


While the Splitcoaststampers site is free to visit and access most of the areas, there are many benefits to becoming a Fan Club member and for the $25.00 a year membership fee (approx. 6.5 cents a day), you can help support this wonderful stamping resource!  I personally visit this site several times a day- so for me it seems to be a terrific bargain!!  And no, I do not receive a commission if you sign up- lol!!,  I am just one of their unofficial “cheerleaders” since I love the site so much- between the galleries of wonderful inspiration, free tutorials, forums and challenges- this site has helped me immensely with my journey into the world of papercrafting!

One rule of participation in the Dare To Get Dirty Challenges is that the actual challenge details are secret to all except the Fan Club Members…I can share the card but not the details on the actual challenge (unfortunately, any details on this card will reveal the challenge details, so if you have any questions, please let me know in the comment area).   

Stamp Sets: Avian Toile (retired), Retired Stampin’ Up! Scripture

Ink: Memento™ Tuxedo Black, Crumb Cake, Stampin’ Blendabilities™ Collections- Daffodil Delight, Night of Navy, Old Olive, Rich Razzleberry, Smoky Slate; Stampin’ Write marker- Crumb Cake


Paper: Whisper White, Marina Mist, Soft Suede

Accessories: Punches- 1 ¼” Square, XL Oval; Natural Linen Thread, retired Antique Brass Hodgepodge Hardware, 5/8” Gold Satin Ribbon


Thanks again for stopping by- I will be sharing additional cards throughout the day that were created for this past week’s 2014 Dare To Get Dirty Challenge hostess samples…  have a marvelous day and I hope you have a chance to visit again soon!!

DTGD14JanTink Trust in the Lord

Hi Stampers!!

This past week has been the annual Dare To Get Dirty Challenge at Splitcoaststampersand I was honored to be able to create a few samples for the many hostesses of this fun challenge!!

Again, if you are not a Fan Club member, here is the link to learn more aboutjoining. 
While the Splitcoaststampers site is free, there are benefits to becoming a Fan Club member and one of them is to be able to participate in the exclusive challenges and possibly win some of the fantastic, free prizes!!  

For the $25.00 a year membership fee (approx. 6.5 cents a day), you can help support this wonderful stamping resource that I know I visit several times a day- what a bargain!!  And no, I do not receive a commission if you sign up- lol!!, I am just one of their unofficial “cheerleaders” since I love the site so much- between the galleries of wonderful inspiration, free tutorials, forums and challenges- this site has helped me immensely with my journey into the world of papercrafting!

One rule of participation in the Dare To Get Dirty Challenges is that the actual challenge details are secret to all except the Fan Club Members…I can share the card but not the details on the actual challenge (unfortunately, any details on this card will reveal the challenge details, so if you have any questions, please let me know in the comment area).   


Stamp Sets: Say It With Scripture (retired)

Ink: Midnight Muse (retired)

Paper: Very Vanilla, Cajun Cruze, Midnight Muse (retired), Comfort Café DSP (retired)

Accessories: Big Shot™, Hearts Collection Framelits™, Lacy Brocade Textured Impressions™ Embossing Folder (retired), 1 ¼” Square Punch, XL Oval Punch, White Tea Lace Doily, 5/8” Satin Ribbon (from my stash)


Thanks again for visiting- I will be sharing additional cards throughout the day that were created as samples for the hostesses of a few of the 2014 Dare To Get Dirty Challenges…  have a wonderful Monday and hope you have a chance to visit again soon!!
Related Posts Plugin for WordPress, Blogger...