Wednesday, September 16, 2015

Snowman Soup- Wishing You A Merry Christmas!!


Hi Friends!


Although I do drink coffee occasionally, I have to "doctor" it up with Hot Chocolate so a true coffee drinker would say "That's not coffee at all!" - lol!!  So, I guess, Hot Chocolate would be my choice of drink :-)

Again, if you have not already done so, I hope you will find the time to visit the above links to check out their wonderful Design Team entries as well as all of their galleries!

This card was extremely easy to make:

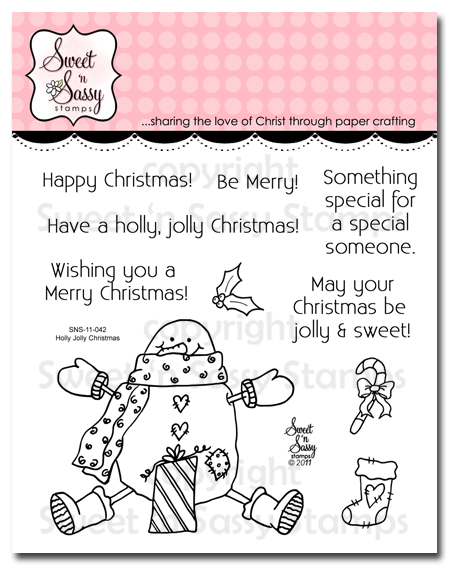
Sweet 'm Sassy Stamps- Snowman Soup, Holly Jolly Christmas
Use the Big Shot™ to emboss the background paper with the Square Lattice Textured Impressions™ Embossing Folder (retired Stampin’ Up!) and stitch this layer to a piece of Chocolate Chip cardstock.  Mount the entire panel onto the white card base.

Stitch a coordinating piece of background paper to a piece of Chocolate Chip cardstock for the upper layer of the sketch and adhere the 5/8” Chocolate Chip Satin Ribbon triple bow.

Punch out three circles from Chocolate Chip cardstock and add the three circles of background paper (also punched and mounted onto circles of white cardstock).

Adhere an embossed piece of Real Red cardstock to Chocolate Chip for the vertical layer of the sketch and add the three punched circles.

Stamp the Sweet ‘n Sassy Stamps Snowman Soup image using a waterproof black ink and color with water brush and water based markers.  Carefully cut out the image (I decided to fussy cut but there is a coordinating Snowman Soup die set from Sweet ‘n Sassy Stamps  as well).

Stamp the sentiment from Holly Jolly Christmas with black ink and create the banner points with the Hexagon Punch or by hand.

To assemble the card- add the stitched layer with the bow to the card front, mount the vertical strip with the three punched elements using dimensional foam, add the Snowman Soup image and Holly Jolly Christmas sentiment with dimensional foam.

Add a few Pearls to the center of the snowflakes on the punched images and the snowman’s hat to finish off the card.
Snowman Soup
Holly Jolly Christmas


Stamp Sets: SnowmanSoup, Holly Jolly Christmas ( both SNSS)

Ink: Stāz-On® Jet Black, Stampin’ Write Markers- Chocolate Chip, Old Olive, Pumpkin Pie, Real Red, Tempting Turquoise, Sahara Sand

Paper: Whisper White, Chocolate Chip, Real Red, retired DSP

Accessories: Big Shot™, retired Square Lattice and Pretty Petals Textured Impressions™ Embossing Folders,  Punches- 1”  and 1 3/8” Circle, Hexagon; retired 5/8” Chocolate Chip Satin Ribbon, Pearls


So which do you prefer- Coffee, Tea or Hot Chocolate?

Thanks again for taking the time to stop by- hugs and have a great day, my friends!

Tuesday, September 15, 2015

ODBDSLC254 Our God, We Give You Thanks and Praise Your Glorious Name


Hello Friends!

The new Our Daily Bread Designs "Shining the Light" ODBDSLC254 Sketch Challenge starts today and I incorporated the sketch with the Splitcoaststampers' WT 533 “Favorite Tools” Challenge.

Since I love using die cuts and embossing folders on my cards, my favorite tool is the Big Shot™ and I rarely make a card without it!

I love the verse from the Thank You stamp set along with the picnic basket image and thought that it is so appropriate for many occasions including Thanksgiving (I know, I am a bit early but am trying not to procrastinate as much this year :-)).  I paired it with the beautiful flowers from the Fragrance set (love those roses) along with some distressing.

To create this card:

Stamp the rose image from the Our Daily Bread Designs (ODBD) Fragrance along with the verse from ODBD Thank You using Stāz-On® ink onto white cardstock.  The rose was colored with a water brush pen using ink from the ink pads and fussy-cut.   

ODBD Stamps- Fragrance, Thank You; Dies- Ovals, Stitched Ovals, Beautiful Borders, Doily, Paper- Christmas Collection
The verse was cut with the Stitched Ovals Dies and layered onto cardstock cut with the Ovals Dies.

Add a distressed, embossed background panel along with a white doily cut from the Doily Dies (split in two) along with a strip  of gingham paper from the Christmas Paper Collection with the Beautiful Borders Dies and ribbon from my stash.

Add the gold twine and mount the layered verse panel with the fussy cut flower using dimensional foam.  Add a few pearls to finish off the card :-)


I hope you will check out my DT sisters:

To see all the projects created for ODBDSLC254 or to join the challenge click here.  You have until September 20, 2015, at 8:00 pm EDT. By participating in the challenge, you have a chance to win a $15 ODBD Gift Certificate good towards the purchase of stamps in the “stamps column” on the ODBD website, or to be spotlighted on the ODBD Blog at our next challenge. The random prize winner will be posted on our next challenge post. Please do not post on Flicker as many of us do not have the ability to comment on your cards nor can we spotlight your cards on the blog.

Thank You
Ovals Dies
Stitched Ovals Dies
Doily Dies
Beautiful Borders Dies
Christmas Paper Collection 2013
Thanks again for stopping by, we hope to see your artwork in the Shining the Light ODBDSCL254 Sketch Challenge gallery!  Have a wonderful week- hugs and God Bless!

SUO131 Get Well Wishes- Woodland Background with An Open Heart

Hello Friends!   

It’s time for the new SUO131 “Get Well Soon” Challenge and I decided to create a quick, fun background with the new Woodland Textured Impressions™ Embossing Folder.  

I also incorporated the Addicted to Stamps and More #161 "Anything Goes" Challenge as well as the Splitcoaststampers’ WT547 “Seasons”Challenge- I love the crisp air and gorgeous colors that are here on the East Coast during the autumn!!

I hope you will have a chance to check out my sister DesignTeam member samples and create your own Stampin’ Up! Only project for our gallery. 

To create this card:

Using a Sponge Dauber, apply Tip Top Taupe to the interior of the Woodland Textured Impressions™ Embossing Folder, insert a piece of Very Vanilla cardstock and emboss with the Big Shot™.

Trim the embossed image and mount onto a piece of Basic Black cardstock, trim again and mount onto the Very Vanilla card base.

Ink the wren image from An Open Heart using Stāz-On® Jet Black Ink and color using Stampin’ Write Markers- Crumb Cake, Sahara Sand and Tip Top Taupe and use the AquaPainter™ to blend the color.

Carefully fussy-cut the image leaving an area for the “ground” – color the “ground” using a Sponge Dauber with Mossy Meadow Classic Ink using the AquaPainter™ to blend the color, add the splatter from Gorgeous Grunge with Tip Top Taupe Classic Ink and use a Basic Black Stampin’ Write Marker to color the edge of the cut paper.

Mount the bird image to the lower portion of the card front using Stampin’ Dimensionals®.

Add a strip of Basic Black cardstock using Stampin’ Dimensionals® and add the sentiment from Teeny Tiny Wishes (punched with the Word Window Punch).

Stamp the leaves from Vintage Leaves with Memento™ Tuxedo Black Ink onto Very Vanilla cardstock, color with Sponge Daubers using Delightful Dijon, Old Olive and Cajun Craze Classic Ink. 

Fussy-cut the leaves and adhere along the sentiment layer to finish off the card.

Stamp Sets:  An Open Heart, Vintage Leaves, Gorgeous Grunge, Teeny Tiny Wishes
Ink: Stāz-On® Jet Black , Memento™ Tuxedo Black, Cajun Craze, Delightful Dijon, Mossy Meadow, Tip Top Taupe; Stampin’ Write Markers- Basic Black, Crumb Cake, Sahara Sand, Tip Top Taupe
Paper/Cardstock: Very Vanilla, Basic Black
Accessories: Big Shot™, Woodland Textured Impressions™ Embossing Folder, Sponge Daubers, Word Window Punch

Thanks again for visiting – we hope to see your Stampin’ Up! Only project in our “Get Well Soon” Challenge gallery!

Vintage Leaves- Let Our Lives Be Full


Hello Friends!

I had a chance to create a simple Mixed Media card this evening using Emboss Resist and Stenciling for the Simon Monday “Love This Technique”  Challenge along with the Splitcoaststampers ‘ CC547 Color Challenge, SC554 SketchChallenge (flipped the sketch)  and the WT544 “Unite for Lefties” Challenge.  
 
If you have not had a chance to visit the above challenge site galleries yet, again, I would encourage you to do so- wonderful inspiration from all!

To create this card:

Stamp the sentiment from Lighthearted Leaves using Blackberry Bliss Classic Ink  onto the Tempting Turquoise card base, adhere the Memory Box™ Heartwood Stencil to the card base with repositionable tape and use a Sponge Dauber to apply Tempting Turquoise Classic Ink.

Stamp the large splatter stamp using Blackberry Bliss Classic Ink over the stenciled area and set aside.

Using Sponge Daubers, apply Pink Pirouette Classic Ink to a piece of Whisper White cardstock, de-static with the Embossing Buddy®, stamp the medium round leaf from Vintage Leaves using Versamark™ ink, apply Stampin’ Emboss® Clear Embossing Powder and heat set with the Heat Tool.  FYI- I originally tried to create this as a one layer card with masking the edges, embossing and sponging, scoring but smudged the Blackberry Bliss sentiment and had to improvise

Apply Tempting Turquoise ink over the embossed areas with a Sponge Dauber, repeat the above steps with the large oak leaf from Vintage Leaves and emboss with Stampin’ Emboss® White Embossing Powder.

Repeat the above steps again with the smaller leaf from the set, emboss with the White EP and apply Blackberry Bliss Classic Ink over the images. 

Use a moistened paper towel to remove the excess ink, spritz with water, remove the excess ink again, apply more Pink Pirouette, Tempting Turquoise and Blackberry Bliss Classic Ink until you are satisfied with the background.

Stamp the large splatter with Blackberry Bliss Classic Ink and wipe one last time with the moistened paper towel.

Trim the panel and mount onto Whisper White cardstock, adhere to the card front to finish off the card.

Stamp Sets:  Vintage Leaves, Lighthearted Leaves, Gorgeous Grunge

Ink: Versamark™, Blackberry Bliss, Pink Pirouette, Tempting Turquoise

Paper/Cardstock: Whisper White, Tempting Turquoise

Accessories:  Embossing Buddy®, Stampin’ Emboss® Clear and White Embossing Powder, Heat Tool, Sponge Daubers, Memory Box™ Heartland Stencil


Thanks again for taking the time to visit- I hope all of you have a fantastic week!

Monday, September 14, 2015

Home for Christmas- White on White Jingle All the Way

Hi Friends!!

I took a moment today to create a very quick, easy Clean and Simple (CAS) card for several challenges at Splitcoaststampers- the SC549 Sketch ( I flipped the sketch), F4A286 “Three Cheers” (use 3 die cuts or punches), TLC516 "White Out",  CCC15 Christmas and SCSCCJUL15 “Your Neck ofthe Woods”.

In this area of Maryland, we tend to receive snow and while I have never been on a horse drawn sleigh ride in the snow, it seems like some of our nearby country areas would be perfect for one!  A girl can dream, right? :-)

I hope you will find the time to check out each of the above links- so much inspiration from all!

To create this card:

Use the Big Shot™ with the Sleigh Ride Edgelits™ to cut out all three of the dies from Whisper White cardstock (angling the dies to align with the sketch).

Position the dies onto a piece of Whisper White cardstock (do not adhere yet- I used a piece of easy release tape) and cut the edges to square up the card.

On the sleigh die cut, de-static t
Another view to show the dimension :-)
he cardstock with the Embossing Buddy® and stamp the “Home for Christmas” sentiment (a bit difficult to see in the photo) using Versamark™ Ink, apply Stampin’ Emboss® White Embossing Powder and heat set with the Heat Tool.

Mount all of the die cuts onto a piece of Whisper White cardstock using Stampin' Dimensionals® between the layers and adhere to the Whisper White card base.

I absolutely love the new Sleigh Ride Edgelits™ along with the matching "Jingle All the Way" stamp set for Christmas cards- so quick and easy!!

Stamp Sets:  Jingle All the Way

Ink:  Versamark™

Paper: Whisper White

Accessories: Big Shot™, Sleigh Ride Edgelits™ , Embossing Buddy®, Stampin’ Emboss® White Embossing Powder, Heat Tool


Thanks again for stopping by- I hope all of you have a fabulous week!

Sunday, September 13, 2015

So Very Thankful Bloom for You :-)


Hi Friends!

I decided to create a Clean and Layered card using the Pals Paper Arts PPA267 Color Challenge along with the Mojo414 Sketch Challenge  and the Splitcoaststampers; F4A286 “Three Cheers” Challenge (use 3 die cuts and/or punches). 

Again, if you have not already done so, I hope you will find the time to visit the above links to check out their wonderful Design Team entries as well as their galleries!

To create this card:

Use the Big Shot™ to emboss the Whisper White background with the Boho Chic Textured Impressions™ Embossing Folder.  Also die cut a piece of Tangelo Twist cardstock, Whisper White and retired I Am Me Designer Series Paper (DSP) with MFT Stitched Rounded Rectangular and Jumbo Fishtail Banner Dies. 

Emboss the Tangelo Twist rounded rectangular die cut and a scrap piece of Pool Party cardstock with the Chevron Textured Impressions™ Embossing Folder.

Layer the Pool Party embossed panel with the 1 ¼” Burlap Ribbon over the Whisper White Boho Chic embossed background, mount onto a piece of Tangelo Twist cardstock and mount onto the Pool Party card base.

Stamp the Bloom for You flower using Crushed Curry Classic Ink and use the Rock-n-Roll technique with Tangelo Twist Classic Ink. 

Fussy-cut the flower, add a 7/8” Scallop Circle punch from the retired I Am Me DSP to the center along with the retired Sycamore Street button and Natural Linen Thread.

Stamp the sentiment using Tangelo Twist Classic Ink onto the Whisper White die cut piece.

Add the knotted Natural Linen Thread to the Pool Party chevron banner (created above from I Am Me DSP), adhere the banner onto the chevron embossed Tangelo Twist die cut, add the Whisper White sentiment die cut and mount the entire layered panel onto the card front using Stampin’ Dimensionals®.

Add the flower using Stampin’ Dimensionals® and a few Pearls to the sentiment layer to finish off the card.

Stamp Sets: Bloom for You, Pretty Patches- Apple (Wplus9 Designs)

Ink: Crushed Curry, Tangelo Twist

Paper: Whisper White, Pool Party, Tangelo Twist, retired I Am Me DSP

Accessories: Big Shot™, Boho Chic and Chevron Textured Impressions™ Embossing Folders, MFT Stitched Rounded Rectangular STAX, Stitched Jumbo Fishtail Banner STAX, 7/8” Scallop Circle Punch, 1 ¼” Burlap Ribbon, Natural Linen Thread, Pearls, retired Sycamore Street Button


Thanks again for taking the time to stop by- hugs and have a great day, my friends!

Wise Men Still Seek Him


Hello Friends!

I wanted to share a card that I created with the new We Three Kings stamp set from Sweet 'n Sassy Stamps using the Splitcoaststampers SC556 Sketch Challenge.


This card was created by sponging the background, heat embossing the images along with a bit of layering and dry embossing. 

I hope you will hop over to the Sweet 'n Sassy Stamps blog to check out more of the details on how I created this card and while there, leave a bit of "love"  :-)
We Three Kings

Thanks again for visiting- hugs and have a blessed day, my friends!

Friday, September 11, 2015

Sweet 'n Sassy September 2015 Release and Blog Hop!


Hello Friends!


We are super excited to be releasing five brand new stamp sets this month and adding four new products from the September Sweet Perks Club to the Sweet 'n Sassy Stamps Store!

Time to check out our gorgeous release for September


I designed this card with the new WeThree Kings stamp set using a Mixed Media background:

Sweet 'n Sassy Stamps- We Three Kings 
Apply Gesso® to a piece of White cardstock and once dried apply Gold Champagne and Iced Chai Gelatos®, spritz with water and add Frayed Burlap, Brushed Corduroy and Tarnished Brass Distress Stains. 

Use a stencil along with a baby wipe to remove portions of the background and once it is completely dry (I use a Heat Tool to speed up the drying process), heat emboss the We Three Kings image using Navy ink and Clear Embossing Powder.

Stamp the sentiment onto Vanilla cardstock with Navy Ink, trim and mount all onto Navy cardstock, then onto Vanilla cardstock.

Add a Pearl to the star to finish off this card.


Sweet 'n Sassy Stamps- Wondrous Miracle, We Three Kings
My second card is an easel card created with the new stamp set, Wondrous Miracle along with the new We Three Kings (for the main panel sentiment). 

Stamp the images with a waterproof black ink onto White cardstock, color with a sponge dauber for the sky and grass along with markers and a water brush for the rest of the images.  


Trim and mount the main panel to Navy cardstock and add the green seam binding ribbon.   Adhere the embossed white background panel onto Navy cardstock, add the focal image and mount onto the front of the easel.   

Mount the sentiment with dimensional foam and add the interior layered panel along with Rhinestones to finish off the card.


To see more gorgeous samples made by the Design Divas using the new stamp sets from the September Release, please click on the links below for our blog hop! Don't forget to leave a little "love" on each blog as you hop along  :-)


Then head on over to the Sweet 'n Sassy Stamps Store to pick up your favorite stamp sets from the release!


Thanks again for stopping by!  Have a wonderful weekend, my friends and God Bless!
Related Posts Plugin for WordPress, Blogger...