Showing posts with label AAA Cards Challenges. Show all posts

Saturday, May 9, 2020

CAS Be Still and Know


Hi Friends!

I hope all of you are continuing to stay healthy during this pandemic.  My hubby and I are enjoying our time together at home and I am spending more time in my craft room for sure!

Today I am sharing a quick Clean and Simple (CAS) card I created for a FB May CAS Card Theme Event   based on their inspiration photo.  I was inspired by the dandelion and the dark background (although my background did not turn out as dark as I had hoped :-)).

I pulled out a set that I not used in ages- the Agapanthus Thank You stamp set by Stampendous and paired it with a verse sentiment from one of my favorite Stamp Simply sets- Words of Encouragement (I love the fonts on this set, don't you?)!

To create this card, sponge distress oxide inks onto white cardstock (the cardstock I used for the main stamped panel was from my stash and does have a slight glossy type coating). 

Once you are satisfied with the color, use an embossing powder tool to de-static the panel, stamp the floral images and sentiment with embossing ink and heat emboss with white embossing powder.

Spritz a bit of water to create a slight bokeh effect, trim the panel and mount with dimensional foam onto a white card base.

Use a clear glitter pen (hard to see in the photo) to add some shimmer onto the flower heads and the card is finished!

Stamp Sets: Agapanthus Thank You (Stampendous), Words of Encouragement (Stamp Simply)

Ink/Mediums: Versamark™ , Distress Oxide- Tumbled Glass, Broken China, Peacock Feathers;  Spectrum Noir™ Clear Glitter Pen

Cardstock/Paper:  Whisper White, coated White (from my stash- not sure of manufacturer)

Accessories: Embossing Buddy®, White Embossing Powder, Heat Tool, Stencil Brushes

I am so thankful that you took the time to visit- I hope you will have a chance to stop by again soon!  Hugs, sweet friends!

Saturday, February 1, 2020

One Layer Snowflakes


Hi Friends!!

I have been stamping and creating cards like crazy but have not had the time to post to my blog (I am hoping to play"catch up" within the next few weeks). 

This card was a fairly simple one layer card designed with a new stamp set, Snowflake Builder (Simon Says Stamp) along with a retired sentiment from Trust God (Stampin’ Up!).


The background was very easy to create- fold a piece of white cardstock in half, using sponge daubers apply Distress Oxide inks (see colors below), once dried, heat embossed the snowflakes with white embossing powder.

The sentiment was heat embossed with clear embossing powder and a bit of water was splashed onto the background.


Stamp Sets: Snowflake Bundle (Simon Says Stamp), Trust God (retired Stampin’ Up!)

Ink/Mediums: Versafine™ Onyx Black, Versamark™, Tim Holtz® Distress Oxide Ink- Broken China, Picked Raspberry, Tumbled Glass

Cardstock/Paper:  Whisper White

Accessories: Embossing Buddy®, Clear and White EP, Heat Tool, Sponge Daubers, Rhinestones, Stencil 

Thanks again for taking the time to stop by- I hope all of you have a wonderful weekend!

Thursday, August 22, 2019

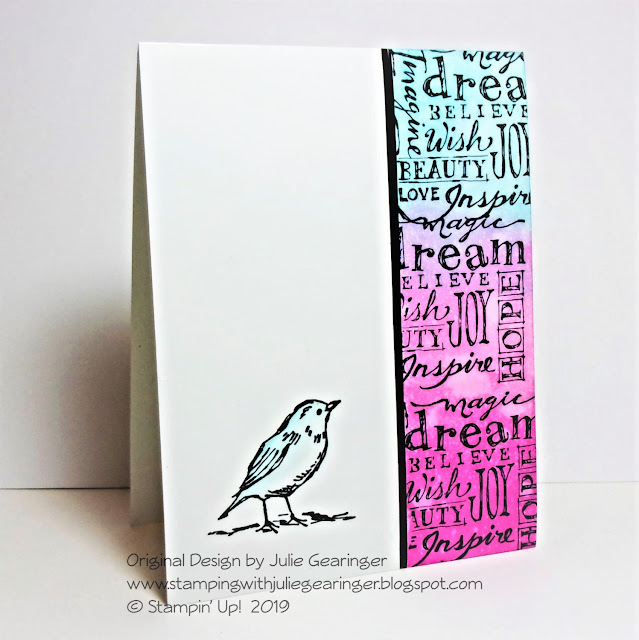
Natural Beauty- Dream One Layer Card


Hi Friends!

I hope all of you are having a great week so far!  My hubby, Dave is doing better with each passing day as we are getting used to his new “normal”. 

I have been creating over the summer but have not had a chance to post many of the cards to my blog or other galleries (many of you have blogs and know the time that it takes photograph, edit and write up the blog posts). 

With my limited creative time due to taking care of the household chores that my hubby normally handles, etc. :-) I am going to post the cards in the future without the detailed step by step instructions but an overview of how they were created.  If you have any questions on a particular card, and/or technique, please feel free to ask.

I am linking this card to several online challenges- AAA #142 “Along the Edge” with optional twist of “Inspired by a Song” ( I think of the song that has the lyrics “Dream, Dream, Dream” when I see this image), the Simon Says Wednesday “Clean and Simple” Challenge , the Addicted to CAS #166 "One Layer Card" Challenge and the 2 Crafty Critters Crazies  “Anything Goes with Critters”Challenge.


If you have not had a chance to stop by the above challenge sites, I encourage you to do so- gorgeous inspiration from all!


This card is a one-layer card designed with an older Stampin’ Up! stamp set, Natural  Beauty.  

The white cardstock card base was folded in half and I used a scrap piece of paper to create a mask for the border along the right side.  I repeatedly stamped the word image along the edge with Versamark™ Onyx Black ink and heat embossed with clear embossing powder.   

The little bird was also heat embossed with clear embossing powder and I used several Distress Oxide inks to blend color over the edge (see colors below)  

I finished off the card using a black marker to create a thick line along the border edge (this covered up a bit of the uneven ink and straighten up the edge).


Stamp Sets: Natural Beauty (retired Stampin’ Up!)

Ink/Mediums: Versafine™ Onyx Black,  Tim Holtz® Distress Oxide- Broken China, Picked Raspberry, Seedless Preserves, Faber-Castell™ Black Pitt Pen Marker

Cardstock/Designer Paper: Whisper White

Accessories: Embossing Buddy®, Clear Embossing Powder, Heat Tool, Sponge Dauber

Thanks again for taking the time to visit- hugs and I hope you can stop by again soon!

Saturday, April 14, 2018

A Mother's Love


Hi Friends!

Today I am sharing a quick card designed with the new Sweet ‘n Sassy Stamps A Mother’s Love Clear Stamp Set from the SNSS April Release and the previously released stamp set, Grunge Elements 2.

A Mother’s Love is such a wonderful set with several silhouette images and sentiments about motherhood- perfect for Mother’s Day as well as for new Moms or just encouragement cards!

For the background, I used a “smooshing” technique that I love to use so I am linking to the AAA Cards #112 “A Favourite Technique” Challenge and am also participating with the CAS on Friday #130 “Mother’s Day” Challenge.

If you have not had a chance to visit the above challenge sites or the SNSS Blog/FB Page yet, I encourage you to do so- fabulous inspiration from all!

To create this card:

1). Pat your ink pad onto a silicone crafting mat (I used Distress Ink), lightly spritz with water, press white cardstock into the ink, lift the panel and re-position in the ink.  Continue to press and lift until you are satisfied with the background.  Dry with a heat tool.

2). De-static the panel with an embossing powder tool, ink the image and sentiment from A Mother’s Love with archival black ink, stamp onto the panel, apply clear embossing powder and heat set with a heat tool.

3). Ink the hearts from Grunge Elements 2 with distress ink and stamp onto the panel. Wipe off any excess ink from the images with a paper towel.

4). Die cut the panel with a stitched rectangle die, mount onto black cardstock and adhere to a white card base.

5). Finish off the card with a few sequins.


Ink/Mediums: Versafine™ Onyx Black, Tim Holtz® Distress Ink- Candied Apple, Abandoned Coral

Paper: Whisper White.  Basic Black (Stampin’ Up!)

Accessories: Big Shot™, MFT Stitched Rectangle STAX Set #1, Embossing Buddy®, Clear Embossing Powder, Heat Tool, Sequins

Thanks again for taking the time to stop by! I hope all of you have a great week/week and visit again soon- hugs, sweet friends!

Friday, March 30, 2018

CAS Mixed Media- Landscape Silhouettes Sympathy


Hi Sweet Friends!

This evening I am sharing a Clean and Simple (CAS) card that I designed using the  Landscape Silhouettes and Tender Thoughts stamp sets from Sweet ‘n Sassy Stamps for the AAA Cards #111 "Use Only One Third" Challenge and the Retro Rubber #83 “Anything Goes” Challenge.

I have owned both stamp sets for several years and they are so versatile for many occasions. I love the silhouette images and while I had Landscape Silhouettes out, I created four additional cards that I will share in the next day or so :-)

If you have not had a chance to visit the above challenge galleries yet or the Sweet ‘n Sassy blog/FB page, I encourage you to do so- gorgeous inspiration from all!

To create this card:

1). Tap a few colors of Distress Oxide onto a silicone mat (see below for the colors I used), lightly spray with water and press a piece of watercolor paper 4 ¼” x 5 ½”.   Lift up and continue to re-apply ink until you are satisfied with the background.


2). De-static the panel with an embossing powder tool, ink the image from Landscape Silhouettes with archival black ink, apply clear embossing powder and heat set with a heat tool.  Trim the panel and mount onto black cardstock.

3). De-static a piece of white cardstock with an embossing powder tool (in the area for the sentiment), ink the sentiment from Tender Thoughts with archival black ink, apply clear embossing powder and heat set with a heat tool.  Trim the panel and mount onto a piece of black cardstock, trim again and mount onto the white card base.

4). Mount the main panel onto the card front with dimensional foam to finish off the card.


Ink: Versafine™ Onyx Black, Tim Holtz® Distress Oxide- Twisted Citron, Broken China, Picked Raspberry

Paper: Whisper White, Basic Black

Accessories: Embossing Buddy®, Clear Embossing Powder, Heat Tool

Thanks again for taking the time to stop by!!  I am planning on sharing a few more CAS cards featuring easy backgrounds this weekend- hopefully you will be able to visit again soon!  Hugs and I hope you have a wonderful weekend reflecting on Christ's sacrifice and Resurrection- Alleluia, what a Savior!!

Tuesday, December 19, 2017

SUO190 The Light of Heaven


Hi Friends!   

It’s time for the #190 “A Favorite Holiday Image” Challenge at SU-Only Challenges!

I decided to pull out the Star of Wonder stamp set with the coordinating Starlight dies and create a Clean and Simple Christmas card reflecting the true meaning of Christmas.  

I love the sentiments as well as the stars in the Star of Wonder stamp set! Christmas is all about the birth of our Lord and Savior, Jesus Christ and the star reminds us that Jesus is the Light of the World!  

Other than the dimensional star die cut, this is technically a one layer card that was very easy to create  and am also participating in the following challenges:

If you have not had a chance to stop by the SU-Only Challenge site to check out the rest of the Design Team’s samples or the other challenge sites yet, I encourage you to do so- fabulous inspiration from all!

To create this card:

1). Using the Big Shot™ with the Starlight Thinlits™ and cut out the large scored star from Silver Foil and the smaller ornate star from Whisper White cardstock.  Lightly fold along the score lines of the large star to create dimension and mount the white die cut star to the center.

2). De-static a piece of Whisper White cardstock with an Embossing Buddy®, stamp the star and scroll images along with the sentiments from Star of Light with Versamark™ Ink, apply Stampin’ Emboss® Silver Embossing Powder and heat set with the Heat Tool.

3). Trim the panel, mount onto a piece of Night of Navy cardstock, trim and mount onto the Extra Thick Whisper White card base.

4). Adhere the die cut/layered star with Stampin’ Dimensionals® to the card front (FYI- I layered several dimensionals together to give the star more height in the center).

5). Add a few Rhinestones to the star centers to finish off the card.

Stamp Sets: Star of Light

Ink/Mediums: Versamark™

Paper: Whisper White, Extra Thick Whisper White, Night of Navy, Silver Foil
Accessories/Tools: Big Shot™, Starlight Thinlits™, Embossing Buddy®, Stampin’ Emboss® Silver Embossing Powder, Heat Tool, Rhinestones

Thanks again for taking the time to stop by and I hope that you will create your own Stampin’ Up! Only project and join us for our “Favorite Holiday Image” challenge! 

May we all reflect on Jesus this Christmas season and remember that the greatest gift of all is free- Salvation in Christ Alone! Acts 16:31a Believe on the Lord Jesus Christ and you will be saved; Ephesians 2:8-9- For by grace you have been saved through faith, and that not of yourselves; it is the gift of God, not of works, lest anyone should boast. 


Merry Christmas and Happy New Year to all of you!!

Monday, September 25, 2017

We Blossom and Flourish

Hi Friends!

This morning I am sharing another quick and easy card that I designed this past weekend using the clear stamp set, Season of Change (retired now but orginally purchased from Sweet 'n Sassy Stamps - designed by Dina Kowal dba dkdesigns).


If you have not had a chance to check out the challenge sites yet, I encourage you to do so- gorgeous inspiration from all!

To create this card:

1). Ink the maple leaf image from Season of Change with carved pumpkin distress ink, lightly sponge Fired Brick onto the image and stamp onto a piece of white cardstock.

2). Create a mask for the maple leaf, mask the stamped leaf, ink the smaller oak leaf image with peeled paint distress ink, sponge carved pumpkin ink onto the image and stamp onto the panel.

3). Repeat the steps above with the maple leaf again using fired brick, aged mahogany and carved pumpkin distress ink and stamp onto the panel. 

4). Lightly mist the ink and use a heat tool to dry the entire panel. The leaves were pretty at this stage but I lost some of the detail with the watercolor (experimenting :-)) and so the next step helped bring back the detail.

5). Re-align the stamps over the inked images, de-static the panel with an embossing powder tool and stamp the leaf images one at a time using Versafine™ Black Onyx Ink (masking as needed).  Apply clear embossing powder, heat with the heat tool and repeat.  Use a water brush to add additional ink as needed and a light wash behind the sentiment area.

6). Ink the sentiment from Season of Change using Versafine™ Black Onyx Ink, apply clear embossing powder, heat with the heat tool and allow the embossing to cool.  Add a few splatters to the card with a small splatter stamp and peeled paint distress ink.

7). Die cut the panel with the MFT Die-namics™ Blueprints 20 Stitched Rectangle Frame die, mount onto a piece of black cardstock and adhere to the white card base.

8). Finish off the card by adding shimmer to the leaves with a clear glitter pen.

Stamp Sets: Season of Change (retired dkdesigns from SNSS), Timeless Textures (Stampin' Up!)

Ink/Mediums: Versafine™ Onyx Black; Spectrum Noir™ Clear Glitter Pen, Tim Holtz® Distress Ink- Aged Mahogany, Carved Pumpkin, Fired Brick, Peeled Paint

Paper: Whisper White, Basic Black
Accessories/Tools: Embossing Buddy®, Clear Embossing Powder, Heat Tool, AquaPainter™, Big Shot™, MFT Blueprints 20 Die

Thanks again for taking the time to stop by! Hugs and I hope all of you have a wonderful week!

Friday, September 22, 2017

Wishing You A Harvest Of Blessings


Hi Friends!

I decided to create a Clean and Simple (CAS) card for LeAnne's #362 “CAS Harvest” Challenge at The Paper Players using the Harvest Mouse stamp set from My Favorite Things™ (MFT). 

I already had a few of the mouse images along with the pumpkins, etc. stamped and colored  in my stash so I decided to pull them out and create this quick card.

I also incorporated the CAS(E) This Sketch #240 Challenge into the design and along with the AAA Cards Game #99 “Autumn Colours” .

I hope you have taken the time to visit each of the challenge sites listed above, and if not, I encourage you to do so- gorgeous inspiration from all!

To create this card:

1). Ink the Harvest Mouse images with Versafine™ Onyx Black Ink and stamp onto Whisper White cardstock.  Heat set the ink (I usually do this to speed up the drying process) and color the images with water-based and alcohol markers.

2). Score a piece of Whisper White cardstock (for the angles on the sketch), de-static the paper with an embossing powder tool, stamp the sentiment with Versafine™ Onyx Black Ink, apply clear embossing powder and heat set with a heat tool.

3). Trim a piece of Pumpkin Pie cardstock, adhere the embossed card front to the panel and mount the entire panel onto a white card base.

4). Die cut the Harvest Mouse images with the coordinating MFT Harvest Mouse dies, mount onto the card front with dimensional foam and add a few blue sequins to finish off the card.

Stamp Sets: Harvest Mouse (My Favorite Things™)

Ink/Mediums: Versafine™ Onyx Black; Spectrum Noir™ Alcohol Markers, Stampin’ Write Markers

Paper: Whisper White, Pumpkin Pie

Accessories/Tools: Big Shot™, MFT Harvest Mouse Dies, Embossing Buddy®, Clear Embossing Powder, Heat Tool, Blue Sequins (Craft Medley Asst)

Thanks again for taking the time to stop by and I hope all of you have a wonderful weekend- hugs!!
Related Posts Plugin for WordPress, Blogger...