Saturday, August 28, 2021

Stamp Simply Orders Delayed


A message from Stamp Simply: 

Shipments are delayed at Stamp Simply. We're terribly sorry for unprecedented late shipping. All late orders should ship next week.

Thanks for your patience, kindness, and understanding. All late shipped orders will be nicely rewarded.

Thank You.  

Saturday, August 21, 2021

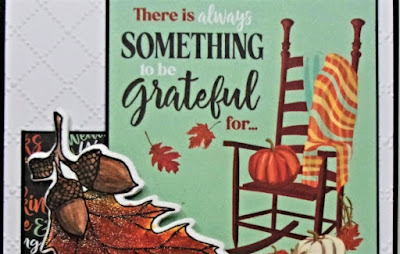
Always Something to Be Grateful For


Hi Friends!

I am having so much fun creating fall cards this month! I have created another quick and easy fall card (using the same stamps and paper as my fall card last week) to share with you today.

Lately, when I create a card, I am making an effort to stamp/color several of the main images so I can create more than one card with that stamp set. 

This simple card uses the leaf image from the  Stamp Simply Clear Stamps- Give Thanks Bundle  along with a cut-a-part from the new Carta Bella Welcome Autumn 6x6 paper pad (all from Stamp Simply )!

As many of you who follow my blog know, I am slowly making a card for each of the over 850+ Splitcoaststampers Sketch Challenges and was able to incorporate the SC165 Sketch into the layout (this sketch was from 2009)- so thrilled that their sketch challenges do not expire, lol!

I am also playing along with the Simon Says Monday “Dry Embossing” Challenge, Simon Says Wednesday “Add A Sentiment” Challenge and the  Word Art Wednesday #505-#506 “Anything Goes” Challenge.

If you have not had a chance to visit the Stamp Simply blog or the other challenge sites yet, I encourage you to do so- wonderful inspiration from all!

Also, don’t forget- Stamp Simply also has a special August promotion!


To create this card:


Ink the oak leaf image from the Give Thanks Bundle using Versafine Onyx Black ink, stamp onto white cardstock and heat set the ink with a heat tool.

Color the image with watercolor pencils and once satisfied with the water color, die cut the leaf with the matching die from the Give Thanks Bundle

Die cut two additional leaf shapes from white cardstock, adhere together and add the colored leaf die cut on top (this gives the die-cut additional strength, almost like a chipboard piece).

Once layered, use a clear glitter marker to add shimmer to the leaf image and set aside to dry thoroughly.

Use the Darice Wire Fence embossing folder to emboss a piece of white cardstock, trim to approx. 4” x 5 ¼” and mount onto a piece of black cardstock.

Mount the panel onto a white card base.


Trim the piece of Carta Bella Welcome Autumn 6x6 Paper for the lower left hand panel, mount onto black cardstock and trim close to the edge.  Mount directly onto the card front.

Trim the cut-a-part “There is always Something to be Grateful For” from the  Carta Bella Welcome Autumn 6x6 Paper , mount onto black cardstock (trimming close to the edge) and adhere directly onto the card front. 

To finish off the card, mount the colored die cut leaf image to the card front using dimensional foam.

Stamp Sets:  Give Thanks Bundle  (Stamp Simply)

Ink/Mediums: Versafine Onyx Black, Derwent and Stampin’ Up! Watercolor Pencils- Browns, Reds, Black; Zig Wink of Stella Brush- Clear Glitter Marker

Cardstock/Paper: White, Black; Carta Bella Welcome Autumn 6x6 Paper Pad

Accessories/Tools: Gemini, Jr., Stamp Simply Steel Dies- Give Thanks (also part of the Give Thanks Bundle), Darice Embossing Folder- Wire Fence

Thanks again for taking the time to stop by and visit!  I hope all of you have a blessed week, sweet friends- we have so much to be grateful for!

Saturday, August 14, 2021

Give Thanks to the Lord


Hi Friends!

This week, I am sharing another fall/Thanksgiving card designed with the Stamp Simply Clear Stamps- Give Thanks Bundle  along with the new Carta Bella Welcome Autumn 6x6 paper pad and other paper, dies, supplies from Stamp Simply !

I love the Stamp Simply Clear Stamps- Give Thanks Bundle as well as the  new Carta Bella Welcome Autumn 6x6 Paper Pad- both are perfect for Autumn/Thanksgiving and all year round!  

Also, don’t forget- Stamp Simply also has a special August promotion!


I had fun incorporating the SC179 Splitcoaststampers Sketch into the layout for this card and will also be linking to the Word Art Wednesday #503-#504 “Anything Goes” Challenge.

If you have not had a chance to visit the Stamp Simply blog or the other challenge sites yet, I encourage you to do so- gorgeous inspiration from all!

To create this card:

Ink the oak leaf image from the Give Thanks Bundle using Versafine Onyx Black ink, stamp onto white cardstock and heat set the ink with a heat tool.


Color the image with watercolor pencils and once satisfied with the water color, die cut the leaf with the matching die.

Trim a piece of the woodgrain paper from the Craft Consortium Wood Textures 6x6 Paper Pad to approx. 4” x 5 ¼”.  Mount onto a piece of black cardstock and trim close to the edge.

Cut a piece of the Carta Bella Welcome Autumn 6x6 Paper (this was actually a scrap approx.. 2” x 3 ½”) and adhere to the background panel.

Die cut a piece of white cardstock using the Tim Holtz Crochet Dies, mount onto the card front and cover the top portion of the die cut with a piece of black twill ribbon (wrapping the ends behind the panel).  

Mount the entire panel onto a white card base.


Use an embossing powder tool to de-static a piece of white cardstock, stamp the verse sentiment from Give Thanks with Versafine Onyx Black ink, apply clear embossing powder and heat with a heat tool.

Die cut the sentiment with the medium Hemstitch Oval Die , also die-cutting two additional ovals from white cardstock, layering the two white die cuts behind the sentiment oval.

Adhere the die cut sentiment oval and the die cut leaf image to the card front with dimensional foam.

Use a clear glitter marker to add shimmer to the leaf image and add a few black rhinestones to the sentiment oval to finish off the card.


Stamp Sets:  Give Thanks Bundle  (Stamp Simply)

Ink/Mediums: Versafine Onyx Black, Derwent and Stampin’ Up! Watercolor Pencils- Browns, Reds, Black; Zig Wink of Stella Brush- Clear Glitter Marker 

Cardstock/Paper: White, Black; Carta Bella Welcome Autumn 6x6 Paper Pad. Craft Consortium Wood Textures 6x6 Paper Pad

Accessories/Tools: Gemini, Jr., Stamp Simply Steel Dies- Give Thanks (also part of the Give Thanks Bundle), Spellbinders Paper Grace- Hemstitch Ovals Die, Sizzix Thinlits Dies by Tim Holtz- Crochet, May Arts 5/8” Twill- 30 yd spool- Black, Kaisercraft Self-Adhesive Rhinestones- Black

Thanks again for taking the time to visit- I hope I have inspired you to create a fall card as well! Hugs and praying that you have a blessed week!

Saturday, August 7, 2021

In All Things, Give Thanks


Hi Friends!

This week, I am sharing another fall card designed with the new Carta Bella Welcome Autumn 6x6 paper pad along with the Stamp Simply Welcome Fall Bundle and other dies/supplies from Stamp Simply !

I love all of the designs in this new Carta Bella Welcome Autumn 6x6 Paper Pad- perfect for Autumn/Thanksgiving and all year round!


 Also, don't forget the Stamp Simply August promotion!


For this card, I used the SC394 Sketch Challenge for the layout (many of you who follow my blog know, I have a personal challenge to create a card for each of the over 860+ Splitcoaststampers Sketch Challenges) and will also linking to one of my favorite online challenges, the Word Art Wednesday #503-#504 “Anything Goes” Challenge.


If you have not had a chance to visit the Stamp Simply blog or the other challenge sites yet, I encourage you to do so- gorgeous inspiration from all!

To create this card:

Ink the pumpkin image from the Welcome Fall Bundle using Versafine Onyx Black ink, stamp onto white cardstock and heat set the ink with a heat tool.

Color the image with watercolor pencils and water-based markers and once satisfied with the water color, die cut the pumpkin with the matching die.


Use an embossing powder tool to de-static a piece of white cardstock, stamp the verse sentiment from Welcome Fall with Versafine Onyx Black ink, apply clear embossing powder and heat with a heat tool.

Die cut the sentiment with the medium Hemstitch Oval Die , also die-cutting two additional ovals from black cardstock, splitting the black oval die cuts to layer behind the sentiment oval.

Die cut the Carta Bella Welcome Autumn 6x6 Paper (love those pumpkins) using the largest oval from the Hemstitch Oval Dies (along with the hemstitch oval).  Also die cut a large oval from black cardstock to layer behind the pumpkin oval.

Emboss a piece of white cardstock with the 3D Lumber Embossing Folder, trim to 4 ⅛” x 5 ⅜” and mount onto a 4 ¼” x 5 ½” black cardstock panel.


Adhere the designer paper die cut large oval layer to the card front.

Trim a piece of the orange plaid from the Welcome Autumn 6x6 paper pad to approx. 2” x 4 ⅛”, mount onto black cardstock, trim close to the edge.

Mount onto the card front overlapping the large die cut designer paper oval.

Add a strip of sage twill ribbon, wrapping the ends behind the panel.

Mount the entire background panel onto a white card base.

Adhere the oval sentiment layer with dimensional foam (or chipboard) onto the card front. 

Also, add the pumpkin image with dimensional foam and finish off the card with self-adhesive pearls.

Stamp Sets:  Welcome Fall Bundle (Stamp Simply)

Ink/Mediums: Versafine Onyx Black, Derwent and Stampin’ Up! Watercolor Pencils- Yellow, Orange, Green, Espresso, Granny Apple Green, Black

Cardstock/Paper: White, Black; Carta Bella Welcome Autumn 6x6 Paper Pad

Accessories/Tools: Gemini, Jr., Stamp Simply Dies- Welcome Fall Pumpkin (also part of the Welcome Fall Bundle), Spellbinders Paper Grace- Hemstitch Ovals Die, Sizzix 3D Texture Fades A6 Embossing Folder- Lumber, May Arts 5/8” Twill- 30 yd spool- Sage, Kaisercraft Self-Adhesive Round Pearls- Pearl

Thanks again for taking the time to stop by! I hope all of you have a blessed week!

Related Posts Plugin for WordPress, Blogger...