Saturday, November 27, 2021

Prince of Peace


Hi Friends!

Today I am sharing a another set of two quick Christmas cards designed with the new Studio Light Sending Joy 6x6 paper pad with the Jesus stamp set along with other items all from Stamp Simply.


I absolutely love all of the patterns in the new Studio Light Sending Joy 6x6 paper pad- you could just add a sentiment and be finished!


Many of you who know that I enjoy participating with online challenges and I will be linking this card to the Simon Says Wednesday “Anything Goes” Challenge along with The Card Concept #164 Rustic Holiday Challenge (I was inspired by the colors, the rustic theme as well as the greenery and lights.  Both cards are Clean and Layered Shabby and Vintage style). 


If you have not had a chance to visit the Stamp Simply blog or the other challenge sites yet, I encourage you to do so- gorgeous inspiration from all!

To create this set of cards:


Trim the ornament and truck patterned paper from the Sending Joy paper pad to approx. 3 ¾” x 5”.

Distress the edges with a distressing tool (or the edge of your scissors). 

De-static the area below the ornaments and the upper right area on the truck scene with an embossing powder tool.
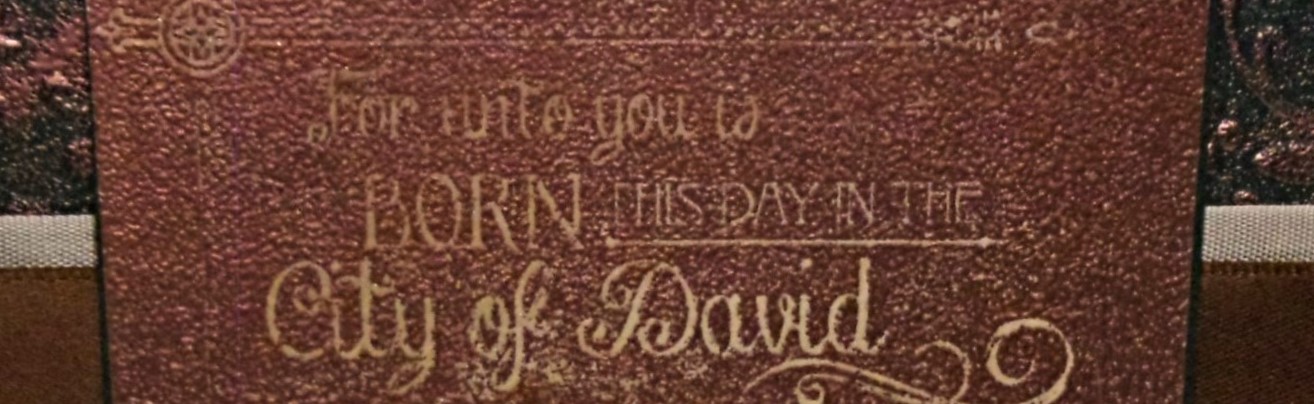
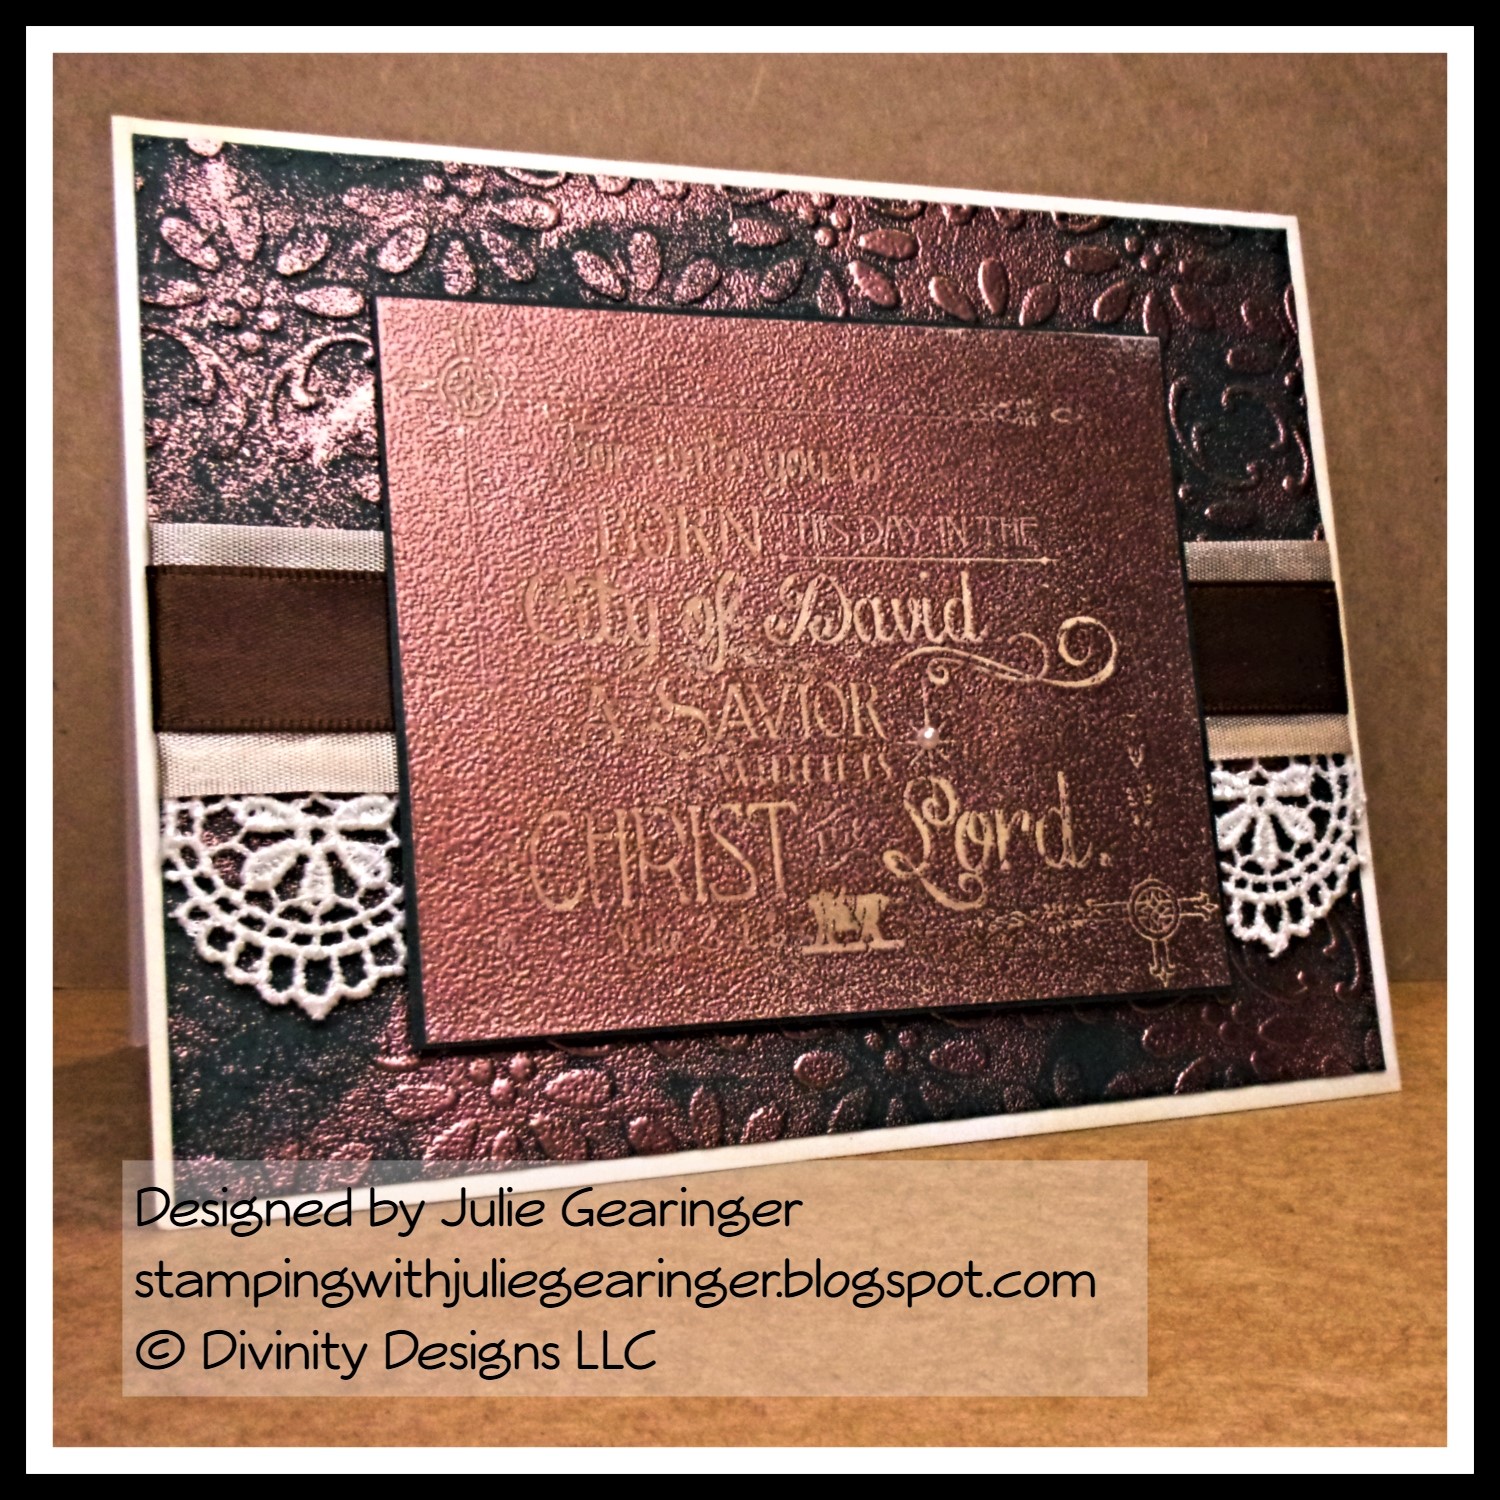
Ink the sentiment from the Jesus stamp set with Versafine Onyx Black ink, apply clear embossing powder and heat set with a heat tool.


Once the embossing has cooled, ink the text block image from the Jesus stamp set with tumbled glass distress oxide ink, stamp over the background on the truck scene.

Mount the truck scene onto dark green cardstock, trim and mount onto a piece of 4 ¼” x 5 ½” red cardstock and adhere to a white card base. 

Use a clear glitter pen to add shimmer to the snow to finish off the truck scene card.


For the ornament card, die cut a piece of white cardstock with the Tim Holtz Crochet Dies.

Adhere the paper lace strip to the ornament panel, add a strip of dark green cardstock over the top of the “lace” and trim off the ends.

Mount onto a piece of dark green cardstock and adhere to a white card base.

Use a clear glitter marker to add shimmer to the stars and ornaments to finish off the card.

Easy to create and flat for mailing! I hope I have inspired you to create a few Christmas cards this week!


Stamp Sets:  Jesus (Stamp Simply)

Ink/Mediums:  Versafine Onyx Black, Tim Holtz Tumbled Glass Distress Oxide, Zig Wink of Stella Brush- Clear Glitter Marker

Cardstock/Paper: White, Dark Green, Studio Light Sending Joy 6x6 Paper Pad

Accessories/Tools: Gemini, Jr. , Sizzix Thinlits Dies by Tim Holtz- Crochet, Embossing Powder Tool, Clear Embossing Powder, Heat Tool, Distressing Tool

Thanks again for stopping by! I hope all of you have a blessed week and don’t forget to stop by Stamp Simply and check out the November sale!


Saturday, November 20, 2021

Sending Joy- A Trio of Tags


Hi Friends! 

Today I am sharing a three quick Christmas tags designed with the new Studio Light Sending Joy 6x6 paper pad, the Christmas Peace  and Merry Christmas stamp sets and other items all from Stamp Simply.

These tags were very quick to create- I used the 2” strips from the scraps from a few cards that I designed recently using the Sending Joy paper pad plus I also had a few of the lace die-cuts already die cut and ready to go (love using up my stash, lol)!

Many of you who follow my blog, know that I enjoy participating with online challenges! I will be linking this card to the Tic-Tac-Toe #140 Challenge (bottom row across- Die Cut, Sequins/Gems, Red), the Craft Rocket #87 Winter/Snow Challenge and the Word Art Wednesday #517-#518 “Anything Goes” Challenge.

If you have not had a chance to visit the Stamp Simply blog or the other challenge sites yet, I encourage you to do so- wonderful inspiration from all!

To create this card:

Die cut the various strips of Sending Joy patterned paper using the medium tag die from the Tim Holtz Tag Collection Dies (my strips were only 2” wide so I positioned them in the die to allow the patterned paper to be layered onto the die cut tags from the dark green cardstock.


Die cut three additional tags (using the same size die) from dark green cardstock.

Die cut the paper lace using the Tim Holtz Crochet Dies from white cardstock.

De-static the patterned tag strips with an embossing powder tool, stamp the verse sentiments from Christmas Peace and Merry Christmas with Versafine Onyx Black ink, apply clear embossing powder and heat set with a heat tool.

Layer the die cut paper lace on two of the patterned paper tag pieces before adhering to the green die cut tags.


Layer a strip of white crochet lace onto the remaining strip of patterned paper tag, adhere to the remaining green tag.

Stamp and heat emboss the star from the Merry Christmas stamp set, die cut with the Merry Christmas coordinating die, and mount onto the tag with dimensional foam.

Color the star using a gold water-based marker.

Die cut three of the hole re-enforcers from the Tag Collection Dies from dark green cardstock and adhere to the tags.

Use a clear glitter marker to add shimmer to the poinsettias, snowflakes and other items on each of the tags and adhere a pearl to the center of the star along with the snowflake on the Spirit of Christmas tag.

Loop pieces of gold twine to finish off the tags.

Stamps:  Christmas Peace, Merry Christmas (Stamp Simply)

Ink/Mediums: Versamark™, Zig Wink of Stella Brush- Clear Glitter Marker; Gold Water-based Marker

Cardstock/Paper: White, Dark Green; Studio Light Sending Joy 6x6 Paper Pad


Accessories/Tools: Gemini, Jr.™, Sizzix Thinlits Dies by Tim Holtz- Crochet,  Sizzix Thinlit Dies by Tim Holtz- Tag Collection,  Stamp Simply Steel Dies- Merry Christmas, May Arts ¼” Crochet Lace- 15 yd spool- White, May Arts Metallic String- 300 Yard Spool- Gold, Kaisercraft Self-Adhesive Round Pearls- Pearl, Embossing Powder Tool, Clear Embossing Powder, Heat Tool

Don't forget our November Special- 15% off plus free shipping on qualified orders- use code SSCS15.  


Thanks again for taking the time to visit- I hope all of you have a great week/weekend!


Wednesday, November 17, 2021

TCC164 For Unto Us A Child Is Born


Hi Friends!

Welcome to The Card Concept #164 Rustic Holiday Challenge

For those of you who are not familiar with The Card Concept Challenge, we are a bi-weekly challenge that uses an inspiration photo for you to create a card. 

Check out our wonderful Rustic Holiday scene!  It looks so warm and cozy, I can imagine sipping a cup of coffee or hot chocolate while relaxing in that checked chair. 

I was inspired by all of the rust colored elements to create a vintage style Mixed Media card!

The main stamped image of the chalkboard verse is a retired stamp from Divinity Designs LLC (they still have the same image available called Born This Day without the chalkboard background).  I am making an effort to use stamps that I already own and this stamp is one that I have not inked in years.

I decided to use copper embossing powder and it is so shiny, it was difficult to photograph, lol! 

We hope you can join us for our challenge.  We are flexible- you can choose one card-making style or a combination of styles, the choice is yours, plus our Design Team of eleven ladies create a card to help give you even more inspiration!

I enjoy participating in other online challenges and will be linking this card to the Word Art Wednesday #518-#519 “Anything Goes” Challenge.

If you have not had a chance to visit The Card Concept, or the Word Art Wednesday Challenge site yet, I encourage you to do so- wonderful inspiration from all! 

To create this card:


De-static a piece of white cardstock with an embossing powder tool, ink the For Unto Us image (retired Divinity Designs LLC) with Versamark™ ink, apply Copper Embossing Powder and heat set with a heat tool.

Trim the panel and mount onto hunter green cardstock.

Emboss another piece of hunter green cardstock with the retired Finial Press (SU!) embossing folder, spread Versmark™ ink over the raised edges, apply copper embossing powder and heat set with a heat tool (FYI- I already had the embossed panel in my stash and just added the copper embossing, love it when I can use up some of my “stuff”, as hubby calls it, lol!).

Once the embossing has cooled, trim the embossed hunter green panel to approx. 4” x 5 ¼”.


Add a strip of cream crochet lace (Hobby Lobby) and adhere a strip of cream seam binding ribbon (retired) along with a strip of copper satin ribbon (from my stash).  Wrap the ends of the ribbon to behind the panel.

Mount the panel onto a white card base, sponge antique linen distress ink over the edges to “age” the white cardstock and also over the lettering on the verse panel.

Mount the verse panel onto the card front with dimensional foam.

Add a small pearl to center of the star to finish off the card.

Again, my apologies for the photos- the card does look much better IRL!

Stamp Sets:  For Unto Us Chalkboard (retired Divinity Designs LLC)

Ink/Mediums:  Versamark™ , Tim Holtz™ Antique Linen Distress

Cardstock/Paper:  Whisper White, Hunter Green (all Stampin’ Up!)

Accessories/Tools: Gemini, Jr.™,  Finial Press Embossing Folder (retired Stampin’ Up!), Embossing Powder Tool, Copper Embossing Powder, Heat Tool, Pearls

Thanks again for taking the time to visit- I hope you have been inspired to join us at The Card Concept! The challenge gallery will be open until 12 noon EST Monday, November 29th - we are looking forward to seeing your artwork in our gallery!

Saturday, November 13, 2021

Glory to God in the Highest


Hi Friends!

Today I am sharing a quick Christmas card designed with the new Studio Light Sending Joy 6x6 paper pad, the Christmas Peace  stamp set and other items from Stamp Simply.


I love the new Sending Joy paper pad- so many gorgeous patterns that make it easy to create multiple cards by just adding a sentiment along with a few other details (plus relatively flat for mailing)!

Many of you who follow my blog, know that I enjoy participating with online challenges! I will be linking this card to the Tic-Tac-Toe #139 Challenge (bottom row across- Holiday, Silver or Gold, Patterned Paper), the Alphabet “P is for Patterned Paper” Challenge and the Word Art Wednesday #517-#518 “Anything Goes” Challenge.

If you have not had a chance to visit the Stamp Simply blog or the other challenge sites yet, I encourage you to do so- gorgeous inspiration from all!

To create this card:

Trim a piece of the Sending Joy 6x6 designer paper to approx. 3 ¾” x 5”. 

De-static the upper area of the panel with an embossing powder tool, ink the sentiment from the Christmas Peace  stamp set with Versamark ink, apply gold embossing powder and heat set with a heat tool.


Use a distressing tool (or the edge of your scissors) to lightly distress the edges.

Die cut a piece of white cardstock with the Tim Holtz Crochet Dies, add to the card front.   


Adhere a strip of sage twill ribbon over the top of the crochet die cut, wrapping the ends behind the panel.

Mount the panel onto dark green cardstock, trim and mount onto a white card base.


Finish off the card by adding shimmer to the bells with a clear glitter marker.


Stamps:  Christmas Peace (Stamp Simply)

Ink/Mediums: Versamark™, Zig Wink of Stella Brush- Clear Glitter Marker

Cardstock/Paper: White, Dark Green; Studio Light Sending Joy 6x6 Paper Pad

Accessories/Tools: Gemini, Jr.™, Sizzix Thinlits Dies by Tim Holtz- Crochet, Embossing Powder Tool, Gold Embossing Powder, Heat Tool, May Arts 5/8” Twill- 30 Yard Spool- Sage

Thanks again for taking the time to visit- I hope I have inspired you to create something this week! 

Saturday, November 6, 2021

Merry Christmas Decor


Hi Friends!

Today I am sharing a Christmas card designed with the new All Season Décor Bundle along with new designer papers from the Stamp Simply October Release!

I love the All Season Décor Bundle, perfect for so many different occasions!

I also love the new Carta Bella Welcome Home 6x6 paper as well as the Studio Light Sending Joy 6x6 paper pad- both are perfect for holiday cards!

As many of you who follow me know, I enjoy playing along with online challenges and will be linking this card to the Word Art Wednesday #515-#516 “Anything Goes” Challenge , the Wednesday Creative Inspiration November “Wonderful Winter/Feeling Festive” Challenge along with the Watercooler Wednesday #328 Tristan’s Challenge: All About Occasions.


If you have not had a chance to visit the Stamp Simply blog or the other challenge sites yet, I encourage you to do so- gorgeous inspiration from all!

To create this card:

De-static a piece of white cardstock with an embossing powder tool, stamp the images from the All Season Décor Bundle with Versafine Onyx Black ink, apply clear embossing powder and heat set with a heat tool.


Repeat the above steps on a small piece of the dark snowflake designer paper from the Carta Bella Welcome Winter 6x6 paper, stamp the pitcher image from All Season Décor Bundle, apply clear embossing powder and heat set with a heat tool.

Heat emboss the “Merry Christmas” sentiment with clear embossing ink onto the wood box image.


Die cut all of the stamped images with the coordinating dies from the All Season Décor Bundle

Watercolor the images with water-based markers.

Trim a piece of the Studio Light Sending Joy designerpaper (with the wreath at the top) to approx. 4” x 5 ¼”.


Repeatedly stamp the pine sprig with green ink repeatedly directly onto the designer paper (for the sprigs in the background), plus stamp a few onto white cardstock (die cutting with the coordinating die).

Mount onto a piece of dark green cardstock and adhere to a white card base.

Position the elements behind the box image and adhere all directly to the card front.

Finish off the card by adding shimmer to the poinsettias on the wreath with a clear glitter marker and a few pearls to the corners of the card as well as the center of the snowflakes on the pitcher.

Stamp Sets: All Season Décor Bundle (Stamp Simply)

Ink/Mediums: Versafine Onyx Black, Zig Wink of Stella Brush- Clear Glitter Marker; Tim Holtz Mowed Lawn Distress Ink

Cardstock/Paper: White, Hunter Green ;Carta Bella Welcome Winter 6x6 Paper Pad;  Studio Light Sending Joy 6x6 paper pad

Accessories/Tools: Gemini, Jr., Embossing Powder Tool, Heat Tool, Clear Embossing Powder, All Season Décor Bundle, Kaisercraft Self-Adhesive Round Pearls- Pearl,

Thanks for taking the time to stop by- don’t forget to check out the rest of the October Release and take advantage of the November sale  (use code SSCS15)!


Related Posts Plugin for WordPress, Blogger...