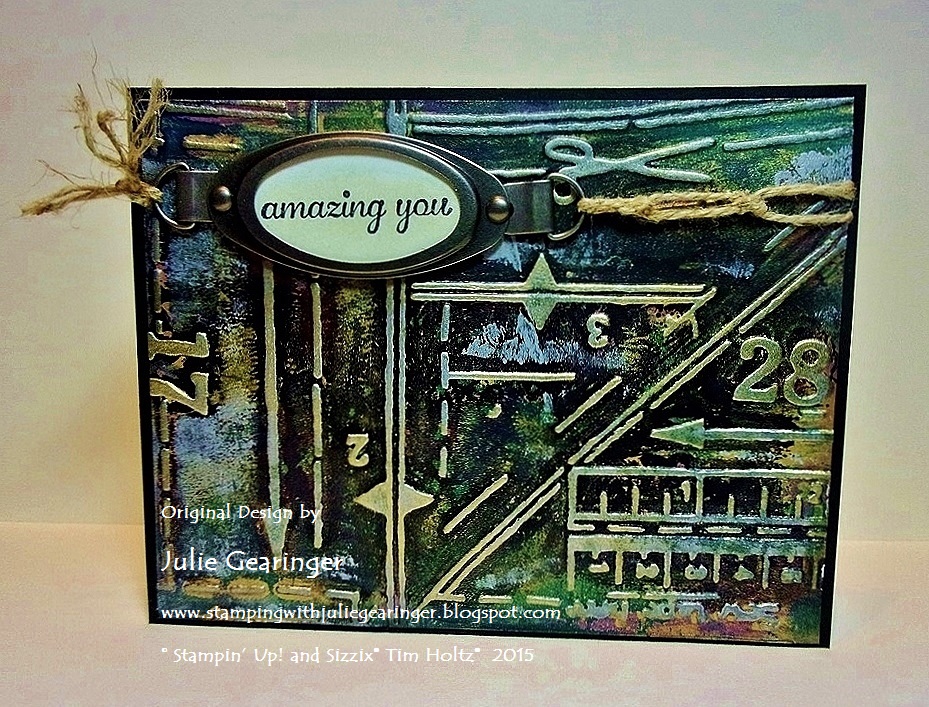
Saturday, October 31, 2015

HYCCT1530 Amazing You- Tough As Nails

Hi Again Friends!

This card was created for the Splitcoaststampers’ “Hope You Can Cling To” HYCCT1530 Yvette’s “Tough As Nails” Challenge to create a card with construction related materials or use construction related stamps, etc.

I decided to use a Gelli Arts® print that I had created a while back using acrylic paints, Stampin’ Up! Classic Inks, Encore!™  Ultimate Metallic Ink and the Sizzix® Tim Holtz® Alterations Patterns Embossing Folder.

I sure hope you have a chance to visit the HYCCT1530 gallery and check out all of the wonderful designs for this challenge- very unique and fun!

I have not ventured into the video making aspect of stamping yet but there are many Gelli Arts® Printing Plate videos describing the basics for monoprinting.

I currently own the 6” square Gelli Arts® Printing Plate and have used it primarily with embossing folders for the printing and texture.  

Below are the basic steps I take to create this type of background print.

Using a brayer, roll Gold and Silver paint onto the Gelli® Arts Printing Plate and spread to cover the plate.

Lay a piece of watercolor paper or cardstock onto the Gelli® Arts Printing Plate and lift off, lay another piece onto the Gelli® Arts Printing Plate for the ghost print.

Add a few drops of colored acrylic paint (I used a dark midnight blue, green and mauve), spread the paint with the brayer onto the Gelli® Arts Printing Plate.

Use the Big Shot to emboss a piece of thick cardstock with the Sizzix® Tim Holtz™ Alterations™ Pattern Texture Fades Embossing Folder.  

Lay the embossed panel (with the raised part of the embossing downward) onto Gelli® Arts Printing Plate, press into the plate and lift up (this action will remove some of the paint for the print design), lay down one of your prints created in the first steps above onto the Gelli® Arts Printing Plate, press with your hands to lift up and if there is enough paint remaining, press the second print into the paint on the Gelli® Arts Printing Plate, smooth over the back with your fingers and lift again.

FYI- I am using very old Folk Art Deco® Acrylic Paints that I have had for years, so they are thin and dry quickly so I usually can only obtain one print after pressing the embossing folder onto the Gelli® Arts Printing Plate.

You can repeat the steps above to build up more layers but I have found that one or two layers give me enough depth for this type of background, plus you will have a bonus print with the embossing folder panel that you are using as the "stencil" will have enough paint and interest to be a print as well :-)

Once the panel is dry, you should be able to see the outline in the paint of the embossing folder that was used as a stencil, match up the stenciled Gelli® Arts print into the actual embossing folder and re-emboss with the Big Shot™.

Add Encore!™  Ultimate Metallic Gold Ink over the raised embossed areas (I just rub the embossed panel over the ink pad) and set the ink with the Heat Tool.

Trim the completed Gelli® Arts Printing Plate panel, add the hardware label with the brads (representing nails) along with the stamped sentiment and twine and mount onto the Basic Black card front to finish off the card.

To me, the metallic inks with the acrylic paint from the Gelli® Arts Printing Plate make this paper look like metal, the pattern embossing folder reminds me of triangles and other items used in the wood shop along with blueprints (even though this embossing folder was meant to represent dressmaking,  which in itself is a form of construction with “nails”- finger nails that is- lol!):-)

So here is my card for the "Tough As Nails" Challenge- are you playing along yet?

Stamp Sets:  Express Yourself

Ink: Stāz-On® Jet Black, Encore!™ Ultimate Metallic Gold; Ranger® Tim Holtz® Old Paper Distress Ink, Various Acrylic Paints (Folk Art Deco®)

Paper: Whisper White, Basic Black

Accessories: Big Shot™, Sizzix® Tim Holtz™ Alterations™ Pattern Texture Fades Embossing Folder, Gelli Arts® Printing Plate, Brayer, retired Antique Pewter Hodgepodge Hardware, Natural Hemp Twine


Thank again for stopping by- I have a few more challenge cards to post this evening.  

Have a blessed weekend, my friends!

HYCCT1529 Thank Pink

Hi Again Friends!

This card was created for the Splitcoaststampers’  “Hope You Can Cling To” HYCCT1529 Mary’s  “Thank Pink” Challenge to create a thank you card using "pinks".

Just a reminder- the Hope You Can Cling To Challenges at Splitcoaststampers is a yearly card drive in October for the MD Anderson Cancer Center.  The challenge is a daily one (with multiple challenges on a few of the days) for a total of 40 challenges in one month and the goal is not only to create the cards but also mail them to the center to be used by the patients undergoing treatment.

It is a very worthy card drive and some of my cards have been sent to friends that are struggling with cancer and the remainder will be sent to the center in early November.

For this fairly simple card, I decided to use the brand new Stampin' Up! October 15 My Paper Pumpkin exclusive stamp set, Blissful Bouquet along with a few other stamps to create my “Thank Pink” card.  

I sure hope you have a chance to visit the HYCCT1529 gallery and possibly gather your supplies to join in on the fun for this worthwhile card drive!!

This Mixed Media card took a bit of time due to the masking, fussy-cutting and painting but it was a lot of fun to create!

First stamp the floral image, mask to add the additional flowers and leaves, color with markers and the AquaPainter™, add Frost White Shimmer Paint to the petals and fussy-cut one of the flowers for additional dimension.

Add splatter and script to the background, trim and mount to cardstock layers, add White Acrylic Paint to the flower stamen ends and Pearls to the flower centers to finish off the card.  

*** FYI- I tried Pink Pirouette for the background splatter, but it stamped almost a light orange color-oops! Possibly my grunge stamp was not clean so I switched to Melon Mambo, stamping off once before applying to the card :-) *** 

Stamp Sets:  Blissful Bouquet (Stampin’ Up! MPP), Gorgeous Grunge, Notable Notions (retired)

Ink: Stāz-On® Jet Black, Melon Mambo, Pink Pirouette; Stampin’ Write Markers- Pink Pirouette, Melon Mambo, Pear Pizzazz, Sahara Sand; Frost White Shimmer Paint, Titanium White Acrylic Paint

Paper: Whisper White, Basic Black, Melon Mambo

Accessories: AquaPainter™, Pearls

I will be sharing a few more of the Hope You Can Cling To Challenge cards this evening (the challenge month is over today and I finished six cards yesterday and have three more posts for those cards plus three more challenge cards to create for today's final challenges :-))


Thanks again for visiting- I hope you have had a chance to visit the HYCCT galleries and possibly time to leave some comment “love” for the participants- wonderful designs and inspiration from all for this very worthy card drive!  Have a blessed weekend, my friends!

HYCCT1528 You Are Such A Blessing

Hi Again Friends!

This Clean and Simple (CAS) card was created for the Splitcoaststampers’  “Hope You Can Cling To” HYCCT1528 Rebecca’s “Rainbows-The Promise of a Better Tomorrow” Challenge to use a rainbow or rainbow colors on your card.

I decided to use the rainbow colors and am also linking to the Splitcoaststampers’ WT552 “Cats” Challenge along with the SC561 Sketch Challenge (modified for a landscape design :-)).

I sure hope you have a chance to visit the above galleries- fabulous inspiration from all!!

This card was very quick and easy to create- trim the Graphic 45® Bohemian designer paper, mount onto Whisper White cardstock, adhere to the Basic Black card base and add the die cut cat and sentiment banner.

Quick, easy and so fun!!

Stamp Sets:  Boho Blessings (Our Daily Bread Designs)

Ink: Stāz-On® Jet Black

Paper: Whisper White, Basic Black, Graphic45® Bohemian Designer Paper

Accessories: Big Shot™, My Favorite Things™ (MFT) Stitched Jumbo Fishtail Banner Dies, Docrafts™ Cat Dies, Rhinestones


Thanks again for taking the time to visit- I have a few more of the Hope You Can Cling To Challenge cards to share with you this evening!!  

HYCCT1527KIDS Furry Kisses


Hi Friends!
Angel

This card was created for the Splitcoaststampers’ “Hope You Can Cling To” HYCCT1527KIDS Andi’s “Mom’s Fave” Challenge to have your kids create a card of something that Mom loves...well, since I do not have any children, my "girls" Angel and Queenie decided to take action :-)

Queenie
The "girls" decided to use a Clean and Simple (CAS) layout with the Simon Says Stamp “Furry Kisses” stamp set (one of their very favorites- can you guess why?).   

They know that they are Mom's favorite "people" (besides Daddy) and they watercolored the images with markers adding a few paw prints along with a heart for their love for me :-)


The  "girls" hope you have 
had a chance to visit the Splitcoaststampers' "Hope You Can Cling To" HYCCT1527KIDS gallery- terrific artwork from all of the "kids" :-) !!

Stamp Sets:  Furry Kisses (Simon Says Stamp)

Ink: Stāz-On® Jet Black, Stampin’ Write Markers- Smoky Slate, Hello Honey, Melon Mambo

Paper: Whisper White, Basic Black, Melon Mambo

Accessories: Big Shot™, MFT Blueprints 20 Dies, AquaPainter™, Rhinestones


Thanks again for taking the time to stop by- Angel and Queenie hope you like their take on this challenge :-)

  I will be sharing more of the Hope You Can Cling To Challenge cards later today!  

JUGS317 One Layer Poinsettia Christmas


Hi Friends!!


It’s time for the new Just Us Girls #317 “One Layer” Challenge and I decided to create a quick Christmas card using Heat Embossing along with Watercolor.

This is my last challenge as a Guest Designer for October and I have truly loved designing with these talented ladies :-)

I hope you will have a chance to check out the rest of the fabulous Just Us Girls Design Teamprojects, pull out your supplies and join in on the fun!   

It was a bit difficult to photograph this card since the panel seems
to warp a bit with the watercoloring but it is flatter IRL :-)
To create this card:

Score a 4.25” x 11” piece of Naturals White cardstock and de-static the front panel using the Embossing Buddy®, stamp the poinsettia and leaf images from the retired set, Joyful Christmas using Versamark™ Ink, apply Stampin’ Emboss White Embossing Powder and heat set with the Heat Tool.

Color using an AquaPainter™ with Cherry Cobbler and Mossy Meadow Classic Ink.  Add additional color using the same colors in Stampin’ Write Markers- spritz with water and allow the colors to run a bit.

Carefully dry the panel with the Heat Tool and once dried, use the Daffodil Delight  Stampin’ Write markers to color the center.

Here is a straight frontal view- again the curve of the lens seems
to accentuate the paper curve from the watercoloring :-)
Stamp the sentiment from the retired set, Christmas Blessings using Stāz-On® Jet Black Ink and add splatters using Gorgeous Grunge with Stāz-On® Jet Black Ink as well.

Quick and easy- perfect for Christmas!


Stamp Sets:  Joyful Christmas, Christmas Blessings (both retired Stampin’ Up!)

Ink: Versamark™, Stāz-On® Jet Black Ink, Cherry Cobbler, Mossy Meadow; Stampin’ Write Markers- Cherry Cobbler, Mossy Meadow, Daffodil Delight

Paper: Naturals White

Accessories: Embossing Buddy®, Stampin’ Emboss® White Embossing Powder, Heat Tool, AquaPainter™


Thanks again for visiting- I hope you have a wonderful week and come play along with us at Just Us Girls!

Friday, October 30, 2015

Smart Is Cool- A No Stamps and Theme Challenge :-)


Hi Again Stampers!   


I just love Graphic45® Designer Papers and this card uses the retired Place In Time (September) paper along with a numbers die cut.  Although the challenge is "Smart is Cool" it does not appear as though this little boy thinks so - lol!!

I hope you will have time to visit the linked galleries above, definitely a challenge to create a card without stamps but Graphic45® makes it so easy!

To create this card:

Separate the September Place In Time Cut Apart page by cutting the individual images and choose the images that you would like to highlight for your card.

Trim the edges and mount onto Basic Black cardstock and trim.

Use the Big Shot™ to emboss a piece of Cajun Craze cardstock (this piece was already embossed and in my stash), trim and mount onto a piece of Basic Black cardstock, trim and mount onto the Whisper White card base.

Arrange the Graphic45® images and mount onto the card front using dimensional foam.
Use the Big Shot™ to die cut the numbers from retired More Mustard cardstock using the retired Go Go Boots Sizzlets™, use an AquaPainter™ with Frost White and Champagne Mist Shimmer Paint to paint over the numbers.

Adhere the numbers to the card front to finish off the card.

 Quick and easy since the Graphic 45™ paper does most of the work for you!!
Stamp Sets: None
Ink:  None; Frost White and Champagne Mist Shimmer Paint
Paper/Cardstock:  Basic Black, Cajun Craze, retired More Mustard; Graphic45® retired Place In Time (September)
Accessories:  Big Shot™, Diamond Sizzix™ Textured Impressions Embossing Folder, retired Go Go Boots Sizzlets™, Watch Charm (from my stash- I believe Paper Studio™)

Thanks again for visiting- have a wonderful Friday!

Thursday, October 29, 2015

HYCCT1527BONUS The Secret of the Sea

Hi Again Friends!

This card was created for the Splitcoaststampers’ “Hope You Can Cling To” HYCCT1527BONUS Shannon’s “Create A Cure” Challenge to create a card using the Salted Background Technique.

I hope you have had a chance to visit the above gallery- terrific inspiration from all!!

To create this card:

Using Ranger® Tim Holtz® Distress Stains- Seedless Preserves, Chipped Sapphire and Peacock Feathers onto a craft mat, lay a piece of Glossy White cardstock in to the ink,
twist and swirl the paper to merge the ink.

Spritz the ink with water to keep it moist and using a salt grinder, grind Sea Salt over the background, lightly mist with water (if needed).

Either allow the salted panel to dry naturally ( or heat with the Heat Tool) and once dry, brush the salt off and trim the panel.

De-static with the Embossing Buddy® , ink the Sweet ‘n Sassy Stamps (SNSS) The Sea with Versamark™, stamp over the background panel, apply Stampin’ Emboss® Black Embossing Powder and heat set with the Heat Tool.

Mount the panel onto Basic Black cardstock and mount onto the Whisper White card base.

Stamp the sentiment with Memento™ Tuxedo Black Ink onto Whisper White and cut out with the Big Shot™ and the My Favorite Things™ (MDT) Stitched Jumbo Fishtail Banner Dies.

Add a few stars with the Faber-Castell® White Pitt Pen Marker.

Mount the sentiment to the card front with dimensional foam to finish off the card.

 Stamp Sets:  The Sea (SNSS)

Ink: Versamark™, Memento™ Tuxedo Black, Ranger® Tim Holtz® Distress Stains- Seedless Preserves, Chipped Sapphire and Peacock Feathers; Faber-Castell® White Pitt Pen Marker

Paper: Whisper White, Basic Black, Glossy White

Accessories: Big Shot™, MFT Stitched Jumbo Fishtail Banners Dies, Sea Salt, Embossing Buddy®, Stampin’ Emboss® Black Embossing Powder, Heat Tool, Craft Mat


Thanks again for taking the time to stop by- I have one more card to share later this evening!  

HYCCT1527 Well Behaved Women Seldom Make History

Hi Friends!!

This card was created for the Splitcoaststampers’ “Hope You Can Cling To” HYCCT1527 Edna’s “Strength In Numbers” Challenge to use "masking" to create a group of people or animals.

Again, if you have not had a chance to do so, I hope you will find the time to visit the above gallery- fantastic inspiration from all!!

I decided to use the Graphic45® Couture set from Hampton Arts® to create my group of fanciful ladies :-)

To create this card:

Stamp the main lady in the center using Stāz-On® Jet Black Ink onto Whisper White cardstock.

Re-ink the image and stamp onto a piece of scrap paper, fussy-cut out the image and use this as a mask for the main image on the Whisper White cardstock.

Ink the other two ladies using Stāz-On® Jet Black Ink.

Remove the mask and color the image with Faber-Castell® Polychromos™ Pencils and use Gamsol® with a Blending Stump to blend.

Add definition with the Real Red Stampin’ Write Marker and add shadows to all of the images with the Sahara Sand Stampin’ Write Marker.

Add Frost White Shimmer Paint with an AquaPainter™ to the hat and dark bands on the central image, the veil, gloves on the right hand side lady and the coat for the lady on the left.

Use the Big Shot™ with the Spellbinders® Labels 18 Die to cut out the panel along with another label from Basic Black cardstock.

Split the Basic Black label in half and mount behind the focal image.

Use the Big Shot™ to emboss a piece of Real Red cardstock with the Lacy Brocade Texture Impressions™ Embossing Folder, trim and mount onto a piece of Basic Black cardstock, trim and mount onto the Whisper White card base.

Stamp the sentiment from the retired Stampin’ Up! set, Fabulous Thoughts using Stāz-On® Jet Black Ink onto Whisper White cardstock, add the banner points with the Hexagon Punch.

Mount the focal image and sentiment to the card front with dimensional foam and add the 5/8” Basic Black Satin Ribbon Double Bow along with the Rhinestone to the center of the lady in red’s blouse to finish off the card.

 Stamp Sets:  Favorite Thoughts (retired Stampin’ Up!), Couture (Graphic 45® by Hampton Arts®)

Ink: Stāz-On® Jet Black Ink, Stampin’ Write Real Red and Sahara Sand Markers, Faber-Castell® Polychromos™ Red Pencil, Frost White Shimmer Paint

Paper: Whisper White, Basic Black, Real Red

Accessories: Big Shot™, retired Lacy Brocade Textured Impressions™ Embossing Folder, Spellbinders® Labels 18 Die, Hexagon Punch, 5/8” Basic Black Satin Ribbon, Rhinestone, Gamsol®, Blending Stump, AquaPainter™


Thanks again for taking the time to stop by- I will be posting a few more of the Hope You Can Cling To Challenge cards later this evening and tomorrow!  

HYCCT1527HERO Fight Cancer Like A Superhero

Hi Friends!!

This card was created for the Splitcoaststampers’  “Hope You Can Cling To” HYCCT1527HERO Fantastic Four’s “You Are My Superhero” Challenge to create a card with a superhero theme :-)

Again, if you have not had a chance to do so, I hope you will find the time to visit the above gallery- "super" inspiration from all!!

This was another difficult challenge for me since I do not own any stamps with superheroes but then I remembered that I had purchased the Stampin’ Up! Calling All Heroes stamp brush set to use with the retired My Digital Studio (MDS)- yippee!!

To create this card:

Open a blank document in MDS and insert the cityscape image from the Calling All Heroes stamp brush set along with the cat eye mask- resize if needed.

Using the alphabet, spell BAM! and POW! -  insert into the zagged word bubble, arrange as a group and re-size.

Create a text box and type the sentiment.

Print all onto Whisper White cardstock, fussy cut the building image along with the word bubbles, trim the sentiment and create the banners with the Hexagon Punch.

Use the Big Shot™ to emboss a piece of Pink Pirouette cardstock using the Chevron Textured Impressions™ Embossing Folder, trim and mount onto a piece of Basic Black cardstock.

Mount the panel onto the Whisper White card base, adhere the city scape and cat eye mask images directly onto the embossed panel and mount the word bubbles along with the sentiment using dimensional foam.

BAM! You are finished!!

Stamp Sets:  Calling All Heroes (MDS version)
Ink: Printer Ink- Black
Paper: Whisper White, Basic Black, Pink Pirouette
Accessories: Big Shot™, Chevron Textured Impressions™ Embossing Folder, Hexagon Punch

Thanks again for taking the time to visit- I will be posting more of the Hope You Can Cling To Challenge cards later this evening and tomorrow!  

HYCCT1526 Fairy Dreams

Hi Friends!!


Again, if you have not had a chance to do so, I hope you will find the time to visit the above gallery- tremendous inspiration from all!!

Since I do not own any stamps with fairies at all, I googled and checked on Pinterest and found this free art image from Enchanted Designs Blog (not sure if she is spunky but I thought she looked hopeful :-)).

To create this card:

Copy the free art image to your computer and upload it to a photo editing software (I use the retired My Digital Studio (MDS)) and print it onto Whisper White cardstock.

Color the image using Stampin’ Write Markers with the AquaPainter™- Hello Honey for her hair, Wisteria Wonder for her dress, Blushing Bride along with Calypso Coral for the flowers, Pear Pizzazz for the stems and leaves, Smoky Slate for the wings and Sahara Sand for the shadows.

Use an AquaPainter™ to apply Frost White Shimmer Paint onto her wings.

Emboss a piece of Wisteria Wonder cardstock with the Big Shot™ and Sizzix® Stars Textured Impressions™ Embossing Folder, trim and mount onto a piece of Pear Pizzazz cardstock, trim and mount onto the Whisper White cardstock.

Cut the image out with the Big Shot™ and MFT Rounded Stitched Rectangle Die.
Add the looped Gold Cord to the card front and mount the focal image die cut over the cord with dimensional foam.

Stamp the sentiment with Stāz-On® Jet Black Ink onto Whisper White cardstock, trim and add the banner points with the Hexagon Punch and mount to the card front with dimensional foam.

Stamp Sets:  Dream A Little (retired Stampin’ Up! Hostess set),  Free digital art from Enchanted Designs Blog (using MDS)

Ink: Printer Ink- Black, Stāz-On® Jet Black; Stampin’ Write Markers- Blushing Bride, Calypso Coral, Hello Honey, Pear Pizzazz, Sahara Sand, Smoky Slate, Wisteria Wonder; Frost White Shimmer Paint

Paper: Whisper White, Wisteria Wonder, Pear Pizzazz

Accessories: Big Shot™, MFT Rounded Stitched Rectangle Die, Sizzix® Stars Embossing Folder, Hexagon Punch, AquaPainter™, Gold Cord

Thanks again for taking the time to visit-stop by again soon as I will be posting more of the Hope You Can Cling To Challenge cards later this evening!  

Wednesday, October 28, 2015

HYCCT1525 Christmas Blessings To You

Hi Friends!!


Again, if you have not had a chance to do so, I hope you will find the time to visit the above galleries- wonderful inspiration from all!!

This was a quick, easy card to create- ink and stamp the images with Versamark™ onto Whisper White cardstock, emboss with White Embossing Powder and watercolor with Cherry Cobbler, Mossy Meadow and More Mustard.

Fussy cut the poinsettias and position onto the die cut More Mustard panel, mount onto the embossed Whisper White panel and layer onto More Mustard and Cherry Cobbler cardstock.

Another view to show that there is very little
dimension so less postage is needed as well :-)
Add the stamped sentiment with dimensional foam and you are finished!

Stamp Sets:  Joyful Christmas, Christmas Blessings (both retired Stampin’ Up!)

Ink: Versamark™, Cherry Cobbler, Mossy Meadow, retired More Mustard Classic Ink and Stampin' Write Markers

Paper: Whisper White, Cherry Cobbler, More Mustard

Accessories: Big Shot™, MFT Blueprints 13 Die, Hexagon Punch, AquaPainter™, Water Spritzer Bottle, retired Petals-A-Plenty Textured Impressions™ Embossing Folder


Thanks again for taking the time to stop by- I will be posting more of the Hope You Can Cling To Challenge cards shortly!

CMCC95 So Very Thankful


Hi Friends!!

It is time for the new Colour Me...! CMCC95 "Colour Me...Playful" Challenge and I decided to create a card using watercolor with the Splitcoaststampers’ SC506 Sketch Challenge and the F4A291 "There  Once was  a Kitty Named Pumpkin" (include a pumpkin in your design).

Again, I hope you will have a chance to check out the rest of the Colour Me..! Design Team projects as well as the other galleries linked above and create your own project to join in on the fun!! 


To create this card:

Ink the Our Daily Bread Designs (ODBD) Cornucopia stamp using Stāz-On® Jet Black Ink and color with an AquaPainter™ using Stampin’ Write Markers- Cucumber Crush, Real Red, So Saffron,Tangelo Twist and add a few shadows using Sahara Sand.

Use the Big Shot™ to cut out the image with the My Favorite Things™ Stitched Rectangle Die and mount onto a piece of Tangelo Twist cardstock.

Emboss a piece of Real Red cardstock using the Woodgrain Textured Impressions, trim and mount onto a piece of Tangelo Twist cardstock.
Add the So Saffron Grosgrain Ribbon and mount onto the card base.

Emboss a piece of So Saffon retired Designer Series Paper (DSP) using the Square Lattice Textured Impressions™ Embossing Folder, trim and mount onto a piece of Tangelo Twist cardstock.

Add the panel to the card front and mount the focal image using Stampin’ Dimensionals®.

Stamp the sentiment using Stāz-On® Jet Black Ink onto Whisper White cardstock, create the banner points using the Hexagon Punch, mount onto Tangelo Twist cardstock and create the banner points again using the Hexagon Punch.

Mount the sentiment to the front of the card and focal image using Stampin’ Dimensionals®.

Add a few Pearls to finish off the card.

Stamp Sets:  Cornucopia (ODBD), Pretty Patches- Apple (Wplus9 Designs)

Ink: Stāz-On® Jet Black Ink; Stampin’ Write Markers- Cucumber Crush, Real Red, So Saffron, Tangelo Twist, Sahara Sand

Paper: Whisper White, Real Red, Tangelo Twist, retired So Saffron DSP

Accessories: Big Shot™, Woodgrain and retired Square Lattice Textured Impressions™ Embossing Folders, Hexagon Punch, So Saffron Grosgrain Ribbon, Pearls


Thanks again for stopping by- I hope you have a fantastic week and come play along with us at ColourMe...!
Related Posts Plugin for WordPress, Blogger...