Showing posts with label Favorite Thoughts. Show all posts

Thursday, October 29, 2015

HYCCT1527 Well Behaved Women Seldom Make History

Hi Friends!!

This card was created for the Splitcoaststampers’ “Hope You Can Cling To” HYCCT1527 Edna’s “Strength In Numbers” Challenge to use "masking" to create a group of people or animals.

Again, if you have not had a chance to do so, I hope you will find the time to visit the above gallery- fantastic inspiration from all!!

I decided to use the Graphic45® Couture set from Hampton Arts® to create my group of fanciful ladies :-)

To create this card:

Stamp the main lady in the center using Stāz-On® Jet Black Ink onto Whisper White cardstock.

Re-ink the image and stamp onto a piece of scrap paper, fussy-cut out the image and use this as a mask for the main image on the Whisper White cardstock.

Ink the other two ladies using Stāz-On® Jet Black Ink.

Remove the mask and color the image with Faber-Castell® Polychromos™ Pencils and use Gamsol® with a Blending Stump to blend.

Add definition with the Real Red Stampin’ Write Marker and add shadows to all of the images with the Sahara Sand Stampin’ Write Marker.

Add Frost White Shimmer Paint with an AquaPainter™ to the hat and dark bands on the central image, the veil, gloves on the right hand side lady and the coat for the lady on the left.

Use the Big Shot™ with the Spellbinders® Labels 18 Die to cut out the panel along with another label from Basic Black cardstock.

Split the Basic Black label in half and mount behind the focal image.

Use the Big Shot™ to emboss a piece of Real Red cardstock with the Lacy Brocade Texture Impressions™ Embossing Folder, trim and mount onto a piece of Basic Black cardstock, trim and mount onto the Whisper White card base.

Stamp the sentiment from the retired Stampin’ Up! set, Fabulous Thoughts using Stāz-On® Jet Black Ink onto Whisper White cardstock, add the banner points with the Hexagon Punch.

Mount the focal image and sentiment to the card front with dimensional foam and add the 5/8” Basic Black Satin Ribbon Double Bow along with the Rhinestone to the center of the lady in red’s blouse to finish off the card.

 Stamp Sets:  Favorite Thoughts (retired Stampin’ Up!), Couture (Graphic 45® by Hampton Arts®)

Ink: Stāz-On® Jet Black Ink, Stampin’ Write Real Red and Sahara Sand Markers, Faber-Castell® Polychromos™ Red Pencil, Frost White Shimmer Paint

Paper: Whisper White, Basic Black, Real Red

Accessories: Big Shot™, retired Lacy Brocade Textured Impressions™ Embossing Folder, Spellbinders® Labels 18 Die, Hexagon Punch, 5/8” Basic Black Satin Ribbon, Rhinestone, Gamsol®, Blending Stump, AquaPainter™


Thanks again for taking the time to stop by- I will be posting a few more of the Hope You Can Cling To Challenge cards later this evening and tomorrow!  

Wednesday, November 19, 2014

Sensible Woman- Two Challenges in One!

Hi Stampers!

I had two additional tags from the homemade “background” panel that I created for the previous post for the PPA227 Color Challenge, so instead of tucking them away for another day,  I decided to create another card :-)  


I hope you will find time to visit both challenge sites- inspiration from all!  Here is the link for the Splitcoaststampers Master Sketch Challenge- so many sketches, so little time- lol!

To create this card:

As mentioned in the previous post (here), stamp the various images from the retired Established Elegance set using Memento™ Tuxedo Black Ink and Old Olive Classic Ink (for the scroll) onto Whisper White cardstock, masking a few images and coloring the images using Stampin’ Write markers- Crushed Curry, Old Olive and Pumpkin Pie. 
Add a bit of distressing with the large splatter stamp from Gorgeous Grunge using Baked Brown Sugar Classic Ink.

Use the Note Punch to punch out the images and sponge additional Baked Brown Sugar onto the tags to “antique” the Whisper White cardstock.   Also punch two tags from Old Olive cardstock, cut the tags apart and mount behind the stamped tag images.

Add the Burnt Sienna Organdy Ribbon along the bottom (this ribbon is from my stash and is wired, so I adhered to the tag with Sticky Strip)- also add a piece at the top of the tag and tie with Linen Thread.

Mount a piece of Eastern Elegance Designer Series Paper (DSP) to a piece of Old Olive cardstock, trim and mount onto a piece of Crushed Curry cardstock and "antique” the Crushed Curry DSP using a Baked Brown Sugar Sponge Dauber.

Add the two strips of Burnt Sienna Organdy Ribbon to the center, slip the embossed strip of Very Vanilla cardstock (this was in my stash- previously cut and embossed) and add a strip of Old Olive cardstock to hide the seam of the two strips of ribbon.

Mount the entire panel onto the Pumpkin Pie card base.

Using My Digital Studio (MDS), insert the sentiment image onto a blank 8.5 x 11 document, reduce in size and print onto Very Vanilla cardstock.  Trim the image and create the banner points using the Hexagon Punch. 

Create the rolled flowers with the 1 ¼” Scallop Circle Punch- punch two scallops from Pumpkin Pie cardstock, carefully cut a wavy spiral from the outside edge toward the center, roll up and adhere in the center (I use Hot Glue to adhere). 

Using the Bird Builder Punch, punch the leaves out of Old Olive cardstock, adhere the leaves behind the flowers and add a rose to the top of each tag. 

Add the tags and the sentiment to the card front using Stampin’ Dimensionals®.  Add a few Pearls to finish off the card.

Stamp Sets:  Established Elegance, French Foliage, Gorgeous Grunge, Favorite Thoughts (MDS version)

Ink:  Memento™ Tuxedo Black Ink, Baked Brown Sugar; Stampin’ Write Markers- Crushed Curry, Old Olive, Pumpkin Pie; Printer Ink- Black

Paper: Whisper White, Very Vanilla, Crushed Curry, Old Olive, Pumpkin Pie; Eastern Elegance DSP (retired)

Accessories: Big Shot™, Adorning Accents Edgelits™ (retired) , Adorning Accents Textured Impressions™ Embossing Folder (retired) , Punches- Note, Hexagon, 1 ¼” Scallop Circle, Bird Builder; Sponge Dauber, Linen Thread, Pearls, Burnt Sienna Organdy Ribbon (from my stash)


 Thanks again for visiting- I hope all of you have a wonderful week!!

Monday, July 21, 2014

CAS Card in Honor of "Queenie" :-)

Hi Again Stampers!!

Here is another quick card that I created using the CASOLOGY #104- Pet and the PPA212 Pals Paper Arts Sketch (love this sketch! :-)) 

As soon as I saw the cue word from CASOLOGY, I knew that I could create a card with a cat stamp that I found at Michael’s years ago in the dollar bin (that until today had not been inked at all :-)).   

Our beloved "Queenie" :-)
We had just adopted two kittens that we destined for the shelter (if they had not found a home) and one of the kittens looked just like the stamp.  Since she was little, she had a "regal" attitude so we nicknamed her “Queenie”.   She loved to wrap her fluffy tail around the face of our older male kitty and then pose in such a pretty manner (trust me, he could not resist her and was in love at first site :-))

To this day, she has a wonderful temperament and queen-like behavior that befits her nickname perfectly!

 Again, I hope you have a chance to visit the above sites to check out the Design Team samples and other entries- both galleries are full of great designs!

 To create this “hybrid” card:

Ink the cat image using Memento™ Tuxedo Black Ink and stamp onto a piece of Whisper White cardstock.  Color the image using the Stampin’ Blendabilities™ Old Olive Collection for the eyes, Daffodil Delight Collection for the crown and Stampin’ Write markers for the fur (Crumb Cake and Smoky Slate).

Punch the image out using the 2” Circle Punch and also punch 2” Circles from Sahara Sand and Basic Black cardstock.  Split the Sahara Sand and Basic Black circles in half and mount behind the cat image.

For the crown, paw prints and sentiment, use My Digital Studio and print the images onto Whisper White cardstock. 
 
Color the crown using the Stampin’ Blendabilities™ Daffodil Delight Collection and punch both images out using the 1 3/8” Circle Punch (also punching 1 3/8” Circles from Sahara Sand and Basic Black cardstock, splitting these circles in half and mounting behind the crown and paws images). 

Add a strip of Basic Black cardstock along with ½ of a White Tea Lace Paper Doily (attached at the bottom) to the Sahara Sand background and mount this layer onto a Basic Black card base.

Add the images along the black strip and the sentiment using Stampin’ Dimensionals® to finish off the card.

Stamp Sets: Favorite Thoughts, Artistic Etchings, Patterned Pets (all MDS versions), cat image (non- SU!)

Ink: Memento™ Tuxedo Black, Stampin’ Blendabilities™-  Old Olive and Daffodil Delight Collections,  Stampin’ Write markers- Crumb Cake and Smoky Slate

Paper: Whisper White, Basic Black, Sahara Sand

Accessories: 1 3/8" Circle Punch, Hexagon Punch, White Tea Lace Paper Doily


Thanks again for stopping by- I hope you enoyed this card in honor of our "Queenie" :-)  Have a great Monday and God Bless!

Sunday, April 27, 2014

MIX65 Crazy Mixed Up World

Hi Again Stampers! 

I am having so much fun with the Splitcoaststampers MIX65 Challenge- Back to Kindergarten (using crayons) and decided to use the crayon rubbed embossing technique on this card as well as creating another card with the CMCC#17 Colour Me! Challenge colors.   
 I hope you will have the time to check out the gallery at both sites- again, so much talent and inspiration!!

To create this card:

Using the crayon rubbed embossing technique (here is the link to the forum and the technique videos), open the Textured Impressions™ Embossing Folder and place a piece of Whisper White cardstock on top of the raised portion of the folder.   Rub the White Crayon over the cardstock (press firmly) and use a brayer to apply Coastal Cabana Classic Ink. 

 
Use a paper towel to rub the ink off the crayon areas, use a Sponge Dauber first with Bermuda Bay Classic Ink, then again with Pacific Point Classic Ink and finally with Tempting Turquoise Classic Ink. 

Mask the areas using either scrap paper or sticky notes and using The Open Sea, stamp the images randomly in different areas (a modified retriform/grid technique) with Basic Gray Classic Ink. Rub off the excess ink with a dry paper towel. 

Use a 1 ¼” Square Punch to punch out the panel, rearrange the squares into the desired pattern and mount onto a piece of Basic Black cardstock.

When choosing the sentiment,  I already had this one previously printed from My Digital Studio and thought it would be perfect since the images were re-arranged in a random pattern and showcased the mixed up “world”  :-)

Add the 5/8” Basic Black Satin Ribbon bow to the edge of the sentiment and mount the entire panel onto the Whisper White card base.

Stamp Sets: The Open Sea, Favorite Thoughts (MDS version)

Ink: Bermuda Bay, Coastal Cabana, Pacific Point, Tempting Turquoise, Basic Gray

Paper/Cardstock:  Whisper White, Basic Black


Accessories: Sizzix Textured Impressions™ Embossing Folder, White Crayon, Sponge Daubers,  5/8” Basic Black Satin Ribbon, Hexagon Punch (for sentiment banner)

Thanks again for stopping by!  Hope you have a great week- I still have a few more creations to share and will post this evening :-)

Saturday, August 24, 2013

Sensible Woman in a Polka Dot Dress :-)


Hi Stampers! 

I wanted to create a card to start off the weekend and decided to use the Freshly Made Sketches #FMS100 Challenge (congrats on 100!) along with the SR190 colors from Stampin’ Royalty.   

Hope you take the time to visit both sites- so many examples of projects (no two the same- love it!! :-))

To create this card:

Stamp the script image from Notable Notions using Basic Black Classic Ink onto Crumb Cake cardstock and adhere to a piece of Basic Black cardstock.

Add the Pistachio Pudding DSP (from Venetian Romance Designer Series Paper) onto a layer of Basic Black cardstock and mount onto the background layer at an angle per the sketch.

Use the Big Shot™ with the Dress Up Framelits™ to cut the dress from the Modern Medley Designer Series Paper and use the Delicate Doilies Sizzlits™ L with a piece of Very Vanilla.  

Add the 1/2” Crumb Cake Seam Binding for the waistband (fold in half first) across the dress and adhere behind the dress with Glue Dots. 

To create the paper roses- Use the 7/8” Scallop Circle Punch and 1 ¼” Scallop Circle Punch to punch out circles from Crisp Cantaloupe cardstock (one with the 7/8” Punch and three with the 1 ¼” Punch).   

Take your scissors and cut a wavy spiral cut around the flower- start from the outside and follow the circle around towards the center leaving an area in the middle for the glue, scrunch the paper a bit and roll the cardstock up starting from the outside edge towards the center.  Add a bit of Multipurpose Liquid Glue to the center of the flower to hold in place and add a Pearl (Splitcoaststampers has a photo tutorial here).

Use the Bird Builder Punch to punch out the leaves from Pistachio Pudding Cardstock (I cut a few leaves off the stem for the small rose) and adhere behind the flowers using Glue Dots.     Add the small rose to the waist of the dress with a Glue Dot.

Adhere a strip of Crisp Cantaloupe DSP (from Birthday Basics) to a piece of Basic Black cardstock and add to the front of the card overlapping the Pistachio Pudding and Doily a bit. 

 I decided to use a previously printed My Digital Studio™  (MDS) sentiment from Favorite Thoughts (love this sentiment and the download is still current :-))  and hand cut the banner points.  To handcut, using Paper Snips cut toward the sentiment on the end (in the middle) and then hand cut from the corners to meet the end of the center cut  (again toward the sentiment).   I have also cut the banner points in the past using the 1" Square Punch but decided to go the hand cut way this time :-)

Using Stampin’ Dimensionals® add the banner and the dress- finish off the card adding the roses to the corner of the sentiment.

Stamp Sets:  Notable Notions, Favorite Thoughts (MDS)

Ink: Basic Printer Ink- Black, Black Classic Ink

Cardstock: Very Vanilla, Basic Black, Crumb Cake, Designer Series Paper- Birthday Basics, Modern Medley and Venetian Romance


Accessories:  Big Shot™, Dress Up Framelits™, Delicate Doilies Sizzlits™ L, 7/8” and 1 ¼” Scallop Circle Punches, ½” Crumb Cake Seam Binding Ribbon, Pearls 

Thanks again for taking the time to visit- it is so encouraging to me!!  Have a great weekend and God Bless!!

Wednesday, April 24, 2013

One Layer Butterfly- Another One for the Paper Players


Hi Stampers! 

I hope all of you are having a great week so far!   I decided to create one more card for this week’s  PP142 One Layer CASfrom Jaydee Challenge at The Paper Players.   Again, if you have not visited, take the time to do so- the Design Team samples and other entries are gorgeous!!

The first two attempts for this challenge are in a previous post and were created using the Straw Technique (not sure if that technique is the best for a One Layer Card).  I was not totally pleased with the results (I liked the foliage one better than the floral- the floral one is a bit busy for me since the ink smudged and I had to add more flowers to hide the smudges), so I decided to give it one more try :-)

To make this quick, easy “hybrid” card:

Using My Digital Studio (MDS), open a blank 8 ½” x 11” page and position the butterfly image from the Wonderful Wings Stamp Brush set into the upper right hand corner.  

Re-size and rotate the butterfly slightly to the right.  Insert the sentiment from Favorite Thoughts Stamp Brush set  a bit below the butterfly image- I just love the sayings in this set :-) )  

 *** Remember to position the butterfly and sentiment on the right hand side of the cardstock so that you can cut the cardstock and score for the fold  ***.  


You can print out two sets per one piece of cardstock- great for multiple cards :-)

Use the Big Shot™ with the Adorning Accents Textured Impressions™ Folder to emboss the right hand edge of the card and color the butterfly with Stampin’ Write markers – I used Daffodil Delight, Pacific Point and Sahara Sand (to add the shadow).

As an afterthought, I could have printed a drop shadow but I like to color so adding one by hand is more relaxing for me :-)

Close up of Spritzing and Shadow :-)

Use the White Gel Pen to add accents to the wings and cover the butterfly with an vval frame - I used a scrap piece of Whisper White cardstock that I had previously cut an Oval Framelit™ from the Ovals Collection.  This became a mask for the rest of the card and the butterfly was the image in the "oval".  

Use the Color Spritzer Tool with the Crumb Cake Stampin’ Write marker to spritz the area around the butterfly and add more dimension to the card.

Now you are finished!!  Quick, easy and to me, a lot of fun!

Stamp Sets:  Wonderful Wings, Favorite Thoughts (both MDS)

Ink: Printer Ink- Black, Stampin’ Write markers- Daffodil Delight, Pacific Point, Sahara Sand, Crumb Cake

Cardstock/Paper: Whisper White

Accessories:  Big Shot™, Apothecary Accents Textured Impressions™ Embossing Folder,  Color Spritzer Tool, White Gel Pen, scrap with an Oval Frame 

Thanks again for stopping by- I hope all of you have a wonderful Wednesday!!

Wednesday, February 27, 2013

Another Quick CAS Card- Two Challenges, MDS and Scraps!


Hi again, Stampers! 

I decided to stay up late and create one more card another  digital image from My Digital Studio (MDS)- Swallowtail.  This image is a background stamp and while I have the actual wood mounted background stamp, it generally will not fit on the standard A2 card, so I was thankful to be able to obtain it in a digital format.  

Why, do you say?  Another thing I love about MDS, is that you can re-size the image plus sets that are retired from the main catalog are still available (as in the sentiment, Favorite Thoughts).

I decided to use this week's Dynamic Duos DD41 colors along with the PP134 sketch from ThePaper Players.  I love both of these challenge sites and again, if you have done so, take a moment to check them out!!

This card was another quick and easy one to create since I already printed the image earlier with my CAS Celebration card (see the last post), had the sentiment printed from months ago and used previously embossed scraps so all I had to do was assemble:-)  

To create this CAS card:

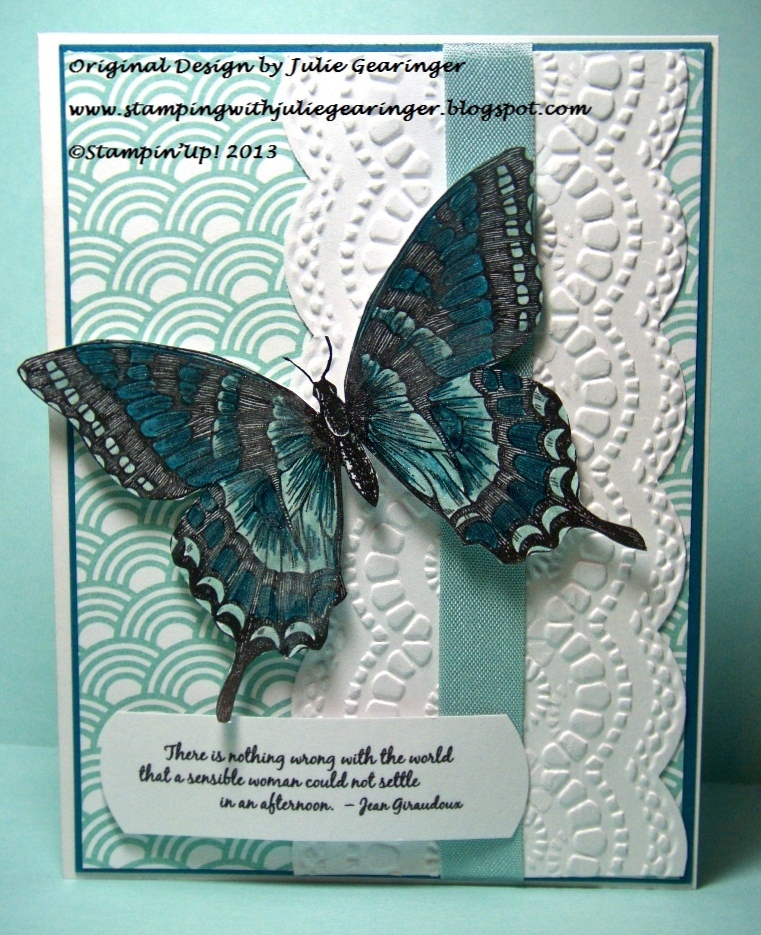
Using My Digital Studio (MDS), position the butterfly image from the stamp brush set,  Swallowtail and reduce to size .  Position the sentiment from Favorite Thoughts on the page below the image and print out onto Whisper White cardstock.

Use the Big Shot™ with the Large Scallop Edgelit™ to cut two pieces of Whisper White cardstock and emboss using the Delicate Designs (Lace) Textured Impressions™ Embossing Folder.  

Adhere these two embossed pieces vertically to the background paper according to the vertical panel in the sketch and mount the entire panel onto a piece of Island Indigo. 

Add the ½” Pool Party Seam Binding Ribbon to cover the seam on the lace embossed panel and adhere the panel to the Whisper White card base.

Color the butterfly image using Pool Party and Island Indigo Stampin’ Write markers.  Use an Aqua Painter™ to apply Shimmer Paint directly to the wings and carefully cut out the image (be careful when cutting- I accidentally cut one of the antennas too short so I had to shorten the other to balance - oops! Now you know all of my secrets:-)).

Close-Up of Shimmer Paint on the wings 
Mount the butterfly and sentiment to the card using Stampin’ Dimensionals (round the corners of the sentiment with the 1 3/8” Circle Punch).

Stamp Sets:  MDS Stamp Brush Set- Swallowtail and Favorite Thoughts

Cardstock: Whisper White, Island Indigo, Sycamore Street DSP

Ink:  Printer Ink, Stampin’ Write Markers- Pool Party and Island Indigo

Accessories:  Big Shot™, Delicate Designs (Lace) Textured Impressions™ Embossing Folder, Large Scallop Edgelit™, 1 3/8” Circle Punch, ½” Pool Party Seam Binding Ribbon, Aqua Painter, Frost White Shimmer Paint, Stampin’ Dimensionals

I hope you like this card- it truly was a quick, easy and fun card to make!  Have fun creating in your craft room this week!

Saturday, April 9, 2011

CQC79 Sensible Woman

Hi Stampers! 
I love the bright color combination for the ColourQ CQC79 Challenge  (see http://colourq.blogspot.com/ ).  Check out the Design Team cards along with all of the other entries- they are so inspiring!
I decided to pull out Fifth Ave Floral and create a Clean and Simple (CAS) card.
To create this card:
Use the Embossing Buddy to de-static a piece of Whisper White cardstock.  Stamp the floral image from Fifth Ave Floral with Versamark on Whisper White and heat emboss with Black EP.  Color with a SU! Melon Mambo marker and cut out close to the embossing lines. 
Use the Big Shot to emboss a piece of Whisper White with a Vintage Wallpaper EF.  Emboss a piece of Bermuda Bay with the Square Lattice EF and layer with Basic Black, Old Olive and Whisper White and add the 5/8” Old Olive Ribbon.  Stamp the sentiment, layer onto Basic Black and finish off the card. 
Stamp Sets:  Fifth Ave Floral,  Favorite Thoughts
 Ink:  Basic Black, Versamark
Cardstock:   Basic Black, Bermuda Bay, Old Olive, Whisper White
Accessories:  Big Shot, Square Lattice and Vintage Wallpaper EF, Heat Gun, Black EP, 5/8” Old Olive Satin Ribbon
Thanks for stopping by and I hope you have a wonderful week! 

Saturday, August 21, 2010

PPA56 Day into Evening

You will need to check out the newly designed Pals Paper Arts site http://www.palspaperarts.com/ - it is gorgeous!
This week they decided to give us this beautiful Vintage photo for inspiration with the challenge to create two looks of the same card- one for “day” and another for “evening”.

I decided to focus on the glorious browns and spice colors from the atomizer (it is in the middle between the two lovely shoes).


For "Day":


Stamps: Bella Toile Background , Greenhouse Garden and Favorite Thoughts

Ink: More Mustard, Early Espresso

Cardstock: More Mustard, Early Espresso, Cajun Craze

Accessories: Big Shot, Vintage Wallpaper Embossing Folder, Victoria crochet trim, sponge daubers

Stamp the Bella Toile Background onto More Mustard.  Cut the cardstock in half (with the lower half being approx two-thirds of the cardstock).  Sponge Early Espresso around the edges. Attach layers to Cajun Craze.  Cut a length of the Victoria trim crochet and attach to the exposed Cajun Craze area of the card front.  Attach the Cajun Craze layer to Early Espresso for the card front. 

Stamp the Greenhouse Garden floral image in Early Espresso over the Bella Toile Background in the center of the upper piece (make sure that you have enough cardstock on both sides of the image for the next step).  Punch this out with the 1 3/8" punch (don't worry- the hole will be covered with the layered pieces when you are finished- no one would be the wiser:-)  Once you clean your stamp, use the Embossing Buddy and with Versamark ink, stamp the floral image again over the stamped Early Espresso image.  Sprinkle on Clear Embossing Powder and set with the Heat Gun.  Sponge Early Espresso around the edges.  Cut out a 1 1/2" circle of Cajun Craze and a 1 3/4" circle of Early Espresso.  Sponge the edges of the Cajun Craze layer. Attach the floral image to the center of the layer at the top of the card. 

Using the Large Oval Punch, cut out an oval from Cajun Craze and run through the Big Shot with the Vintage Wallpaper Embossing Folder.  Sponge Early Espresso over the edges and lightly on the raised images.  Attach to the lower part of the card.  Using the sentiment from Favorite Thoughts, stamp with Early Espresso onto More Mustard.  Cut out image and sponge around the edges with Early Espresso.  Attach to card front layering onto the Oval Embellishment.  Take another length of the Victoria crochet trim to create a bow and use a Antique Brad in the center.  Attach to the center under the floral image.


For "Evening" :
Use the Color Spritzer Tool and Early Espresso marker to spritz the entire card (cover the crochet trim). 

Add Pearls, Vintage Trinkets and additional Victoria crochet trim to the corners of the sentiment. 

Final step- Spray entire card with Champagne Mist Shimmer Paint Mist (Champagne Shimmer Paint mixed with 70% isoprophyl alcohol), again protecting the crochet trim from the spray. 

I hope you like these two- they were a lot of fun to make!
Thanks for looking- God Bless!
Related Posts Plugin for WordPress, Blogger...