Showing posts with label Butterfly. Show all posts

Monday, July 9, 2018

His Love Endures Forever


Hi Friends!

Today I am sharing a fun simple Mixed Media card designed with retired stamps from my massive stash :-)  The butterfly image is from the retired Stampin’ Up! Ageless Adornment (hostess set) and the sentiment is from the recently retired Verve Stamps, Scripture Medley 3.  

I had this butterfly image already stamped, colored , fussy-cut and layered in my stash and in my recent (and continuing) organization project, I decided to pull out my "stashed" images and create a few cards:-).

If you have not had a chance to visit the above challenge galleries yet, I encourage you to do so- wonderful ideas and projects by all!

To create this card:

1). De-static a scrap piece of white cardstock with an embossing powder tool, stamp the butterfly image with Versafine™ Onyx Black ink onto the prepared cardstock, apply clear embossing powder and heat set with a heat tool.  Once the embossing as cooled, watercolor using ink from water-based markers.  Fussy-cut the image, mount onto black cardstock and cut close to the edge.

2). Die cut a piece of white cardstock with a stitched rectangle die.  Scribble a bit of green water-based marker onto a silicone craft mat, lightly spritz with water and press the die cut panel into the ink.  Lift up and repeat until you are satisfied with the background.

3). De-static the background panel with an embossing powder tool, stamp the verse image with Versafine™ Onyx Black ink, stamp onto a piece of white cardstock, apply clear embossing powder and heat set with a heat tool.  Mount the panel onto a piece of black cardstock, trim and mount onto the white card base.

4). Mount the fussy-cut butterfly image with dimensional foam.  Add white highlights to the butterfly’s wings using an extra fine white paint pen and use a clear glitter pen to add shimmer to the wings.

5). Finish off the card with a few jewel drops.

Stamp Sets: Ageless Adornment (retired Stampin’ Up!), Scripture Medley 3 (retired Verve Stamps)

Ink: Versafine™ Onyx Black, Zig® Real Clean Color Markers- Light Green, Yellow, Orange, Light Purple; Stampin’ Write Tangerine Tango Marker; Clear Wink of Stella® , Sharpie® Extra Fine White Paint Pen, Nuvo™ Lime Jewel Drops

Paper: Whisper White, Basic Black, Extra Thick Whisper White

Accessories: AquaPainter™, Embossing Buddy®, Clear Embossing Powder, Heat Tool, Water Spritzer Bottle

Thanks again for visiting- you are all such an encouragement to me!!  Hugs and I hope you have a fabulous week, my friends!


Tuesday, July 11, 2017

One Layer Wonderful Wings


Hi Friends!!

I am sharing a One Layer Mixed Media card that I created this evening using a retired Stampin’ Up! butterfly image from the Wonderful Wings stamp set along with a sentiment from the brand new Stampin’ Up! Ribbon of Courage stamp set.

I decided to participate in the CAS-ual Fridays #177 Tic-Tac-Toe Challenge (Butterflies, One Layer, Stripes), the FUSION “Sand, Beach” Challenge (I was inspired by the colors in the sign), the Alphabet Challenge “I for Insects”Challenge and the Tuesday Throwdown #351 "One Layer" Challenge.

If you have not already had a chance to visit the above challenge sites, I hope you will do so- they both have fabulous Design Teams as well as inspiration in their galleries.

To create this card:

1). Fold a 4 ¼” x 11” piece of Crumb Cake cardstock in half and score for the card base.

2). De-static the front of the card with an Embossing Buddy®, ink the Wonderful Wings image using archival black ink, stamp onto the card front, apply Stampin’ Emboss® Clear Embossing Powder and heat set with the Heat Tool.

3). Once the embossing has cooled, watercolor the image with Stampin’ Up! Watercolor Pencils- Daffodil Delight, Pumpkin Pie and Pacific Point blending with a water brush.  Add additional color to the wings with the Pumpkin Pie Stampin’ Write Marker (blending the color with the water brush) and when dry, add white highlights with an Extra Fine White Sharpie® Paint Pen.  Add shadows with the Tip Top Taupe Stampin’ Write Marker (also blending with the water brush).

4). Using Tim Holtz® Vintage Photo Distress Oxide Ink, a sponge dauber and the Memory Box™ Texture Line Up Stencil, add stripes to the background.  Add a bit more color to the stripes with Broken China Distress Oxide Ink and use a water spritzer to add water droplets.  Dry carefully with a Heat Tool and apply Nuvo™ Fresh Copper Embellishment Mousse with your finger to a few of the stripes.

5). Use a Spectrum Noir™ Clear Glitter Pen to add shimmer to the wings of the butterfly and apply Nuvo™ Grey Mist Crystal Jewel Drops to the background finish off the card.

Stamp Sets: Wonderful Wings (retired), Ribbon of Courage (both Stampin’ Up!)

Ink/Mediums: Versamark™ Onyx Black, Stampin’ Up! Watercolor Pencils- Daffodil Delight, Pacific Point, Pumpkin Pie; Stampin’ Write Markers- Pumpkin Pie, Tip Top Taupe; Nuvo™ Fresh Copper Embellishment Mousse & Gray Mist Crystal Jewel Drops, Spectrum Noir™ Clear Glitter Pen, Sharpie® Extra Fine White Paint Pen

PaperCardstock: Crumb Cake

Accessories: Embossing Buddy®, Stampin’ Emboss® Clear Embossing Powder, Heat Tool, Memory Box™ Texture Line Up Stencil, Sponge Daubers

Thanks again for taking the time to visit- I hope you have a blessed week, sweet friends!

Thursday, April 21, 2016

Trust In the Lord - A Mixed Media Butterfly Card


Hi Friends!

This is the second Mixed Media card I created last night (well, actually early this morning ) using the Stampin’ Royalty SR326 “Butterflies” Challenge along with the ColourQ CQC338 Challenge , Simon Monday “Butterfly Beauty” Challenge and the Happy Little Stampers Mixed Media April "Wings" Challenge.
 
If you have not had a chance to visit the above challenge sites, I highly encourage you to do so- fabulous inspiration from all!!

To create this card:
De-static a piece of Whisper White cardstock with the Embossing Buddy®, ink the Swallowtail image using Versamark™ Ink, stamp onto the prepared cardstock, apply Stampin’ Emboss® Black Embossing Powder and heat set with the Heat Tool.

Once the embossing powder has cooled, color the image with an AquaPainter™ and Calypso Coral Classic Ink followed by the corresponding Stampin’ Write Marker (for additional shadows) and the retired Coastal Cabana Stampin’ Write Marker (I substituted retired Coastal Cabana for Cool Carribean).

Use a Faber-Castell® Black 1.0 Pitt Pen Marker to fill in the dark areas on the wings and carefully fussy cut the butterfly.

De-static another piece of Whisper White cardstock with the Embossing Buddy®, ink the flourish image from Timeless Textures with Versamark™ Ink, stamp onto the prepared cardstock and re-ink (stamp repeatedly), apply Stampin’ Emboss® Gold Embossing Powder and heat set with the Heat Tool.

Ink the sentiment from Trust God with Versamark™ Ink, stamp onto the lower portion of the background panel, apply Stampin’ Emboss® Black Embossing Powder and heat set with the Heat Tool.

Trim the background panel, stamp the small splatter stamp from Timeless Textures with Calypso Coral Classic Ink (stamping off before stamping onto the background).

Mount the panel onto the Calypso Coral card base and adhere the butterfly onto the card front (I used Hot Glue to mount the body, dimensional foam under the right wing, gently folded the left wing to the back of the card and adhered to the back).
View of the wing wrapped to the back :-)

Brush Clear Wink of Stella® onto the wings to finish off the card.

This is the first time I have inked the actual Swallowtail image (all of my previous cards with this image used the digital version).  I love this image and am so sad to see it on the retiring list along with the Trust God stamp set- so if you are in love with these two stamp sets as much as I am, now is the time to get yours before they retire forever!

Stamp Sets:  Swallowtail, Trust God, Timeless Textures

Ink: Versamark™, Calypso Coral; Stampin’ Write Markers- Calypso Coral, retired Coastal Cabana; Faber-Castell® Pitt Pen 1.0 Black Marker, Clear Wink of Stella®

Paper/Cardstock: Whisper White, Calypso Coral

Accessories:  Embossing Buddy®, Stampin’ Emboss® Black and Gold Embossing Powder, Heat Tool


Thanks again for taking the time to stop by and visit- hugs to all of you and I hope you have a wonderful day, my friends!

Tuesday, August 18, 2015

Happy Birthday with God's Beauty


Hi Stampers!!


I had a chance to play in my craft room last night and decided to create a card using the FabFri70 Sketch Challenge along with the Friday Mashup FM221 "Fields of Flowers" Challenge and the Seize the Birthday 08/13 Anything that Flies Challenge.  

I decided to pull out a few retired sets that needed some “love” :-)

Again, if you have not already done so, I hope you will find the time to visit the above challenge sites to check out the inspiration from their Design Teams as well as their wonderful galleries!

To create this card:

Stamp the floral, stem and butterfly images from the retired set, God’s Beauty using Stāz-On® Jet Black Ink onto Whisper White cardstock.  

Use an AquaPainter™ with Classic Ink from Delightful Dijon, Old Olive and Rich Razzleberry to color the images. 

Carefully cut out (“fussy-cut”) each image, use a foam brush to apply ModPodge® to the butterfly image (this helps to stabilize the image and give it a bit of strength) and set aside to dry.

Use the Big Shot™ to emboss a piece of Whisper White cardstock with the Brick Wall Textured Impressions™ Embossing Folder and a piece of Old Olive with the Woodgrain Textured Impressions™ Embossing Folder.

Trim the Brick Wall embossed panel and mount onto a piece of Rich Razzleberry cardstock.

Trim the Woodgrain embossed panel and mount onto the Rich Razzleberry card base.

Add the Brick Wall layered panel to the card front.

Stamp the sentiment from Express Yourself using Rich Razzleberry Classic Ink onto a scrap piece of Whisper White cardstock, trim and mount onto a piece of Rich Razzleberry cardstock.

Add the sentiment to the Brick Wall embossed panel and mount the stems, flowers and butterfly.

Use the White Gel Pen to highlight the center of the flowers and when dry, apply Crystal Effects™ to the centers.

Add a few Pearls to the corner to finish off the card.

Stamp Sets:  God’s Beauty, Express Yourself

Ink:  Stāz-On® Jet Black, Delightful Dijon, Old Olive, Rich Razzleberry; White Gel Pen

Paper: Whisper White, Old Olive, Rich Razzleberry

Accessories: Big Shot™, Brick Wall and Woodgrain Textured Impressions™ Embossing Folders, Pearls, ModPodge®, Crystal Effects™


Thanks again for stopping by- I hope all of you have a fantastic day!!

Thursday, January 15, 2015

CAS Sympathy- Three Challenges in One :-)


Hi Stampers!

I hope all of you are having a wonderful week so far!  I had a great evening with our Awana clubbers and once I arrived home, decided to spend some time in my craft area and create a card  for the PP227 Ann's Color Challenge Challenge along with inspiration from the FMS169 Sketch Challenge and the SR262 Inspiration Photo.  

If you have not had a chance to visit the above challenge sites yet, again, I would encourage you to do so- they all have wonderful Design Teams and tremendous inspiration from their galleries each week!


I chose to create another sympathy card since so many people in our lives have lost loved ones recently and I like to pray for them as I create the cards...

This Clean and Simple (CAS) card was fairly quick and easy since I already had the butterfly image embossed in my “organized” images from a previous project (believe me, not all of my images are organized, that’s for sure- a definite work in progress :-))  

Also, it was difficult to get a good photograph of this card- the Crisp Cantaloupe on the wings appears darker in the photo than IRL and the background is a bit greener IRL than the photo shows (where the Sahara Sand and Lost Lagoon overlap) - possibly due to the Frost White Shimmer Paint on the wings, and of course, lighting- ugh, always an issue!!  

To create this CAS card:

Ink the center of the retired background stamp, Medallion using Sahara Sand Classic Ink and using a Sponge Dauber randomly apply Lost Lagoon Classic Ink over the Sahara Sand (be careful not to cover the Sahara Sand completely).

Ink the large splatter stamp from Gorgeous Grunge using Lost Lagoon Classic Ink and stamp onto the Medallion background.
 
Ink the sentiment using Memento™ Tuxedo Black Ink and stamp onto the panel.  Trim the panel and mount onto a piece of Crisp Cantaloupe, trim again and mount onto the Lost Lagoon card base.

Using the Embossing Buddy®, de-static a piece of Whisper White cardstock and stamp the butterfly image using Versamark™ ink. 

Apply Stampin’ Emboss® Black Embossing Powder and heat with the Heat Tool.  

Using the Crisp Cantaloupe and Lost Lagoon Stampin’ Write marker, color the image.   Carefully cut out (“fussy cut”) the butterfly out and mount onto the card front.

Using an AquaPainter™, apply diluted Frost White Shimmer Paint to the colored portions of the butterfly wings to finish off the card.

Stamp Sets: Wonderful Wings, Medallion, Love & Sympathy, Gorgeous Grunge

Ink: Versamark™,  Lost Lagoon, Sahara Sand; Stampin’ Write Markers-Crisp Cantaloupe, Lost Lagoon

Paper/Cardstock:  Whisper White, Crisp Cantaloupe, Lost Lagoon

Accessories:  Embossing Buddy®, Stampin’ Emboss® Black Embossing Powder, Heat Tool, Sponge Daubers


Thanks again for visiting- you are all such an encouragement to me!!

Tuesday, July 1, 2014

SUO100 Celebrating Our First 99 Challenges :-)


Hi Stampers! 

Wow!!  We are celebrating our 100th SU-Only Challenge and we love for you to choose one of our past 99 Challenges and participate in our “Celebrating our First 99 Challenges" and this card also qualifies for the Paper Players Tic Tac Toe Challenge (Birthday, Patterned Paper, Pearls) :-) 

I decided to use the SUO70 Butterflies theme for my card and I cannot wait to see what you decide to choose:-)    Stop by and check out our Design Team projects and hope to see your project in the gallery!

I love using My Digital Studio (MDS) images and coloring them with our Stampin’ Blendabilites™ so I decided to use several retired stamp images that are still currently available in MDS- again, love using MDS for cards!!

To create this project:
In My Digital Studio (MDS), open a blank 8.5 x 11 custom page and insert the French Foliage script image (enlarge a bit), flowers from Touch of Nature (re-sizing each to different sizes), sentiment from Feeling Sentimental and butterflies from Wonderful Wings (re-sizing the images).  Print the images out onto Whisper White cardstock (I use a Kodak inkjet-works great for MDS and cardmaking)..
Cut the French Foliage script image out using the Big Shot™ with the Window Frames Collection Framelits™ cutting a frame the same size from Basic Black cardstock.  Cut the frame in half and mount behind the script image background.
 Using the Stampin’ Blendabilities™ , color the flowers using the Coastal Cabana, Rich Razzleberry and Daffodil Delight Collections , color the butterflies with the Daffodil Delight, Pumpkin Pie and Coastal Cabana Collections and carefully “fussy-cut” the images.  Add a few highlights using the Chalk Marker.   
Use the 1” Square Punch to punch out the squares from the Back to Black Designer Series Paper (DSP) and mount onto the 5 ½” square Basic Black card base.  
Cut a White Tea Lace Paper Doily in half, adhering half of the doily to the lower part of the frame and mount the second half behind the right hand side of the frame.
Mount the frame onto the card front using Stampin’ Dimensionals®.  Add a strip of Rich Razzleberry cardstock to cover the edge of the paper doily, mount the sentiment layer using Stampin’ Dimensionals® and add the Antique Brad to the corner. 
Adhere the flowers and butterflies to the card front and add the Pearls to finish off the card.
Stamp Sets: Wonderful Wings, Touch of Nature, Feeling Sentimental, French Foliage (all MDS versions)
Ink: Printer Ink- Basic Black, Blendabilities™ Collections- Rich Razzleberry, Coastal Cabana, Daffodil Delight and Pumpkin Pie; Chalk Marker
Paper/Cardstock:  Whisper White, Basic Black, Back to Black DSP
Accessories:  Big Shot™, Window Frames Collection Framelits™, Hexagon Punch, Pearls, Antique Brad, White Tea Lace Paper Doily

Thanks again for stopping by - I hope you have a chance to join in on our “Blast from the Past” Challenge!  Have a blessed week!!

Sunday, June 29, 2014

Vintage Butterflies for Three Challenges :-)


Hi Stampers! 

I had a chance to play around in the craft room again today and created this card using the Create with Connie and Mary CCMC309 Sketch Challenge, the PP202 Paper Players “Tic Tac Toe” Challenge (two different sets of three elements in a row- Ribbon, Blue, Birthday and Blue, Designer Series Paper, Pearls) and the Stampin’ Royalty SR234 Inspiration Photo.  

If you have not had a chance to do, I hope that you will take a moment to visit all of the challenge sites- so many wonderful Design Teams samples and entries!

I decided to utilize My Digital Studio (MDS) with traditional card making techniques for this “hybrid” card:

Open MDS and insert the butterfly stamp images from Flores Suaves into a blank 8.5x11 document and print out onto Whisper White cardstock.  

Color the wings using the Daffodil Delight and Coastal Cabana Stampin’ Blendabilities™, darken the black areas on the wings with the Basic Black Stampin’ Write marker, color the body of the butterfly with the Crumb Cake Stampin’ Write marker, add a few shadows with the Sahara Sand Stampin’ Write marker and finally, add a few white highlights to the wings using the Chalk Marker. 

Use a sticky note or scrap paper to create a mask, mask over the butterflies and stamp the script stamp from retired Notable Notions using Crumb Cake Classic Ink.  Remove the masks and add additional distressing with the splatter stamp from Gorgeous Grunge and Crumb Cake Classic Ink.

Distress the edges using the Distressing Tool and with a Sponge Dauber, sponge additional Crumb Cake Classic Ink over the Whisper White to “antique” the paper and edges.  Adhere to scrap pieces of Basic Black cardstock, distressing the edges as well with the Distressing Tool.

Ink the retired En Francais background stamp using Crumb Cake Classic Ink and stamp onto a piece of Crushed Curry cardstock and Coastal Cabana cardstock. 

Create the banner from the stamped Crushed Curry cardstock using the 1 ¼” Square Punch, distress the edges using the Distressing Tool and mount onto a piece of Basic Black cardstock, again, distressing the edges with the Distressing Tool.

Add the vertical panels of stamped, distressed Coastal Cabana cardstock (mounted onto Basic Black cardstock), along with the scrap, distressed stamped circles of Crushed Curry cardstock.  

Add a distressed piece of Typeset Designer Series Paper (DSP) onto a distressed piece of Basic Black cardstock and adhere the piece of Venetian Crochet Trim to the side along with a piece of retired 5/8” Basic Black Satin Ribbon.

Mount the stamped, distressed piece of Coastal Cabana cardstock onto the Basic Black card base.  Add the banner panel to the card front using Stampin’ Dimensionals®.  

Stamp the sentiment from the retired set, Express Yourself using Memento™ Tuxedo Black ink onto a piece of Whisper White cardstock, trim and create the banner points using the Hexagon Punch, distress the edges with the Distressing Tool.  Add additional distressing using the splatter stamp from Gorgeous Grunge, the script stamp from Notable Notions and a Sponge Dauber- all using Crumb Cake Classic Ink.

Mount the sentiment using Stampin’ Dimensionals® and Pearls to finish off the card. 

Stamp Sets: Flores Suaves (MDS version), En Francais, Notable Notions, Gorgeous Grunge, Express Yourself (2013-2014 Hostess set)

Ink: Crumb Cake, Memento™ Tuxedo Black, Stampin’ Blendabilities- Daffodil Delight, Coastal Cabana; Stampin’ Write Markers- Basic Black, Crumb Cake, Sahara Sand; Chalk Marker

Paper/Cardstock:  Whisper White, Basic Black, Coastal Cabana, Crushed Curry,Typeset DSP

Accessories: Distressing Tool, Sponge Dauber, Punches- 1 3/8” Circle, Hexagon, 1 ¼” Square, Venetian Crochet Trim, retired 5/8” Basic Black Satin Ribbon,  Pearls


Thanks again for stopping by- I hope you have a great evening!

Saturday, June 21, 2014

Another Fun Card using the Packing Tape Technique :-)

Hi Again Stampers!!

Here is my second card that I created yesterday using my Gelli Arts® Gel Printing Plate and the Packing Tape Technique (see this post for the steps to create the packing tape strips) :-)


Again, I hope you have the time to check out all of the challenge sites- so many different interpretations and ideas!

To create this card:

Use one of the packing tape layers to create the banner and adhere to a piece of Basic Black cardstock. Add the White Baker’s Twine to the top of the banner. 

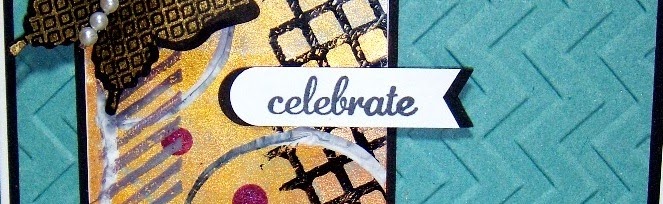
Use the Big Shot™ with the Chevron Textured Impressions™ Embossing Folder to emboss a piece of Lost Lagoon cardstock, trim and mount onto a piece of Basic Black cardstock.  Trim and mount onto the Whisper White card base and add the banner to the card front.  

Using Gold Encore™ Ink, stamp the butterflies from Papillon Potpourri onto Basic Black cardstock and punch out using the Elegant Butterfly Punch.  Adhere to another butterfly (also punched with the Elegant Butterfly Punch from Basic Black cardstock) and mount the butterflies to the card front.

Close-Up of the banner
Stamp the sentiment from Express Yourself using Memento™ Tuxedo Black Ink onto Whisper White cardstock, punch out using the Word Window Punch and create the banner points using the Hexagon Punch.

Mount onto a layer of Basic Black cardstock (also punched with the Word Window Punch along with banner points created from the Hexagon Punch).  Add to the front of the card. 

Add the Pearls to the butterfly centers to finish off the card.

Stamp Sets: Papillon Potpourri, Gorgeous Grunge, Express Yourself

Ink: Memento™ Tuxedo Black , Encore™ Gold Pigment Ink, Acrylic Paints- Metallic Titanium Teal, Light Village Green, Metallic Green Patina, Soft Black, Soft White, metallic Crown Red Velvet  

Paper: Whisper White, Basic Black, Lost Lagoon

Accessories: Big Shot™, Chevron Textured Impressions™ Embossing Folder, Gelli Arts® Gel Printing Plate, Brayer, Punches- Hexagon, Elegant Butterfly; Pearls

Thanks again for visiting- I have one more card to share using the Packing Tape strips and will do so shortly.   I hope all of you have a great weekend- God Bless!

Tuesday, May 6, 2014

SUO96 Bees, Birds and Butterflies!!


Hi Stampers! 


I hope you will have the time to visit and check out the rest of the fantastic Design Team projects at both sites and if you have a chance, using your Stampin’ Up! Only products, come join in on the fun!

To create this project:
Using My Digital Studio (MDS), position the flower stamp brush set from Springtime Hello along with the bee (of course, if you have the stamp set you can stamp as well with Basic Black Classic Ink- I decided to enlarge the images so I used MDS). 
Print out onto Whisper White cardstock, color using Stampin’ Write markers- Island Indigo for the flower petals, So Saffron for the flower centers and bee, Pear Pizzazz for the stems and Sahara Sand for the shadows.   Use a Chalk Marker to create highlights on the flowers and bee wings.
Use the Big Shot™ with the Ovals Collection Framelits™ to cut out the image and cut another oval the same size from Basic Black cardstock, cutting the black oval in half for the frame.  Position the black frame behind the focal image oval, use a Sponge Dauber to apply Crumb Cake Classic Ink and the Color Spritzer Tool along with a Basic Black Stampin’ Write Marker to distress a bit more.
Ink the En Francais background stamp using Crumb Cake Classic Ink and stamp onto a piece of Crumb Cake cardstock and stamp again onto a piece of Soft Sky cardstock (without re-inking).  Use the Big Shot™ with the Honeycomb Textured Impressions™ Embossing Folder to emboss both pieces.
Use the Distressing Tool to distress the edges and sponge Crumb Cake Classic Ink over the edges.   Adhere to the Basic Black card base per the sketch, add the 5/8” Basic Black Satin Ribbon strip and mount the focal image oval using Stampin’ Dimensionals®.
Stamp the sentiment from Express Yourself using Basic Black Classic Ink and cut out using the Big Shot™ with the Bitty Banner Framelits™ cutting another banner from Basic Black cardstock as well.
Cut the Basic Black banner in half and adhere behind the sentiment on both ends.  Use the Color Spritzer Tool with the Stampin’ Write Basic Black marker to add distressing and with the Sponge Dauber apply Crumb Cake Classic Ink.  Add to the card front using Stampin’ Dimensionals®.
Stamp the butterfly from Papillon Potpourri using Basic Black Classic Ink onto Island Indigo cardstock.  Punch out using the Elegant Butterfly Punch and mount onto another butterfly punched from Basic Black cardstock. 
Mount to the card front and add Pearls to finish off the card. 
Stamp Sets: Springtime Hello, Papillon Potpourri, Express Yourself
Ink: Basic Black, Printer Ink- Black, Stampin’ Write Markers- Island Indigo, So Saffron, Pear Pizzazz, Sahara Sand, Basic Black; Chalk Marker
Paper/Cardstock:  Whisper White, Basic Black, Crumb Cake, Soft Sky
Accessories: Big Shot™, Honeycomb Textured Impressions™ Embossing Folder, Ovals Collection and Bitty Banners Framelits™, Elegant Butterfly Punch, Color Spritzer Tool, Sponge Daubers, Ribbon, Pearls

Thanks again for stopping - I hope you have a chance to join in on our “Birds, Bees and Butterflies”SU-Only Challenge!
Related Posts Plugin for WordPress, Blogger...