Showing posts with label Honeycomb EF. Show all posts

Wednesday, May 12, 2021

TCC155 Garden Pleasures- Cast All Your Cares


Hi Friends!


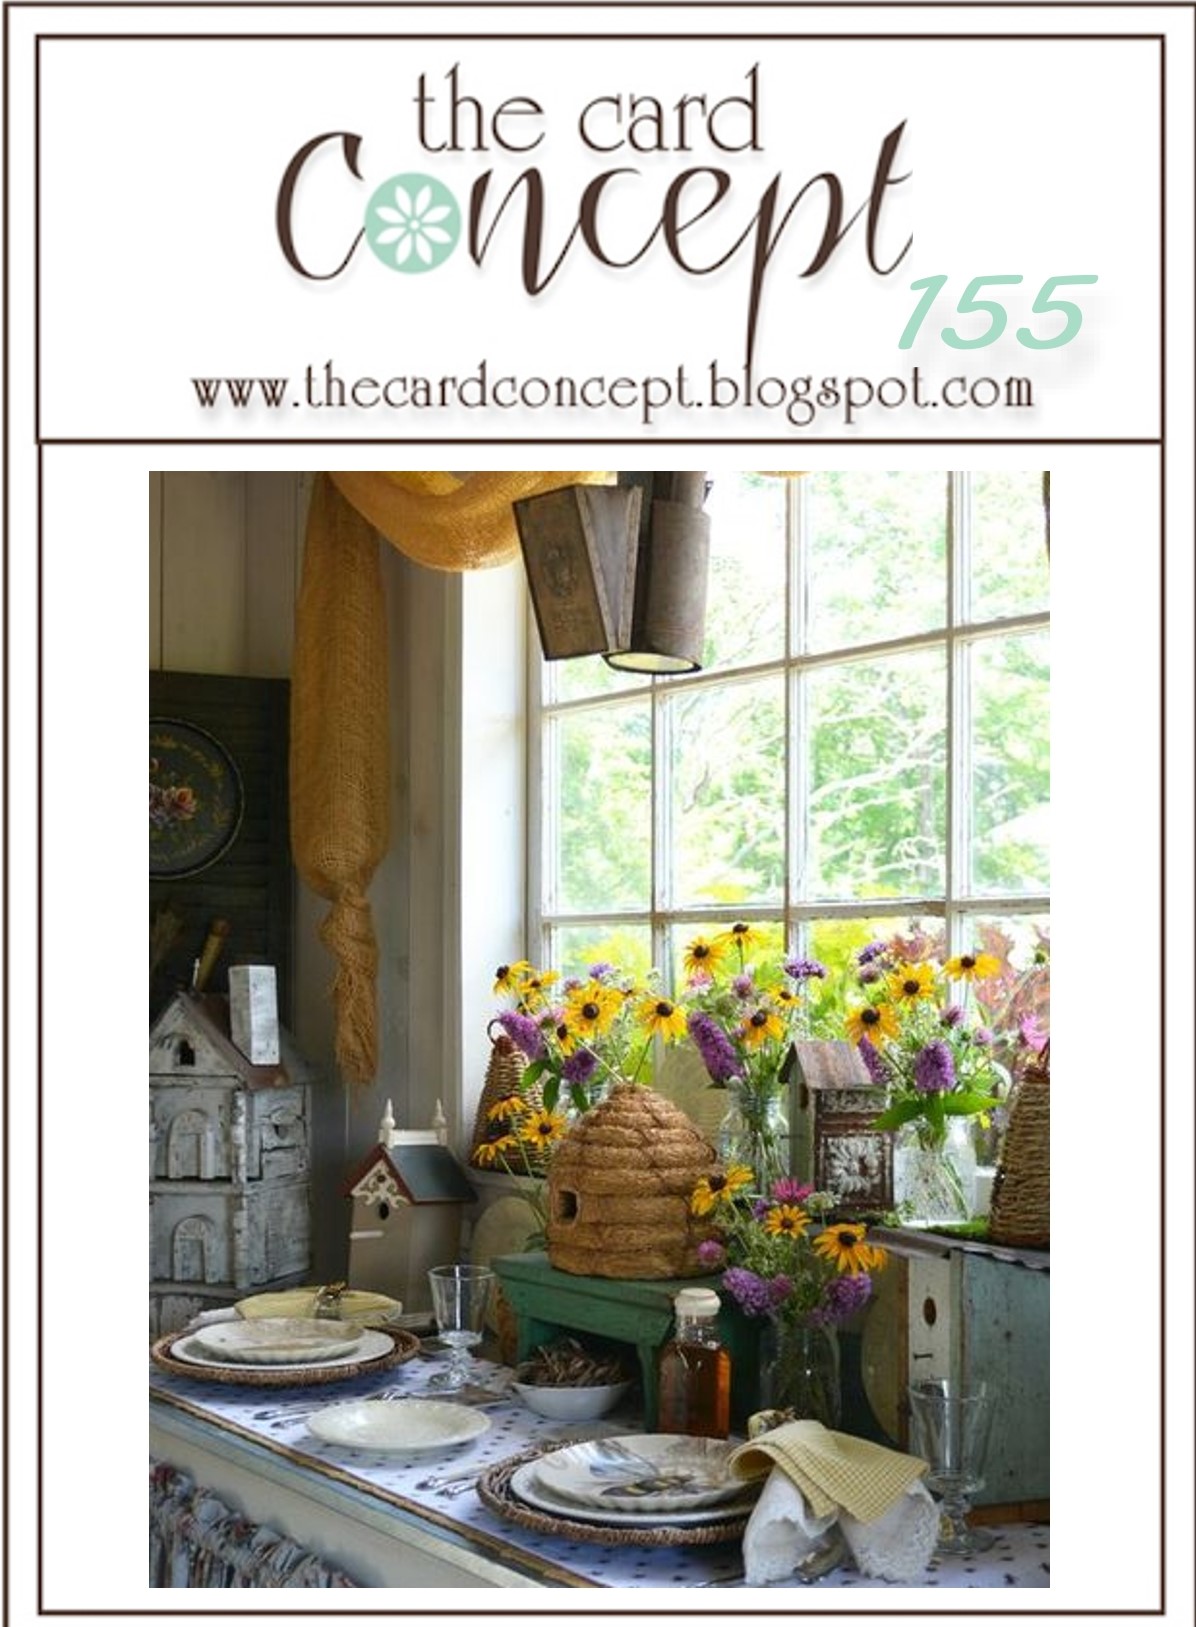
Welcome to The Card Concept #155 {Garden Pleasures} Challenge!

For those of you who are not familiar with The Card Concept Challenge, we are a bi-weekly challenge that uses an inspiration photo for you to create a card.  

You can choose one style and/or a combination of card making styles, the choice is yours!  Plus, our Design Team of ten ladies create a card to inspire you. 

I love the overall feel of this photo- the bright window with the beautiful Black-eyed Susans as well as the gorgeous birdhouses (especially the one in the same of a beehive) and the gold curtain and black accents, all inspired my Shabby and Vintage Mixed Media card!

I have mentioned in the past that my husband and I collect antique honey dishes and I love vintage images of bees, so I had to pull out this bee image from the French Country Collection by
Graphic 45.


I am still working my way through the Splitcoaststampers Sketches and was able to incorporate the SCS #SC276 Sketch into the layout (moved panel #4 up a bit). I am also participating in the A Place to Start May #5- “Anything Goes” Challenge and the Watercooler Wednesday #315 Marsha’s Challenge: All Things Feminine.  

If you have not had a chance to visit The Card Concept, or the other challenge sites yet, I encourage you to do so- fabulous inspiration from all! 

To create this card:

Ink the inside of a 3D Honeycomb Embossing Folder with Ground Espresso Distress Ink, insert a piece of mustard cardstock, and run through an embossing machine.  Repeat the process so you have two embossed panels.


Spritz the panels lightly with water to dilute the espresso ink a bit.  Stamp various splatter images using Wild Honey distress ink and allow the panels to dry.

Trim one of the panels to approx. 3 ¾” x 3 ¼”.  Distress the edges, mount onto a piece of black cardstock, distress the edge and use a straight stitch on a sewing machine with white thread.

Distress the edges of the other panel, mount onto black cardstock, distress the edges again.

Mount the smaller panel onto the larger background panel, add the strip of lace and stitch around the edges with a zigzag stitch.

Trim the Graphic 45 French Country image, mount onto mustard cardstock. Distress and mount again onto black cardstock, distressing the edges before adhering to the card front using dimensional foam (or chipboard).

Stamp the sentiment onto mustard cardstock with Versafine™ Onyx Black ink, apply clear embossing powder and heat set with a heat tool.


Once the embossing has cooled, trim to a rectangle, distress the edges, mount onto black cardstock, and distress the edges again before mounting onto the panel with dimensional foam (or, as I prefer, chipboard).

Mount the entire layered background panel onto a white card base.

Add the bulb pin with the key charm plus a few pearls to the outside corners. 

To finish off the card,  apply a few drops of Morning Dew Nuvo™ Jewel Drops as well as "smoosh" a bit in the upper left hand corner to mimic dripping honey.

Stamp Sets: Faith Medley (retired Verve Stamps), Grunge Elements, Timeless Textures (both retired Stampin’ Up!)

Ink/Mediums: Versafine™ Onyx Black Ink, Tim Holtz™ Early Espresso, Wild Honey Distress Ink, Nuvo™ Morning Dew Jewel Drops

Paper/Cardstock: More Mustard, Basic Black; French Country 12 x 12 (Graphic 45)

Tools/Accessories: Texture Boutique™ (Sizzix™), 3D Honeycomb Embossing Folder (Stampin’ Up!), Heat Tool, Embossing Buddy, Clear Embossing Powder, Water Spritzer Bottle, Distressing Tool, Sewing Machine, White Thread, Lace (retired Stampin’ Up!), Pearls, Antique Brass Bulb Pin and Key Charm

Thanks again for taking the time to visit!  We hope you will have the time to create a card based on our inspiration photo and join us at The Card Concept! The challenge is open until May 24th at noon EDT.

Thursday, April 21, 2016

Bear Hugs- You're So Sweet


Hi Friends!

I had a chance to create another quick card this evening and decided to participate in the #60 Bear Hugs Challenge at What Will You Stamp? (a new challenge site for me)  along with the Stampin’ Celebration SC127 Sketch Challenge and the Splitcoaststampers' CC579 Color Challenge.

If you have not had a chance to check out the above sites, I encourage you to do so- wonderful samples from all!
I love this sweet bear set, but must confess, I truly struggle with designing "cute" cards...

The background was created with the Smakin' Acetate technique (I am addicted- lol!)....

Cut open a clear envelope (or transparency sheet) and gently press the Hello Honey Classic Ink Pad directly onto the acetate (not the whole pad only partial areas), press the envelope together, smoosh the ink around a bit, re-open the envelope and press a piece of Whisper White cardstock down onto the ink on one side of the envelope.

Once the ink dries, use the Big Shot™ with the retiring Honeycomb Textured Impressions™ Embossing Folder to emboss the panel.

Trim and mount onto a piece of Lost Lagoon cardstock, trim and mount onto a piece of Basic Gray, trim and mount onto the Hello Honey card base.

Emboss a piece of Whisper White cardstock with the retiring Chevron Textured Impressions™ Embossing Folder, trim and mount onto a piece of Lost Lagoon cardstock, trim and mount onto a piece of Basic Gray cardstock and adhere onto the card front.

Ink the large bear image, the honeypot and the sentiment with Stāz-On® Jet Black Ink and stamp onto a piece of Whisper White cardstock. 

Stamp the skirt image onto a piece of retired Moonlight Designer Series Paper using Stāz-On® Jet Black Ink.

Use the Big Shot™ with the Bear Hugs Framelits™ to cut out the bear and honeypot images (fussy-cut the skirt image).

Color the bear with an AquaPainter™ and Basic Gray Classic Ink and fold up the arms.

Use an AquaPainter™ with Lost Lagoon Classic Ink to color the skirt and lower part of the honeypot adding shadows to both with the Stampin’ Write Lost Lagoon Marker.

Color the honey with the Hello Honey Stampin’ Write Marker and add Crystal Effects™ over the honey (set aside to dry).

Trim the sentiment, create the banner points with the retiring Hexagon Punch, mount onto Lost Lagoon cardstock, trim and create the banner points again with the punch and add a strip of Basic Gray cardstock (also creating the banner points with the Hexagon Punch- I am going to miss this punch in the catalog). 

Wrap a few pieces of the retired SAB 2015 In-Color Thick Baker's Twine around the sentiment and set aside.

Mount the bear, sentiment and honey pot using Stampin’ Dimensionals®.

Add the two Lost Lagoon buttons (with separated and knotted Hello Honey Thick Baker’s Twine in the center) to finish off the card.

Stamp Sets: Bear Hugs

Ink/Mediums: Stāz-On® Jet Black, Basic Gray, Hello Honey, Lost Lagoon; Stampin’ Write Markers- Hello Honey, Lost Lagoon; Crystal Effects™

Paper: Whisper White, Basic Gray, Hello Honey, Lost Lagoon

Accessories: Big Shot™, Bear Hugs Framelits™, Honeycomb and Chevron Textured Impressions™ Embossing Folders, Clear Envelope, retired SAB 2015 Hello Honey and Lost Lagoon Thick Baker’s Twine, retired SAB 2015 Lost Lagoon buttons


Thanks again for taking the time to visit- I hope you have a fantastic weekend!

Sunday, October 25, 2015

HYCCT1522 Adopt the Pace of Nature

Hi Friends!!

This card was created for the Splitcoaststampers’  “Hope You Can Cling To”  HYCCT1522 Angie’s “Tears Can Be A Good Thing” Challenge to use the  Wrinkle-Free Distress background technique (FYI- I used distress stains versus inks) :-))

If you have not had a chance to do so, I hope you will find the time to visit the above gallery- wonderful inspiration from all!!

To create this card:

Apply Ranger® Tim Holtz® Forest Moss, Chipped Sapphire and Brushed Corduroy Distress Stains onto a craft mat, spritz with water and lay a piece of watercolor paper over the ink. 

Press the paper into the ink, twist as you lift up the panel turning to allow the ink to run and merge.

Use the Heat Tool to dry the panel, spritzing with water, re-apply additional ink and drying with the Heat Tool until you are satisfied with the results.

De-static the panel with the Embossing Buddy®, stamp the image using Versamark™ Ink, apply Stampin’ Emboss® White Embossing Powder, heat with the Heat Tool to melt the powder and allow the embossed image to cool.

Use the Big Shot™ with the My Favorite Things™ (MFT) Horizontal Stitched Banners Die to cut out the image, mount onto a piece of Whisper White cardstock, trim and mount onto a piece of Mossy Meadow cardstock, trim and mount onto a piece of Delightful Dijon cardstock.

Ink the large solid splatter stamp from Gorgeous Grunge using Delightful Dijon Classic Ink and stamp onto the upper part of a piece of Whisper White cardstock.

Ink the large splatter stamp using Mossy Meadow Classic Ink and stamp onto the panel as well.

Trim and mount onto Delightful Dijon cardstock, trim and mount onto the Whisper White card base.

Mount the embossed panel onto the card front using dimensional foam and add the Pearls to finish off the card.

Stamp Sets:  Nature’s Pace (retired), Gorgeous Grunge

Ink: Versamark™, Delightful Dijon, Mossy Meadow; Ranger® Tim Holtz® Distress Stains- Forest Moss, Chipped Sapphire and Brushed Corduroy

Paper: Watercolor, Whisper White, Delightful Dijon, Mossy Meadow

Accessories: Big Shot™, Honeycomb Textured Impressions™ Embossing Folder,  MFT Horizontal Stitched Banners Dies, Embossing Buddy®, Stampin’ Emboss® White Embossing Powder, Heat Tool, White Crochet Lace, 5/8” Olive Satin Ribbon, Pearls


Thanks again for taking the time to stop by- I hope you have a wonderful Monday, my friends!

Monday, September 28, 2015

A Floral Birthday- A Color, Sketch and Designer's Choice Challenge :-)


Hi Friends!


Again, I hope you will take the time (if you have not done so already) to visit the above challenge sites to check out all of the Design Team entries as well as the galleries- tremendous inspiration from all!

To create this card:

Ink the retired background stamp, En Francais using Calypso Coral Classic Ink and stamp onto a piece of Whisper White cardstock, trim and mount onto a piece of Blushing Bride cardstock, trim and mount onto a piece of Watermelon Wonder card stock.

Use the Big Shot™ with the retired Finishing Touches Edgelit™ to cut out the strip from Whisper White cardstock, add to the bottom of the panel along with a scrap strip of Calypso Coral cardstock.

Emboss a piece of Blushing Bride cardstock with the Honeycomb Textured Impressions™ Embossing Folder and use a sewing machine to add the embossed panel to a piece of Calypso Coral cardstock.  Trim and mount onto the Whisper White card base.

Ink the honeycomb background from Butterfly Basics with Blushing Bride  Classic Ink and stamp onto a piece of Blushing Bride cardstock, trim and stitch to a piece of Calypso Coral cardstock for the horizontal strip in the sketch. 

Add this panel to the stamped panel created in the first step and mount to the card front.

Ink the floral image from Butterfly Basics using Stāz-On® Jet Black Ink and stamp onto a piece of Whisper White cardstock.

Color the image using Stampin’ Write Markers- Blushing Bride, Calypso Coral and Watermelon Wonder (using an AquaPainter™ behind layers to soften the edges).  Add a few white highlights to the flower center with the White Gel Pen.

Create a loose mask from scrap paper to cover the flower and stamp the honeycomb image using Blushing Bride Classic Ink.  Add the canceled stamp image using Watermelon Wonder Classic Ink and a few shadows to all of the images with the Sahara Sand Stampin’ Write Marker.

Trim the panel and mount onto Blushing Bride cardstock, trim again and mount onto Calypso Coral cardstock.

Mount the panel onto the card front using Stampin’ Dimensionals®.

Ink the butterfly using Stāz-On® Jet Black Ink and stamp onto a piece of Whisper White cardstock, color with the Blushing Bride and Calypso Coral Stampin’ Write Markers and punch out with the Elegant Butterfly Punch.

Add the butterfly to the card front (I used Hot Glue for this step and part of a dimensional behind the butterfly).

Ink the sentiment with Stāz-On® Jet Black Ink and stamp onto a piece of Whisper White cardstock, punch out with the Word Window Punch and add a layer of Blushing Bride and Calypso Coral cardstock (also punched with the Word Window Punch and all three punched on the end with the Hexagon Punch to create the banner points).

Adhere the sentiment to the card front and add the Pearls to the corners.

Create a Calypso Coral bow with the Bow Builder Punch and mount to the card front along with the Antique Brad to finish off the card.

Stamp Sets: Butterfly Basics, Papillon Potpourri, Teeny Tiny Wishes, En Francais (retired)

Ink:  Stāz-On® Jet Black, Blushing Bride, Watermelon Wonder;  Stampin’ Write Markers- Blushing Bride, Calypso Coral, Watermelon Wonder, Sahara Sand; White Gel Pen

 Paper: Whisper White, Blushing Bride, Calypso Coral

Accessories: Big Shot™, Honeycomb Textured Impressions™ Embossing Folder, Finishing Touches Edgelits™ (retired), AquaPainter™, Sewing Machine, Punches- Elegant Butterfly, Bow Builder, Word Window, Hexagon, Antique Brad, Pearls


Thanks again for stopping by- I hope you have a glorious day and stop by tomorrow for the new SUO Challenge!

Sunday, July 26, 2015

Choose Happiness - Feel Better Soon :-)


Hi Stampers!

This weekend I had a chance to play around in my craft room and created a fun Mixed Media card for the As You See It #97 Sketch Challenge using the Colour Me...!#81 "Colour Me Playful" Challenge along with the Friday Mash Up! FM218 "Let's Eat" Challenge (food and/or drink or use markers to color or both- I chose markers to color only :-)). 

If you have not had a chance to visit the above challenge sites yet, again, I would encourage you to do so- wonderful inspiration from all!

To create this Mixed Media card:

Use the Big Shot™ with the Honeycomb Textured Impressions™ Embossing Folder to emboss a piece of Whisper White cardstock, trim the panel and mount onto a piece of Calypso Coral, trim again and mount onto a piece of Blackberry Bliss, trim once more and mount onto the Pink Pirouette card base.

De-static a piece of Vellum and stamp the woodgrain banner image from Choose Happiness several times using Versamark™ ink.  Apply Stampin’ Emboss® White Embossing Powder and use the Heat Tool to heat set.   Once the powder has cooled carefully cut out the banners.

Mount the banners at varying lengths to the upper right hand portion of the card front.  

Ink the flower and stem images from Choose Happiness with Stāz-On® Jet Black Ink and stamp two of the flower images as well as three of the stems onto Whisper White cardstock.

 Use Stampin’ Write Markers to color the images- Pink Pirouette and Calypso Coral for the flowers and Garden Green for the stems (scribbling the Garden Green onto a craft mat and using the AquaPainter™ for the first layer of color, then coloring direct with the marker).  

Spritz the colored images with water to help soften the edges of the marker and “fussy-cut” out the images.  

Use the AquaPainter™ to apply Frost White Shimmer Paint to the petals, and, if needed, the White Gel Pen to highlight the center. 

Stamp the bird, sentiment and border using Blackberry Bliss Classic Ink onto Whisper White cardstock.  Fussy cut out the bird image and set aside.

Trim the border image and sentiment into strips and create the banner point using the Hexagon Punch.  Layer onto Blackberry Bliss cardstock, create the banner points using the Hexagon Punch, layer onto Calypso Coral cardstock and create the banner points once more with the Hexagon Punch.

Mount the banners to the card front per the sketch and add the stems.
Mount the flowers to the corner (using Stampin’ Dimensionals® for the second flower) and add the bird image with Stampin’ Dimensionals® to finish off the card.

Stamp Sets:  Choose Happiness, Express Yourself (retired Hostess set)

Ink: Versamark™, Stāz-On® Jet Black, Blackberry Bliss; Stampin’ Write Markers- Calypso Coral, Garden Green, Pink Pirouette, White Gel Pen

Paper/Cardstock:  Whisper White, Blackberry Bliss, Calypso Coral, Pink Pirouette

Accessories:  Big Shot™, Honeycomb Textured Impressions™ Embossing Folder, Embossing Buddy®, Stampin’ Emboss® White Embossing Powder, Heat Tool, Hexagon Punch, Frost White Shimmer Paint


Thanks again for taking the time to stop by- I will be sharing one more card shortly :-)

I hope you have a wonderful weekend, my friends!

Friday, June 19, 2015

JUN15VSNF The Latest Buzz...

Hi Again Stampers!

This card was created for the Splitcoaststampers’ Virtual Stamp Night JUN15VSNF “Choose Happiness” Challenge (see details here and gallery here) along with the SC539 Sketch Challenge (see details here and gallery here).

This was the first shaker card that I ever created and it took the entire hour to complete (and that was pushing it- lol!).   I love this retired stamp set and thought it would be perfect for a shaker element :-)

Again, if you have not visited the challenge sites yet, I hope you will find time to do so- terrific Design Team designs and as well as their galleries!!

To create this card:

Stamp the bee image and sentiment from the retired set, Honey Bear using Stāz-On® Jet Black Ink onto Whisper White cardstock (make sure you position to leave room for the die cuts). 

Color the images using Stampin’ Write markers- Bear’s Fur and Bee Suit: Daffodil Delight, Delightful Dijon, Crumb Cake, Baked Brown Sugar, Basic Black; Sentiment and Honey Jar: Melon Mambo, Bermuda Bay, Sahara  Sand, Delightful Dijon, Daffodil Delight.

Cut the images out with the Big Shot™ along with the MFT Stitched Circle STAX Die and cut a larger stitched circle from Basic Black for the frame on the bear.

Emboss a piece of Bermuda Bay cardstock using the Honeycomb Textured Impressions™ Embossing Folder (I still had a bit of Delightful Dijon ink on the interior of my folder from the last card).

Decide where you would like the sentiment shaker element to be positioned and punch out a hole with the 1 ¾” Circle Punch.

Dry-fit the bear with the frame and use the 1 ¾"  Circle Punch to cut out a notch to fit  around the treat cup.

Cut a strip of retired Botanical Gazette Designer Series Paper (DSP) and mount onto Basic Black cardstock (also punching part of a circle to fit around the treat cup).

Add the retired In-Color Sequins to the treat cup, adhere the sentiment to the back, insert the treat cup into the opening and mount the Bermuda Bay layer onto the Basic Black card base.

Add the Botanical Gazette DSP layer and adhere the bee circle with the frame to the card front.

Use a Sponge Dauber with the Mini Punchenella Stencil to carefully add the Delightful Dijon Classic Ink through the honeycomb part of the stencil.

Use the 1 ¾” Circle Punch to punch  out a 1 ¾” Circle from Basic Black cardstock and position the 2” Circle Punch over the opening (created by the 1 ¾” Circle Punch in the piece of cardstock) and punch out the 2 “ Circle to create the black ring- adhere to the outside of the treat cup.
Close-up of the Treat Cup Shaker Element :-)

Mount a scrap strip of Basic Black cardstock to mimic ribbon and add the triple ribbon bow (Black Organdy) along with the retired More Mustard button to finish off the card.

Stamp Sets: Honey Bear

Ink:  Stāz-On® Jet Black, Delightful Dijon; Stampin’ Write Markers-  Daffodil Delight, Delightful Dijon, Crumb Cake, Baked Brown Sugar, Basic Black, Melon Mambo, Bermuda Bay

Paper: Whisper White, Basic Black, Bermuda Bay, retired Botanical Gazette DSP

Accessories: Big Shot™, Honeycomb Textured Impressions™ Embossing Folder, MFT Stitched Circle Dies, Circle Punches- 1 ¾” and 2”; 2013-2015 In-Color Sequins, Treat Cup, Black Organdy Ribbon, More Mustard Button, Mini Punchenella Stencil, Sponge Dauber

Ok, the challenge was to make a card that would make someone  smile…do you think I succeeded :-) ?

Thanks again for stopping by- I hope all of you have a fabulous Friday and weekend !

Vintage Graphic45 French Bee for Two Challenges :-)

Hi Again Stampers!

This vintage style card was created for the Splitcoaststampers’ Virtual Stamp Night JUN15VSNE “Bee Happy” Challenge (see details here and gallery here) along with the FabFri66 Sketch at Fab Friday.

I left the sentiment off so I can add at the time of mailing (or maybe use as a note card) :-). 


Again, if you have not had the chance to do so, I hope you will find the time to visit each of the above sites- tremendous inspiration from all!

To create this quick and easy card:

The bee focal image is from the retired Graphic 45 French Country cut apart. 

Trim the bee image and mount onto a piece of Delightful Dijon cardstock.

Cut the frame for the bee image from Basic Black cardstock using the Big Shot™ with the Spellbinders™ Fleur des Lis Rectangle die and mount the bee image onto the front of the die cut frame.

Ink the interior of the Honeycomb Textured Impressions™ Embossing Folder with Delightful Dijon Classic Ink , insert a piece of Delightful Dijon cardstock and emboss with the Big Shot™.

Trim the honeycomb embossed panel and mount onto the Basic Black card base.

Cut the strips of designer paper from the retired French Country 6x6 Patterns and Solids collection and mount onto Basic Black cardstock.

Add the vertical strips to the card front and mount the bee image using Stampin’ Dimensionals® to finish off the card.

Stamp Sets: None

Ink: Delightful Dijon

Paper: Basic Black, Delightful Dijon; Graphic 45- French Country
Accessories: Big Shot™, Honeycomb Textured Impressions™ Embossing Folder, Spellbinders™ Fleur des Lis Rectangle Die


Thanks again for visiting-a few more of the Virtual Stamp Night cards to go!

Wednesday, June 17, 2015

Of The Earth- Bluebird of Happiness :-)

Hi Stampers!!

I have been having fun the last few evenings creating cards for the Splitcoaststampers’ “Happy” Virtual Stamp Night and decided to incorporate the CC534 Color Challenge (see details here and gallery here) along with the CAS Colours & Sketches #128 Sketch Challenge  with the JUN15VSNG “Bluebird of Happiness” Challenge.

Again, if you have not already done so, I hope you will find the time to visit the above challenge sites to check out the wonderful Design Team samples as well as the inspiration from their galleries!

To create this card:

Ink the bird image from the retired set, Of the Earth, with Blackberry Classic Ink and stamp two images onto Pool Party cardstock and one image onto Wisteria Wonder cardstock.

Punch out the images with the 1 ¼” Square Punch and mount onto Whisper  White cardstock squares that have been die cut with the MFT Stitched Stax Square Die.

Emboss a  piece of  Whisper White cardstock using the Big Shot™ with the Honeycomb Textured Impressions Embossing Folder™ , trim and mount onto a piece of Blackberry Bliss cardstock.

Add a piece of 3/8” Wisteria Wonder Seam Binding and mount the panel onto the Whisper White card base.

Mount the bird image squares using Stampin’ Dimensionals® and add the digital sentiment to finish off the card.

Stamp Sets:  Of The Earth, Digital Sentiment from Word Art Wednesday

Ink:  Blackberry Bliss, Printer Ink-Black

Paper: Whisper White, Blackberry Bliss, Pool Party, Wisteria Wonder

Accessories: Big Shot™, Honeycomb Textured Impressions™ Embossing Folder, MFT Stitched Square STAX Die, 3/8” Wisteria Wonder Seam Binding


Thanks again for visiting- I will be sharing more cards throughout the evening and tomorrow :-)
Related Posts Plugin for WordPress, Blogger...