Showing posts with label Graphic45. Show all posts

Saturday, February 6, 2016

Mojo337 Purr-fect Thank You :-)


Hi Friends!

I am working on a few pet themed cards for a card drive at Splitcoaststampers and decided to use the Mojo337 Sketch for the layout.

I love this sketch- it was fun to work with and you should see all of the gorgeous examples in their gallery!

Bermuda Bay is another color that seems a bit difficult to photograph- it
is not as bright blue/turquoise as it appears here :-)
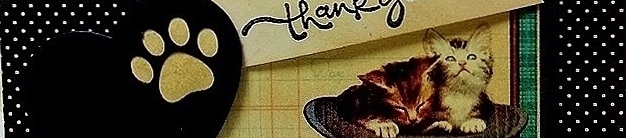
To create this card-  emboss a piece of Bermuda Bay cardstock with the Darice® Paw Print Background Embossing Folder, trim and mount onto Basic Black cardstock, add the Graphic45® Raining Cats and Dogs designer paper to the stitched Basic Black frame, add the strip of polka dot paper along with the framed designer paper, sentiment and paw print heart and you are finished!

Stamp Sets: Short & Sweet (retired Stampin’ Up!)

Ink: Stāz-On® Jet Black, Ranger® Tim Holtz® Old Paper Distress Ink

Paper: Very Vanilla, Basic Black, Bermuda Bay; Graphic45® Raining Cats and Dogs

Accessories: Big Shot™, Darice® Paw Prints Background Embossing Folder, My Favorite Things© (MFT) Pet Accents Dies,  MFT Blueprints 20 Die, Hexagon Punch


Thanks again for taking the time to stop by- hugs and have a great week, my friends!

Saturday, October 31, 2015

HYCCT1528 You Are Such A Blessing

Hi Again Friends!

This Clean and Simple (CAS) card was created for the Splitcoaststampers’  “Hope You Can Cling To” HYCCT1528 Rebecca’s “Rainbows-The Promise of a Better Tomorrow” Challenge to use a rainbow or rainbow colors on your card.

I decided to use the rainbow colors and am also linking to the Splitcoaststampers’ WT552 “Cats” Challenge along with the SC561 Sketch Challenge (modified for a landscape design :-)).

I sure hope you have a chance to visit the above galleries- fabulous inspiration from all!!

This card was very quick and easy to create- trim the Graphic 45® Bohemian designer paper, mount onto Whisper White cardstock, adhere to the Basic Black card base and add the die cut cat and sentiment banner.

Quick, easy and so fun!!

Stamp Sets:  Boho Blessings (Our Daily Bread Designs)

Ink: Stāz-On® Jet Black

Paper: Whisper White, Basic Black, Graphic45® Bohemian Designer Paper

Accessories: Big Shot™, My Favorite Things™ (MFT) Stitched Jumbo Fishtail Banner Dies, Docrafts™ Cat Dies, Rhinestones


Thanks again for taking the time to visit- I have a few more of the Hope You Can Cling To Challenge cards to share with you this evening!!  

Friday, October 30, 2015

Smart Is Cool- A No Stamps and Theme Challenge :-)


Hi Again Stampers!   


I just love Graphic45® Designer Papers and this card uses the retired Place In Time (September) paper along with a numbers die cut.  Although the challenge is "Smart is Cool" it does not appear as though this little boy thinks so - lol!!

I hope you will have time to visit the linked galleries above, definitely a challenge to create a card without stamps but Graphic45® makes it so easy!

To create this card:

Separate the September Place In Time Cut Apart page by cutting the individual images and choose the images that you would like to highlight for your card.

Trim the edges and mount onto Basic Black cardstock and trim.

Use the Big Shot™ to emboss a piece of Cajun Craze cardstock (this piece was already embossed and in my stash), trim and mount onto a piece of Basic Black cardstock, trim and mount onto the Whisper White card base.

Arrange the Graphic45® images and mount onto the card front using dimensional foam.
Use the Big Shot™ to die cut the numbers from retired More Mustard cardstock using the retired Go Go Boots Sizzlets™, use an AquaPainter™ with Frost White and Champagne Mist Shimmer Paint to paint over the numbers.

Adhere the numbers to the card front to finish off the card.

 Quick and easy since the Graphic 45™ paper does most of the work for you!!
Stamp Sets: None
Ink:  None; Frost White and Champagne Mist Shimmer Paint
Paper/Cardstock:  Basic Black, Cajun Craze, retired More Mustard; Graphic45® retired Place In Time (September)
Accessories:  Big Shot™, Diamond Sizzix™ Textured Impressions Embossing Folder, retired Go Go Boots Sizzlets™, Watch Charm (from my stash- I believe Paper Studio™)

Thanks again for visiting- have a wonderful Friday!

Friday, June 19, 2015

Vintage Graphic45 French Bee for Two Challenges :-)

Hi Again Stampers!

This vintage style card was created for the Splitcoaststampers’ Virtual Stamp Night JUN15VSNE “Bee Happy” Challenge (see details here and gallery here) along with the FabFri66 Sketch at Fab Friday.

I left the sentiment off so I can add at the time of mailing (or maybe use as a note card) :-). 


Again, if you have not had the chance to do so, I hope you will find the time to visit each of the above sites- tremendous inspiration from all!

To create this quick and easy card:

The bee focal image is from the retired Graphic 45 French Country cut apart. 

Trim the bee image and mount onto a piece of Delightful Dijon cardstock.

Cut the frame for the bee image from Basic Black cardstock using the Big Shot™ with the Spellbinders™ Fleur des Lis Rectangle die and mount the bee image onto the front of the die cut frame.

Ink the interior of the Honeycomb Textured Impressions™ Embossing Folder with Delightful Dijon Classic Ink , insert a piece of Delightful Dijon cardstock and emboss with the Big Shot™.

Trim the honeycomb embossed panel and mount onto the Basic Black card base.

Cut the strips of designer paper from the retired French Country 6x6 Patterns and Solids collection and mount onto Basic Black cardstock.

Add the vertical strips to the card front and mount the bee image using Stampin’ Dimensionals® to finish off the card.

Stamp Sets: None

Ink: Delightful Dijon

Paper: Basic Black, Delightful Dijon; Graphic 45- French Country
Accessories: Big Shot™, Honeycomb Textured Impressions™ Embossing Folder, Spellbinders™ Fleur des Lis Rectangle Die


Thanks again for visiting-a few more of the Virtual Stamp Night cards to go!

JUN15VSNA Happy Anniversary- Time To Celebrate and Dance :-)

Hi Stampers! 

I have been busy this week designing cards for the Splitcoaststampers’ “Happy” Virtual Stamp Night and one of the rules is that you can only spend one hour creating the card (very difficult at times for me :-)).

This card was created for the JUN15VSNA “Happy Dance” Challenge (see details here and gallery here) along with the SC544 Sketch Challenge (see details here and gallery here). 
 
If you have not had a chance to do so, I hope you will find the time to visit the above challenge sites to check out the Design Team samples as well as their galleries- gorgeous inspiration from all!

This card was fairly easy to create since I used Graphic 45’s Time To Celebrate paper along with the Time to Flourish  stamp set#2… a few layers, add  a die cut along with a punch and you are done!

Stamps: Time To Flourish Cling Stamp 2 (Graphic 45)

Ink: Early Espresso

Paper: Whisper White, Crisp Cantaloupe, Cucumber Crush, Early Espresso; Time To Celebrate (Graphic 45)

Accessories: Big Shot™, MFT Dizzy Border Die, Hexagon Punch, Pearls


Thanks again for visiting- I will be posting more of the challenge cards this evening and tomorrow :-)  Hope all of you have a great weekend!

Thursday, April 23, 2015

Happy Mother's Day- A Color and Sketch Challenge

Hi Again Stampers! 

This is the second card that I created  using the Just Us Girls JUGS289 Color Challenge along with the Splitcoaststampers SC496 Sketch Challenge- see details here and the gallery here.

Again, if you have not had a chance to do so, I hope you will find the time to visit the above sites- gorgeous inspiration from all!

To create this card:

Using Soft Suede Classic Ink, stamp the sentiment onto Very Vanilla cardstock and punch out with the Word Window Punch. 

Layer onto another frame created from two pieces of Soft Suede cardstock punched from the Word Window Punch and layered to be just a bit wider than the sentiment.

Trim the Graphic 45® Botanical Tea cut-apart and mount onto a piece of Soft Suede cardstock.

Trim the brown print Botanical Tea background paper and mount onto a piece of Soft Suede cardstock, trim again and mount onto the a piece of Very Vanilla cardstock.

Trim the pink polka-dot patterned Botanical Tea background paper and mount onto a piece of Soft Suede cardstock.

Add the polka-dot panel to the print background and adhere the entire background panel onto the Soft Suede card base.

Use the Bow Builder Punch to create the Soft Suede bow, adhere the retired In Color Dahlia Assortment Adornment to the center of the bow and mount onto the focal image panel.

Add the focal image to the card front using Stampin’ Dimensionals® and mount the sentiment with Stampin’ Dimensionals® as well.

Add the Pearls to finish off the card.

Stamp Sets: Teeny Tiny Wishes

Ink: Soft Suede

Paper: Very Vanilla, Soft Suede, Graphic 45® Botanical Tea

Accessories: Punches- Bow Builder and Word Window, Pearls


Thanks again for visiting- have a wonderful evening, my friends!

Botanical Tea Thinking of You- A Color and A Sketch

Hi Stampers! 

I had a chance to play around in my craft room last night and decided to create two cards using the Just Us Girls JUGS289 Color Week Challenge along with a different Splitcoaststampers Sketch Challenge.  

I will post the cards in separate posts and this card incorporates the SC532 Sketch- see details here and the gallery here.

If you have not had a chance to do so, I hope you will find the time to visit the above sites- they have wonderfully diverse Design Team samples as well as inspiration from their galleries!

To create this card:

Using Early Espresso Classic Ink, stamp the sentiment from the Peonies & Tulips Dynamic Duos from Power Poppy© by Marcella Hawley onto Very Vanilla cardstock and punch out with the Word Window Punch. 

Layer onto another frame created from two pieces of Early Espresso cardstock punched from the Word  Window Punch and layered to be just a bit wider than the sentiment.

Trim the Graphic 45® Botanical Tea cut-apart and mount onto a piece of Soft Suede cardstock.

Trim the striped Botanical Tea background paper and mount onto a piece of Soft Suede cardstock, trim again and mount onto the a piece of Very Vanilla cardstock.
Trim the blue patterned Botanical Tea background paper and mount onto a piece of Soft Suede cardstock.

Add the blue vertical panel to the striped background, add the strip of 5/8” Early Espresso Satin Ribbon and mount the entire background panel onto the Soft Suede card base.

Add the 5/8” Early Espresso Satin Double Ribbon Bow to the focal image panel and mount onto card front using Stampin’ Dimensionals®.

Use the Big Shot™ with the My Favorite Things® (MFT) Royal Mini Rose dies to cut out the roses from retired Baja Breeze cardstock, run through the Crimper Tool to soften the paper, roll up and adhere with adhesive (I used Hot Glue).

Add the rolled roses with the Early Espresso leaves to the card front and mount the sentiment with a Stampin’ Dimensional® under the edge that hangs off the focal image panel. 

Add the Pearls to finish off the card.

Stamp Sets: Peonies & Tulips (Power Poppy©)

Ink: Early Espresso

Paper: Very Vanilla, Early Espresso, Soft Suede, retired  Baja Breeze; Graphic 45® Botanical Tea

Accessories: Big Shot™, MFT Royal Mini Roses Die, Punches- Word Window, Leaf (MS), retired 5/8” Early Espresso Satin Ribbon, Pearls


Thanks again for stopping by- I will share the second card created for the same color challenge (with a different highlight color and sketch) shortly :-)

Have a terrific Thursday evening, my friends!

Wednesday, April 1, 2015

TCC32 Pleasant Poppies- Just Because :-)


Hi Stampers!! 

It’s time for the new Card Concept #32 (Coral, Aqua, Green & White) Inspiration Photo Challenge- my Mixed Media card was inspired by the colors as well as the beautiful flowers.

I decided to combine our Card Concept challenge with the Splitcoaststampers Ways to Use It WT524 Tortoise or Hare Challenge (see details here and gallery here) and the Mix-Ability MIX112 First Day of Spring Challenge (see details here and gallery here) and Virginia's View Challenge #14 Layers and Dimension :-)  

I am normally a “tortoise” when it pertains to card making – especially my Mixed Media designs but that is what I love about stamping and creating….you are allowed to go at your own pace and it is so therapeutic:-)

The Card Concept is a bi-weekly challenge that has an inspiration photo along with a number of design styles that you can choose from to create your card- Clean and Simple, Clean and Graphic, Clean and Layered, Shabby Chic, Freestyle Collage, Classy and Elegant and Mixed Media. 

So pull your supplies together and come join in on the fun!! 

To create this card:

Apply a layer of Gesso to a piece of Whisper White cardstock and allow to dry (I prefer to use my Heat Tool to speed up the process).

On your craft mat, apply Ranger® Tim Holtz® Distress Stains- Peacock Feathers, Faded Jeans and Broken China and lay your prepared piece of Whisper White cardstock over the stains, twist and lift.   

Repeat until you have the desired effect on your background, spritzing with water and allowing to spread over the page and drying as needed between layers with the Heat Tool. 


Ink the retired background stamp, Ex Libré using Bermuda Bay Classic Inkand position the background panel over the image, “finger walk” the panel on parts of the stamp to allow only portions of the stamp to be revealed on the background, re-position the background layer and repeat (again, until the desired effect is achieved).

Once dried, apply Gesso® using the Balzar Designs® Well Rounded stencil- allow this to dry and add a few torn pieces of Graphic 45 Washi Tape. 

Stamp the Notable Notions script stamp with Bermuda Bay Classic Ink over the background and stamp the large splatter stamp from Gorgeous Grunge using Ranger® Tim Holtz® Vintage Photo Distress Ink.

Use the Distressing Tool to distress the edges and mount onto the Calypso Coral card base.   Use a Sponge Dauber to apply Ranger® Tim Holtz® Vintage Photo Distress Ink to the edges.

Open My Digital Studio (MDS) and position the Pleasant Poppies background stamp (enlarge the flowers a bit) as well as the sentiment, Just Because from Notably Ornate (enlarging this a bit as well) and print out onto Whisper White cardstock.

Color the Pleasant Poppies using the Light and Medium Calypso Coral and Old Olive Stampin’ Blendabilities™.  Add a few shadows with the Crumb Cake Stampin’ Write marker and a few highlights with the Faber-Castell White Pitt Pen marker. 

Carefully “fussy-cut” the flowers and add to the card front using Stampin’ Dimensionals®. 

Hand cut the sentiment away from the frame and use a Sponge Dauber with Ranger® Tim Holtz® Vintage Photo Distress Ink to age the paper a bit.   Mount to the card front using Stampin’ Dimensionals®.

Cut a strip of 1 ½” Burlap Ribbon, cut off the binding on both sides and remove a few strands of the Burlap.  Spread the remaining strands apart a bit and adhere the larger strip to the card front.

Weave a few strands of the burlap into the retired Designer Round Ribbon Slide and adhere to the card front to finish off the card.

Stamp Sets:  Pleasant Poppies, Notably Ornate (both MDS Versions), Notable Notions, Gorgeous Grunge, Ex Libré background stamp

Ink: Bermuda Bay, Stampin’ Blendabilities™- Light and Medium Calypso Coral and Old Olive Collections,  Stampin’ Write Marker- Crumb Cake; Ranger® Tim Holtz® Peacock Feathers, Faded Jeans, Broken China Distress Stain, Ranger® Tim Holtz® Vintage Photo Distress Ink, Printer Ink- Black, Faber-Castell White Pitt Pen marker

Paper: Whisper White, Calypso Coral

Accessories: Gesso®, Balzar Designs® Well Rounded Stencil, Graphic45 Washi Tape, Sponge Dauber, Distressing Tool, 1 ½” Burlap Ribbon, retired Designer Round Ribbon Slide


I have some good news to share- those of you who have been following my blog, know that my husband has been undergoing chemo treatments for a rare form of non-Hodgkin’s lymphoma (short name- Waldenstroms) and we found out yesterday that the bone marrow biopsy results show that the chemo has been effective and he will now be under a 2 year maintenance program- Praise the Lord!!  We are so thrilled to hear these results and wanted to thank all of you for your prayers, cards and support!  The Lord has blessed us so and we are so thankful!!

Thanks again for taking the time to visit, and again, I hope you will find the time to stop by The Card Concept to check out the rest of the Design Team projects as well as create your own to join in on the fun!!  Have a fabulous Easter Week and Resurrection Sunday!!
Thursday, January 8, 2015

HYCCT1417 Rocky Seas

Hi Stampers!

I finally have a chance to finish posting the cards that I created for this past year’s annual Hope You Can Cling To Challenge (HYCCT) Card Drive at Splitcoaststampers.   There were a total of thirty-five challenges and I did not start creating them until a week before the deadline- duh!!!   Lord Willing, next year, I am determined to start at the beginning of October versus the end :-)

We have been busy the past few months with doctor’s appointments, chemo treatments, scans, etc. for my husband Dave (he is doing as well as possible at this time) and of course, the holidays, so I apologize that I am a bit off schedule :-)

This card was created for HYCCT1417 Edna15’s “All That Binds Us” Challenge - (see the gallery here and the details here).  

I love the saying on this Graphic 45 By The Sea paper- it seemed to be an encouraging thought for those who are struggling with cancer, or other challenges in life, so I decided to leave it ”as is” versus adding another sentiment. 

To create this card:

Ink the seashell images from By The Seashore using Memento™ Tuxedo Black Ink and stamp onto Whisper White cardstock.

Use Sponge Daubers with Baked Brown Sugar, Midnight Muse and Tangerine Tango Classic Ink to color the images.   Add the highlights using a Faber-Castell White Pitt Pen and “fussy-cut” each image.

Adhere a piece of the By The Sea paper to a Tangerine Tango panel and adhere to the Midnight Muse card base and add the Retro Fresh Washi Tape to the folded edge.

Mount the By The Sea image onto a piece of Tangerine Tango cardstock, trim and mount again onto a piece of Midnight Muse cardstock.

Add the focal image to the card front and adhere the fussy-cut shells to the card using Stampin’ Dimensionals®.

Stamp Sets: By The Seashore

Ink: Memento™ Tuxedo Black Ink, Baked Brown Sugar, Midnight Muse, Tangerine Tango, Faber-Castell White Pitt Pen

Paper: Tangerine Tango, retired Midnight Muse; Graphic 45 By The Sea

Accessories: Retro Fresh Washi Tape, White Gel Pen

Thanks again for stopping by- have a fantastic day, my friends!

Thursday, November 6, 2014

HYCCT1408 My Hero, My Husband :-)

Hi Stampers!

Woohoo!!  It was alot of work (since I started on October 31st vs. October 1st) but I have finished all of the 35 of the Splitcoaststampers Hope You Can Cling To Challenges (HYCCT) to promote Breast Cancer Awareness and create cards to encourage those with cancer and their families. 

This card was created for bkfinlay aka Bridget’s HYCCT1408 “My Hero” Challenge - (see the gallery here and the details here) along with The Paper Players PP220 Vintage challenge.  

I have many “heroes” in my life- first and foremost for me is my Lord and Savior, Jesus Christ! I can never forget, or be thankful enough, for His sacrifice on the cross for my sins and the free gift of salvation.   I also feel that the men and women who serve our country in the armed forces are heroes along with our police, fire, doctors, pastors, nurses, teachers and others in public service.  Of course, I cannot forget my parents (my Mother has been with the Lord for over 20 years and I am fortunate that my Father is still alive), but I chose to make this card in honor of my "hero" husband, Dave. 

Dave and I have been together almost 32 years and he still loves me unconditionally (amazing, huh? :-))  He is the best husband in the world, faithful to the Lord, his wife and his job (he has been with the same company for 43 ½ years – through two mergers in the last nine years) and starting next week, he will have to undergo chemotherapy for a rare form of non-Hodgkin’s lymphoma.

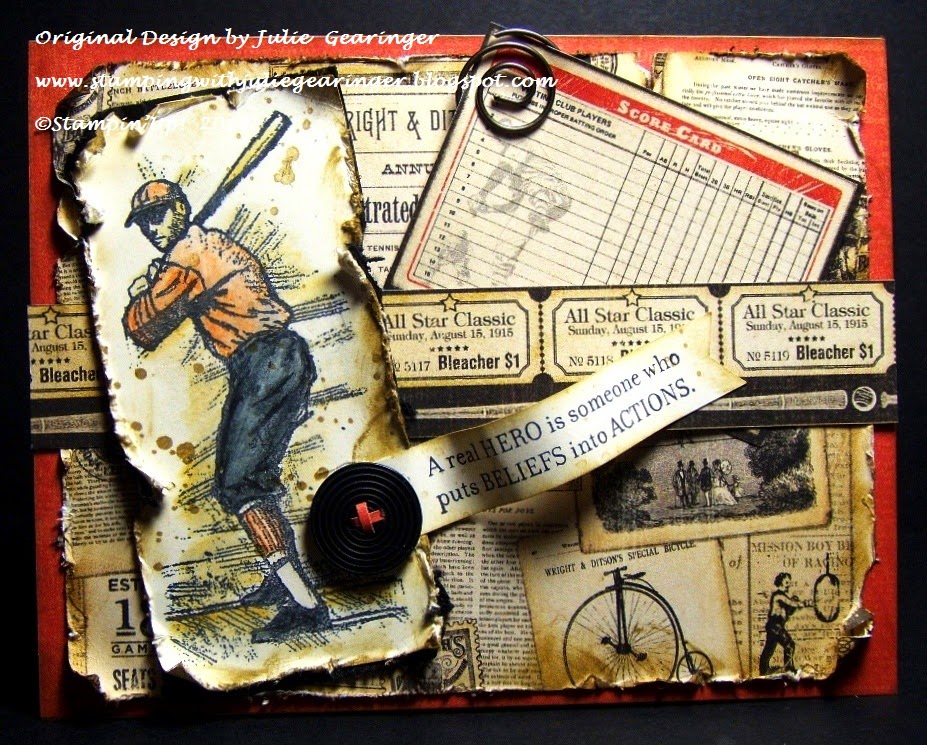
Dave loves sports, especially baseball (the Orioles and Nationals-he is a “hometown boy”) so I decided to pull out one of my favorite masculine retired sets, Take Me Out to the Ballgame along with paper from Graphic 45's Good Ol' Sport Collection to create this card in Dave’s honor.

Again, I hope you will find the time to check out the links above- the Splitcoaststampers HYCCT "Hope You Can Cling To" Challenge is a yearly one and next year, I hope I can start creating when the challenge starts on the 1st of the month (versus waiting until the end of the month- it could not be helped this year due to the tests, etc. that Dave had to have in October). 

To create this card:

Ink the batter image using Memento™ Tuxedo Black Ink onto a piece of Very Vanilla cardstock.   Color the image using Stampin’ Up! watercolor pencils and dilute using an AquaPainter™.

Use the Distressing Tool to distress the edges and use a Sponge Dauber to apply Baked Brown Sugar Classic Ink to “antique” the paper and edges.  Stamp the Gorgeous Grunge splatter stamp using Baked Brown Sugar to add additional distressing.

Mount the distressed panel onto a piece of Basic Black cardstock and use the Distressing Tool to distress the edges and “match” the stamped image.

Mount a piece of Graphic45 Good Ol’ Sport background paper (I used an Orange piece for the Orioles theme) to the Basic Black card base. 

Distress the edges of the Good Ol’ Sport newsprint paper with the Distressing Tool (be careful, the tool can tear the paper a bit too much) and use the Baked Brown Sugar Classic Ink in the same manner as the focal image to add a bit more distressing.  

Mount the distressed newsprint panel onto the card front and add the ticket stub strip (adhering the ticket stub strip on the ends only).

Stamp the sentiment from Service and Sacrifice using Memento™ Tuxedo Black Ink onto Very Vanilla cardstock, create the banner points using the Hexagon Punch and sponge the edges with Baked Brown Sugar Classic Ink .

Insert the Graphic45 cut-a-way along with the retired Antique Pewter Hodgepodge Hardware spiral clip (this comes out of the band and I adhered a little note on the back as well as milestones for us on the front:-)).

Add the focal image to the card front and mount the sentiment along with the Basic Black button (retired Neutrals Collection).

Stamp Sets: Take Me Out to the Ballgame, Courage and Sacrifice, Gorgeous Grunge

Ink:  Baked Brown Sugar, Memento™ Tuxedo Black Ink; Stampin’ Up! Watercolor Pencils

Paper: Very Vanilla, Basic Black; Graphic 45 Good Ol’ Sport

Accessories: Distressing Tool, Sponge Dauber, Hexagon; retired Basic Black button

In order to make the deadline for the HYCCT uploads to the Splitcoaststampers gallery, I will be posting the cards to my gallery at Splitcoaststampers (here) and will update my blog later this week/weekend (I have 27 more cards to post and describe:-)).


Thanks again for visiting- you are all a blessing to me!!   I hope you have a chance to  personally thank the "heroes" in your life!!
Related Posts Plugin for WordPress, Blogger...