Saturday, October 28, 2023

Stamp Simply 2023 Fall/Winter Release- My Church


Hi Friends!

This week at the Stamp Simply blog, the Stamp Simply Design Team have been continuing to share cards showcasing the new 2023 Fall/Winter Release.   

My card this week features the My Church Stamp and Die bundle set along with the new Worship and Praise stamp set and two different Ink Drops 6x6 paper pads from Craft Consortium- Candy and Organic.  


If you have not had a chance to check out my Sister DT cards yet, I hope you will do so- absolutely gorgeous inspiration from all!

To create this card:

For the sky, trim a piece of the Candy Ink Drops paper to 4” by 3.5” and adhere to the top area of a piece of white cardstock (approx. 4 ¼” x 5 ½”). 

Using the hill dies from the My Church die set, cut a few hills from white cardstock and set aside.

Using the tree line die from the My Church die set, cut a few tree lines from a piece of green Organic Ink drops paper and adhere to the card front (overlapping some of the trees).


Add the first hill die cut, covering the bottom of the trees.

De-static the lower left area of the bottom hill area with an embossing powder tool, ink the sentiment from Worship and Praise stamp set with Versafine Onyx Black ink, apply clear embossing powder and heat set with a heat tool.

Add this hill die cut to the card front (overlapping the first hill layer).

De-static another piece of white cardstock with an embossing powder tool, ink the church image from the My Church stamp set with Versafine Onyx Black ink, apply clear embossing powder and heat set with a heat tool.

Once the embossed image has cooled, water color using distress inks and die with the coordinating My Church die.


Mount the church image onto the panel with dimensional foam and adhere to a white card base.

Finish off the card by adding “snow” with a white paint pen and coloring the bell in the tower with a gold marker.


Stamp Sets:
My Church Stamp Die Bundle, Worship and Praise  (Stamp Simply)

Inks/Mediums: Versafine Onyx Black, Distress Inks- Mowed Lawn, Twisted Citron, Picked Raspberry, Hickory Smoke; Gold Metallic Marker, Extra Fine White Paint Pen

Cardstock/Paper: White, Craft Consortium Paper Pads- Candy Ink Drops 6x6, Organic Ink Drops 6x6

Accessories/Tools: Gemini, Jr., My Church Stamp Die Bundle, Embossing Powder Tool, Clear Embossing Powder, Heat Tool


Also, don’t miss out on the current specials at Stamp Simply!

Thanks again for visiting- I hope you have a wonderful weekend! 

Saturday, October 21, 2023

Stamp Simply 2023 Fall/Winter Release- Pray Without Ceasing


Hi Friends!

This week at the Stamp Simply blog, the Stamp Simply Design Team have been sharing cards from the new 2023 Fall/Winter Release.   


My card features the new Pray Without Ceasing stamp set, Praying Hands Die Set, the new Carta Bella A Wonderful Christmas 6x6 paper pad along with lace, twill ribbon and an embossing folder!

If you have not had a chance to check out my Sister DT cards yet, I hope you will do so- wonderful inspiration from all!

To create this card:

Trim a piece of the burgundy designer paper from the A Wonderful Christmas 6x6 paper pad to approx. 4” x 5 ¼”. 

Emboss the designer paper panel with a Quatrefoil embossing folder, lightly sand with a sanding block before adhering to a piece of white cardstock (approx. 4 ⅛” x 5⅛”).


Layer a piece of the white Venise lace onto the card panel.

Layer a piece of black ribbon twill over the lace, wrapping the ends behind the panel.

Adhere the card panel to a 4 ¼” x 5 ½” piece of black cardstock and mount onto a white card base.


On the poinsettia circle cut-a-part from the A Wonderful Christmas 6x6 paper pad, de-static the paper with an embossing powder tool, ink the sentiment from the Pray WithoutCeasing stamp set with Versafine Onyx Black ink, apply clear embossing powder and heat set with a heat tool.


Once the embossing has cooled, die cut the panel with the smaller square die from the Praying Hands Die Set.

Die cut a piece of black cardstock panel using the larger square die from the Praying Hands Die Set and mount the embossed panel onto the black square.

Mount the panel onto the card front using dimensional foam.

Ink the Pray WithoutCeasing hands image with Versafine Onyx Black ink, apply clear embossing powder and heat set with a heat tool.

Watercolor the image with water-based markers.  Die cut with the coordinating die from the Praying Hands Die Set.

Mount onto the card front using dimensional foam to finish off the card. 

As many of you who follow my blog know that I enjoy playing along with online challenges.  I am linking this card to the Word Art Wednesday #617-#618 "Anything Goes" Challenge. 

Stamp Sets: Pray Without Ceasing (Stamp Simply


Inks/Mediums: 
Versafine Onyx Black, Stampin’ Write Markers- Blush Blossom, Creamy Caramel, Baroque Burgundy, Basic Gray

Cardstock/Paper: White, Black, Carta Bella A Wonderful Christmas 6x6 Paper Pad

Accessories/Tools: Gemini, Jr., Stamp Simply Steel Dies- Praying Hands,

Darice Embossing Folder- Quatrefoil, May Arts 5/8” Twill- 10 Yard Bundle- Black , Venise Lace 1.75” – Gabriella- White, , Embossing Powder Tool, Clear Embossing Powder, Heat Tool


Also, don’t miss out on the current specials at Stamp Simply- we still have some of the popular surprise boxes left! 


Thanks again for visiting- I hope you have a blessed weekend! 

Saturday, October 14, 2023

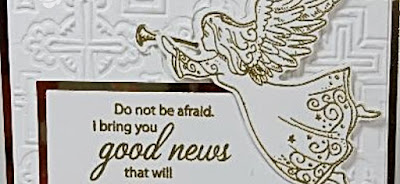
Stamp Simply 2023 Fall/Winter Release- Angels Among Us


Hi Friends!

We are excited about the new Fall/Winter 2023 Release at Stamp Simply!


 This week on the Stamp Simply blog, the Stamp Simply Design Team have been sharing cards using the new Fall/Winter 2023 Release stamp sets, dies and other supplies!


I am sharing a quick, fun card using the new Angels Among Us Bundle and along with the new Praying Hands square stacking dies.  The Angels Among Us Bundle is perfect for Christmas and as well as for cards all year round!

As many of you who follow my blog know, I enjoy playing along with online challenge,  I am linking this card to the Word Art Wednesday #611-#612 “Anything Goes” Challenge.


If you have not had a chance to check out my Sister DT cards yet, or the Word Art Wednesday Challenge site, I hope you will do so- gorgeous inspiration from all!

To create this card:

Trim a piece of white cardstock to approx. 4” x 5 ¼” and emboss it with the Crosses embossing folder.

Mount onto a 4 ¼” x 5 ½” gold metallic cardstock.  Adhere to a white card base. FYI- I die cut the square for the layer behind the sentiment using the largest die from the Praying Hands die set (before I mounted the embossed panel) .  No one will be the wiser, except now you, of course, lol!.

De-static two pieces of white cardstock, stamp the sentiment on one piece and the angel along with the trumpet images on the other panel (both from the Angels Among Us Bundle) using Versamark ink.  Apply gold clear embossing powder and heat set with a heat tool.

Die cut the angel and trumpet with the coordinating dies from the Angels Among Us Bundle and the sentiment using the smallest square die from the Praying Hands dies.

Note- I also die cut another angel and trumpet from white cardstock to layer behind the embossed images for strength. I usually do this for most of my image die cuts to create additional thickness- like a thin chipboard.


Layer the larger square die cut from gold metallic cardstock behind the sentiment and mount directly onto the card front (see my FYI note above re: where I obtained the large square die cut).

Mount the angel along with the trumpet using dimensional foam to finish off the card.

Stamp Sets: Angels Among Us (Stamp Simply)

Inks/Mediums: Versamark

Cardstock/Paper: White,  Bazzill Mirror Cardstock- 8.5 x 11- Gold- 15 ct 

Accessories/Tools: Gemini, Jr., Stamp Simply Dies- Angels Among Us Bundle, Praying Hands;  Darice Embossing Folder- Crosses, Embossing Powder Tool, Gold Embossing Powder, Heat Tool

I hope I have inspired you to create a card this week! Also, don’t miss out on the current specials at Stamp Simply, especially the new release!

Thanks again for visiting- I hope all of you have a blessed weekend! 

Wednesday, October 11, 2023

TCC200 Give Thanks


Hi Friends!


Welcome to our new #200 {Autumn Chill} Challenge at the
The Card Concept!

Our inspiration photo for this month invokes feelings of the autumn chill in the air, doesn’t it?

We are looking forward to seeing what inspires your card! Will it be the overall theme, the actual elements (book, coffee leaves sweater, etc.), the colors, textures or something else?

I was inspired by the rich fall colors, textures and leaves for my Clean and Layered card.

If you have not already visited us at The Card Concept, I hope you will find the time to do so.  Gorgeous inspiration from the rest of my DT sisters!  Create a card and join us!

This was a fun card to create:


Trim the purple background paper from the Craft Consortium Over The Rainbow paper pad to approx. 4 ¼” x 5 ½”, emboss with the Foliage 3D embossing folder and then die cut the corner with the TH Mixed Media #1 die.

Lightly sand the embossed panel to raise the detail.

Trim the panel to approx. 4” x 5 ¼” and adhere to a 4 ⅛” x 5 ¼” piece of white cardstock, then mount onto a 4 ¼” x 5 ½” black card front.

Adhere the panel to a white card base.

Die cut the leaves using the TH Fall Foliage Thinlit Dies from a piece of the orange/yellow designer paper from the Craft Consortium Sunset Ink Drops 6x6 paper pad. Crush the leaves by hand a bit to distress.


De-static a piece of white cardstock with an embossing powder tool, stamp the verse sentiment from the
Give Thanks stamp set with Versafine Black Onyx ink, apply clear embossing powder and heat set with a heat tool.

Once the embossing has cooled, die cut the sentiment with a circle die, die cut another circle a bit larger from black cardstock and layer the sentiment onto the black circle.

Adhere the sentiment to the card front with dimensional foam.

Add the die cut leaves around and under the circle and finish off the card with a few black rhinestones.  

Stamp Sets: Give Thanks- (Stamp Simply)

Inks/Mediums: Versafine Onyx Black

Cardstock/Paper: Whisper White, Basic Black, Craft Consortium Over The Rainbow  6x6 Paper Pad, Craft Consortium Ink Drops- Sunset 6x6 Paper Pad

Accessories/Tools: Gemini, Jr., Sizzix Thinlit Dies by Tim Holtz- Fall Foliage, Sizzix Thinlit Dies by Tim Holtz -Mixed Media #1, Spellbinders Nestabilities- Standard Circle Dies- SM, Sizzix 3D Texture Fades by Tim Holtz- Foliage, Embossing Powder Tool, Clear Embossing Powder, Heat Tool, Black Rhinestones

I enjoy playing along with online challenges and will be linking this card to the Craft Rocket #108 "Autumn and/or Halloween" Challenge. 

Thanks again for taking the time to visit! I hope you are inspired to create a card and join us for our #200 {Autumn Chill} Challenge at The Card Concept! The deadline to play along is November 6th at noon EST. 


Saturday, October 7, 2023

Lord of the Harvest


Hi Friends!

This week at the Stamp Simply blog, the Stamp Simply Design Team have been sharing their gorgeous fall cards.   

Fall in the Mid-Atlantic is so pretty and is one of my favorite seasons! The change in the temperature and humidity makes it easier for me to breathe outside, lol!  Plus, even though the trees are not at their peak color yet, they will be soon!  Another reminder of God’s Handiwork all around us! 


For my fall card, I combined two stamp sets- Harvest and Floral Cluster- Fall Flowers along with scraps from two Craft Consortium paper pads and a lace die cut!

As many of you who follow my blog know, I enjoy playing along with online challenges and am playing along with the Word Art Wednesday #615-#616 Anything Goes Challenge.

If you have not had a chance to check out my Sister DT cards yet, or the Word Art Wednesday challenge site yet, I hope you will do so- gorgeous inspiration from all!

To create this card:

Trim a piece of Craft Consortium Sunset Ink Drops paper to approx. 4” x 3”.  De-static the  paper with an embossing powder tool, ink the sentiment from the Harveststamp set with Versafine Onyx Black ink, apply clear embossing powder and heat set with a heat tool.

Once the embossing has cooled, mount the sentiment panel onto a piece of 4 ¼” x 5 ½” black cardstock.


Trim a piece of Craft Consortium Over The Rainbow paper to approx. 2 ½” x 4” and mount onto the bottom of the card front panel.

Use one of the Sizzix Tim Holtz Crochet dies to die cut a piece of lace from white cardstock and mount onto the card front.

Trim a piece of black cardstock approx. ¾” x 4” and adhere over the cut edges of the designer paper and the lace die cut.

De-static a piece of a 4 ¼” x 5 ½” piece of white cardstock an embossing powder tool, ink the sunflower cluster image with Versafine Onyx Black ink, apply clear embossing powder and heat set with a heat tool.

Once the embossing has cooled, color with water-based markers.

Die cut the sunflower cluster image using the Floral Clusters and Sprigs Die (also die-cut a second piece from white cardstock to layer behind the colored image).


Mount the background panel onto a white card front and adhere floral cluster image with dimensional foam to finish off the card. 

Stamp Sets: Harvest, Floral Cluster- Fall Flowers (Stamp Simply)

Inks/Mediums: Versafine Onyx Black, Stampin’ Write Markers- Crushed Curry, Hello Honey,Tangerine Tango, Wild Wasabi, Lemon Lime Twist, Cherry Cobbler, Early Espresso

Cardstock/Paper: White, Black, Craft Consortium Ink Drops-Sunset 6x6, Craft Consortium Over The Rainbow 6x6

Accessories/Tools: Gemini, Jr., Stamp Simply Steel Dies- Floral Cluster and Sprigs, Sizzix Thinlit Dies by Tim Holtz- Crochet, Embossing Powder Tool, Clear Embossing Powder, Heat Tool

A fairly, quick and easy card and relatively flat for mailing! I hope you are inspired to create a card this week in celebration of fall!  

Also, don’t miss out on the current specials at Stamp Simply!

                        Thanks again for visiting- have a blessed weekend! 

Related Posts Plugin for WordPress, Blogger...