Showing posts with label Harvest. Show all posts

Saturday, October 7, 2023

Lord of the Harvest


Hi Friends!

This week at the Stamp Simply blog, the Stamp Simply Design Team have been sharing their gorgeous fall cards.   

Fall in the Mid-Atlantic is so pretty and is one of my favorite seasons! The change in the temperature and humidity makes it easier for me to breathe outside, lol!  Plus, even though the trees are not at their peak color yet, they will be soon!  Another reminder of God’s Handiwork all around us! 


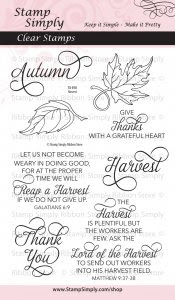
For my fall card, I combined two stamp sets- Harvest and Floral Cluster- Fall Flowers along with scraps from two Craft Consortium paper pads and a lace die cut!

As many of you who follow my blog know, I enjoy playing along with online challenges and am playing along with the Word Art Wednesday #615-#616 Anything Goes Challenge.

If you have not had a chance to check out my Sister DT cards yet, or the Word Art Wednesday challenge site yet, I hope you will do so- gorgeous inspiration from all!

To create this card:

Trim a piece of Craft Consortium Sunset Ink Drops paper to approx. 4” x 3”.  De-static the  paper with an embossing powder tool, ink the sentiment from the Harveststamp set with Versafine Onyx Black ink, apply clear embossing powder and heat set with a heat tool.

Once the embossing has cooled, mount the sentiment panel onto a piece of 4 ¼” x 5 ½” black cardstock.


Trim a piece of Craft Consortium Over The Rainbow paper to approx. 2 ½” x 4” and mount onto the bottom of the card front panel.

Use one of the Sizzix Tim Holtz Crochet dies to die cut a piece of lace from white cardstock and mount onto the card front.

Trim a piece of black cardstock approx. ¾” x 4” and adhere over the cut edges of the designer paper and the lace die cut.

De-static a piece of a 4 ¼” x 5 ½” piece of white cardstock an embossing powder tool, ink the sunflower cluster image with Versafine Onyx Black ink, apply clear embossing powder and heat set with a heat tool.

Once the embossing has cooled, color with water-based markers.

Die cut the sunflower cluster image using the Floral Clusters and Sprigs Die (also die-cut a second piece from white cardstock to layer behind the colored image).


Mount the background panel onto a white card front and adhere floral cluster image with dimensional foam to finish off the card. 

Stamp Sets: Harvest, Floral Cluster- Fall Flowers (Stamp Simply)

Inks/Mediums: Versafine Onyx Black, Stampin’ Write Markers- Crushed Curry, Hello Honey,Tangerine Tango, Wild Wasabi, Lemon Lime Twist, Cherry Cobbler, Early Espresso

Cardstock/Paper: White, Black, Craft Consortium Ink Drops-Sunset 6x6, Craft Consortium Over The Rainbow 6x6

Accessories/Tools: Gemini, Jr., Stamp Simply Steel Dies- Floral Cluster and Sprigs, Sizzix Thinlit Dies by Tim Holtz- Crochet, Embossing Powder Tool, Clear Embossing Powder, Heat Tool

A fairly, quick and easy card and relatively flat for mailing! I hope you are inspired to create a card this week in celebration of fall!  

Also, don’t miss out on the current specials at Stamp Simply!

                        Thanks again for visiting- have a blessed weekend! 

Saturday, October 1, 2022

Have a Cup On Us


Hi Friends!

In celebration of International Coffee Day, World Card Making Day and the National Coffee Day Blog Hop, there are several blog hops and prizes! 

Come hop along for a chance to win prizes!


Come hop along and leave a comment for a chance to win!


The National Coffee Day Blog Hop and the Stamp Simply National Blog Hop post are still active as well!  Come hop along and leave a comment for a chance to win!  It’s easy to enter to win!  Just leave a comment on this Stamp Simply Blog Post telling us what your favorite HOT beverage is. This post is open for comments thru Tuesday, 10/04/22. The winner will be announced on Thursday, 10/06/22 in the evening.


Plus, Stamp Simply is one of the sponsors of the National Coffee Day Blog Hop and to celebrate, all items in the Stamp Simply Coffee Category (stamps, dies, paper, ribbon, embellishments) are 15% OFF with code Coffee2022.

FYI- The sale code is Case Sensitive and runs through 10/02/22.  Also note: Select stamps/dies that were marked at 35% OFF previously, are still on sale and you still get another 15% OFF those!!!   Shop the Coffee Category here.


To celebrate, I am sharing a fall coffee card designed with several stamp sets and supplies from Stamp Simply!


To create this card:

De-static two panels of white cardstock (4 ¼” x 5 ½”) with an embossing powder tool.

With Versafine Onyx Black ink, stamp the coffee cup /images from the Have A Cup On Us Bundle and on the other panel, stamp the sentiment from Welcome Fall.

Apply clear embossing powder and heat set with a heat tool.

Once the embossing has cooled, create a mask with a sticky note and stamp/heat emboss the leaf image from Harvest onto the coffee cups in the same manner as above.

Die cut the coffee cups using the coordinating Have A Cup On Us Bundle dies and color with water-based markers. Add a bit of shimmer with a clear glitter pen to both cups and set aside.

Trim the panel with the “pumpkins and spice…” sentiment to approx. 2 ¾” x 4 ¼” . 

Ink the subway style background stamp from A Cup of Java with teal ink (I used the same teal marker to color the stamp), stamp onto the bottom of the panel.


De-static the panel and heat emboss the sentiment “Rise & Shine” from the A Cup of Java stamp set with clear embossing powder (same steps as above for the heat embossing).

Add a strip of plaid designer paper (a scrap from the Doodlebug Design Pumpkin Spice 6x6Paper Pad) and mount onto a piece of teal cardstock.

Wrap a few strands of natural twine (wrapping the twine ends behind the panel) add the twine bow with a button.

Trim the pieces of Carta Bella Welcome Autumn designer paper to approx. 3 ¾” x 2 ½” and layer onto a piece of white cardstock.  Mount the panel onto a piece of teal cardstock, trim again and mount onto a piece of black cardstock, finally mounting onto a white card base.

Adhere a piece of 3/8" white crochet lace and a piece of scrap cardstock to cover the raw edges of the designer paper.


Adhere the layered twine/button panel onto the card front using dimensional foam and add the stamped/die cut coffee cups with dimensional foam as well.

Finish off the card with a few black rhinestones.

As many of you know, I enjoy participating with online challenges and used the Splitcoaststampers SC345 Sketch for the layout and will also be linking to the Simon Says Monday “Emboss It” Challenge, the Addicted to Stamps and More #439 Any Occasion Challenge and the Word Art Wednesday #563-#564 “Anything Goes” Challenge.

If you have not already had a chance to do so, I hope you visit the Stamp Simply blog to see all of the inspiration from the rest of the SS Design Team as well as the above challenge sites- gorgeous  galleries from all!


Stamp Sets: A Cup of Java, Have A Cup On Us Bundle, Harvest, Welcome Fall (Stamp Simply)

Ink/Mediums: Versafine Onyx Black, Stampin' Write Markers- Coastal Cabana, Tangelo Twist; Zig Wink of Stella Clear Glitter Marker

Cardstock/Paper:  White, Black, Coastal Cabana; Doodlebug Design Pumpkin Spice 6x6 Paper Pad, Carta Bella Welcome Fall 6x6 Paper Pad

Accessories/Tools: Gemini, Jr., Stamp Simply Dies- Have A Cup on Us Bundle. White Crochet Lace, Natural Twine, Black Rhinestones, Pumpkin Button (from my stash)


Thanks again for stopping by! I am praying for those of you in the path of Hurricane Ian and hope you are staying as safe as possible.  

Tuesday, September 28, 2021

Pastor Appreciation


Hi Friends!

Did you know that October is Pastor Appreciation Month?  My hubby and I appreciate our pastors all year long, but I decided to create a special card in honor of Pastor Appreciation using stamps, dies and designer paper from Stamp Simply

Stamp Simply has a wonderful Pastor and Ministry Appreciation Bundle – perfect for appreciation for anyone in ministry as well as fabulous Scriptures that can be used all year long!


Plus, I saw the Featured Designer Betty’s #132 Tic-Tac-Toe Challenge and wanted to create a card using the elements on the board. 

Once I was finished, I realized I had used ALL of the board elements- Die Cuts, Masculine, Wood, Orange/Rust, Free, Layers, Embossing, Patterned Paper, Fall/Halloween Theme (fall theme with leaves).  Woohoo!!

I am also joining the Double D “Leaves” Mood Board Challenge and the WWC325 Heidi’s Challenge: “All Things Masculine” at Watercooler Wednesday.

If you have not had a chance to visit the Stamp Simply blog or the other challenge sites yet, I encourage you to do so- gorgeous inspiration from all!

To create this card:

Ink the leaves from Harvest and Give Thanks with Versafine Onyx Black ink, stamp onto white cardstock and heat set with a heat tool.

Watercolor the leaves with water-based markers- I used a combination of orange, rust and browns.  Once you are satisfied with the coloring, die cut using the coordinated Harvest and Give Thanks dies.


Die cut additional shapes from white cardstock to adhere behind the stamped/colored images (this helps to give the die cut additional strength).


Trim a piece of the woodgrain designer paper from the Craft Consortium Aood Textures 6x6 paper pad to approx. 3 ¾” x 5”.  Mount onto a piece of black cardstock, trim close to the edge, mount onto a piece of rust cardstock, again, trimming close to the edge.

Adhere the background panel to a white card base.


Ink the verse sentiment from the Pastor & Ministry Appreciation Scripture Sentiments stamp set with Versafine Onyx Black ink, stamp onto a prepared piece of cardstock, apply clear embossing powder and heat set with a heat tool.

Once the embossing has cooled, die cut with the tag die (again die cut another tag from white cardstock to mount behind the sentiment tag).

Add the strip of black baker’s twine and mount the tag onto the card front using dimensional foam.


Mount the die cut/colored leaves with dimensional foam (stacking the foam for additional height in areas as needed).

Finish off the card by applying a bit of shimmer to the leaves with a clear glitter marker.


Stamp Sets: Pastor & Ministry Appreciation Scripture Sentiments, Give Thanks, Harvest (Stamp Simply)

Ink/Mediums:  Versafine Onyx Black, Stampin’ Write Markers- Really Rust, Tangerine Tango, Pumpkin Pie, Early Espresso; Zig Wink of Stella Clear Glitter Marker

Cardstock/Paper:  White, Black, Rust; Craft Consortium Wood Textures 6x6 Paper Pad

Accessories/Tools: Gemini, Jr., Stamp Simply Dies- Harvest, Give Thanks; Sizzix Thinlit Dies by Tim Holtz- Tag Collection, Divine Twine Baker’s Twine- Black, Embossing Powder Tool, Clear Embossing Powder, Heat Tool

Thanks so much for taking the time to visit! I hope you have a fabulous week, sweet friends!


Friday, October 11, 2019

The Blessings of the Lord


Hi Friends!!

While the roofing contractors replaced all our roof yesterday, I had a chance to spend time in my craft room and create a few cards.  I miss my stamping “therapy” and with the stress of all of the recent remodeling/construction lately, I definitely needed some time in my craft room, lol!

Today I am sharing a card that I designed yesterday using two stamp sets from Divinity Designs LLC- the Indian corn image is from the A-Maize-ing Stamp/Die Duo set and the sentiment from the retired set, Doily Blessings.  **FYI** I fussy-cut the image this time (versus using the die) since some of my watercolor bled over the stamped edges- oops!

I love participating with online challenges and incorporated the Sketch Saturday #584 SketchChallenge, the Simon Says Monday “Fall/Autumn” Challenge , the Addicted toStamps and More #362 “Make Your Mark” Challenge and the {PIN}spirational #249 InspirationChallenge (I was inspired by the theme as well as the colors).

If you have not had a chance to drop by the above challenge sites yet, I hope you do so- fabulous inspiration from all!


Stamp the Indian corn image using Staz-On® Black ink, watercolor with water-based markers and watercolor pencils and once satisfied, die cut (or in this case, fussy-cut) the image.  

Add a bit of shimmer over the corn with a clear glitter pen and a few white highlights to the berries with an extra fine white paint pen before mounting onto an oval die cut using dimensional foam.

Cut the two pieces of designer paper (from my stash), lightly stamp the background of the upper panel with a retired script stamp (Botanicals from Stampin’ Up!) using distress ink, dry emboss the lower panel with a quilt embossing folder and use a distressing tool to lightly distress all of the outside edges of both panels.  

Mount both panels  onto a piece of cream cardstock and adhere to a piece of berry cardstock, trimming to fit a 4 ¼” x 5 ½” card base.

Add a strip of berry satin ribbon to cover the edges of the panels on the card front (wrapping the ends behind the panel) before adhering the entire panel onto a white card base.

Die cut the doily oval from berry cardstock , adhere the Indian corn image to the center and add to the card front using dimensional foam (or lately, I prefer using my scraps of chipboard :-)).

Stamp the sentiment with Staz-On® Black ink , die cut with a stitched circle die and mount onto a circle die cut from berry cardstock.  Slip the upper end of the circle under the ribbon and adhere directly to the card front.

Add the wire clip to the ribbon to finish off the card.

Stamp Sets: A-Maize-ing Stamp/Die Duo, Doily Blessings (Divinity Designs LLC), Botanicals (retired Stampin’ Up!)

Ink/Mediums: Staz-On® Black, Tim Holtz® Rusty Hinge Distress Ink, Stampin’ Write Markers- Crushed Curry, Pumpkin Pie, Rich Razzleberry, Sahara Sand, Soft Suede; SU! Black Watercolor Pencil, Spectrum Noir™ Clear Glitter Pen, Sharpie® Extra Fine White Paint Pen

Cardstock/Paper: Very Vanilla, Rich Razzleberry; retired SU! Comfort Café Designer Series Paper, misc. DSP from my stash (upper panel)

Accessories: Big Shot™ , SU! Quilt Top Embossing Folder, MFT Dies- Stitched Circle STAX, Die-namics Open Oval Scallop Doily (retired); AquaPainter™,  5/8” Rich Razzleberry Satin Ribbon, Wire Clip

Thanks again for taking the time to visit-  I hope all of you have a blessed week/ weekend and stop by again soon!

Saturday, October 8, 2016

Today I Am Thankful


Hi Friends! 

Today I am sharing an Autumn Inspired Mixed Media card on the Artistic Outpost blog and wanted to share with you as well.

This card features the Artistic Outpost  stamp sets, Seed Packets Background , Harvest and Grunge Elements along with the ODBD Pierced Rectangles Dies (all available at Our Daily Bread Designs).  

To create the background for this card, ink the AO Seed Packets Background with black soot distress ink and stamp onto kraft cardstock.

Use a  water brush with distress inks to add the distressing and color to the pumpkin as well as the vegetables (I used brushed corduroy along with crushed pumpkin, peeled paint and wild honey distress inks).

Die cut and emboss the background panel with the ODBD Pierced Rectangles Dies, ink the corner splatter image from AO Grunge Elements with walnut stain distress ink and stamp  over all of the edges before applying crazing medium with a palette knife over the entire panel.

Once the crazing medium is dry, layer the panel onto a piece of vanilla cardstock, trim and mount onto the black card base.

Ink the sentiment from AO Harvest with black soot distress stain and stamp onto vanilla cardstock, ink the AO Grunge Elements grid image with walnut stain distress ink, stamp over the sentiment and die cut/emboss the sentiment with the ODBD Pierced Rectangles Dies.

To finish off the card, mount the sentiment onto black cardstock, trim close to the die cut edge, add the four antique brads to the corners, adhere the looped natural polished hemp twine to the card front (I used hot glue for this step) and mount the sentiment with dimensional foam.

I hope I have inspired you to pull out your Artistic Outpost stamps and create a project of your own this weekend!  If so, please share with us on our Artistic Outpost Facebook page- we would love to see your artwork!

Thanks again for stopping by- hugs and I hope you have a wonderful weekend, my friends!


Related Posts Plugin for WordPress, Blogger...