Saturday, January 30, 2021

Clean and Simple- Love the Lord Your God

Hi Friends!

Today I am sharing another Clean and Simple (CAS) black and white card using stamps and paper available from The Stamp Simply Ribbon Store!

As many of you know, I enjoy participating in online challenges and will be playing along with the Stamping Sensations January “Fav Stamps” Challenge along with the Simon Says Wednesday “Anything Goes” Challenge and the Use Your Stuff #414 “Out with the Old” Challenge.

I love the stamp sets from Stamp Simply and they are some of my favorite stamps.  I have not had a chance to use the background die and/or the verse image that I chose for this card, but I have owned them for a while now. 

Plus, the snippet of collage paper was a piece left over from a few cards that I created earlier this month (I have also owned this paper for years and it is the first time I used it).  I absolutely love the black and white design as well as the designs in the rest of the bundle (available at Stamp Simply).

If you have not had time to check out the Stamp Simply blog or the other challenge sites yet, I hope you will do so- gorgeous inspiration from all!

To create this card:

Die cut a piece of 4” x 5 ¼” with the Tim Holtz Mixed Media 2 die (rose pattern) and mount onto a 4 ¼” x 5 ½” black cardstock.


Cut a piece of the Botanical Collage paper to approx. 2 ¼ ” x 4”, adhere to bottom of the panel.   


Here are the four different collage patterns in the bundle

Adhere a piece of
black satin ribbon to the card front, wrapping the ends of the ribbon behind the panel. 

Mount the entire panel onto the front of a white card base.

Use an embossing powder tool to prepare a piece of white cardstock for heat embossing. 

Stamp the sentiment from Love Sentiments  using Versafine Onyx Black ink, apply clear embossing powder and heat set with a heat tool.

Once the embossing has cooled, trim the panel and mount onto a piece of black cardstock (trimming close to the edge).  Adhere to the card front with dimensional foam (or chipboard).

Add a few black rhinestones to finish off the card.

Quick and simple plus easy to mail)!


Stamps: Love Sentiments  (Stamp Simply)

Ink/Mediums: Versafine Onyx Black

Cardstock/Paper: White, Black ; Tim Holtz Idea-ology Collage Paper Tube- Botanical

Accessories/Tools:  Gemini. Jr., Tim Holtz Mixed Media #2 Dies, Embossing Powder Tool, Clear Embossing Powder, Heat Tool, Black Satin Ribbon, Black Rhinestones

Thanks again for taking the time to visit- I hope all of you have a fabulous weekend!  

FYI- We are anticipating a major snowstorm tomorrow and Monday. If you are in the path of the storm, stay safe and warm, sweet friends- hugs!

Sunday, January 24, 2021

Praying for You


Hi Friends!

Today I am sharing another quick card designed with several stamp sets, embossing folder, crochet dies and paper from The Stamp Simply Ribbon Store!

I do not know about you but unfortunately, as I am getting older, I seem to need more sympathy/praying for you/get well type cards than ever before.  I decided to go with the sentiment “Praying for You” so this card could apply to several situations.

I enjoy participating with online challenges and will be linking this card to the Simon Says Wednesday “We’re On A Roll” Challenge (use round elements, my wreath is round so I hope this qualifies :-)) along with the Word Art Wednesday #475=#476 “Anything Goes” Challenge.

If you have not had time to check out the Stamp Simply blog or the other challenge sites yet, I hope you will do so- fabulous inspiration from all!


To create this card:

Emboss a piece of white cardstock using the Script embossing folder.  Trim and mount onto a piece of 4 ¼” x 5 ½” black cardstock.


Add a 2” strip of the floral design from the Forward with Faith paper at the bottom along with a piece of paper lace and 1” black satin ribbon.

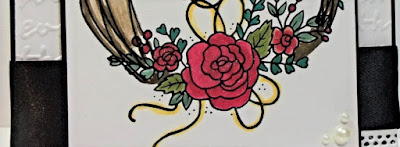
Ink the floral part of the Seasonal Wreaths- Spring and Summer stamp set with Versafine Onxy Black ink onto white cardstock, heat set with a heat tool.

Stamp the same floral image onto scrap paper (or a sticky note), fussy cut around the outside edges to create a mask.  

Mask the image you stamped in the first step, ink up the wreath from Seasonal Wreaths- Spring and Summer and stamp over the floral image to complete the wreath.  

Heat set with a heat tool. Using water-based markers, color the flowers in colors to match the designer paper (I chose to use a piece from the designer paper).  

Stamp the sentiment from Sympathy Sentiments Set 2 inside the wreath using Versafine Onyx Black ink, heat set with a heat tool.

Trim the panel and mount onto a piece of black cardstock. Adhere to the card front with dimensional foam (or chipboard).

Add a few pearls to the corners and use a clear glitter pen to add shimmer to the flowers to finish off the card.


Stamp Sets: Seasonal Wreaths- Spring & Summer, Sympathy Sentiments Set 2 (Stamp Simply)

Ink/Mediums:  Versafine Onyx Black, Water-based Markers (Bermuda Bay, Blushing Bride, Daffodil Delight, Melon Mambo, Sage Shadow), Zig Wink of Stella Brush- Clear Glitter Marker

Cardstock/Paper:  White, Black; Forward with Faith 6x6 Paper Pack by Echo Park

Accessories/Tools:  Gemini. Jr. ; Sizzix Thinlit Dies by Tim Holtz- Crochet, Script Embossing Folder by Darice, Heat Tool, Black Satin Ribbon, Pearls


Thanks again for taking the time to stop by! I hope all of you are having a wonderful weekend!

Wednesday, January 20, 2021

TCC147 This is the Day


Hi Friends!

Welcome to The Card Concept #147 {Dare To Dream} Challenge! This week our Design Team has outdone themselves- so many beautiful cards and different styles/interpretations- we hope you will check it out!

Don't you think that this room looks like a wonderful place to study, journal, and/or create! So peaceful but I would need a bit more desk space for sure :-)

Also, I absolutely love all the different globes, the tones of brown on the suitcases as well as the overall vintage feel.  The combination of all of this inspired my Shabby and Vintage card!

I enjoy participating with online challenges and used the Try Stamping On Tuesday #489 Sketch Challenge  for the layout (plus I used die cuts :-)) and will also be linking to the Word Art Wednesday #475-#476 “Anything Goes” Challenge.

Again, if you have not had a chance to visit The Card Concept or the other challenge sites yet, I encourage you to do so- wonderful inspiration from all! 

To create this card:

For the background panel- distress the edges of a 4” x 5 ¼” piece of the Vintage Emporium designer paper and mount it onto a piece of espresso cardstock.

Cut another horizontal piece of the ledger design from the Vintage Emporium paper, distress the edges and mount onto espresso cardstock, distressing the edges.  Adhere to the background panel.

Die cut a piece of the world map design from the Vintage Emporium paper pack using one of the larger outside ovals from the Hemstitch Oval Dies and lightly distress the edges.

Close-up of the map :-)
Die cut another oval using the same oval die from espresso cardstock, cut the espresso oval in half and adhere behind the map die cut (allowing a bit of the espresso oval to show at the top and bottom) and lightly distress the edges.

Adhere the map oval die cut directly to the background panel.

Add the ribbon slide to a piece of sage twill ribbon and adhere to the card front (wrapping the edges of the sage ribbon behind the panel). 

Add the three antique brads to the panel before mounting the entire panel to the white card base.

De-static a piece of vanilla cardstock with an embossing powder tool, stamp the sentiment from Give Thanks using Versafine Onyx Black ink, apply clear embossing powder and heat set with a heat tool.

Once cooled, die cut with the Fishtail Sentiments Banner Dies (also die cutting another one from espresso cardstock).  Cut the espresso die cut in half, layer behind the sentiment layer. 

Use a sponge dauber to apply antique linen distress ink to the edges and mount onto the card front using dimensional foam (or chipboard) to finish off the card.

Stamp Sets: Give Thanks (Stamp Simply)

Ink/Mediums: Versafine™ Onyx Black, Tim Holtz Antique Linen Distress

Paper/Cardstock: Vanilla, Espresso; Vintage Emporium 6x6 Paper Pad (Craft Consortium)

Tools/Accessories: Gemini, Jr., Stamp Simply Dies- Fishtail Sentiment Banners Dies, Spellbinders Dies- Hemstitch Ovals, Embossing Powder Tool, Clear Embossing Powder, Heat Tool, Distressing Tool, Sage Twill Ribbon, Antique Ribbon Slide, Antique Brads, Sponge Dauber

Thanks again for taking the time to visit!  We would love for you to create a card based on our Dare To Dream photo and join us at The Card Concept! The challenge is open until February 1st at noon EST.

Sunday, January 17, 2021

Hello Sweet Friend


 Hi Friends!

Today I am sharing a fun card designed with the new Cupid & Co 6x6 Paper Pad by Echo Park along with stamps and dies from The Stamp Simply Ribbon Store!

This is such a cute paper pad- perfect for Valentines Day or other occasions- wedding, anniversary, etc. 

As many of you know that follow my blog, I have a personal goal to create a card for each of the over 800 Splitcoaststampers Sketch Challenges and used Sketch #828 for the layout on this card.

I am also participating with the Tic-Tac-Toe #096 Challenge (left column down Heart-Red-Ribbon) along with the Simon Says Wednesday “Layer It Up” Challenge.  

If you have not had time to check out the Stamp Simply blog or the other challenge sites yet, I hope you will do so- wonderful inspiration from all!

To create this card:

Cut a piece of black cardstock to 4 ¼” x 5 ½”, adhere the vertical floral and striped Cupid & Co paper to the panel.

Add a strip of red satin ribbon to cover the edges, wrap the ends of the ribbon behind the panel.

Mount the entire panel onto a white card base.

Using the Tim Holtz Tag Collection Dies, die cut a tag from black cardstock.  Add a piece of the Cupid & Co paper to the tag.  Adhere a piece of white paper lace (die cut with the Tim Holtz Crochet Die) to the bottom of the tag and add a strip of red satin ribbon (again, wrapping the ends behind the tag).

Add the looped satin ribbon to the top of the tag and adhere to the card front using dimensional foam (or chipboard).

For the heart, use the tiny strips of paper that you normally trim off the top of each page in the Echo Park Cupid & Co 6x6 pad

Adhere the trimmed pieces and adhere them to a piece of white cardstock.  Die cut the “quilt” panel with the Farmhouse Pierced Nested Heart Dies.

Die cut another heart (the same size) from black cardstock, cut in half and mount behind the “quilted” heart.

Use an embossing powder tool to de-static a piece of white cardstock, stamp the sentiment from Typewritten Just Checking In using Versafine Onyx Black ink, apply clear embossing powder and heat set with a heat tool.

Once the embossing powder has cooled, die cut with the Fishtail Sentiments Banner Dies, mount onto the quilt heart, and adhere the entire heart to the card front using dimensional foam to finish off the card.


Stamp Sets: Typewritten Just Checking In  (Stamp Simply)

Ink/Mediums: Versafine Onyx Black

Cardstock/Paper: White, Black; Cupid & Co 6x6 Paper Pad by Echo Park

Accessories/Tools: Gemini, Jr., Stamp Simply Dies- Fishtail Sentiments Banner, Farmhouse Pierced Nested Hearts, Sizzix Thinlit Dies by Tim Holtz- Crochet, Sizzix Framelit Dies by Tim Holtz- Tag Collection, Embossing Powder Tool, Clear Embossing Powder, Heat Tool, 1” Red Satin Ribbon

Thanks again for visiting- I hope all of you are staying safe and having a great weekend!


Saturday, January 16, 2021

Clean and Simple- Grateful for Your Kindness


 Hi Friends!

As mentioned in my previous post, this week we are featuring Clean and Simple (CAS) cards in black and white on the Stamp Simply blog! 

This card was another easy one to create using several Stamp Simply stamp sets- Typewritten What You Mean To Me along with the Thank You for Caring Coneflower stamp set (plus the coordinating Coneflower die).  

I enjoy participating with online challenges and will be linking this card to the My Time to Craft #448 “Thank You” Challenge and the Through the Craft Room Door “Anything Goes” Challenge.

If you have not had time to check out the Stamp Simply blog or the other challenge sites yet, I hope you will do so- fabulous inspiration from all!


To create this card:

Cut a piece of white cardstock to approx. 4” x 5 ¼”, adhere to a piece of black cardstock and adhere to the white card base.

Die cut a tag using the Tim Holtz Tag Collection Dies from black cardstock, de-static with an embossing powder tool , stamp the sentiment from Typewritten What You Mean To Me  using Versamark ink, apply white embossing powder and heat set with a heat tool.

Once the embossing has cooled, add the black gingham bow and mount to the card front using dimensional foam (or chipboard).

Stamp the floral image from Thank You for Caring Coneflower using Versafine Onyx Black  ink onto prepared white cardstock, apply clear embossing powder and   once cooled, watercolor with black and gray water-based markers.

Die cut the floral image with the coordinating coneflower die, mount onto the card front using dimensional foam or chipboard.

Add a few rhinestones below the sentiment to finish off the card.

Another quick and easy card!


Stamp Sets: Typewritten What You Mean To Me,  
Thank You for Caring Coneflower (Stamp Simply)

Inks/Mediums: Versamark, Versafine Onyx Black

Cardstock/Paper: White, Black 

Accessories/Tools:  Gemini. Jr. Stamp Simply Dies- Coneflower, Sizzix Framelits Dies by Tim Holtz- Tag Collection, Embossing Powder Tool, Clear Embossing Powder, Heat Tool, Black and White Gingham Ribbon, Silver Rhinestones

Thanks again for taking the time to visit- I hope all of you have a wonderful weekend!

Clean and Simple Prayers

Hi Friends!

This week we are featuring Clean and Simple (CAS) cards in black and white on the Stamp Simply blog! 

This card was easy to create using the TimHoltz Botanical Collage Paper for the background and it was paired with a simple heat embossed sentiment from the Stamp Simply Typewritten Just Checking In stamp set (I am also sharing another black and white CAS card today in this post).

I may have to create a few more cards like this, since unfortunately, several of my Christmas cards did not make it to the recipients as intended (they received just the front of the envelope).  I had placed additional postage as well as non-metered mail stamps on most of the cards, but they still did not make it through intact.  

In the past, I was able to hand-deliver my Christmas cards to most of the recipients, but with the virus, this year I mailed over 150.  I am concerned now that some did not receive their cards at all, so this year, I may have to go CAS (which is not my normal design style).

I am participating with the Word Art Wednesday #473-#474 “Anything Goes” Challenge.

If you have not had a chance to check out the Stamp Simply blog or the Word Art Wednesday challenge site yet, I hope you will do so- gorgeous inspiration from all!


To create this card:

Cut a piece of the Botanical Collage paper to approx. 4” x 5 ¼”, adhere to a piece of white cardstock.  Trim the panel and mount onto a piece of black cardstock.

Adhere a piece of black satin ribbon to the card front, wrapping the ends of the ribbon behind the panel. 

Mount the entire panel onto the front of a white card base.

Use an embossing powder tool to prepare a piece of white cardstock for heat embossing. 

Stamp the sentiment from Typewritten Just Checking In using Versafine Onyx Black ink, apply clear embossing powder and heat set with a heat tool.

Once the embossing has cooled, die cut the sentiment with the Fishtail Sentiment Banners Dies and adhere to the ribbon.

Add a few black rhinestones to finish off the card.

Quick and simple (and easy to mail)!


Stamps:   Typewritten Just Checking In  (Stamp Simply)

Ink/Mediums: Versafine Onyx Black

Cardstock/Paper: White, Black ; Tim Holtz Idea-ologyCollage Paper Tube- Botanical (part of a four tube bundle)

Accessories/Tools:  Gemini. Jr. Stamp Simply Dies- Fishtail Sentiment Banners, Embossing Powder Tool, Clear Embossing Powder, Heat Tool, Black Satin Ribbon, Black Rhinestones

Thanks again for taking the time to stop by- I hope you will visit again soon!


Monday, January 11, 2021

Hug in a Mug

Hi Friends!

Today I am sharing a card that was posted to the Stamp Simply blog yesterday (my apologies for the late post to my blog).  

We finally were able to celebrate Christmas plus all of the 2020 birthdays in my family this past week (in addition to our anniversary and remodeling, lol!) so I am a bit behind on my blog post, again, my apologies.

This card was designed using the new Coffee & Friends 6x6 Paper Pad by Echo Park along with stamps and dies from Stamp Simply.


I love the new
Coffee & Friends paper- the patterns are so pretty, and the colors of spring help cheer you up on dreary winter days, lol!  I paired the paper with the coffee themed stamp sets and coordinating dies as well as a few new to me items from Stamp Simply (including their color coordinating seam binding- this one is Tangerine- isn’t it lovely?)!

I enjoy participating in online challenges and, in addition to incorporating the Splitcoaststampers SC390 Sketch for the layout (from 2012-so thankful that their challenges never expire),  I am also linking to the Watercooler Wednesday Challenge #303 “Karen’s Anything Goes with a Feminine Twist” and Shopping Our Stash #436 “What’s New with You” Challenge (the paper, embossing folder, ribbon and oval dies are all new and the rest is from my stash).


If you have not had a chance to stop by the Stamp Simply blog yet, or the other the challenge sites, I encourage you to take the time to do so- fabulous inspiration from all!

This card took a bit of time but was easy to create- mostly die cutting, dry embossing, layering and just a bit of stamping for the sentiment. 


The new Coffee & Friends paper did most of the work for me, lol!  I used a scrap piece of die cut lace that I had in my stash along with a heat embossed sentiment from Coffee or Tea?  Plus, the coffee/teacup die is from the coordinating dies from Coffee or Tea?

The banner was created using the Fishtail Sentiments Banner dies and the background was embossed with the Lace embossing folder.

After die cutting the hem-stitch oval from white cardstock, I heat embossed the Coffee or Tea? sentiment using clear embossing powder.

A little bit of the tangerine seam binding plus the pearls and the card was finished!


Stamp Sets:  Coffee or Tea? (Stamp Simply)

Ink/Mediums: Versafine Onyx Black

Cardstock/Paper:  White, Black; Coffee & Friends 6x6 Paper Pad by Echo Park

Accessories/Tools:  Gemini, Jr., Stamp Simply Dies- Coffee or Tea?, Fishtail Sentiment Banners; Hemstitch Ovals (Spellbinders), Sizzix Thinlits Dies by Tim Holtz- Crochet, Sizzix Texture Fades A2 Embossing Folder- Lace, Embossing Powder Tool, Clear Embossing Powder, Heat Tool, Pearls, Tangerine Seam Binding


Thanks again for taking the time to stop by- I hope you have a fabulous week, sweet friends!

Related Posts Plugin for WordPress, Blogger...