Showing posts with label Gesso. Show all posts

Wednesday, May 11, 2016

TCC55 "You Are My Sunshine" - Celebrate Spring!


Hi Friends!!


Our inspiration photo can be interpreted in so many ways- the colors, polka dots, theme of sunshine, wood block letters, etc.  Remember- there is no right or wrong way when it comes to interpretation and we hope to see your card in our gallery!!

I was inspired by the colors- bright yellow with black remind me of summer and yikes, bees!  Yes, I said bees..... I love bee images but am allergic to bee stings so am a bit afraid of the real thing :-) 

It is ironic since my husband and I love to collect antique honey dishes and one of the main criteria for being added to our collection is that the honey dish needs to have a bee molded into the glass or image on the dish.  There is just something about those little honeybees that we think are so cute!!


I hope you have a chance to visit us at The Card Concept and check out the rest of our Design Teamsamples as well as the other challenge sites- wonderful inspiration from all!!

To create this card:

On a piece of watercolor paper, apply Gelatos® (Lemon Yellow and Gold Champagne), spritz with water, use your fingers to mix the colors and dry with the Heat Tool.

Apply Ranger® Tim Holtz® Distress Stains- Squeezed Lemonade and Wild Honey)  to a craft mat, spritz with water and lay the panel into the ink, lift up and allow the ink to spread, if needed, add additional water to dilute a bit, continue to tilt to spread the ink and dry with the Heat Tool.

Apply more ink as desired along with Gelatos® until you are satisfied with the colors.

Once the panel was thoroughly dry, stamp the images from Graphic45® French Country III and Secret Garden with Stāz-On® Jet Black Ink (masking some of the images as you stamp and create the background).

Use as Sponge Dauber with Delightful Dijon Classic Ink (Stampin’ Up!) along with the honeycomb portion of the Mini Punchenella Stencil from Balzar® Designs to stencil part of the background and your finger using Gesso® along with the Mini Well Rounded Stencil from the Crafter’s Workshop®. 

Use a paint brush with Ranger® Tim Holtz® Picket Fence Distress Stain to tone down the postcard part of the image.

Cut the panel into thirds, use a Distressing Tool to distress all of the edges, apply Delightful Dijon Classic Ink over the distressed edges with a Sponge Dauber and mount the panels per the sketch onto a distressed piece of Basic Black cardstock.

Using a foam brush, apply Ranger® Tim Holtz® Distress Collage Crazing Medium to all of the panels and allow to dry.

Ink the sentiment from Time to Flourish (Graphic45®) using Stāz-On® Jet Black Ink onto Whisper White cardstock, sponge some of the same inks as the background and add additional texture with the background strip stamp from Secret Garden, Gesso® with the stencil and the Distressing Tool.

Create the banner points with the Hexagon Punch, mount onto Basic Black carstock and distress the edges again with the Distressing Tool.

Add the sentiment to the background panel with dimensional foam.

Add the ivory crochet lace along with a piece of ¼” Basic Black Grosgrain Ribbon and mount the entire panel to the Whisper White card base.

Create the roses using the Big Shot™ with the My Favorite Things™ (MFT) Royal Rose Die and Mini Royal Rose Dies from Very Vanilla, Crushed Curry and So Saffron cardstock.  Roll up the roses and adhere in the center (I used Hot Glue for this step).

With a paintbrush, lightly add Wild Honey Distress Stain, spritz with Imagine Crafts Sheer Shimmer Spritz and allow to the flowers to dry.

Adhere the roses with the black leaves (punched from Basic Black cardstock and the Martha Stewart Leaf Punch) to the card front (I used Hot Glue for this step as well).

Stamp the butterflies from Papillon Potpourri using Stāz-On® Jet Black Ink onto Whisper White cardstock, color with the So Saffron and Delightful Dijon Stampin’ Write Markers, punch out with the Elegant Butterfly Punch and add to the card front (again, with Hot Glue).

With a paint brush, apply Mod Podge® to the butterfly wings and once dried, add the Pearls to the butterfly centers to finish off the card.

Stamp Sets: Papillon Potpourri (Stampin’ Up!), French Country III and Botanicals (Graphic45®)

Ink/Mediums: Stāz-On® Jet Black Ink, Delightful Dijon; Stampin’ Write Marker- So Saffron, Delightful Dijon; Gelatos®- Lemon, Gold Champagne; Ranger® Tim Holtz® Distress Stains- Squeezed Lemonade, Wild Honey, Picket Fence; Gesso® , Sheer Shimmer Spray, Ranger® Tim Holtz® Distress Collage Crazing Medium

Paper: Watercolor, Whisper White, Basic Black

Accessories: Big Shot™, MFT Royal Rose and Mini Royal Rose Dies, SU! Punches- Elegant Butterfly, Hexagon; MS Leaf Punch, Pearls, ¼” Basic Black Grosgrain Ribbon, Ivory Crochet Lace, Mini Punchenella and Mini Well Rounded Stencils, Paintbrush, Sponge Dauber, Distressing Tool

Thanks again for taking the time to stop by- I hope you can gather your supplies and pick a style to create your own card for “You Are My Sunshine” gallery at The Card Concept!

Wednesday, January 20, 2016

TCC47 Warm Winter Roses


Hi Friends!!

It’s time for new The Card Concept #TCC47 "Floral Elegance" Challenge!  I just love this neutral color palette along with all of the different floral textures in this cake from our fabulous photo inspiration- don’t you? 

For my Mixed Media card, I combined the colors along with a fun textured background (a bit difficult to see the texture in the photo but IRL it almost feels like leather :-)).

Just a reminder that the Card Concept is a bi-weekly challenge that has an inspiration photo along with a number of design styles that you can choose from to create your card- Clean and Simple, Clean and Graphic, Clean and Layered, Shabby Chic, Freestyle Collage, Classy and Elegant and Mixed Media.  

I hope you have a chance to visit us at The Card Concept and check out the rest of our Design Team samples as well as the other challenge sites- fabulous inspiration from all!

I have also linked this card to the Artistic Outpost January 2016 “Show us Your AO Art Challenge"- wonderful designs in their gallery as well:-)

To create this card:

On a piece of Very Vanilla cardstock, apply Liquidtex® Matte Gel Medium and layer pieces of white tissue paper over the gel (allowing the paper to crinkle a bit).

Carefully use a Heat Tool to speed up the drying process and apply ProArt® Gesso® over the surface.

Once the Gesso® has dried, add color using Ranger® Tim Holtz® Old Paper, Tea Dye and Vintage Photo Distress Inks (layering, spritzing and drying with the Heat Tool between layers).

Once you are satisfied with the background, lay the Memory Box™ Winter Flurry Frame Stencil over the corners and remove the ink using a wet cloth (again, drying with the Heat Tool as you re-position the stencil and continue to remove the ink).

Ink the images from the Artistic Outpost (AO) Skating Emporium with Early Epresso Classic Ink (I used the snowflake and the Central Park Script stamps), repeatedly stamp onto the panel and cut out the panel with the Our Daily Bread Designs (ODBD) Double Stitched Rectangle Dies .

Mount the panel onto a piece of Smoky Slate cardstock, sponge Vintage Photo around the edges and mount onto a piece of Early Espresso cardstock.

Add the 1” Dark Brown Satin Ribbon Strip and mount onto the Smoky Slate card base.

Ink the Holly and the Ivy (A/O) image using Staz-On™ Jet Black Ink and stamp onto a piece of Very Vanilla cardstock.

Using Sponge Daubers, apply Ranger® Tim Holtz® Old Paper, Tea Dye and Vintage Photo Distress Inks around the panel to color the background of the image.

Use a paint brush with Titanium White Acrylic Paint (dilute with a small bit of water) to highlight the fur on her collar/arms, ribbon in her hat and the flower at the top right.

Use the Big Shot™ with the (ODBD) Double Stitched Rectangle Dies to cut out the image (I had to re-position the image back into the die after the first pass to reduce the size of the rectangle), mount onto a piece of Smoky Slate cardstock, sponge Ranger® Tim Holtz® Vintage Photo Distress Ink around the edges and mount onto a piece of Early Espresso cardstock. 

Add the Holly and the Ivy panel onto the card front using dimensional foam.

Create the flowers from Very Vanilla and Smoky Slate cardstock using the My Favorite Things™ (MFT) Mini Royal Rose and Royal Rose Dies-use the Crimper Tool to crimp the paper before rolling into the flower and sponge a bit of Ranger® Tim Holtz® Vintage Photo Distress Ink on the edges.

Use the Martha Stewart (MS) Leaf Punch to punch out the leaves from Early Espresso cardstock, crimp the leaves with the Crimper Tool and attach the leaves along with the flowers using Hot Glue to the card front to finish off the card.

I did not add a sentiment yet since I think this card could work for several occasions- Valentine’s Day, Birthday (Winter Months), Christmas or a “Thinking of You”...what do you think?

Stamp Sets: Holly and the Ivy, Skating Emporium (both Artistic Outpost)

Ink: Staz-On™ Jet Black, Ranger® Tim Holtz® Old Paper, Tea Dye and Vintage Photo Distress; Titanium White Acrylic Paint

Paper: Very Vanilla, Early Espresso, Smoky Slate, White Tissue Paper

Accessories: Gesso®, Matte Gel, Big Shot™,  ODBD Double Stitched Rectangle Dies, MFT Mini Royal Rose Die, MFT Royal Rose Die, MS Leaf Punch, Crimper Tool, Sponge Daubers, MB Winter Flurry Frame Stencil, 1” Dark Brown Satin Ribbon, Paint Brush


Thanks again for taking the time to visit- I hope you can gather your supplies and pick a style to create your own card for our gallery at The Card Concept!

Wednesday, October 21, 2015

TCC42 Celebrate with Roses


Hi Friends!!

It is time for the new Card Concept #42 Color Inspiration "Autumn Beauty" Challenge- this is a gorgeous combination for the upcoming holiday season!

I also decided to incorporate the Splitcoaststampers’ Mix-Ability MIX131 “Love It” Challenge into the design- I love using texture paste, stencils and dies in my mixed media designs :-)  as well as the F4A289 "Happy Birthday To Me"  (create a card in the style that you would like for your birthday) :-)

The Card Concept is a bi-weekly challenge that has an inspiration photo along with a number of design styles that you can choose from to create your card- Clean and Simple, Clean and Graphic, Clean and Layered, Shabby Chic, Freestyle Collage, Classy and Elegant and Mixed Media.   

 
To create this card:

Apply Gesso® to a piece of Whisper White cardstock and allow to dry (Gesso® dries quickly but you could use a Heat Tool to speed up the process).

Using a palette knife, apply Wendy Vecchi® Crackled Texture Paste over The Crafters Workshop™ Designs by Jamie™ Mini Harlequin Stencil and allow to dry (I did use my Heat Tool but very carefully since I have found that my Heat Tool will “bubble up” the texture paste and the crackle effect is not as pronounced if too much heat is applied).

Once dried, apply Metallic Gold Champagne, Iced Cherry, Light Pink Gelatos® (spritzing with water and allowing to run), Ranger® Tim Holtz® Distress Stains- Worn Lipstick, Seedless Preserves, Fired Brick , Picked Raspberry and Picket Fence (last layer to tone down the colors).  

The Distress Stain layers are created by applying the ink to a craft mat, spritzing water onto the stain, laying the panel into the stains and allowing the inks to run and merge by twisting the panel and continuing to repeat the steps until the desired color is achieved (carefully using the Heat Tool between layers).

Ink the retired background stamp, Bella Toile using Early Espresso Classic Ink and stamp over the prepared panel.  Trim the panel and mount onto Very Vanilla cardstock, trim again and mount onto the Early Espresso card base.  Sponge Ranger® Tim Holtz® Tea Dye Distress Ink over the edges to “antique” the paper a bit.

Ink the Graphic45® Botanicals stamp using Early Espresso Classic Ink and stamp onto a piece of Whisper White cardstock.  “Antique” the paper by sponging Ranger® Tim Holtz® Tea Dye Distress Ink over the entire panel, crumple the paper by hand and apply more ink.
Adhere the “antiqued” stamped panel to the card front and using your finger, apply Gesso® over the background and stamped panel.

Use the Big Shot™ with the My Favorite Things™ (MFT) Mini Royal and Royal Rose Dies to cut the flowers from Very Vanilla, Blushing Bride and Cherry Cobbler cardstock. 

Use a Bone Folder to curl the edges and roll the roses up (adhering in the center with adhesive- I prefer Hot Glue for this step). 

Stamp the sentiment from the Graphic45® Time to Flourish stamp set onto Very Vanilla cardstock using Early Espresso Classic Ink, create the banner points with the Hexagon Punch and lightly sponge Ranger® Tim Holtz® Tea Dye Distress Ink over the edges.

Mount the sentiment onto the card front using Stampin’ Dimensionals® and add the roses along with leaves from Early Espresso cardstock (using the Martha Stewart® Leaf Punch) using Hot Glue (or your preferred adhesive).

Use your finger to apply Gesso® over the petals and leaves and add a few Pearls to the corner to finish off the card.

Stamp Sets:  Bella Toile (retired Stampin’ Up! background), Botanicals and Time To Flourish (G45)

Ink: Early Espresso, Gelatos®- Metallic Gold Champagne, Iced Cherry, Light Pink;  Ranger® Tim Holtz® Distress Stains- Worn Lipstick, Seedless Preserves, Fired Brick , Picked Raspberry, Picket Fence; Ranger® Tim Holtz® Tea Dye Distress Ink

Paper: Whisper White, Very Vanilla, Blushing Bride, Cherry Cobbler, Early Espresso

Accessories: Big Shot™, MFT Royal Rose and Mini Royal Rose Dies, Gesso®, Punches- Hexagon, MS Leaf, Palette Knife, Wendy Vecchi® Crackled Texture Paste, Sponge Dauber, Pearls

For some reason I could not seem to get a good photograph of this card- the pinks seemed to bright in the photo (in real life it is more on the soft Blushing Bride side of the color scale) :-)  


Thanks again for stopping by- I hope you have a fantastic week and come play along with us at The CardConcept!

Wednesday, September 9, 2015

TCC39 To Everything There is A Season


Hi Friends!!

Woohoo!!  It is time for The Card Concept Challenges to resume and this card was created for #39 Photo Challenge!  I love the blues and the daisies in this fun photo and used those for my inspiration :-)

I also incorporated the Splitcoaststampers' F4A264 "Baby Pinks and Blues" Challenge (blue only, of course) along with the WT529 "It's About Time Challenge :-)

The Card Concept is a bi-weekly challenge that has an inspiration photo along with a number of design styles that you can choose from to create your card- Clean and Simple, Clean and Graphic, Clean and Layered, Shabby Chic, Freestyle Collage, Classy and Elegant and Mixed Media.  

I hope you can find some time to gather your supplies together and come join in on the fun!! 

To create this card:

Apply Gesso® to a piece of Whisper White cardstock and allow to dry (it dries fairly quickly but you can use the Heat Tool to speed up the drying process).

Start layering color using Gelatos® (Bubblegum and Metallic Blueberry), Ranger® Tim Holtz® Distress Stains- Salty Ocean, Chipped Sapphire, Broken China, Peacock Feathers and Picket Fence along with water (spritzing as you go), drying with the Heat Tool between layers, adding Wendy Vecchi® Crackled Texture Paste with the Mini Harlequin Stencil (allowing the paste to dry) and adding more Distress Stains to create the background.

Once you achieve the desired effect for the background, apply Frost White Shimmer Paint to portions as well as using a baby wipe with the Mini Punchenella stencil to remove some of the ink in areas.

Trim the panel, mount onto a piece of Whisper White cardstock, trim again and add the clock charm with a brad, the crocheted lace trim along with the 3/8” Midnight Muse Stitched Ribbon.

Mount the panel onto the Midnight Muse card base and use your finger to apply Gesso® over some of the stenciling and edges of the card.

Stamp the daisy image three times using Stāz-On® Jet Black Ink onto Whisper White cardstock, color the flowers with Stampin’ Write Markers- Hello Honey and Sahara Sand and “fussy-cut” the daisies.

Stamp the verse from the Our Daily Bread Designs (ODBD) God’s Timing using Stāz-On® Jet Black Ink onto Whisper White cardstock, cut out with the Big Shot™ and the MFT Die-namics™ Blueprints 20 Die (also cutting another die the same size from Midnight Muse cardstock), trim the top of the die to size and adhere the Midnight Muse layer behind the sentiment.

Mount the sentiment layer along with the daisies to the card front using dimensional foam and add the Pearls to the corner of the verse sentiment to finish off the card.

Stamp Sets:  Bloom with Hope (retired hostess), God’s Timing (ODBD)

Ink: Stāz-On® Jet Black, Ranger® Tim Holtz®  Distress Stains- Salty Ocean, Chipped Sapphire, Broken China, Peacock Feathers, Picket Fence; Gelatos®- Bubblegum, Metallic Blueberry; Frost White Shimmer Paint

Paper: Whisper White, Midnight Muse

Accessories: Big Shot™, MFT Die-namics™ Blueprints 20 Die, Stencils –Mini Punchenella (Balzar Designs®), Mini Harlequin  (The Crafters Workshop®), Nautical Charms (The Paper Studio®), retired 3/8” Stitched Midnight Muse Satin Ribbon, Wendy Vecchi® Crackled Texture Paste, Misc. Crochet Lace, Pearls


Thanks again for stopping by- I hope you have a wonderful week and come play along with us at The CardConcept!

Tuesday, August 4, 2015

Bible Art Journaling (An Experiment)- Psalm 91:4a - He shall cover you with His Feathers :-)

Hi Everyone!


I wanted to share with you my second Bible Art Journaling page that I created this past evening....

Originally I was planning on journaling on cardstock pages and putting them into a binder but I changed my mind (just like a women to do so :-)) and decided to use NKJV My Upmost Devotional Bible.  This is a daily devotional Bible that allows you to read the entire Bible in a year and since I will be experimenting on the pages, I can use my main Bible to read God's Word if it is completely covered (as in this experiment) :-).

The passage reading that I focused on for this artwork is Psalm 91:4a “He shall cover you with His feathers, and under His wings you shall take refuge.”

This past year has been a year where my husband and I have truly felt covered by His wings...some of you are aware that my husband was diagnosed with a very rare non-Hodgins lymphoma in November 2014 and has been through numerous tests and chemo treatments since July 2014.  

His cancer has no cure but does have a good response to chemo and my husband is now in the maintenance chemo portion of the treatment (will be in maintenance for two years or more). 

He has blessed us so along this journey and we are so thankful to have the Lord by our side!  We have trusted fully in the Lord with each and every day and take comfort in knowing that He is in charge- To God be the Glory, great things He hath done!!

When I contemplated on Psalm  91:4a, I thought that the wings would be a good image to try to draw.  I "google" for free angel wings art and used some of the art on the internet for inspiration:-)

The steps I took are as follows:

With a brush , I applied a coat of Liquitex® Professional Clear Gesso® and used a Heat Tool to speed up the drying process.  

***NOTE*** One thing I noticed is that the this brand of clear Gesso® definitely has a gritty texture on this thin paper.... not sure if there are other brands of clear gesso that may be smoother but the texture definitely played a part in the rest of the process....

A piece of scrap paper was inserted under the page to protect the sheets below from the indentation of the next few steps. 

I used a regular mechanical pencil to lightly draw the feathers on the page, then applied Silver Metallic Gelatos® to fill in the area (I tried to spread the Gelatos® with my finger but it was difficult with the grit of the paper and to get it into the thin points of the feathers, so I decided to use a watercolor brush with water to dilute the Gelatos® and fill in the feathers).

Once the Gelatos® was dry (again, I used the Heat Tool), I tried to outline the feathers with a Gray Prismacolor Pencil but was not getting the definition I wanted, so I tried a Pigma Micron™ 05 Pen (.45), a Faber-Castell® Pitt Pen S and M Black Marker, a Black Fine Point Sharpie® and had difficulty with all of the pens over the Gelatos® and Gesso® (the surface was so gritty- it was jamming the points on the pens).  

I was able to letter the verse above the wings over the Gesso® using the Pigma Micron™ 05 Pen (.45) followed by the Black Fine Point Sharpie® (I did taed to work on my lettering- lol!)

I was still not satisfied with the wings so I decided to watercolor a bit of Ranger® Tim Holtz® Picket Fence Distress Stain over the wings to lighten the gray color, then added more pencil shading and Lukas-Nerchau® Opaque White watercolor over the feathers.

After this layer, the wings seemed a bit more realistic so I added the Metallic Blue Gelatos® (sorry, I forgot to write down the official names of the colors- this may be Blueberry) to the outside area and used water to spread the color around.

I am still not completely thrilled with how this
a bit closer view of the feathers and lettering- still needs work:-)
turned out but it is a start and the point  of  Bible Art Journaling is to focus on God's Word and express with the art- not to criticize yourself into not journaling because it is not  perfect :-)   I tend to be a type A perfectionist person, so I have to keep reminding myself of this- lol!!

I was pleased to see that the artwork and colors did not bleed through at all but the back of the page is a bit “bumpy”- not really wrinkled but sort of dimpled...

I could do artwork on the  other side of this page but most likely will not at this time.  

Lesson  learned- watercolor and Gelatos® worked great on the clear Gesso® but will need to figure out a writing utensil that will write smoothly on the gritty surface (again, the surface feels like a fine grit sandpaper).

I had fun with this experiment and will share more soon- so thankful that you were able to stop by to visit.  Hugs and God Bless!

Monday, August 3, 2015

DTGD15JulieGearinger- Mixed Media Love and Prayers

Hi Stampers!!

Woohoo!!  Today is the day!  I am hosting my very first Dare To Get Dirty Challenge at Splitcoaststampers!!

As I mentioned in my previous posts, Dare to Get Dirty is an annual event that allows the Splitcoaststampers’ Fan Club members to participate in several challenges hosted by the Dirty Dozen Girls (current and alumni, like me) in creating cards but also the possibility to receive prizes from the member companies. 

To participate in Dare To Get Dirty, you have to be a Splitcoaststampers’ Fan Club Member, and if you are not a Fan Club member, here is the link to learn more about joining.    The Dare To Get Dirty for 2015 is from August 1st until August 7th (deadline for uploading your cards is August 10th) and it is a fun time of chatting in the challenge forums as well as being creative creating cards. 

While the Splitcoaststampers site is free, there are many benefits to becoming a Fan Club member and for the $25.00 a year membership fee (less than a penny a day), you can help support this wonderful stamping resource!  

I personally visit this site several times a day- so for me it seems to be a terrific bargain!!  And no, I do not receive a commission if you sign up- lol!!, I am just one of their unofficial “cheerleaders” since I am one of the Dirty Dozen Alumni and just love the site so much- between the galleries of wonderful inspiration, free tutorials, forums and challenges- this site has helped me immensely with my journey into the world of papercrafting!

One rule of participation in the Dare To Get Dirty Challenges is that the actual challenge details are secret to all except the Fan ClubMembers…I can share the card but not the details on the actual challenge (unfortunately, any details on this card will reveal the challenge details, so if you have any questions, please let me know in the comment area).  

I hope you enjoy my Mixed Media card for my DTGD15JulieGearinger Challenge :-)

Stamp Sets: En Francais (retired background), ODBD Sharing Your Sorrow
Ink: Stāz-On® Midnight Blue, Gelatos®, Ranger® Tim Holtz® Distress Stains and Alcohol Inks

Paper: Whisper White, Elegant Eggplant

Accessories: Big Shot™, MFT Royal Rose Die, Gesso®, Distressing Tool, Stencils, Water and Alcohol Spritzer Bottles, Gelatos®, 3/8" Perfect Plum Taffeta Ribbon, Crochet Lace, Pearls, MS Leaf Punch, Chipboard, Crackle Paste

Thanks again for visiting- I will be sharing more of my sample cards for the Dare To Get Dirty challenges over the next few days … hugs to you, my friends!!

Monday, July 20, 2015

His Eye Is On The Sparrow- A Mixed Media Card for Two Challenges :-)

Hi Stampers!!

Sorry I have not posted in a few days – I have been creating cards for the upcoming 2015 Dare to Get Dirty Week at Splitcoaststampers!

This year I will be hosting one of the DTGD challenges for the very first time and only Fan Club Members are allowed to see all of the challenge particulars and participate (see details here on becoming a Fan Club Member).

The yearly membership fee helps to offset the cost of maintaining the Splitcoaststampers website, so if you are not already a Fan Club Member, I hope you will consider joining (no, I do not receive commission, but for all of the gallery inspiration, free tutorials, etc. that Splitcoaststampers provides to our art community, it is well worth less than a penny a day to become a Fan Club Member :-)).

In the meantime, while I had some of the Mixed Media supplies on my craft table, I decided to create a card for the Mixed Media Monthly Card Challenge #13 “Blue” along with the Splitcoaststampers Free For All F4A282 “Anything That Flies” Challenge (see details here and gallery here).

Again, I hope you will take the time to visit the above sites- fabulous Design Team creations as well as gorgeous galleries and inspiration from all! 

This card was created using Gesso® over a piece of Stampin’ Up! retired DSP as the background “base”, applying layers of Gelatos®, Ranger® Tim Holtz® Distress Stains and Adirondack® Alcohol Inks as well as Crackle Texture Paste with Stencils.  Keep applying layers until you are satisfied (I am a messy Mixed Media artist so if you are like me, you fingers will become "blue" as well as the background- lol!)...
Add the crochet lace, ribbon, stamped bird and digital sentiment along with a few Pearls and you are done :-)

Stamp Sets: Choose Happiness, Script (retired background stamp), Word Art Wednesday (digital sentiment)

Ink: Stāz-On Midnight Ink, Island Indigo; Gelatos®,  Ranger® Tim Holtz® Distress Stains and Adirondack® Alcohol Inks

Paper: Whisper White, Elegant Eggplant, Island Indigo, Mossy Meadow, Perfect Plum; retired SU! DSP (patterned covered with Gesso®)

Accessories: Gesso®, Heat Tool, Big Shot™, MFT Royal Mini Rose Dies, Flourish Stencil, Crackle Texture Paste, Frost White Shimmer Paint, Crochet Lace, MS Leaf Punch, Hexagon Punch, 3/8” Perfect Plum Taffeta Ribbon, 5/8” Satin Ribbon, Pearls


Thanks again for taking the time to stop by- it is such an encouragement to me!  Have a wonderful day, my friends!

Wednesday, May 27, 2015

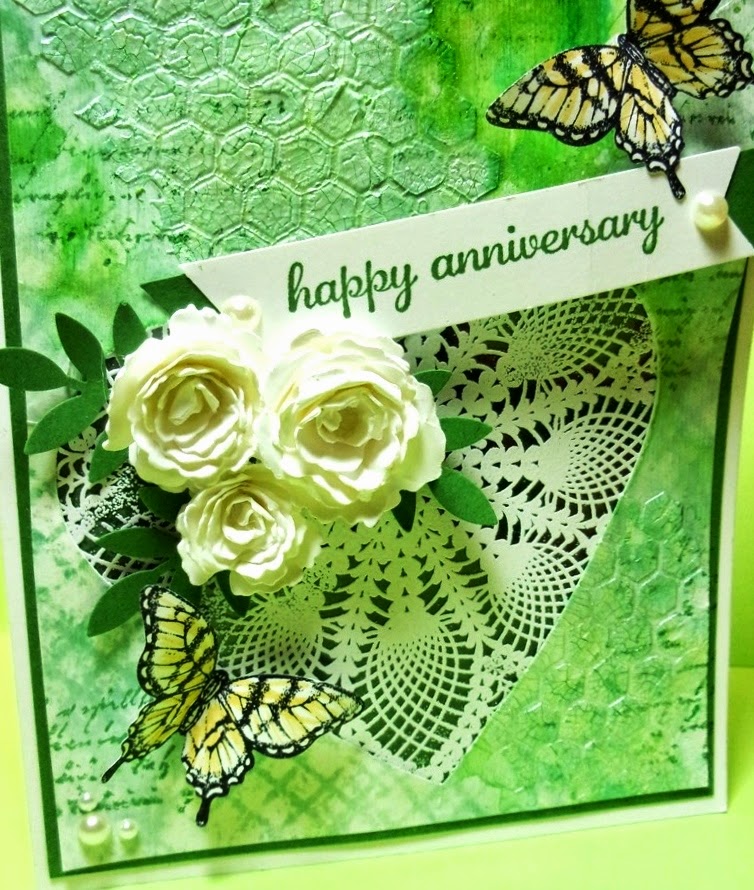
TCC36- Happy Anniversary Mixed Media Card


Hi Stampers!!


I was inspired by the gorgeous green and white and created my Mixed Media card by upcycling some acrylic packaging material (this is the first time I tried heat embossing on the acrylic :-)).

I combined our Card Concept challenge with the Splitcoaststampers’  MIX121 “It’s Summer- Better Work Those Quads” Challenge (see details here and gallery here), the TLC521 "Negative and Positive" Challenge (see details here and gallery here) and The Friday Mash Up! FM210 "Butterflies and Lace" Challenge (I think the embossed doily qualifies as lace...don't you)?

The Card Concept is a bi-weekly challenge that has an inspiration photo along with a number of design styles that you can choose from to create your card- Clean and Simple, Clean and Graphic, Clean and Layered, Shabby Chic, Freestyle Collage, Classy and Elegant and Mixed Media.  

So I hope you have time to gather your supplies together, stop by to check out the inspiration from the rest of the Design Team and come join in on the fun!! 

To create this card:

Apply Gesso® to a piece of Whisper White cardstock and set aside to dry.

Once dried, apply Ranger® Tim Holtz® Mowed Lawn and Squeezed Lemonade Distress Stains, dilute with water and allow to run over the background- dry with the Heat Tool.

Keep repeating the above until you are satisfied with the color and results.

Ink the border stamp from Summer Silhouettes with Garden Green Classic Ink and stamp over the background at the bottom.

Add Ranger® Tim Holtz® Picket Fence Distress Stain to tone down the green color and  use the Big Shot™ with the Heart Collection Framelits™ to cut out the heart opening.

Apply Studio 490® Wendy Vecchi® Crackled Texture Paste (using the Balzar Designs® Mini Punchenella stencil) over the  background and carefully dry with the Heat Tool.

Add additional Ranger® Tim Holtz® Mowed Lawn Distress Stain and when the desired effect has been achieved, spray the texture paste area with Frost White Shimmer Paint.

Ink the retired Notable Notions script stamp with Garden Green Classic Ink and stamp onto the background.

On a piece of acrylic plastic packaging, use the Embossing Buddy® to de-static the acrylic, ink the retired Hello Doily background stamp with Versamark™ Ink, stamp onto the acrylic, apply Stampin’ Emboss® White Embossing Powder and carefully heat with the Heat Tool.   ***Note- as I mentioned above, this is the first time I ever tried this and it did warp the plastic a bit, plus a fair amount of odor but it did work  :-) ***
Close-up of embossing paste and embossed  acrylic panel behind heart :-)
Trim the plastic and adhere behind the prepared background panel.
Mount the panel onto a piece of Garden Green cardstock, trim and mount onto the  Whisper White card base.

Ink the sentiment from the retired Express Yourself stamp set with Garden Green Classic Ink and stamp onto Whisper White cardstock, trim and create the banner points using the Hexagon Punch and layer a strip of Garden Green cardstock behind the sentiment (punching the ends as well with the Hexagon Punch).

Mount the sentiment onto the card front using Stampin’ Dimensionals®.

Create the rolled flowers with the Big Shot™ and the Royal Rose and Mini Royal Rose Die (My Favorite Things™) from Whisper White cardstock.

Adhere the flowers to the front of the card along with the leaves punched from Garden Green cardstock (with the Martha Stewart Leaf Punch) .

Ink the butterflies using Stāz-On® Jet Black Ink and stamp onto Whisper White cardstock.  Add a bit of yellow to their wings with the So Saffron Stampin’ Write marker, punch out with the Elegant Butterfly Punch and mount onto the card front.

Add Pearls to the corners and the sentiment to finish off the card.

Stamp Sets:  Papillon Potpourri, Summer Silhouettes;  retired - Express Yourself (hostess), Notable Notions, Hello Doily

Ink: Garden Green Classic Ink, Stāz-On Jet Black, Versamark™; Stampin’ Write So Saffron Marker, Ranger® Tim Holtz® Distress Stains- Mowed Lawn, Squeezed Lemonade, Picket Fence

Paper: Whisper White, Garden Green

Accessories: Gesso®, Big Shot™, Heart Collection  Framelits™, MFT Royal Mini Rose and Royal Rose Dies,  Punches- Elegant Butterfly, Hexagon, MS Leaf, Pearls, Studio 490® Wendy Vecchi® Crackled Texture Paste,  Balzar Designs® Mini Punchenella stencil, Embossing Buddy®, Stampin’  Emboss® White Embossing Powder, Heat Tool, acrylic packaging, Frost  White Shimmer Paint

OK, for the MIX121 Challenge, we were supposed to use at least four mediums...this card has Gesso®, Crackled Texture Paste, Distress Stains and Classic Ink, Pigment Inks (Versamark Ink and Stāz-On Jet Black), Embossing Powder, Shimmer Paint and Found Objects - by my count, at least six mediums :-)

Anyway, I had a great time creating this card and I hope you pick a style and come play along with us at The Card Concept!

Thanks for stopping by- have a wonderful week, my friends!
Related Posts Plugin for WordPress, Blogger...