Showing posts with label Hello Doily. Show all posts

Wednesday, May 27, 2015

TCC36- Happy Anniversary Mixed Media Card


Hi Stampers!!


I was inspired by the gorgeous green and white and created my Mixed Media card by upcycling some acrylic packaging material (this is the first time I tried heat embossing on the acrylic :-)).

I combined our Card Concept challenge with the Splitcoaststampers’  MIX121 “It’s Summer- Better Work Those Quads” Challenge (see details here and gallery here), the TLC521 "Negative and Positive" Challenge (see details here and gallery here) and The Friday Mash Up! FM210 "Butterflies and Lace" Challenge (I think the embossed doily qualifies as lace...don't you)?

The Card Concept is a bi-weekly challenge that has an inspiration photo along with a number of design styles that you can choose from to create your card- Clean and Simple, Clean and Graphic, Clean and Layered, Shabby Chic, Freestyle Collage, Classy and Elegant and Mixed Media.  

So I hope you have time to gather your supplies together, stop by to check out the inspiration from the rest of the Design Team and come join in on the fun!! 

To create this card:

Apply Gesso® to a piece of Whisper White cardstock and set aside to dry.

Once dried, apply Ranger® Tim Holtz® Mowed Lawn and Squeezed Lemonade Distress Stains, dilute with water and allow to run over the background- dry with the Heat Tool.

Keep repeating the above until you are satisfied with the color and results.

Ink the border stamp from Summer Silhouettes with Garden Green Classic Ink and stamp over the background at the bottom.

Add Ranger® Tim Holtz® Picket Fence Distress Stain to tone down the green color and  use the Big Shot™ with the Heart Collection Framelits™ to cut out the heart opening.

Apply Studio 490® Wendy Vecchi® Crackled Texture Paste (using the Balzar Designs® Mini Punchenella stencil) over the  background and carefully dry with the Heat Tool.

Add additional Ranger® Tim Holtz® Mowed Lawn Distress Stain and when the desired effect has been achieved, spray the texture paste area with Frost White Shimmer Paint.

Ink the retired Notable Notions script stamp with Garden Green Classic Ink and stamp onto the background.

On a piece of acrylic plastic packaging, use the Embossing Buddy® to de-static the acrylic, ink the retired Hello Doily background stamp with Versamark™ Ink, stamp onto the acrylic, apply Stampin’ Emboss® White Embossing Powder and carefully heat with the Heat Tool.   ***Note- as I mentioned above, this is the first time I ever tried this and it did warp the plastic a bit, plus a fair amount of odor but it did work  :-) ***
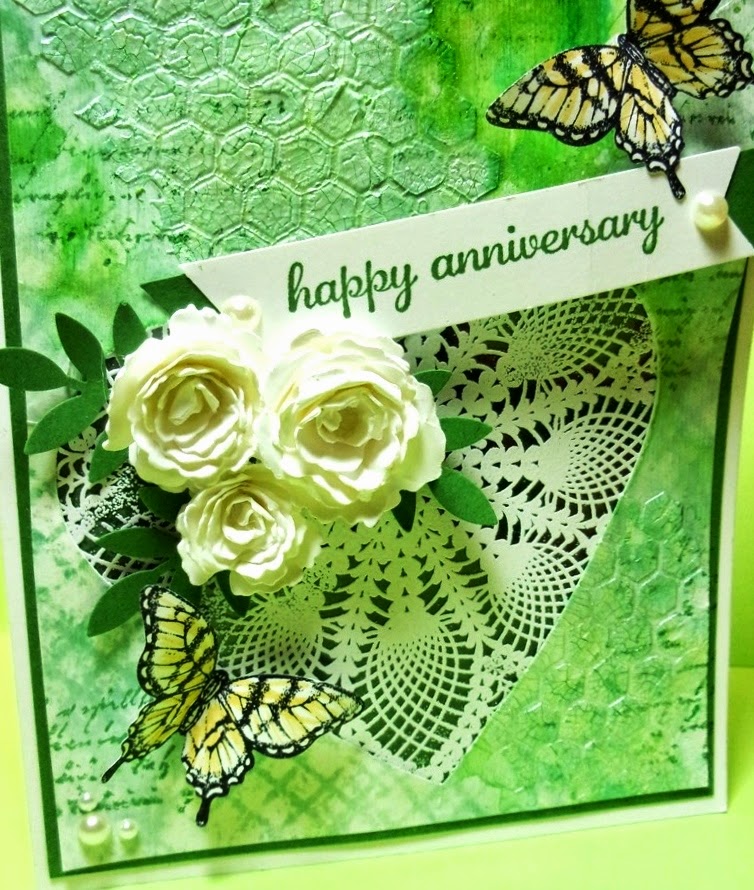
Close-up of embossing paste and embossed  acrylic panel behind heart :-)
Trim the plastic and adhere behind the prepared background panel.
Mount the panel onto a piece of Garden Green cardstock, trim and mount onto the  Whisper White card base.

Ink the sentiment from the retired Express Yourself stamp set with Garden Green Classic Ink and stamp onto Whisper White cardstock, trim and create the banner points using the Hexagon Punch and layer a strip of Garden Green cardstock behind the sentiment (punching the ends as well with the Hexagon Punch).

Mount the sentiment onto the card front using Stampin’ Dimensionals®.

Create the rolled flowers with the Big Shot™ and the Royal Rose and Mini Royal Rose Die (My Favorite Things™) from Whisper White cardstock.

Adhere the flowers to the front of the card along with the leaves punched from Garden Green cardstock (with the Martha Stewart Leaf Punch) .

Ink the butterflies using Stāz-On® Jet Black Ink and stamp onto Whisper White cardstock.  Add a bit of yellow to their wings with the So Saffron Stampin’ Write marker, punch out with the Elegant Butterfly Punch and mount onto the card front.

Add Pearls to the corners and the sentiment to finish off the card.

Stamp Sets:  Papillon Potpourri, Summer Silhouettes;  retired - Express Yourself (hostess), Notable Notions, Hello Doily

Ink: Garden Green Classic Ink, Stāz-On Jet Black, Versamark™; Stampin’ Write So Saffron Marker, Ranger® Tim Holtz® Distress Stains- Mowed Lawn, Squeezed Lemonade, Picket Fence

Paper: Whisper White, Garden Green

Accessories: Gesso®, Big Shot™, Heart Collection  Framelits™, MFT Royal Mini Rose and Royal Rose Dies,  Punches- Elegant Butterfly, Hexagon, MS Leaf, Pearls, Studio 490® Wendy Vecchi® Crackled Texture Paste,  Balzar Designs® Mini Punchenella stencil, Embossing Buddy®, Stampin’  Emboss® White Embossing Powder, Heat Tool, acrylic packaging, Frost  White Shimmer Paint

OK, for the MIX121 Challenge, we were supposed to use at least four mediums...this card has Gesso®, Crackled Texture Paste, Distress Stains and Classic Ink, Pigment Inks (Versamark Ink and Stāz-On Jet Black), Embossing Powder, Shimmer Paint and Found Objects - by my count, at least six mediums :-)

Anyway, I had a great time creating this card and I hope you pick a style and come play along with us at The Card Concept!

Thanks for stopping by- have a wonderful week, my friends!

Wednesday, March 18, 2015

TCC31 Birthday Wishes- A Mixed Media Monochromatic Card


Hi Stampers!!

It’s time for the new Card Concept #31 “Cupcakes” using our fun inspiration photo.  My Mixed Media card was inspired by the pink in the frosting as well as the beautiful crocheted lace doily.

The Card Concept is a bi-weekly challenge that has an inspiration photo along with a number of design styles that you can choose from to create your card- Clean and Simple, Clean and Graphic, Clean and Layered, Shabby Chic, Freestyle Collage, Classy and Elegant and Mixed Media.

I decided to combine our challenge along with the Splitcoaststampers Free for All F4A257 Challenge (see details here and gallery here) as well as the Mix-Ability MIX104 Pick A Color, Any Color Monochromatic Challenge (again, see details here and gallery here). 

So pull your supplies together and come join in on the fun!! 

To create this card:

Apply a layer of Gesso to a piece of Whisper White cardstock and allow to dry (or use a Heat Tool to speed up the process).

Using Gelatos®, apply color to the background and spritz with water to dilute and allow to spread.  Again, dry with the Heat Tool and repeat the colors as needed.

Apply additional color with Ranger® Tim Holtz® Distress Stains- Worn Lipstick and Festive Berries spritzing with water and allowing the stain to dilute and spread over the background, dry with the Heat Tool.
Background before adding the QR Die Paper

Ink the retired stamp, Bella Toile using Stone Gray Stāz-On Ink and stamp onto the background panel.

Once dried, de-static the background panel using the Embossing Buddy® and stamp the Hello, Doily background stamp using Versamark™ Ink.  Apply Stampin’ Emboss® White Embossing Powder and heat with the Heat Tool. 

Tear the Ultimate Crafts Quick Release Die Paper into small pieces and apply Mod Podge® over the background around the doily, applying the Release Die Paper and adding additional Mod Podge® over the paper.

Allow the panel to dry, use the Distressing Tool to add distressing to the edges.

Using My Digital Studio (MDS), print out the dress form image and the sentiment onto Whisper White cardstock. 

“Fussy-cut” the dress form image, color the image using the Sahara Sand Stampin’ Write marker and apply Mod Podge® to the dress form- set aside to dry.

Add the strip of crocheted lace trim along with the 5/8” Basic Black Triple Satin Ribbon bow. 

Mount the panel onto a piece of Basic Black cardstock, distress the edges with the Distressing Tool and mount onto the Pretty In Pink card base.

Use the XL Oval Punch to punch out the sentiment and mount onto two ovals from Basic Black cardstock (punched with the XL Oval Punch and overlapped to create a frame for the sentiment).

Mount the dress form and the sentiment to the card front using Stampin’ Dimensionals®.

Create the rolled roses using the ” and 1 ¼” Scallop Circle Punches (punch the scallop circles from Pretty in Pink cardstock, hand cut a wavy spiral toward the center of each scallop, roll up and adhere in the middle).    Add the rolled roses to the dress form and bow along with the Pearls to finish off the card.

Stamp Sets:  Established Elegance, Watercolor Trio (both MDS Versions), Bella Toile and Hello, Doily background stamps

Ink: Stāz-On® Stone Gray Ink, Ranger® Tim Holtz® Worn Lipstick and Festive Berries Distress Stain, Gelatos®, Printer Ink- Black, Stampin’ Write Marker- Sahara Sand, Versamark™

Paper: Whisper White, Basic Black, retired Pretty In Pink, Ultimate Crafts Quick Release Die Paper

Accessories: Embossing Buddy®, Stampin’ Emboss® White Embossing Powder, Punches- XL Oval, Scallop Circle- ⅞” and 1 ¼”, Mod Podge®,  Pearls, ⅝” Basic Black Satin Ribbon, crochet lace from my stash


Thanks again for stopping by- I hope you have a wonderful Wednesday and find time to visit us at  The Card Concept and check out the rest of the Design Team samples  as well as pull out your supplies and play along!! 

Sunday, February 19, 2012

Vintage Sketch- Two in One!


Hi Stampers!

Finally a chance to spend some time creating this evening!  I decided to use the ColourQ CQC124 colors along with the Stamping 411 SSC243 Sketch Challenge to create a fun, vintage style card!

If you have the time, check out both sites for great inspiration! 


To create this card:

Ink the background stamp, Hello Doily with Versamark™ Ink and stamp onto Pool Party cardstock.  Apply Stampin’ Emboss® White Embossing Powder and heat with the Heat Tool.   Ink the background stamp, En Francais with Poppy Parade Classic Ink and stamp over the embossed doily – gently wipe off the excess ink from the embossed image.

With the 2 ½” Circle Punch, punch out a piece from the Everyday Enchantment DSP and layer two Decorative Labels from Poppy Parade (cut in half) behind the circle.   Emboss the circle  with the Big Shot™ and Square Lattice Textured Impressions™ Embossing Folder. 

Attach a 5/8” Pool Party Seam Binding Ribbon.  Create the rolled flowers from Poppy Parade, Pool Party and Pretty in Pink cardstock using 1 3/8” and 1 ½” Circle Punches along with the Crimper Tool.

Assemble the layers, add the pearls to the flowers to finish off the card.

Stamp Sets:  Hello Doily, En Francais, Short & Sweet

Ink: Poppy Parade, Versamark™

Paper: Whisper White, Pretty in Pink, Poppy Parade, Pool Party, Everyday Enchantment DSP

Accessories:  Big Shot™, Square Lattice Textured Impressions™ Embossing Folder, Crimper Tool, Heat Tool, Stampin’ Emboss® White Embossing Powder,  Punches-2 ½” Circle, 1 3/8” Circle, 1 ½” Circle,  Decorative Label, Word Window, Scallop Trim Border;  5/8” Pool Party Seam Binding,  Pearls 

Thanks again for stopping by- I hope you have a blessed week! 

Saturday, September 17, 2011

Happiness Shared- A Sketch and Color Challenge


Hi Stampers! 

I just love the PPA111 sketch this week at Pals Paper Arts and decided to combine it with the CQC102ColourQ Challenge. The designers and submissions at both site are fabulous- again, if you have the time, check them out and leave them some stamping “love”!

Once I decided on the design, this was a quick, easy card and can you believe it, I did not use an embossing folder (although I still had to use my Big Shot™- I cannot make a card without it now :-))?

To create this card:

Use the Big Shot™ along with the Bigz™ Top Note Die to cut a piece of Whisper White  and Basic Gray cardstock.  Cut both shapes in half and trim the edge off the Whisper White piece and sand the rough edges with the Sanding Block.

Ink the blossom stamp from Happiness Shared with Basic Gray Classic Ink and stamp the image onto the Top Note shape.  Color with Stampin’ Write Markers in Certainly Celery and Poppy Parade.  Use the Color Spritzer Tool with the Basic Gray marker to spritz the image.

Ink the Hello, Doily background stamp with Tempting Turquoise and stamp onto a piece of Tempting Turquoise cardstock.  Layer with the Top Note focal image, adhere the 5/8” satin ribbon bow and mount onto Whisper White and again onto Basic Gray. 

Stamp the sentiment from Teeny Tiny Wishes in Basic Gray, punch out with the Word Window Punch and mount onto a piece of Basic Gray punched with the Modern Label Punch.

Add the Pearls and spritz again with the Color Spritzer Tool and Basic Gray Stampin’ Write Marker to finish off the card.

Stamp Sets:  Happiness Shared, Hello, Doily, Teeny Tiny Wishes
 Ink: Basic Gray, Stampin’ Write Markers- Basic Gray, Certainly Celery, Poppy Parade
Cardstock:  Basic Gray, Tempting Turquoise, Whisper White
Accessories:  Big Shot™, Bigz™ Top Note Die, Color Spritzer Tool, Word Window and Modern Label Punch, Pearls, Satin Ribbon (from my stash)

Thanks again for stopping by and blessing my life! 

Wednesday, September 14, 2011

Sympathy- Kitty Best Friend


Hi Stampers! 

For those of us who have pets in our lives, their loss can be devastating.  The companionship and unconditional love that they give us is so comforting and recently I saw a saying on a frame for a pet  “God gave us an angel disguised in fur to show us His love”. This saying definitely applies to my two “girls” (of which one is named Angel), so when I heard about the loss of the beloved kitty of one of my friends, I knew that I wanted to create a special card for her.    

 I decided to use the CCMC166 sketch challenge at Create with Connie and Mary for the layout of the card (the Design Team has done a fabulous job, as always, and if you have a chance, stop by to visit them). 


To create this card:

Use the Embossing Buddy® to de-static a piece of Basic Black cardstock.  Ink the background stamp, Hello Doily with Versamark® , apply Stampin’ Emboss® White  and emboss with the Heat Tool.  Once cooled, carefully cut out the doily and with a Paper Trimmer cut the doily in half. 

Follow the same procedure to emboss the cat image with Stampin’ Emboss® Black on a piece of Whisper White.   Mount this layer on Basic Black and apply a small Rhinestone for the collar name tag.

Ink a Brayer with River Rock, apply the ink to the smooth inside panel of the Finial Press Textured Impressions™ Embossing Folder, insert a piece of River Rock cardstock into the folder and emboss using the Big Shot™ .

Stamp the sentiment with Basic Black Classic ink and punch out using the Medium Oval Punch (retired).  Layer onto a Large Oval (punched from the background layer – under the area where the doily will cover) and two Basic Black ovals punched with the Large Oval as well.  Again, all of my sentiment layers are generally created from cardstock that is punched out from the background or hidden layers on the cards (you cannot see that this was done unless you hold the card up to a bright light).  This helps the weight and bulk of the card for mailing, not to mention stretching the budget:-)

Layer the pieces and add the 5/8” Black Satin Ribbon bow to finish off the card.

Stamp Sets: C is for Cat, Hello Doily, D is for Dog (sentiment)
Cardstock: Basic Black, River Rock, Whisper White
Ink: Basic Black, River Rock, Versamark®
Accessories: Big Shot™ , Finial Press Textured Impressions™ Embossing Folder,  Brayer, Heat Tool, Embossing Buddy®, Stampin’ Embosss® White and Black EP, Rhinestone, Large Oval Punch, retired Medium Oval Punch, 5/8” Black Satin Ribbon

Thanks again for stopping by and if you have any “furry” friends, give them an extra hug today!  Have a great time stamping and God Bless!

Sunday, September 4, 2011

A Card from Scraps with a Twist :-)


Hi Stampers!  
 
This week ColourQ celebrates their 100th post!  Congratulations to Arielle and the rest of the Design Team- you have been a true inspiration to me and so many others! 

In honor of the 100th post, they have decided to use a sketch challenge in combination with your favorite past ColourQ Challenge.  With over 100 combinations to choose from, I was having a difficult decision so I decided to use the CQC75 color combination- one that I found to be extremely challenging (plus I had not created a card for this one in the past:-)).

I also decided to create a card using all scraps or previously created parts from other card efforts.  The doily had already been heat embossed, the rolled flowers had already been made (this is the twist :-))  and the bow had already been tied and was lying in wait for the right card (see, I told you my "method of madness" would come in handy:-))

Since everything was ready to go, it was a quick and easy card.  I am not sure if I am fond of the Pumpkin Pie and Black (it reminds me too much of Halloween)- what do you think?  

Stamp Sets:   Hello, Doily, Teeny Tiny Wishes
Ink: Versamark®, Basic Black
Cardstock:  Whisper White, Pumpkin Pie (cardstock and DSP), Daffodil Delight, Basic Black
Accessories:  Big Shot™,  Embossing Buddy®, Black Stampin’ Emboss® Powder, Punches- 1 3/8” Circle, 1 ¼” Circle, 1 ¾” Scallop Circle, Satin Ribbon (from my stash), Pearls  

Thanks again for stopping by- I hope all of you have a wonderful week stamping and creating!

Sunday, August 7, 2011

Triple Treat Flower- Experiment #1

Hi Stampers!  

This week has been extremely busy and I did not have a chance to create a card for some of my favorite weekly challenges, but I did find time to stamp and experiment:-)

Yesterday I attended the quarterly Joyful Hearts Demonstrator Meeting and am so thankful to my wonderful upline, Cindy Fodor- she is so fabulous!  We had a great time (as always) and one of the highlights of our quarterly meetings is the card swap with my fellow demonstrators (25 cards using current product with a minimum of two layers and one embellishment).  

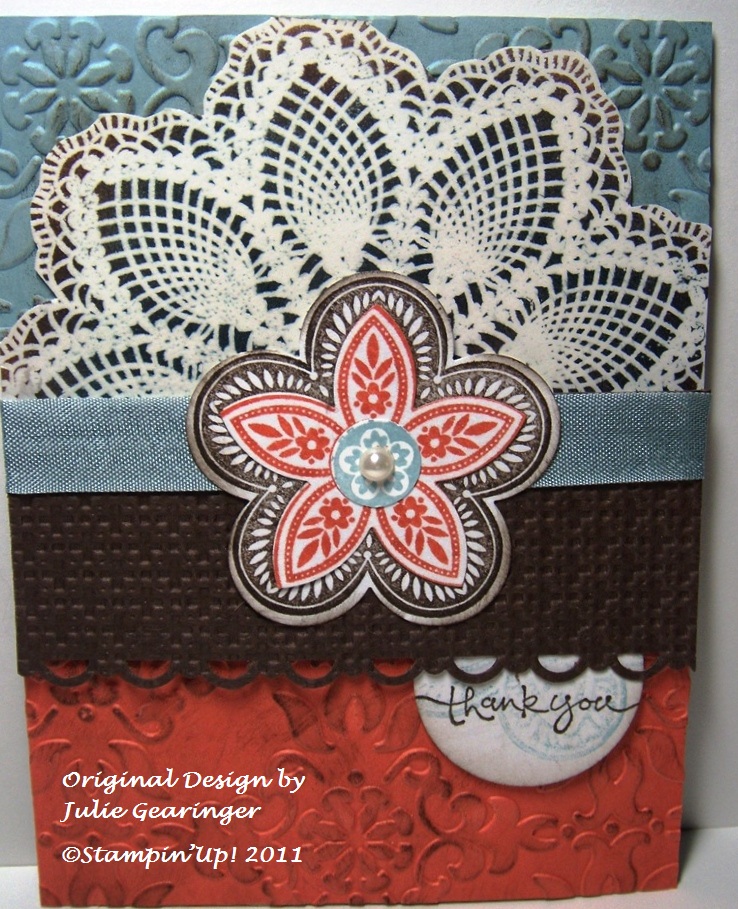
This time, due to many other commitments during the week, I was struggling with the design of the swap card.  In my first attempt, I chose to use the brand new background stamp, Hello Doily along with the new “a la carte” stamp, Triple Treat Flower.  Since I still had Calypso Coral and Early Espresso out from the CQC95 ColourQ Challenge, I decided to pair the colors with Baja Breeze and Early Espresso.

To create this card:  

De-static a piece of Whisper White with the Embossing Buddy and stamp the Hello, Doily background stamp using Veramark ink, apply Clear EP and heat emboss with the Heat Gun.  Using Sponge Daubers with Island Indigo and Early Espresso ink, sponge over the entire image.  Remove the excess ink over the embossed images with a moistened paper towel and carefully cut out around the edges.  Cut the image in half with the paper cutter. 

Emboss a piece of Baja Breeze and Calypso Coral cardstock with the Big Shot and  the Vintage Wallpaper EF. Lightly sponge with Early Espresso ink and spray both pieces with Champagne Mist Shimmer Paint.  

Stamp the Triple Treat Flower image three times- first in Baja Breeze ink, then in Coral Calypso ink and lastly in Early Espresso ink (don’t forget to clean the stamp between each color:-))  Use the ½” Circle Punch to punch out the center in Baja Breeze piece, the 5-Petal Punch for the Calyspo Coral piece and the XL Fancy Flower Punch for the Early Espresso piece. 

Emboss a piece of Early Espresso with the Big Shot and the Square Lattice EF and punch the border with the Scallop Trim Border Punch.  

Stamp the sentiment with Early Espresso ink onto Whisper White, punch out with a 1 3/8” Circle Punch.  Layer the pieces, adhere the flower with SU! Dimensionals and add a pearl to finish off the card. 

Stamp Sets:  Triple Treat Flower, Short & Sweet,  Hello, Doily
Ink: Versamark, Baja Breeze, Calypso Coral, Early Espresso
Cardstock:  Whisper White, Baja Breeze, Calypso Coral, Early Espresso
Accessories:  Big Shot, Square Lattice and Vintage Wallpaper EF, Scallop Trim Border, Punches- ½” and 1 3/8” Circle, 5-Petal Flower, XL Fancy Flower, Pearls, Baja Breeze Seam Binding, Champagne Mist Shimmer Paint (mixed with 70% alcohol)

After creating this card, I realized that I would not have enough time to create 25 more so it was back to the drawing board :-)

Thanks again for looking- I will post the next sample design and the final swap card soon!
Related Posts Plugin for WordPress, Blogger...