Showing posts with label Summer Silhouettes. Show all posts

Wednesday, September 10, 2025

TCC219 I Will Give You Rest


Hi Friends! 

Welcome back to The Card Concept!  We are starting our monthly challenges again with our September #219 Butterflies and Blooms with two new designers on the team!

We hope that you will take the time to check out the Design Team's cards for even more inspiration! 

I was inspired by the florals and colors for my simple Mixed Media card and I decided to pull out a few of my retired Stampin’ Up! sets- Summer Silhouettes, En Francais along with the sentiment from Words of Encouragement from Stamp Simply.

I have been trying to ink up some of my older stamps and thought that this set would be perfect for the florals/background on this card.  I also have not had a chance to play around with my oxide inks in a while.  

If you follow my blog, you know that I enjoy playing along with other online challenges and will be linking this card to the As You Like It "Favourite- Layered or Flat and Why?" Challenge.  

I tend to gravitate to layered cards and love using lace and ribbon along with pearls.  The more layers, the more for me!


To create this card:

Using distress oxides (the colors I used are listed below), layer the inks onto a piece of white cardstock using a stencil brush.

Dry the inks with a heat tool before stamping the floral images using Versafine Black Onyx ink, apply clear embossing powder and heat set with a heat tool.

Continue layering the floral images with the above process, applying white embossing powder to some of the petals.

Ink the background image from Summer Silhouettes with Crushed Olive Distress Oxide ink and repeatedly stamp over the background (gently wipe off the ink from the floral tops).  Apply clear embossing powder and heat set with a heat tool.

Ink the background stamp, En Francais with Abandoned Coral Distress Oxide ink and randomly press over the background.

Once satisfied with the background, trim to approximately 3.75” x 5”.  Mount onto a piece of white cardstock, trim close to the edges.  Mount onto a piece of black cardstock, trim once more.

Add a strip of white crochet lace to the card front. 

Adhere a piece of black and white checked ribbon to the card front, wrapping the ends behind the card front.

Mount the entire card panel onto a white card base.

De-static a piece of white cardstock with an embossing powder tool, stamp the verse sentiment from Words of Encouragement with Versafine Onyx Black ink, apply clear embossing powder and heat set with a heat tool.

Once the embossing has cooled, die cut the sentiment with a stitched circle die.

Mount onto black cardstock (I die cut two circles from the same circle die, layering for a small frame behind the sentiment).

Adhere to the card front using dimensional foam and add a few pearls to finish off the card.

Stamp Sets: Words of Encouragement (Stamp Simply); En Francais and Summer Silhouettes (retired Stampin’ Up!)

Inks/Mediums: Versafine Black Onyx, Distress Oxide- Abandoned Coral, Mustard Seed, Ripe Persimmon, Crushed Olive

Cardstock/Paper: White, Black

Accessories/Tools: Gemini, Jr., MFT Stitched Circle Dies, Stencil Brushe, Embossing Powder Tool, Clear and White Embossing Powder, Heat Tool, White Crochet Lace (Hobby Lobby), Black and White Checked Ribbon, Pearls

I hope you have had a chance to stop by The Card Concept to see how the rest of the Design Team were inspired as well as check out the other challenge gallery entries! Gorgeous work from everyone!

We hope you are inspired to create a card and join us for our #219 Butterflies and Blooms at The Card Concept!  The deadline to play along is Monday, October 6th at noon EDT.

Monday, July 6, 2015

Happy Birthday- Summer Silhouette Style :-)

Hi Stampers! 

I wanted to share another card that I created last night for the CCMC362 Color Challenge at Create with Connie and Mary along with the Seize the Birthday 07/02/15 "Red, White and Blue" Challenge ( Lost Lagoon is sort of blue…but you do not have to do the “topping option” as long as it is a Birthday card) along with the Splitcoaststampers CAS326 Wildflowers Challenge (see details here and gallery here)   :-)
 
If you have not had a chance to do so, I hope you will find the time to visit the above challenge sites to check out the Design Team samples as well as their galleries- fabulous inspiration from all!

This was a nother quick, easy card to create :-) :

Ink the floral stems and leaves with Lost Lagoon Classic Ink and stamp onto Crumb Cake cardstock, add the flower tops with Real Red Classic Ink and add a few highlights with the Gel Pen.

Trim the panel and mount onto a piece of Whisper White cardstock.

Stamp the sentiment using Real Red Classic Ink onto a piece of Lost Lagoon cardstock, trim and mount onto a piece of Whisper White cardstock, trim and mount onto the Real Red card base.

Stamp the lattice border using Real Red Classic Ink onto Whisper White cardstock, trim and mount onto a scrap piece of Real Red cardstock.

Mount the focal image to the card front and add the lattice border layer.

Create a Real Red cardstock bow using the Bow Builder Punch and adhere the Antique Brad to the center (I remove the brad points and use adhesive to adhere the brad to the bow). 

Mount the bow to the card front to finish off the card.

Not sure if I am pleased with this card- it feels like something is missing,- maybe I will add some Pearls before I mail this one :-)

Stamp Sets: Summer Silhouettes, Butterfly Basics

Ink: Lost Lagoon, Real Red; White Gel Pen

Paper: Whisper White, Crumb Cake, Lost Lagoon, Real Red

Accessories: Bow Builder Punch, Antique Brads


Thanks again for stopping by- I hope you all have a marvelous Monday!!

Wednesday, May 27, 2015

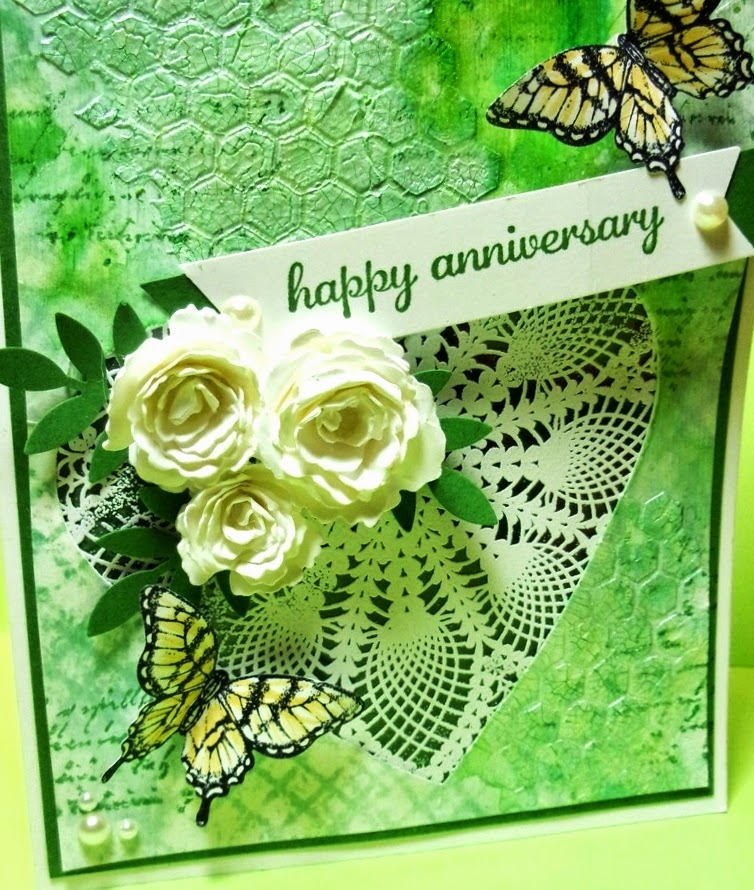
TCC36- Happy Anniversary Mixed Media Card


Hi Stampers!!


I was inspired by the gorgeous green and white and created my Mixed Media card by upcycling some acrylic packaging material (this is the first time I tried heat embossing on the acrylic :-)).

I combined our Card Concept challenge with the Splitcoaststampers’  MIX121 “It’s Summer- Better Work Those Quads” Challenge (see details here and gallery here), the TLC521 "Negative and Positive" Challenge (see details here and gallery here) and The Friday Mash Up! FM210 "Butterflies and Lace" Challenge (I think the embossed doily qualifies as lace...don't you)?

The Card Concept is a bi-weekly challenge that has an inspiration photo along with a number of design styles that you can choose from to create your card- Clean and Simple, Clean and Graphic, Clean and Layered, Shabby Chic, Freestyle Collage, Classy and Elegant and Mixed Media.  

So I hope you have time to gather your supplies together, stop by to check out the inspiration from the rest of the Design Team and come join in on the fun!! 

To create this card:

Apply Gesso® to a piece of Whisper White cardstock and set aside to dry.

Once dried, apply Ranger® Tim Holtz® Mowed Lawn and Squeezed Lemonade Distress Stains, dilute with water and allow to run over the background- dry with the Heat Tool.

Keep repeating the above until you are satisfied with the color and results.

Ink the border stamp from Summer Silhouettes with Garden Green Classic Ink and stamp over the background at the bottom.

Add Ranger® Tim Holtz® Picket Fence Distress Stain to tone down the green color and  use the Big Shot™ with the Heart Collection Framelits™ to cut out the heart opening.

Apply Studio 490® Wendy Vecchi® Crackled Texture Paste (using the Balzar Designs® Mini Punchenella stencil) over the  background and carefully dry with the Heat Tool.

Add additional Ranger® Tim Holtz® Mowed Lawn Distress Stain and when the desired effect has been achieved, spray the texture paste area with Frost White Shimmer Paint.

Ink the retired Notable Notions script stamp with Garden Green Classic Ink and stamp onto the background.

On a piece of acrylic plastic packaging, use the Embossing Buddy® to de-static the acrylic, ink the retired Hello Doily background stamp with Versamark™ Ink, stamp onto the acrylic, apply Stampin’ Emboss® White Embossing Powder and carefully heat with the Heat Tool.   ***Note- as I mentioned above, this is the first time I ever tried this and it did warp the plastic a bit, plus a fair amount of odor but it did work  :-) ***
Close-up of embossing paste and embossed  acrylic panel behind heart :-)
Trim the plastic and adhere behind the prepared background panel.
Mount the panel onto a piece of Garden Green cardstock, trim and mount onto the  Whisper White card base.

Ink the sentiment from the retired Express Yourself stamp set with Garden Green Classic Ink and stamp onto Whisper White cardstock, trim and create the banner points using the Hexagon Punch and layer a strip of Garden Green cardstock behind the sentiment (punching the ends as well with the Hexagon Punch).

Mount the sentiment onto the card front using Stampin’ Dimensionals®.

Create the rolled flowers with the Big Shot™ and the Royal Rose and Mini Royal Rose Die (My Favorite Things™) from Whisper White cardstock.

Adhere the flowers to the front of the card along with the leaves punched from Garden Green cardstock (with the Martha Stewart Leaf Punch) .

Ink the butterflies using Stāz-On® Jet Black Ink and stamp onto Whisper White cardstock.  Add a bit of yellow to their wings with the So Saffron Stampin’ Write marker, punch out with the Elegant Butterfly Punch and mount onto the card front.

Add Pearls to the corners and the sentiment to finish off the card.

Stamp Sets:  Papillon Potpourri, Summer Silhouettes;  retired - Express Yourself (hostess), Notable Notions, Hello Doily

Ink: Garden Green Classic Ink, Stāz-On Jet Black, Versamark™; Stampin’ Write So Saffron Marker, Ranger® Tim Holtz® Distress Stains- Mowed Lawn, Squeezed Lemonade, Picket Fence

Paper: Whisper White, Garden Green

Accessories: Gesso®, Big Shot™, Heart Collection  Framelits™, MFT Royal Mini Rose and Royal Rose Dies,  Punches- Elegant Butterfly, Hexagon, MS Leaf, Pearls, Studio 490® Wendy Vecchi® Crackled Texture Paste,  Balzar Designs® Mini Punchenella stencil, Embossing Buddy®, Stampin’  Emboss® White Embossing Powder, Heat Tool, acrylic packaging, Frost  White Shimmer Paint

OK, for the MIX121 Challenge, we were supposed to use at least four mediums...this card has Gesso®, Crackled Texture Paste, Distress Stains and Classic Ink, Pigment Inks (Versamark Ink and Stāz-On Jet Black), Embossing Powder, Shimmer Paint and Found Objects - by my count, at least six mediums :-)

Anyway, I had a great time creating this card and I hope you pick a style and come play along with us at The Card Concept!

Thanks for stopping by- have a wonderful week, my friends!

Monday, May 11, 2015

Farewell to Blooming with Kindness- A Color, Inspiration and May Challenge :-)


Hi Stampers!!

Here is another Mixed Media card (focal image is just one layer) that I designed using The Paper Players PP244 Color Challenge along with the Just Add Ink JAI261 Inspiration Challenge and the Splitcoaststampers’ Free For All F4A272 Colors of May Challenge (see details here and gallery here).

Again, if you have not already done so, I hope you will find the time to visit the above sites to check out the wonderful Design Team samples as well as their terrific galleries!

To create this card:

Using Stāz-On® Jet Black Ink, stamp the flower from the soon-to-be retired set, Blooming with Kindness onto a piece of Naturals White cardstock. 

Create a mask for the same flower stamp from a sticky note or scrap piece of paper, cover the initial stamped flower, re-ink the stamp using Stāz-On® Jet Black Ink and stamp next to the masked image  (overlapping a bit). 

Repeat the above steps for the third flower.

Color the flowers using the Lost Lagoon Stampin’ Write Marker and color around the images with the Pistachio Pudding and Sahara Sand markers. 

Spritz the entire image with water, allow the ink  to spread a  bit, heat with the Heat Tool to dry and re-apply color as needed.

Once you are satisfied with the flowers, add additional shadows with the Sahara Sand Stampin’ Write Marker, spritz the image with water and stamp the border stamp from Summer Silhouettes with Sahara Sand Classic Ink.

Once the panel is dry, re-ink the border stamp with Sahara Sand Ink and stamp again over the background.

Ink the large splatter stamp from Gorgeous Grunge with Sahara Sand Classic Ink and stamp a bit of splatter on the panel.

Apply Ranger® Tim Holtz® Picket Fence Distress Stain over the background and two of the flowers to add a bit of interest and tone down the colors.  

Use the Faber-Castell® White Pitt Pen marker to add highlights to the flower center and a black Stampin’ Up! Watercolor Pencil to add shadows to the flower petals.

Stamp the sentiment with Stāz-On® Jet Black Ink, trim the panel and mount onto a piece of Sahara Sand cardstock, trim and mount onto the Lost Lagoon card  base.

Stamp Sets:  Blooming with Kindness, Summer Silhouettes,Trust God, Gorgeous Grunge

Ink:  Stāz-On® Jet Black Ink, Sahara Sand; Stampin’ Write Markers- Lost Lagoon, Pistachio Pudding, Sahara  Sand; Faber-Castell® Pitt Pen White Marker, Ranger®  Tim Holtz® Picket Fence Distress Stain

Paper: Naturals White, Sahara Sand, Lost Lagoon

Accessories: Water Spritzer Bottle, Heat Tool


Thanks again for stopping by- have a great evening!  Tomorrow morning will be the start of the new SUO Challenge- we hope to see you in our gallery :-)

Sunday, April 19, 2015

Summer Silhouettes- An Assortment, Color and Sketch Challenge :-)


Hi Stampers! 

This card was created using the As You See It AYSI083 Assortment Challenge along with the CMCC67 Colour Me! Challenge and Friday Mashup! FM205 Challenge (used the sketch only).

I hope you will have the time to check out all of the linked sites- fantastic Design Teams and galleries!


To create this card:

Ink the stem image from Summer Silhouettes using Memento™ Tuxedo Black Ink and stamp three times onto a piece of Whisper White cardstock.

Ink the leaves using Pistachio Pudding Classic Ink and repeatedly stamp around the stems (stamping off as you repeat).

Stamp the flower tops using Blushing Bride, repeat with Rose Red Classic Ink and stamp the border using Rose Red Classic Ink.

Ink the large splatter stamp from Gorgeous Grunge using Sahara Sand Classic Ink to  add distressing and cut the entire image out using the Big Shot™ with the Circle Collection Framelits™ (cutting a circle from Rose Red cardstock as well).

Add additional “antiquing” using a Sponge Dauber with Sahara Sand Classic Ink  and mount onto the Rose Red circle.

Use the Distressing Tool to carefully distress the edges of Typeset Designer Series Paper (DSP)- this paper is very thin and the tool can be a bit rough on the edges :-)

Apply Sahara Sand Classic Ink to the edges and interior of the DSP, mount onto a piece of Blushing Bride cardstock, sponge additional Sahara Sand Classic Ink onto the Blushing Bride cardstock and adhere the focal image circle to the card front.

Use the Big Shot™ with the Chevron Textured Impressions™ Embossing Folder to emboss a scrap piece of Pistachio Pudding cardstock, use the Sponge Dauber to apply Sahara Sand Classic Ink to the edges (and embossing) and mount onto a piece of Rose Red cardstock.

Add the crochet lace trim to the bottom and adhere to the card front.

Use the Bow Builder Punch to create a bow from Rose Red cardstock.  Add a strip of Rose Red cardstock to the embossed layer and add the bow.

Stamp the sentiment with Memento™ Tuxedo Black Ink onto Whisper White cardstock, sponge the edges and add the splatter with Sahara Sand Classic Ink.

Stamp the butterflies with Memento™ Tuxedo Black Ink onto a retired piece of Blushing Bride DSP, punch out with the Elegant and Small Butterfly Punches and mount onto the card front.

To finish off the card and for the shiny element of the ASYI083 Assortment Challenge- add the Pearls to the butterfly centers as well as the upper and lower corners of the card and add the Antique Brad to the center of the bow. 

Stamp Sets: Summer Silhouettes, Papillon Potpourri, Gorgeous Grunge, retired Express Yourself (hostess set)

Ink:  Memento™ Tuxedo Black, Blushing Bride, Pistachio Pudding, Rose Red, Sahara Sand; Stampin’ Write Marker- Sahara Sand

Paper:  Whisper White, Blushing Bride, Pistachio Pudding, Rose Red, Typeset Specialty DSP, retired Blushing Bride DSP

Accessories: Big Shot™, Circle Collection Framelits™, Chevron Textured Impressions™ Embossing Folder, Distressing Tool, Punches- Elegant Butterfly, Small Butterfly, Hexagon (for the sentiment banner points), Bow Builder; Sponge Dauber, Pearls, Antique Brad, crochet lace from my stash


Thanks again for stopping by- I will be sharing a few more cards later today, so if you have the time, drop in again soon :-) 

I hope all of you have a wonderful, and hopefully, restful Sunday!

Monday, March 9, 2015

Monochromatic Shades of Purple with Summer Silhouettes

Hi Stampers! 

I had a chance to play around in my craft room this evening and decided to create a 10 Minute Mixed Media card for the As You See It #077 Speed Stamping "Shades of Purple" Challenge and combined it with the Splitcoaststampers MIX104 MonochromaticChallenge.

If you have not had a chance to do so, I hope you will find the time visit the above sites!  Great Design Teams and wonderful inspiration from both galleries!

To create this 10 Minute (actually 9:58 min) CAS card:

Ink the Summer Silhouettes leaves using Perfect Plum Classic and stamp onto a piece of retired Orchid Opulence cardstock.  

Add the stem and flower head images using Blackberry Bliss Classic Ink.

Stamp the large splatter stamp from Gorgeous Grunge with Perfect Plum Classic Ink, stamp off and stamp over the images.

Add the Blackberry Bliss Washi Tape (from the retired Colour Me Autumn Washi Tape Collection) and ink the retired En Francais background stamp with Perfect Plum Classic Ink.  

Stamp off the background image and place the panel face down onto the stamp and “finger stamp” the script background  around the edges onto the panel.

Trim the panel and emboss the lower part of the card only using the Big Shot™ with the Zig Zag Textured Impressions™ Embossing Folder.

On your craft mat, add some Titanium White Acrylic Paint using a liner brush to to the flower tops.  Dilute the paint with water and a wider brush to add a light wash over the background of the stems, washi tape and embossing at the bottom.

Add a few more strips of the same Washi Tape and mount onto a piece of Whisper White Textured cardstock.

Trim and mount the entire panel onto the Blackberry Bliss card base.

I was running out of time so I did not add the sentiment yet (but can add one later :-))

Quick and easy- love the fact that it was completed in under 10 minutes!

Stamp Sets: Summer Silhouettes, Gorgeous Grunge, retired En Francais

Ink: Perfect Plum, Blackberry Bliss

Paper: Whisper White Textured, Blackberry Bliss, retired Orchid Opulence

Accessories: Big Shot™, Zig Zag Textured Impressions™ Embossing Folder, Titanium White Acrylic Paint, Paintbrushes- Liner and Wash, Blackberry Bliss Washi Tape (retired Color Me Autumn collection)


Thanks again for visiting- have a great Monday!!

Tuesday, February 17, 2015

CAS An Open Heart Sympathy


Hi Stampers!


Again, if you have not visited the challenge sites yet, I hope you will find time to do so- terrific Design Team designs and as well as their galleries!!

To create this card:

Ink the bird image and branch from An Open Heart using Memento™ Tuxedo Black Ink and stamp onto a sticky note.  

Cut the images out to use as masks and stamp the bird image using Memento™ Tuxedo Black Ink onto Whisper White cardstock. 

Mask the bird and stamp the branch image from An Open Heart using Memento™ Tuxedo Black Ink, mask the stamped branch image and re-ink and stamp the branch once more.

Keep the bird mask in place, create a mask for the horizon line and ink the branch image from Summer Silhouettes using Sahara Sand Classic Ink and stamp repeatedly.

Remove the masks and color the images using the Sahara Sand and Hello Honey Stampin’ Write markers.

Ink and stamp the Gorgeous Grunge diagonal line stamp using Hello Honey Classic Ink.

Use a Black Stampin’ Write Marker to add the horizon line and with the retired Color Spritzer Tool to add additional interest to the background.

Use the Big Shot™ with the Window Frames Collection Framelit™ to cut out the image along with another frame from Basic Black cardstock.   Cut the Basic Black cardstock frame in half and mount behind the focal image.

Use the Big Shot™ to emboss a piece of Sahara Sand cardstock with the Stylish Stripes Textured Impressions™ Embossing Folder, trim and mount onto a piece of Basic Black cardstock.  Trim and mount onto the Whisper White card base.

Mount the focal image to the card front using Stampin’ Dimensionals®.

Ink the sentiment from Bloom with Hope using Memento™ Tuxedo Black Ink and stamp onto Whisper White cardstock.  Use the Hexagon Punch to add the banner ends and mount onto a piece of Basic Black cardstock (using the Hexagon Punch to add the banner ends as well).

Mount onto the card front using Stampin’ Dimensionals® and add the Rhinestones to finish off the card.

Stamp Sets: An Open Heart, Gorgeous Grunge, Bloom with Hope, Summer Silhouettes

Ink:  Memento™ Tuxedo Black Ink, Stampin’ Write Markers- Basic Black, Hello Honey and Sahara Sand

Paper: Whisper White, Basic Black, Sahara Sand

Accessories: Big Shot™, Window Frame Collections Framelits™, Stylish Stripes Textured Impressions™ Embossing Folder, Hexagon Punch, retired Color Spritzer Tool, Rhinestones, sticky note paper


 Thanks again for stopping by- I hope all of you are having a wonderful Tuesday!!

Tuesday, February 10, 2015

Sending Love & Sympathy- SUO116 & AW34

Hi Stampers!   

It’s time for the new SUO116 “Shape Up!” Challenge (any shape other than rectangle or square) and I decided to create a card using the AW34Color Challenge. 

I hope you will find the time to check the rest of the Design Team at both challenge sites and come join in on the fun!

To create this card:
Use the Big Shot™ with the large Window Frames Collection Framelits™ Die to cut out the shape of the card (fold the Very Vanilla card base in half and place the fold within the die so that the edge will not be cut).
Cut out another piece of Very Vanilla cardstock using the same size die and trim the top of the panel to match the card base.
Drop a few drops of So Saffron and Crisp Cantaloupe Classic Ink using re-inkers onto a craft mat and spritz with water.  Take the single die cut (from the step above) and lay face down into the ink and swirl it on the mat a bit, lift up and repeat until the coverage is to your liking :-)
Allow the panel to dry (I used a Heat Tool to speed up the process) and once dried, stamp the silhouette leaves using Crisp Cantaloupe and So Saffron Classic Ink onto the panel.
Stamp the stems with flower tops using Basic Gray Classic Ink and add the splatter with the large splatter stamp from Gorgeous Grunge using Crisp Cantaloupe Classic Ink. 
De-static the panel using the Embossing Buddy® and stamp the stems with flowers again using Versamark™ Ink, apply Stampin’ Emboss® Whtie Embossing Powder and heat with the Heat Tool. 
Stamp the butterflies onto So Saffron cardstock using Basic Gray Classic Ink and add additional color to the wings with the Crisp Cantaloupe Stampin’ Write marker.    Punch the butterflies out with the Elegant Butterfly Punch.
Stamp the sentiment onto Very Vanilla cardstock using Basic Gray Classic Ink and add a bit of distressing with the large splatter stamp (“huff” onto the stamp to re-moisten the existing Crisp Cantaloupe ink from the previous steps above).  
Punch out the sentiment using the Large Oval Punch and layer onto an extended Large Oval from Crisp Cantaloupe and So Saffron cardstock (punch out two ovals from each of the colored cardstock and adhere with just a bit of each color showing behind the sentiment layer).
Mount the background panel onto the card base and add the sentiment using Stampin’ Dimensionals®. 
Add the butterflies to the panel and adhere Pearls to the center of the butterflies. 
Create a bow from So Saffron cardstock using the Bow Builder Punch and adhere at the bottom of the card front (this bow will allow the card to remain upright since the die cut is curved). 
Add the Antique Brad to the center of the bow along with the Pearls in the corner to finish off the card.  
Stamp Sets:  Summer Silhouettes, Papillon Potpurri, Love & Sympathy, Gorgeous Grunge
Ink: Crisp Cantaloupe, So Saffron, Basic Gray, Versamark™,  Crisp Cantaloupe Stampin’ Write Marker
Paper/Cardstock: Very Vanilla, Crisp Cantaloupe, So Saffron
Accessories: Big Shot™,  Window Frames Collection Framelits™,  Embossing Buddy®, Heat Tool, Stampin’ Emboss® White Embossing Powder, Punches- Bow Builder, Elegant Butterfly, Large Oval; Pearls, Antique Brad

Thanks again for taking the time to visit – I hope that you will join in on in on the fun with your Stampin’ Up! Only creations and create your own “Shape Up!” project!
Related Posts Plugin for WordPress, Blogger...