Showing posts with label Trust God. Show all posts

Monday, August 10, 2020

Tea Party


Hi Friends!

This card was designed with the retired Trust God and Gentle Thoughts stamp sets from Stampin’ Up! using a stacked designer paper technique for the background.

As I have mentioned in previous posts, I am slowly working my way through the over 800 sketches at Splitcoaststampers and this card uses the SC128 Sketch for the layout (I did modify it a bit).

I also have a personal goal to try to ink up some of my older (and neglected) stamp sets.  Gentler Times is from 1999 or so and I have not inked up this image in years, so when I saw the International Art & Soul #89 “Tea Party” Challenge, I knew I would have to join in, lol!


I have so many favorite tools, it is hard to choose just one but I tend to use my heat tool for almost every card), so I would say my heat tool is my favorite tool :-)

I hope you have had the chance to check out the above challenge sites, gorgeous inspiration from all!

To create this card:

De-static two pieces of white cardstock with an embossing powder tool, ink the tea party image from Gentle Thoughts and the verse sentiment from Trust God with black archival ink, apply clear embossing powder and heat set with a heat tool.

Once the embossing has cooled, die cut the verse sentiment with a stitched circle die, mount onto another circle cut from black cardstock.

Watercolor the tea party image with water-based markers and distress oxide inks.  Once you are satisfied with the coloring, fussy cut the image and mount onto black cardstock.  Fussy cut around the edge of the image, set aside.

For the background, stack two pieces of designer paper together and cut on the diagonal across both sheets together.

Adhere the pieces of designer paper onto a white card base, separating a bit to create a quilted look (you will have two card bases from this technique).

Emboss the panel with a tin tile embossing folder, trim and mount onto black cardstock.

Add a strip of black satin ribbon, wrapping the ends behind the back of the panel and mount the entire panel onto a white card base.

Mount the sentiment with chipboard (or dimensional foam) and add the tea party image using a double layer of chipboard.

To finish off the card, add a few pearls to the edges of the sentiment layer and use a clear glitter pen to add shimmer to the flowers.

Stamp Sets: Gentler Times, Trust God  (retired Stampin’ Up!)

Ink/Mediums: Versafine™ Onyx Black; Stampin’ Write Markers- Crushed Curry, Pineapple Punch, Old Olive, Garden Green, Pool Party, Soft Suede, Poppy Parade; Tim Holtz® Twisted Citron Distress Oxide; Clear Wink of Stella™

Paper/Cardstock: Whisper White, Basic Black; retired Park Lane Designer Series Paper

Accessories/Tools: Gemini, Jr™, Tin Tile 3D Embossing Folder (Stampin’ Up!), Embossing Buddy®, Clear Embossing Powder, Heat Tool, AquaPainter™, Black Satin Ribbon (from my stash), Pearls

Thanks again for taking the time to visit- I hope you have a wonderful week!

Saturday, February 1, 2020

One Layer Snowflakes


Hi Friends!!

I have been stamping and creating cards like crazy but have not had the time to post to my blog (I am hoping to play"catch up" within the next few weeks). 

This card was a fairly simple one layer card designed with a new stamp set, Snowflake Builder (Simon Says Stamp) along with a retired sentiment from Trust God (Stampin’ Up!).


The background was very easy to create- fold a piece of white cardstock in half, using sponge daubers apply Distress Oxide inks (see colors below), once dried, heat embossed the snowflakes with white embossing powder.

The sentiment was heat embossed with clear embossing powder and a bit of water was splashed onto the background.


Stamp Sets: Snowflake Bundle (Simon Says Stamp), Trust God (retired Stampin’ Up!)

Ink/Mediums: Versafine™ Onyx Black, Versamark™, Tim Holtz® Distress Oxide Ink- Broken China, Picked Raspberry, Tumbled Glass

Cardstock/Paper:  Whisper White

Accessories: Embossing Buddy®, Clear and White EP, Heat Tool, Sponge Daubers, Rhinestones, Stencil 

Thanks again for taking the time to stop by- I hope all of you have a wonderful weekend!

Thursday, October 17, 2019

A Friend Loves At All Times


Hi Friends!!

Today I am sharing a card that was designed using two retired Stampin’ Up! sets, Trust God and Best of Sale-A-Bration along with some retired Designer Series Paper (DSP). 

Believe it or not, I am still working on organizing my craft room (it is a never-ending process, lol!) and wanted to give both of my older (and neglected) stamp sets some love :-)


If you have not had a chance to drop by the above challenge sites yet, I hope you do so- terrific inspiration from all!

Trim a piece of pink designer paper to 4" x 5 1/4" (I think this panel might be from Tea Party circa 2009).  I am not totally sure if is from Tea Party but I know it is definitely an older Stampin' Up! paper :-)  While organizing, I have been cutting some of my DSP into 4' X 6" panels for cardmaking and neglected to label this package, oops!.  Mount onto Basic Black cardstock, trim and adhere to the Whisper White card base.

Trim the piece of green designer paper (retired Festival of Prints) and mount onto a piece of Basic Black cardstock, trim close to the edge. Adhere this strip directly onto the card front.

Ink the floral image along with the sentiment using Versamark™ ink , stamp onto a prepared piece of Whisper White cardstock, apply black embossing powder and heat set with a heat tool. 

Use the retired Note Punch to punch out the sentiment, punch an additional tag using the Note Punch from Basic Black cardstock, trim the black punched tag in half and mount behind the embossed sentiment,  Adhere the layered sentiment directly onto the card front.

Color the cooled image with Stampin’ Write markers (using a water brush to blend the colors) and fussy cut the image. Mount onto Whisper White cardstock, trim close to the edge and mount onto Basic Black cardstock (again, trimming close to the edge).  Use Clear Wink of Stella to add shimmer to the petals and a white gel pen to add white highlights to the center of the flower.  Mount the layered image to the card front with dimensional foam.

Add a few pearls to the corners to finish off the card.

Stamp Sets: Best of Sale-A-Bration, Trust God, (both retired Stampin’ Up!)

Ink/Mediums: Versamark™ , Stampin’ Write Markers- Bermuda Bay, Chocolate Chip, Pear pizzazz, Pool Party, Rich Razzleberry; Wink of Stella™ Clear Glitter Pen, White Gel Pen

Cardstock/Paper: Whisper White, Basic Black; retired SU! Designer Series Paper- Festival of Prints, Tea Party

Accessories: Embossing Buddy®, Heat Tool, Black Embossing Powder, AquaPainter™, Note Punch, Pearls

I am so thankful that you stopped by today- hugs and I hope you have a blessed week/weekend!

Wednesday, December 26, 2018

The Card Concept #105- Favorite Card from 2018


Hi Friends!


We know that most of you are very busy during the Christmas season and New Year but wanted to have a challenge that you could participate with us that would be easy.

To play along, just share with us either your favorite card that you designed in 2018 or a photo of your Christmas tree this year.

Since our Christmas tree is very small and it is hard to get a great photo, I am sharing one of my favorite cards from 2018.


This card was created for The Card Concept #91 Challenge and all of the free step by step instructions can be found in this blog post.

Thanks again for your faithful participation with The Card Concept in 2018 and we are looking forward to another great year in 2019!  

Merry Christmas and Happy New Year!!

Wednesday, April 18, 2018

TTC91 Trust in the Lord


Hi Friends!


Woohoo! It’s time for the new #91 {Blossoms in Blue} Challenge at The Card Concept! Isn’t that a gorgeous dress?  I was inspired by the overall feminine feel, the beautiful blue and pink as well as the sheerness of the fabric to create a vintage Mixed Media card.

I decided to pull out a few retired Stampin’ Up! Stamp sets and am also linking to the Dragonfly Journey's #116 "April Showers Bring May Flowers" Challenge, the Word ArtWednesday #330-#331 “Anything Goes” Challenge.

Just a reminder that the Card Concept is a bi-weekly challenge that has an inspiration photo along with a number of design styles that you can choose from to create your card- Clean and Simple, Clean and Graphic, Clean and Layered, Shabby Chic, Freestyle Collage, Classy and Elegant and Mixed Media (or you can combine several styles for your own style).


If you have not had a chance to visit us at The Card Concept or visit the other challenge sites yet, I hope you will find time to do so- wonderful inspiration from all!

To create this card:


1). Ink the vintage girl image from Friendship's Journey with archival black ink, stamp onto a piece of white cardstock, apply clear embossing powder and heat set with a heat tool.  Once the embossing has cooled, color the image using ink from markers along with a water brush.  Die cut the image with a stitched rectangle die.

2). Stamp the verse sentiment from Trust God with archival black ink, stamp onto a piece of vellum, apply clear embossing powder and heat set with a heat tool.  Once the embossing has cooled, trim and gently distress the lower edge.

3). For the panel on the background, use a stencil brush with distress oxide ink to lightly stencil the area before die cutting with a stitched rectangle die and mounting onto stitched die cut rectangle panel from white cardstock.

4). Add the sentiment to the card front using a strip of 5/8" black satin ribbon to hide the seam (wrapping the ends behind the panel).

5).  Mount the layered vintage girl panel onto the card front with dimensional foam.

6). Add the single floral image from Flower Shop (retiring this month) along with punched leaves from green cardstock.   ***FYI- I had this image already stamped, colored and punched out in my stash from a project a few years ago (I am such a hoarder :-))***. 

7). Use an extra fine white paint pen to add highlights to the flower centers and a clear glitter pen to add shimmer to all of the petals. Use a gold marker to add metallic highlights to the cord and locket type image under the Eiffel Tower. 

8).  Add pearls to the corners to finish off the card.

Stamp Sets: Friendship's Journey, Trust God, Flower Shop (all retired Stampin' Up!)

Ink/Mediums: Versafine™ Onyx Black, Tim Holtz® Distress Markers- Salty Ocean; TH Distress Oxide Salty Ocean Ink,  SU! Markers- Blush Blossom, Berry Burst, Flirty Flamingo, Hello Honey, Baked Brown Sugar, Early Espresso; Spectrum Noir® Clear Glitter Pen, Sharpie® Extra Fine White Paint Pen, Faber-Castell® Gold Pitt Pen Marker

Cardstock/Paper: Whisper White, Basic Black, Vellum

Tools/Accessories:  Big Shot™, My Favorite Things™ Dies- A2 Stitched Rectangles STAX Set 1 & 2, Embossing Buddy®, Heat Tool, Clear Embossing Powder, Claritystamps™ Stencil Brush, Memory Box™ Distressed Tula Stencil, 5/8” Black Satin Ribbon, SU! Flower Punch Pearls

Thanks again for stopping by! I had fun designing this card and hope you will have a chance to come play along with us at The Card Concept!!

Wednesday, March 7, 2018

TCC87 Monochromatic Green


Hi Friends!!

It’s time for The Card Concept #88 {Monochromatic Green } Challenge!!  Look at this fabulous inspiration photo! With the theme of travel, greens, golds, suitcases, tins, vintage lettering, etc. what would inspire you?

I was inspired by all of the shades of green along with the gold to create a Shabby Chic/Mixed Media with a bit of Freestyle Collage card-lol!  How’s that for a style :-) ?

I decided to pull out several neglected Stampin’ Up! sets- Ephemera Background (from 2005), Sunflower and Trust God (for the sentiment).  I also used the current Timeless Textures for a few splatter effects.

I love participating with online challenges and am linking this card to the Simon Says Work It Wednesday “Green” Challenge, the Time Out #104 “Bold” Challenge (I think that the sunflower is a pretty bold image- do you?, the Flower Challenge #18 "Anything Goes" Challenge and the Alphabet “Y is Your Choice” Challenge.

If you have not had a chance to do so, I hope you will find the time to check out the rest of the wonderful Design Team cards at The Card Concept as well as the entries at the other challenge sites- gorgeous inspiration from all!

To create this card:

1). Press Twisted Citron Distress Oxide ink onto a silicone craft mat, lightly spritz with water and press a piece of white cardstock into the ink. Smoosh the cardstock around a bit before lifting and re-pressing into the ink as needed.  Dry with a heat tool and repeat the process with Peacock Feathers, Peeled Paint and Lucky Clover Distress Oxide Inks.

2). Once you are satisfied with the background, ink and stamp the Ephemera Background stamp with Versafine® Onyx Black ink and heat set with a heat tool. 

3). Add a few shadows to the background with watercolor pencils (I used Pacific Point (SU!) and 46-Emerald Green (Derwent®).  Apply Nuvo™ Indian Gold Embellishment Mousse to some of the labels to give the appearance of metal, distress the edges with a distressing tool and apply the Indian Gold Mousse to the edges as well.  Use the Timeless Textures small splatter stamp with Versafine® Onyx Black ink (stamp off first) over the background to add additional texture.

4). Mount the background panel onto a piece of Basic Black cardstock.   Add the 1 ¼” Burlap Ribbon along with the strip of black satin and bright green satin ribbon (all from my stash), wrapping the ends behind the panel.  Mount the entire panel onto the white card base.

5). De-static two pieces of white cardstock with an embossing powder tool, ink and stamp the Sunflower with Versafine™ Onyx Black ink onto one panel and the sentiment from Trust God with Versamark™ ink onto the other panel.  Heat emboss the sunflower image with clear embossing powder and the sentiment with gold embossing powder.
6). Once the embossing has cooled, die cut the sentiment with the MFT Stitched Half Dome STAX Dies. Also die cut the same size dome from Basic Black cardstock, mount behind the embossed sentiment die cut and mount onto the card front with dimensional foam (tucking under the black ribbon strip).

7). Watercolor the sunflower with Cracked Pistachio Distress Oxide Ink. Fussy-cut the image and split the sunflower in half.  Tuck under the burlap ribbon and adhere directly to the card front.

8). Finish off the card by adding the Polished Hemp Twine bow along with the black button and a few Pearls in the corners and on the sentiment panel.

Stamp Sets: Sunflower, Ephemera Background, Trust God (all retired Stampin’ Up!),  Timeless Textures (current SU!)

Inks/Mediums:  Versafine™ Onyx Blackm Versamark™, Tim Holtz® Distress Oxide Inks- Twisted Citron, Peacock Feathers, Peeled Paint, Lucky Clover; SU! Pacific Point Watercolor Pencil, Derwent® #46-Emerald Green Watercolor Pencil, Nuvo™ Indian Gold Embellishment Mousse

Cardstock/Paper: Whisper White, Basic Black

Accessories: Big Shot™, MFT Stitched Half Dome STAX Dies, Embossing Buddy®, Clear & Gold Embossing Powder, Heat Tool, 1 ¼” Burlap Ribbon, 1 “ Bright Green Satin Ribbon, 5/8” Black Satin Ribbon, Polished Hemp Twine, retired Basic Black Button, Pearls

Thanks again for stopping by- I hope you will be able to join us for the The Card Concept #88 {Monochromatic Green”  Challenge at The Card Concept!


Friday, October 21, 2016

CAS Mixed Media- French Foliage Leaves

Hi Stampers!!

I am sharing another quick Clean and Simple (CAS) card using a few retired Stampin’ Up! stamp sets that needed some “love”.


Again, if you have not already done so, I hope you will find the time to visit the above challenge sites to check out their fabulous Design Team samples and challenge entries- wonderful inspiration from all!

To create this card:

Ink the retired French Foliage oak leaf with Stāz-On® Jet Black Ink and onto a piece of Whisper White cardstock as well as a sticky note to create a mask.

Mask the oak leaf and repeat the same steps as above with the other two leaf images.

Keeping the mask on all three leaves, stamp the script and postage seal images with Stāz-On® Jet Black Ink.

Watercolor the images using an AquaPainter™ and ink from Stampin’ Write Markers- Cherry Cobble, Crushed Curry, Garden Green and Pumpkin Pie (I scribble the ink onto my craft mat and use a palette but a clear block would work or ink from the ink pads).

Add a few shadows and the splatter from the French Foliage stamp set with Pumice Stone Distress Ink and once the leaves are dry, apply shimmer with a Clear Glitter Pen (hard to see in the photo).

Stamp the sentiment from the retired Trust God stamp set and watercolor with Crushed Curry and Pumpkin Pie- add the splatter stamp image using Pumice Stone Distress Ink.

Die cut the images with MFT Stitched Rectangle and Stitched Circle STAX, mount onto Basic Black cardstock and adhere to the Whisper White background.

Trim the background and mount onto the Basic Black card base to finish off the card.

Stamp Sets: French Foliage, Trust God (retired Stampin’ Up!)

Ink/Mediums: Stāz-On® Jet Black; Stampin’ Write Markers- Crushed Curry, Cherry Cobbler, Garden Green, Pumpkin Pie; Pumice Stone Distress Ink; Clear Glitter Pen

Paper: Whisper White, Basic Black

Accessories: AquaPainter™, Sticky Note Paper, Big Shot™, MFT Stitched Rectangles STAX, MFT Stitched Circle STAX


Thanks again for taking the time to visit- I hope you have a wonderful weekend, my friends!  

Wednesday, May 25, 2016

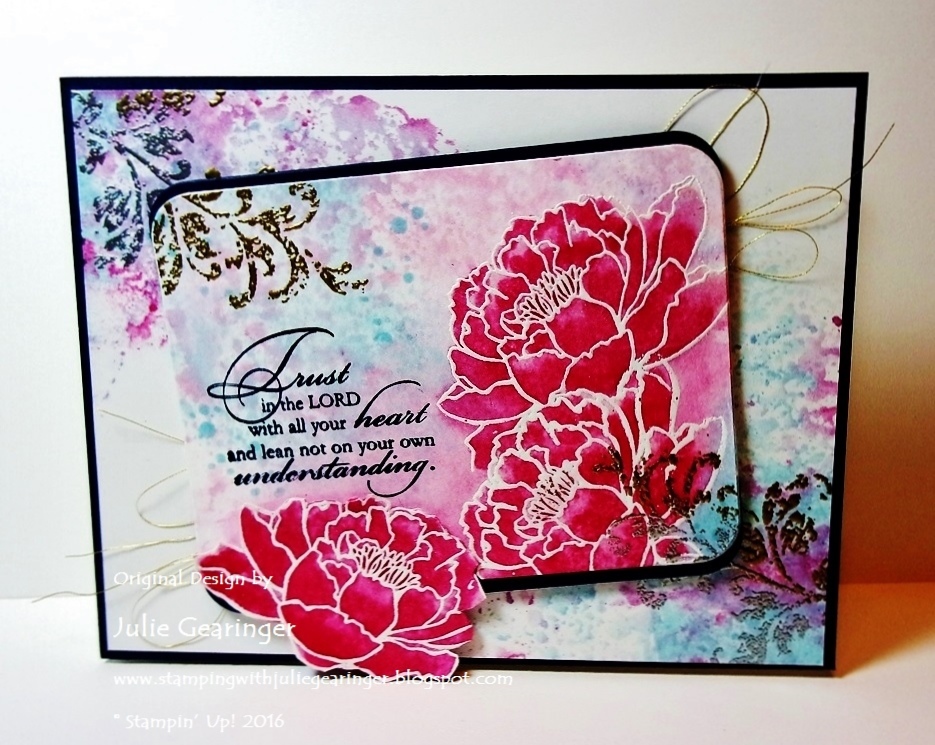
TCC56- Trust In the Lord


Hi Friends!!


Woohoo!  It’s time for the #56 Sweet Tea Challenge at The Card Concept!  Don't you just love this inspiration photo?  

I think that it is gorgeous and can be interpreted in so many ways- the colors, teacup, bloom/flower, silverware, lace, etc.  Remember- there is no right or wrong way when it comes to interpretation and we hope to see your card in our gallery!!

I was inspired by the bloom in the teacup, the soft pastel colors and the metallic silver and gold of the silverware for my Mixed Media card- I think the photo depicts such a beautifully elegant setting and I hope I was able to create that feeling in this card :-)

I gave this card to my sister in law for a belated Mother's Day celebration.  She was able to sneak away for a vacation right after Mother's Day so we celebrated this past weekend- she loves the Lord and has raised three wonderful children (yes, I am biased :-)).  She truly exemplifies a woman who fears the Lord and trusts in Him completely :-)

I am also linking this card to the Splitcoaststampers’ Alphabet “S” Challenge (“S”= Silver Embossing, Smakin’ Acetate and Shimmer – hard to see in the photo but the flowers are very shimmery).

I hope you have a chance to visit us at The Card Concept and check out the rest of our DesignTeam samples as well as the Splitcoaststampers challenge site- wonderful inspiration from all!!

In order to save time, I am not listing a step by step for this card- this Mixed Media card utilizes a few techniques that I use often- heat embossing for the flowers with two tone heat embossing for the flourishes in the corners, Smakin’ Acetate for the splatter, watercoloring for the flowers and shadows, looped gold thread and fussy cutting one bloom to hang off the edge.

All of these techniques are fairly basic and if you have any questions , please feel free to ask me in the comment section :-)

Stamp Sets:  You’ve Got This, Timeless Textures, Trust God

Ink: Versamark™, Classic Ink and Stampin’ Write Markers- Blushing Bride, Melon Mambo, Rose Red, Night of Navy, Pool Party; Clear Wink of Stella®, Gold Stampin’ Up! Marker (retired)

Paper: Whisper White, Night of Navy

FYI- This was my original version and I felt that it needed greater contrast so I added the
darker shadows and gold for the flower centers (once added, you cannot go back- lol!)
Accessories: Big Shot™, Project Life® Label Framelits™, AquaPainter™, Embossing Buddy®, Stampin’ Emboss® White, Silver and Gold Embossing Powder, Heat Tool, Gold Thread, Clear Envelope


Thanks again for taking the time to stop by!  I hope all of you have a fabulous week and join us for our #56 Sweet Tea Challenge at The CardConcept!
Related Posts Plugin for WordPress, Blogger...