Showing posts with label You've Got This. Show all posts

Wednesday, May 29, 2019

TCC116 Sending Hugs


Hi Friends!

Welcome to The Card Concept #116 {Pink Retro} Challenge!  Since I do not own any record dies, I decided to take a different approach with this inspiration. 

The colors and retro vibe remind me of the pink or silver Christmas trees of the 60’s- lol!  I almost created a Christmas card, but instead, decided to create a simple Mixed Media floral card using a stencil with texture paste for the background (to try to mimic the pattern on the glass in the photo).


If you have not had a chance to visit us at The Card Concept or the other challenge sites yet, I hope you will find time to do so- gorgeous inspiration from all!

To create this card:

1). Score and fold a piece of 4.25” x 11” heavy white cardstock in half.  Using a stencil brush with Hickory Smoke Distress Oxide ink, stencil the background (somewhat sporadic).  Once the ink has dried, place the stencil over the same place on the background and use your finger to apply Nuvo™ Platinum Embellishment Mousse over the oxide ink on some of the areas.

2).  De-static a piece of white cardstock with an embossing powder tool, stamp the floral image from the You’ve Got This (Stampin’ Up!) using Versafine™ Onyx Black Ink, apply clear embossing powder and heat set with the heat tool.  Once the embossing has cooled, color the flower with water based and alcohol markers.  Fussy cut the image and attach to the card front using dimensional foam.

3).Stamp the images from the retired Label Maker Love (My Favorite Things™) using Versafine™ Onyx Black Ink, apply clear embossing powder and heat set with the heat tool.  Once the embossing has cooled, fussy-cut the labels and attach to the card front with dimensional foam.

4).  Use a gel pen to add highlights to the flower center, add sparkle to the flower petals with a clear shimmer pen and a few rhinestones to finish off the card.

Stamp Sets:  You’ve Got This (Stampin’ Up!), Label Maker Love (retired My Favorite Things™)

Ink/Mediums: Versafine™ Onyx Black, Tim Holtz® Hickory Smoke Distress Oxide, Stampin’ Write Markers- Blushing Bride, Petal Pink, Smoky Slate, Gray Granite; Stampin’ Blends- Light and Dark Pink Pirouette, White Gel Pen, Spectrum Noir™ Clear Glitter Pen; Nuvo™ Platinum Embellishment Mouse

Cardstock/Paper: Whisper White

Tools/Accessories: Embossing Buddy®, Clear Embossing Powder, Heat Tool, Stampendous ArtPlorations™ Stained Glass Stencil, Claritystamps™ Stencil Brushes, Rhinestones

Thanks again for taking the time to visit!  I hope I have inspired you to create your own card based on our {Pink Retro} photo and link up to our gallery at The Card Concept- we would love to see your interpretation!! The challenge is open until Monday, June 10th at noon (EDT).

Tuesday, September 26, 2017

SUO184 Autumn Kitty

Hi Friends!   

It’s time for the #184 “Shape Up!” Challenge at SU-Only Challenges!  We are challenging you to use your favorite punch(s) and/or dies and I decided to use the Cat Punch from the new Holiday Mini.  As soon as I saw this punch, I knew it would be one of my first purchases from the HM- it is so cute and versatile!

I love to watercolor so I paired the Cat Punch with a background create with Autumn Colors and am linking to the INKSpire_Me #318 “Autumn-Halloween Special” Challenge as well as the Word Art Wednesday #300-#301 “Anything Goes” Challenge.

If you have not had a chance to stop by the SU-Only Challenge site to check out the rest of the Design Team projects or the other challenge sites yet, I encourage you to do so- gorgeous inspiration from all!

To create this card:

1). Ink the You’ve Got This floral blossom with Stampin’ Archival™ Basic Black Archival Ink and stamp onto a piece of Very Vanilla cardstock.  Apply Clear Embossing Powder and heat set with the Heat Tool.  Create a mask of the flower, mask the initial image and repeat the steps above for two additional blossoms .

2). Using ink from the ink pads along with an AquaPainter™, watercolor the blossoms and background.  I used Crushed Curry for the flower centers, Cajun Craze and Rich Razzleberry for the petals and Bermuda Bay for the background. I also used Stampin’ Write markers in the same colors to add additional shadows and depth.

3). Once you are satisfied with the watercolor, trim the panel and add the sentiment from Rose Wonder with Stampin’ Archival™ Basic Black Archival Ink and emboss with clear embossing powder.  Add a bit of splatter with the small splatter image from Timeless Textures with Early Espresso Classic Ink.

4). Trim the panel, mount onto Cajun Craze cardstock, trim again and mount onto Very Vanilla cardstock.  Trim once more and mount onto Cajun Craze cardstock.

5). Stamp the floral scroll stamp from Timeless Textures with Versamark™ ink onto a piece of Bermuda Bay cardstock, trim and mount onto Cajun Craze cardstock and mount onto a white card base.

6). Add the stamped floral panel directly to the card front, use the Clear Wink of Stella™ Glitter Pen to add shimmer to the blossoms and the White Gel Pen to add highlights to the flower centers.

7).   Use the Cat Punch with Basic Black cardstock and cut out three cats, layer together and add to the card front with Stampin’ Dimensionals® to finish off the card.

Stamp Sets: You’ve Got This, Rose Wonder, Timeless Textures

Ink/Mediums: Versamark™, Stampin’ Archival™ Basic Black, Classic Ink- Cajun Craze, Crushed Curry, Early Espresso, Rich Razzleberry, Bermuda Bay; Stampin' Write Markers- Cajun Craze, Crushed Curry, Rich Razzleberry; Clear Wink of Stella™, White Gel Pen
Paper: Very Vanilla, Cajun Craze, Bermuda Bay,  Basic Black, Extra Thick Whisper White
Accessories/Tools: Cat Punch, AquaPainter™, Embossing Buddy®, Clear Embossing Powder, Heat Tool
 Thanks again for taking the time to visit and I hope that you will create your own Stampin’ Up! Only project and play along with our “Shape Up!” challenge!

Friday, September 15, 2017

F4A395 You've Got This- I am Praying for You


Hi Friends!

I hope all of you are having a great week so far!  Today I am sharing a card designed for the Splitcoaststampers F4A395 “An Encouraging  Word Goes a Long Way” Challenge.  I am praying for quite a few people right now and needed to have a few more "Praying for You" cards in my stash.  

I decided to use the Splitcoaststampers CC652 "Eating Berries and Doing Pirouettes in the Lost Lagoon" Color Challenge (including dimension for dessert) as well as my second card using the SC662 Sketch Challenge (I told you I loved this week's sketch in my previous post :-)).


If you have not had a chance to check out the above challenge sites, I hope you will find time to do so- great inspiration from all!

To create this card:

1). Ink the floral images from You’ve Got This (Stampin’ Up!) with archival black ink and stamp onto Whisper White cardstock.  Stamp three of the images and immediately apply clear embossing powder, heat set with a heat tool.

2). Watercolor the flowers using Stampin’ Write Markers- Pink Pirouette, Berry Burst and Lost Lagoon and once the watercolor has dried, fussy-cut the flowers and leaves.

3). Ink the sentiment from Strength & Prayers with archival black ink, apply clear embossing powder and heat set with the heat tool.  Die cut the sentiment with Circle Framelits™.

4). Cut an oval from Whisper White cardstock using an Oval Stitched Die.  Trim a piece of Berry Burst cardstock to 4” x 5 ¼”, die cut an oval in the center (same size die as used for the WW die cut) and emboss the panel with the retired Square Lattice Textured Impressions™ Embossing Folder.  Layer the embossed panel onto a piece of Lost Lagoon cardstock (4 ⅛” x 5 ⅜” ) and adhere to the Extra Thick Whisper White card base.

5). Insert the die cut Whisper White oval into the opening and mount the fussy-cut flowers with dimensional foam. Apply clear shimmer to the flower petals using Clear Wink of Stella® and add white highlights to the flower center with an Extra Fine White Paint Pen.

6). Using a scoring board, score a piece of Lost Lagoon cardstock every ⅛”.  Mount onto the card front (along with the sentiment) using dimensional foam and add a few sequins to finish off the card.

Stamp Sets: You’ve Got This, Strength & Prayers (retired)

Ink/Mediums: Versafine™ Black Onyx; Stampin’ Write Markers- Pink Pirouette, Berry Burst, retired Lost Lagoon; Clear Wink of Stella®, Sharpie® Extra Fine White Paint Pen.

Paper: Whisper White, Berry Burst, retired Lost Lagoon

Accessories: Big Shot™, retired Square Lattice Textured Impressions™ Embossing Folder, Circle Framelits™, MFT Stitched Oval STAX Dies, Sequins (Craft Medley)

Thanks again for taking the time to visit- if you have the time, we hope that you can join in on the fun with our Free For All Challenges!

Tuesday, June 6, 2017

SUO176 Floral Birthday


Hi Friends!   

It’s time for the #176 “Out in the Garden” Challenge at SU! Only Challenges! I used to dream of having beautiful floral gardens but as time progressed and my work hours averaged 60+ a week, those dreams never became a reality-lol!

So when Robin suggested the theme “Out in the Garden” floral images came immediately to my mind, although it could be anything in the garden- bees, butteflies, flowers, garden benches, etc. as long as you only use only Stampin’ Up! products.

I decided to incorporate the CAS(E) This Sketch #224 Challenge (I completely flipped the sketch) along with the TGIF Challenges! #114 Color Challenge and the Paper Players PP347 "Birthday" Challenge into the design.

If you have not had a chance to stop by the SU-Only Challenge site to check out the rest of the Design Team projects or the other challenge galleries yet,  I encourage you to do so- wonderful inspiration from all!

To create this card:

1). Ink the floral image from You’ve Got This with Stampin’ Archival™ Basic Black Ink and stamped onto Whisper White cardstock.  Heat set with the Heat Tool and use the AquaPainter™ to watercolor the image using Peekaboo Peach and Bermuda Bay Classic Ink.  Add additional color with the Stampin’ Write Peekaboo Peach and Bermuda Nay Markers, blending the color as needed.  Use the Basic Black Stampin’ Write Marker to color the center of the flower, fussy-cut the image and use the White Gel Pen to add highlights to the center.

2). Ink the grid stamp from You’ve Got This using Bermuda Bay Classic Ink, apply a sticky note to “mask” off part of the image and stamp onto a piece of Whisper White cardstock.  Stamp the splatter image from Awesomely Artistic using Stampin’ Archival™ Basic Black Ink and use the AquaPainter™ with diluted Stampin’ Archival™ Basic Black Ink.

3). Ink the sentiment from Rose Wonder with Stampin’ Archival™ Basic Black Ink and stamp onto the background panel.

4). Trim the panel, mount onto Basic Black cardstock, trim again and mount onto the Bermuda Bay card front.

 5). Trim the stem and leaves from the floral image, add the leaves behind the flower and mount onto the card front with Stampin’ Dimensionals®.

6). Use the Clear Wink of Stella® Glitter Pen to add shimmer to the petals and add a few Rhinestones to finish off the card.
Stamp Sets: You’ve Got This, Awesomely Artistic. Rose Wonder
Ink/Mediums: Classic Ink- Bermuda Bay, Peekaboo Peach, Stampin’ Archival™ Basic Black; Versamark™; Stampin’ Up! Markers- Bermuda Bay, Peekaboo Peach; Clear Wink of Stella® Glitter Pen, White Gel Pen
Paper: Whisper White, Basic Black, Bermuda Bay
Accessories/Tools: AquaPainter™, Rhinestones
Thanks again for taking the time to stop by and I hope that you will create your own Stampin’ Up! Only project and play along with our “Out in the Garden” challenge!

Tuesday, March 28, 2017

SUO171 Happy Easter


Hi Friends!   

It’s time for the #171 “April Theme” Challenge  at SU-Only Challenges!  April reminds me that spring has arrived and this year, Easter is also in April, so it is my favorite time of year!  

I had fun masking the You’ve Got This floral image and coloring with the Marina Mist marker using the AquaPainter™ and pairing the image with a heat embossed sentiment from Crazy About You for this quick Easter card.  If you have any questions on how to create this card, please let me know.

I love to play along with online challenges so I incorporated the Splitcoaststampers’ CC627 Color Challenge and the As You See It #146 "Spring has Sprung" Challenge (Easter is my favorite part of Spring).  

If you have not had a chance to stop by the SU-Only Challenge site to check out the rest of the Design Team projects or the other challenge sites, I hope you will do so- wonderful inspiration from all!  

Thanks again for taking the time to stop by and I hope that you will create your own Stampin’ Up! Only project and play along with our “April Theme” challenge!

Wednesday, June 8, 2016

You've Got This


Hi Friends!!

I am having a great time stamping this week and this card was designed using the  #tgif58 Color Challenge along with the Mojo Monday #451 Sketch Challenge (flipped the sketch and tilted the panel:-)) , the What Will You Stamp? #67 “You’ve Got This” Challenge and the Simon Says Monday "Summer Garden" Challenge. 

I always seem to have a difficult time capturing red shades when I photograph my cards but this card does look a bit better IRL :-).  Also, you can not see the pretty shimmer on the blossoms from the Clear Wink of Stella®- my camera is a basic point and shoot so I may need to upgrade- lol!!

Again, I hope you will take the time to visit the above listed challenge sites- fabulous inspiration from all!


To create this card:

Ink the floral image from "You’ve Got This" with Stāz-On® Jet Black Ink and stamp onto a piece of sticky note paper (repeat three times).  Fussy-cut out the images and set aside to be used as masks.

Ink the floral image again with Stāz-On® Jet Black Ink and stamp onto a piece of Whisper White cardstock, mask the image and re-ink the stamp, stamping two additional flowers onto the panel.

Remove the masks and color the entire flower with an AquaPainter™ using Daffodil Delight Classic Ink (being careful not to use too much water).

With the AquaPainter™ apply Pumpkin Pie Classic Ink onto the petals and follow with Melon Mambo, blending the ink slightly.

Dry the panel with the Heat Tool and use the Stampin’ Write Pumpkin Pie and Melon Mambo Markers to add additional color, blending with the AquaPainter™ and apply Clear Wink of Stella® to the blossoms.

Add highlights to the flower centers with the White Gel Pen.

Once you are satisfied with the color on the petals, mask the flowers, ink the background stamp from “You’ve Got This” using Melon Mambo ink and stamp over the remaining part of the background.

Add shadows with the Basic Black Stampin’ Write Marker, blending into the Melon Mambo background with the AquaPainter™.

After you have finished the background, use the AquaPainter™ to pick up excess water off your craft mat and tap onto the stamped background and flowers (to create the water drops).

Trim the stamped panel and mount onto a piece of Basic Black cardstock, trim and mount onto a piece of Pumpkin Pie cardstock, trim once more and mount onto a piece of Basic Black cardstock.

Use the Big Shot™ with the Woodgrain Textured Impressions™ to emboss a piece of Whisper White cardstock, trim and mount onto a piece of Pumpkin Pie cardstock, trim and mount onto the Basic Black card base.

Use the Big Shot™ with the Oval Framelits™ to cut an oval from Pumpkin Pie cardstock (also cutting an oval with the same size die from Basic Black cardstock), ink the background image with Pumpkin Pie Classic Ink, stamp onto the Pumpkin Pie die cut and cut both ovals in half layering the black oval behind the Pumpkin Pie layer.

Adhere the panel to the card front and mount the half oval Pumpkin Pie layer to the top of the card front per the sketch.

Stamp the sentiment from "You’ve Got This" with Stāz-On® Jet Black Ink onto Whisper White cardstock, use the Big Shot™ with the Circle Framelits™ to cut out the sentiment and mount onto a Basic Black circle cut from the same size framelit™.

Add the sentiment along with the Gold Cord and Pearls to the card front to finish off the card.

Stamp Sets: You’ve Got This (Stampin’ Up!)

Ink: Stāz-On® Jet Black Ink, Daffodil Delight, Pumpkin Pie, Melon Mambo; Stampin’ Write Markers- Pumpkin Pie, Melon Mambo; White Gel Pen, Clear Wink of Stella®

Paper: Whisper White, Basic Black, Pumpkin Pie

Accessories: Big Shot™, Circle and Oval Framelits™, Woodgrain Textured Impressions™ Embossing Folder, Gold Cord, Pearls


Thanks again for taking the time to visit- you are all such an encouragement to me!  Hugs and have a great week, my friends! 

Wednesday, May 25, 2016

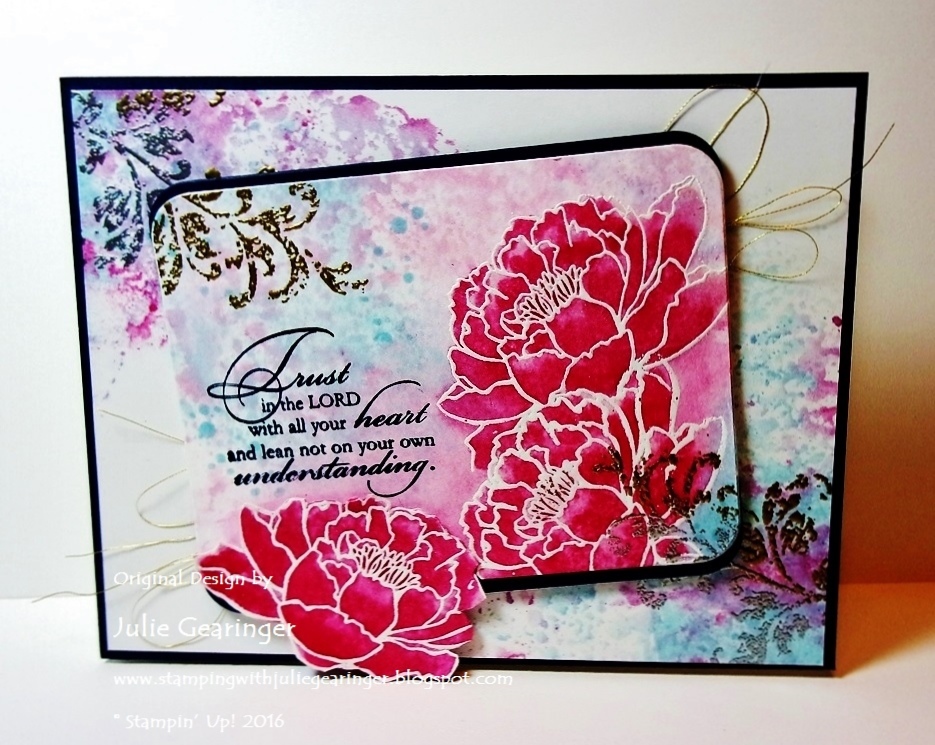
TCC56- Trust In the Lord


Hi Friends!!


Woohoo!  It’s time for the #56 Sweet Tea Challenge at The Card Concept!  Don't you just love this inspiration photo?  

I think that it is gorgeous and can be interpreted in so many ways- the colors, teacup, bloom/flower, silverware, lace, etc.  Remember- there is no right or wrong way when it comes to interpretation and we hope to see your card in our gallery!!

I was inspired by the bloom in the teacup, the soft pastel colors and the metallic silver and gold of the silverware for my Mixed Media card- I think the photo depicts such a beautifully elegant setting and I hope I was able to create that feeling in this card :-)

I gave this card to my sister in law for a belated Mother's Day celebration.  She was able to sneak away for a vacation right after Mother's Day so we celebrated this past weekend- she loves the Lord and has raised three wonderful children (yes, I am biased :-)).  She truly exemplifies a woman who fears the Lord and trusts in Him completely :-)

I am also linking this card to the Splitcoaststampers’ Alphabet “S” Challenge (“S”= Silver Embossing, Smakin’ Acetate and Shimmer – hard to see in the photo but the flowers are very shimmery).

I hope you have a chance to visit us at The Card Concept and check out the rest of our DesignTeam samples as well as the Splitcoaststampers challenge site- wonderful inspiration from all!!

In order to save time, I am not listing a step by step for this card- this Mixed Media card utilizes a few techniques that I use often- heat embossing for the flowers with two tone heat embossing for the flourishes in the corners, Smakin’ Acetate for the splatter, watercoloring for the flowers and shadows, looped gold thread and fussy cutting one bloom to hang off the edge.

All of these techniques are fairly basic and if you have any questions , please feel free to ask me in the comment section :-)

Stamp Sets:  You’ve Got This, Timeless Textures, Trust God

Ink: Versamark™, Classic Ink and Stampin’ Write Markers- Blushing Bride, Melon Mambo, Rose Red, Night of Navy, Pool Party; Clear Wink of Stella®, Gold Stampin’ Up! Marker (retired)

Paper: Whisper White, Night of Navy

FYI- This was my original version and I felt that it needed greater contrast so I added the
darker shadows and gold for the flower centers (once added, you cannot go back- lol!)
Accessories: Big Shot™, Project Life® Label Framelits™, AquaPainter™, Embossing Buddy®, Stampin’ Emboss® White, Silver and Gold Embossing Powder, Heat Tool, Gold Thread, Clear Envelope


Thanks again for taking the time to stop by!  I hope all of you have a fabulous week and join us for our #56 Sweet Tea Challenge at The CardConcept!

Tuesday, May 17, 2016

Monochromatic Floral One Layer Card


Hi Friends!

I hope you are having a great week so far!  I had a chance to spend some time in my stamping studio today and decided to create another One Layer Floral card using the Create with Connie and Mary CCMC406 Color Challenge along with Splitcoaststampers’ Alphabet“N” Challenge (I chose neutrals for my “N”).

I know, why would you create flowers with brown and grays?  Not sure, but when I saw this color combination, this card came to my mind- lol!!

If you have not had a chance to visit the above challenge galleries yet, I encourage you to do so- it always amazes me how many different cards can be designed with one color, sketch or theme challenge!

To create this card:

Use a bone folder to score and fold a 4 ¼” x 11” piece of Extra Thick Whisper White cardstock.

Create a diagonal mask from a piece of scrap paper and tape down to a craft mat using washi tape (or any tape that will lift easily from your paper :-)).

Ink the large flower image from You’ve Got This with Stāz-On® Jet Black Ink and stamp onto the card base. 

Stamp an additional flower onto a piece of sticky note paper, fussy cut the image to create a mask and repeatedly re-ink the floral image and stamp along the diagonal line as well as in the corner.

Color the blossoms with the Stampin’ Write Crumb Cake marker, add additional shadows with the Smoky Slate marker and use the AquaPainter™ to blend the colors.

Add more shadows with the Basic Gray marker (I also used the re-inker with the AquaPainter™) until you are satisfied with the colors.

Using the Smakin’ Acetate technique, scribble some color from the Crumb Cake and Smoky Slate markers into the center of a clear envelope (cut open like a book), spritz the ink and close the envelope, use your fingers to “smoosh/smack” the colors together, re-open the envelope and lay the card front into the ink.
Close-Up to try to show the sparkle :-)

Ink the Timeless Textures border stamp with Crumb Cake Classic Ink and stamp around the border.

Add additional distressing with the splatter stamp from Timeless Textures and Smoky Slate Classic Ink.

Ink the sentiment from Rose Wonder with the Basic Gray Stampin’ Archival Pad™and stamp onto the card front.

Use a ruler with the Basic Black Stampin’ Marker to add the line on the diagonal and apply Clear Wink of Stella® to the flowers to finish off the card.

Stamp Sets: You’ve Got This, Rose Wonder, Timeless Textures

Ink: Stāz-On® Jet Black Ink, Basic Gray Stampin’ Archival Ink, Crumb Cake; Stampin’ Write Marker- Crumb Cake, Basic Gray, Smoky Slate, Basic Black; Clear Wink of Stella®

Paper: Extra Thick Whisper White

Accessories: AquaPainter™, Ruler, Paper for masking


Thanks again for stopping by!!  I hope you have a fabulous week, my friends!
Related Posts Plugin for WordPress, Blogger...