Showing posts with label Cat Punch. Show all posts

Wednesday, November 2, 2022

TCC183 Give Thanks Pumpkin Kitty


Hi Friends!

Welcome to the #183 Pumpkin Party Challenge at The Card Concept

I thought that this fun photo had so much inspiration- I love the patterns on the pumpkins as well as the colors and decided to pull out several older stamp sets in my stash to create a Mixed Media card (and, of course, it had to have a black kitty, lol!).

Those of you who follow my blog know that I have a goal to use some of my older stamps and I was able to pull out four older stamp sets to create this card, woohoo!

I also enjoy playing along with other online challenges and will be linking this card to the Tic-Tac-Toe #185 Featured Designer Claire’s Challenge (bottom row across- Die Cuts, Orange, and Enamel Dots- I did not have any enamel dots so I used black rhinestones) along with  the Word Art Wednesday #567-#568 Anything Goes Challenge.


If you have not had a chance to visit our Design Team/gallery at The Card Concept Challenge, or the other challenge sites yet,  I hope you will find time to do so- wonderful inspiration from all!

To create this card:

De-static a piece of black cardstock with an embossing powder tool, ink the Chalkboard Vine background stamp with Versamark ink, stamp onto the prepared panel (omitting stamping some areas), apply white embossing powder and heat set with a heat tool.


Trim the panel to approx. 3 ⅞” x 5”, mount onto a piece of white cardstock, trim to approx. 4 ⅛” x 5 ⅛” and mount onto a 4 ¼” x 5 ½” piece of black cardstock.

Adhere the entire panel onto a white card base.

Die cut the tag from white and black cardstock using the medium tag from the Tim Holtz Tag Collection dies.

Ink the medallion image from the Paisley Bouquet stamp set (Joy Clair Stamps) using Hickory Smoke Distress Oxide ink and stamp onto the white tag die cut.

Heat set the ink with a heat tool, de-static the upper area with an embossing powder tool, ink the sentiment from Autumn Blessings (Verve Stamps) with Versafine Onyx Black ink, stamp onto the tag, apply clear embossing powder and heat set with a heat tool.

Use an orange colored pencil to lightly add orange to the paisley image on the tag, layer the tag onto the black tag and mount onto the card front with dimensional foam.

Stamp the pumpkin from Autumn Harvest (Concord & 9th) with Versafine ink onto white cardstock, apply clear embossing powder and heat set with a heat tool.


Once the embossing has cooled, watercolor the pumpkin with water-based markers and add texture with an orange-colored pencil.

Die cut the pumpkin with the coordinating masking die and mount onto the lower part of the tag (using dimensional foam on the left-hand side where the pumpkin hangs off the tag).

Use a clear glitter pen to add shimmer to the pumpkin.

Using the cat punch (Stampin’ Up!), punch out three cats from black cardstock and glue all three together.

De-static the top of the layered cat with an embossing powder tool, ink the paisley bouquet image with Versamark ink, stamp onto the cat, apply clear embossing powder and heat set with a heat tool (the embossing is hard to see in the photo).

Adhere the cat onto the tag.

Add the black and white checked bow and black rhinestones (my substitute for enamel dots) to finish off the card.

Stamp Sets: Chalkboard Vine Background (Divinity Designs LLC), Autumn Harvest (Concord & 9th), Autumn Blessings (Verve Stamps), Paisely Bouquet (Joy Clair Stamps)

Ink/Mediums: Versamark, Versafine Black Onyx, Stampin’ Write Markers- Pumpkin Pie, Tangerine Tango, Old Olive, Soft Suede; Spectrum Noir Clear Glitter Pen

Cardstock/Paper: White, Black

Accessories/Tools: Gemini, Jr., Sizzix by Tim Holtz- Tag Collection, Embossing Powder Tool, Clear and White Embossing Powder, Heat Tool, Black Rhinestones, ⅝” Black and White Checked Ribbon

I hope you have a chance to create a card and join us for our #183 Pumpkin Party at The Card Concept

Thanks again for taking the time to visit- have a blessed week, sweet friends! 

Wednesday, March 2, 2022

TCC170 Set of Two Kitty Cards


Hi Friends!

It’s time for the #170 {Wearing O’ The Green} Challenge at The Card Concept!

What a fun inspiration photo!  There are so many elements to choose for your card inspiration- items on the pillow (tree, shamrocks or hat, bicycle), the flowers in the background, the white walls, colors or possibly something else?

I was inspired by the colors to create two cards using the same cat punch (I had these "kitties" already punched out and ready to go in my stash) and also used a few other retired items- I love being able to use "stuff" I already have on hand!

I also enjoy playing along with other online challenges as well and am linking my first card to the Try It On Tuesday “Add Some Texture” Challenge, the Sisterhood of Crafters “Favorite Pet” Challenge (Guess what- I love cats! :-)) and the Colorful Options March 2022 "Gorgeous Green" Challenge (this is a ew challenge site for me, thanks Makira for letting me know about this one :-))

To create the first card:


De-static the lower left hand area of a piece of green designer paper, stamp the verse sentiment from Scripture Medley 2 (retired Verve Stamps) with Ground Espresso Distress Oxide ink, apply clear embossing powder, heat set with a heat tool.

Once the embossing has cooled, distress the edges and also distress the edges of a piece of daffodil designer paper (both designer paper pieces were approx. 4” x 2 ¾”).

Mount both pieces onto a piece of espresso cardstock, trim close to the edge.

Add a piece of espresso cardstock over the cut edges of the two pieces of designer paper and mount the panel onto a white card base.

Die cut a doily using the retired Darling Doily Die (Stampin’ Up!).

Emboss the doily die cut with the Wire Fence (Darice) Embossing Folder.

Die cut the quilt from espresso, daffodil and garden green designer paper using the retired SU! Quilt Collection Dies.

Paper piece the quilt onto a scrap piece of white cardstock, trim close to the edge of the quilt (so the white base does not show)- emboss the quilt with the Wire Fence embossing folder.

Mount the doily onto the card front and add the quilt using dimensional foam (or chipboard).

Use the Cat Punch (SU!) to punch out three kitties from espresso cardstock, layer all three together to create a thicker “kitty”.

Mount the kitty onto the card front with dimensional foam or chipboard.

Add a large pearl to the middle of the quilt to finish off the card.

Stamp Sets:  Scripture Medley 2 (retired Verve Stamps)

Ink/Mediums: Tim Holtz™ Ground Espresso Distress Oxide

Cardstock/Paper:  White, Early Espresso; Daffodil Delight, Early Espresso, Garden Green Designer Paper (retired Stampin’ Up!)

Accessories/Tools:  Big Shot™, retired Stampin’ Up!- Darling Doily Thinlit™ and Quilt Builder Framelit™ Dies, Wire Fence Embossing Folder (Darice), Embossing Powder Tool, Clear Embossing Powder, Heat Tool, Cat Punch (Stampin’ Up!), Pearl

---------------------------------------------------------------------------------------------------------------------------

I am linking my second card to the Tic-Tac-Toe #150 Featured Designer Vicky Challenge (bottom row across Bold Sentiment, Ribbon Twine and Stencil), the Simon Monday “Use At Least One Stencil” Challenge and the My Time to Craft #476 “Embossing Theme- Wet or Dry” Challenge (I used both types of embossing).

To create the second card:

Using the Debra Stencil (Simon Says Stamp) along with stencil brushes, apply Distress Oxide Ink- first Fossilized Amber, followed by Twisted Citron, Crushed Olive, Early Espresso and Mowed Lawn.

Once the stenciling has been completed, de-static with an embossing powder tool.


Ink the Bless the Lord stamp (Typografia in Faith by STAMPlorations™ ) with Ground Espresso Distress Oxide ink, stamp onto the prepared stenciled panel, apply clear embossing powder and heat set with a heat tool.

Die cut the sentiment panel with the outside oval from the Spellbinders Amazing Paper Grace- Hemstitch Oval Dies (die cut another oval from white cardstock, layer the sentiment over the blank oval to thicken the layer).

Emboss a piece of white cardstock with the Wire Fence embossing folder, trim and mount onto a piece of espresso cardstock.

Add the white crochet lace to the card panel, adhere the green grosgrain ribbon and wrap the edges behind the panel.

Mount the panel onto a white card base and add the sentiment oval with dimensional foam (or, I prefer, chipboard).

Cut three “kitties” using the SU! Cat Punch, layer to create a thicker “kitty” and adhere onto the card front with dimensional foam.

Use a clear glitter marker to add shimmer to the oval sentiment and finish off the card with a few pearls.

Stamp Sets: Bless the Lord (Typografia in Faith by STAMPlorations™)

Ink/Mediums: Tim Holtz™ Distress Oxide- Crushed Olive, Fossilized Amber, Ground Espresso, Mowed Lawn, Twisted Citron; Wink of Stella Clear Glitter Marker

Cardstock/Paper: Whisper White, Early Espresso

Accessories/Tools: Big Shot™, Wire Fence Embossing Folder (Darice), Spellbinders Amazing Paper Grace Hemstitch Oval Dies, Stencil Brushes, Debra Stencil (Simon Says Stamp), Embossing Powder Tool, Clear Embossing Powder, Heat Tool, Green Grosgrain Ribbon, Cat Punch (Stampin’ Up!), Pearls

Thanks again for taking the time to visit- I hope you have a chance to check out the rest of The Card Concept Design Team cards and, if you have time, create a card based on our inspiration photo and join us!

Sunday, November 5, 2017

So Very Blessed


Hi Friends!


This evening I am sharing a card that was designed using the 10/26/17 FUSION “Autumn Leaves” Challenge (sketch portion) along with the Just Add Ink #384 Inspiration Challenge (I was inspired by the blues, yellow and white), the Tic-Tac-Toe #022 Challenge (top row across- Vibrant, Thank You, Layers) and the International Art & Soul #20 “Add a Charm or Tag” Challenge.

I pulled out Painted Harvest and Timeless Textures stamp sets to create my own “designer” paper for the tag element of the sketch and for the background panel, used a piece of embossed paper from my stash (left over from a previous project/experiment).  I have had this inked/embossed diamond patterned background in my stash for years and thought it would be purr-fect for this card :-)

If you have not had a chance to check out the challenge sites yet, I encourage you to do so- gorgeous galleries and ideas from all!

To create this card:

1). Use the Big Shot™ with the Sizzix™ Backgrounds 1 Texturz™ Plate, ink the plate with Night of Navy Classic Ink and emboss a piece of Tempting Turquoise cardstock.  Trim the panel and mount onto a piece of Crushed Curry cardstock, trim and mount onto a piece of Night of Navy cardstock.  Adhere the entire card front onto the white card base.

2). To create the “designer paper” for the tag-  a). Ink the solid image of the sunflower from the Painted Harvest stamp set with Daffodil Delight Classic Ink, stamp onto a piece of Whisper White cardstock, re-ink and rotate the stamp, stamp again over the first image.  Repeat this process for a total of five sunflowers on the panel.  b). Ink the detailed petal image of the sunflower with Crushed Curry Classic Ink, stamp over the bold images, rotate, re-ink with Crushed Curry ink and stamp again.  Continue until all five sunflowers are completed.  c). Repeat the same process with the detailed petal image of the sunflower using Soft Suede ink.  d). Ink the center of the sunflower with Pacific Point Classic Ink, stamp onto the centers.  Repeat the same process with the center of the sunflower using Night of Navy Classic Ink. e). Once you have completed the sunflowers, create a mask for the sunflowers using sticky note paper and the bold image stamp.  Mask the sunflowers and ink the solid stem image with Tempting Turquoise Classic Ink, stamp a few stems (masking each flower as you stamp) and repeat the process with the detailed leaf image using Night of Navy Classic Ink. f). Use an AquaPainter™ with ink from the Tempting Turquoise Classic Ink Pad and watercolor around the flowers being careful not to watercolor over the petals).  g). Once the watercolor has cooled, add a bit of texture with the small splatter stamp from Timeless Textures using Night of Navy Classic Ink.

3), Die cut the sunflower designed paper from the step above using a Big Shot™ with the MFT™ Pierced Traditional Tag STAX Dies.  Mount onto Night of Navy cardstock and trim close to the edge of the tag.  Add the ½ White Tea Lace Doily to the one side of the tag and mount onto the card front with dimensional foam.

4). Ink the sentiment from So Blessed (Technique Tuesday) with Night of Navy Classic Ink, stamp onto a scrap piece of Whisper White cardstock, trim and mount onto a piece of Night of Navy cardstock, trim close to the edge.

5). Add the sentiment to the card front (per the sketch) with dimensional foam.

6). Add the hemp twine bow with the Tempting Turquoise button to the corner of the tag.

7). Cut three cats (one from Night of Navy and two from Whisper White cardstock) using the Cat Punch, layer with the Night of Navy cat on top and mount to the card front.  Add the twine bow and rhinestone for the collar.

8). Add a few Rhinestones to the card front to finish off the card.

Stamp Sets: Painted Harvest, Timeless Textures (both Stampin’ Up!); So Blessed (Technique Tuesday®)

Ink/Mediums: Crushed Curry, Daffodil Delight, Pacific Point, Tempting Turquoise, Soft Suede

Paper: Whisper White, Crushed Curry, Night of Navy

Accessories/Tools: Big Shot™, My Favorite Things™ Traditional Pierced Tag STAX Dies, Sizzix™ Backgrounds 1 Texturz™ Plate, Cat Punch, White Tea Lace Doily, Polished Hemp Twine, Turquoise Button, Rhinestones


Thanks again for taking the time to stop by- hugs and I hope you have a wonderful week!

Tuesday, October 24, 2017

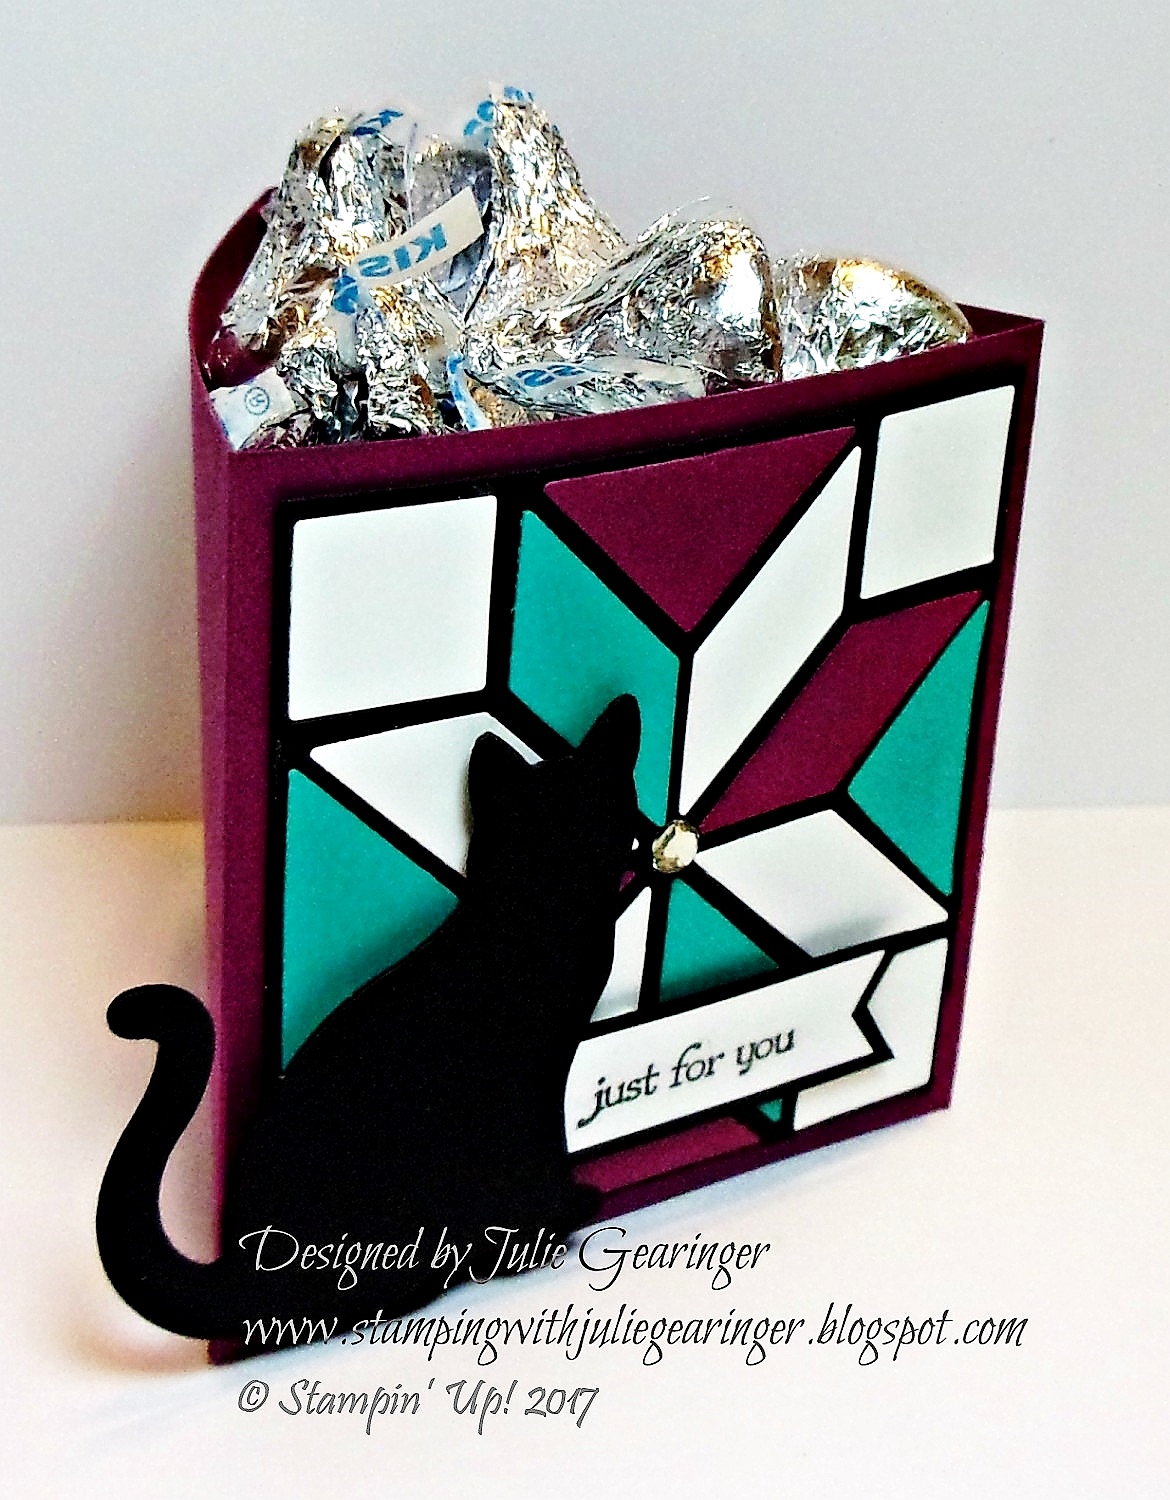
SUO186 Triangular Treat Box- Just for You


Hi Friends!   


Since I do not own any current Stampin’ Up! sets that feature coffee, cupcakes, candy, tea or other "sweet treats" , I decided to create a Triangular Treat Box using this tutorial from Splitcoaststampers (see written tutorial here and tutorial video here). 

I wanted to incorporate two of my favorite items from the Holiday Mini Catalog- the Cat Punch and the Quilt Builder Framelits™ Dies.  I had die-cut the "quilts" from pieces of background paper that I used in other cards (fyi- I tend to die cut shapes from cardstock layers that are “hidden” by other layers to reduce the postage costs as well as re-purposing cardstock that would otherwise be wasted:-)).

I am also linking to the Just Us Girls #416 Color Week Challenge (Bermuda Bay is a shade of green, right?) and the International Art & Soul #19 “Not Square or Rectangles” Challenge. 

If you have not had a chance to stop by the SU-Only Challenge site to check out the rest of the Design Team’s samples or the other challenge sites yet, I encourage you to do so- fabulous wonderful inspiration from all!

To create this project:

1). Using the Big Shot™ with the Quilt Builder Framelits™ and die cut four separate  quilt images – one each from Whisper White, Basic Black, Rich  Razzleberry and Bermuda Bay cardstock (I use a piece of Glad®  Press ‘n Seal® (PNS) to hold all of the quilt die pieces together).  Arrange the pieces onto the Basic Black backing square, just peel off each piece of the PNS and adhere to the quilt (I used the Two Way Glue Pen).

2). Using the tutorial linked above for the Triangular Treat Box, score a piece of 3” x 11” Rich Razzleberry cardstock at the 3”, 6” and 9” mark.  Continue with the tutorial to create the bottom from a scrap piece of Rich Razzleberry cardstock and assemble the box.

3). Use the Cat Punch to punch out three cats from Basic Black cardstock, layer the three together to create the cat embellishment.

4). Trim the quilt (my frame around the quilt was a bit “off” so I trimmed it to even up the sides- if you are able to die-cut it perfect, then you may not need to trim- lol!).  Add the assembled quilt to the front of the box.


5). Stamp the sentiment from Teeny Tiny Wishes using Stampin’ Archival™ Basic Black Ink onto a scrap piece of Whisper White cardstock, trim and create the banner by hand (I used the retired Hexagon Punch).  Mount onto a piece of Basic Black cardstock and trim around the edges.  Add to the back of the Cat Punch image and mount onto the front of the box with Stampin’ Dimensionals®.

6). Add a Rhinestone to the center of the quilt to finish off the box.  Fill with “Sweet Treats” and enjoy!  A quick and easy treat box for any occasion!

Stamp Sets: Teeny Tiny Wishes

Ink/Mediums: Stampin’ Archival™ Basic Black
Paper: Whisper White, Basic Black, Bermuda Bay, Rich Razzleberry
Accessories/Tools: Big Shot™, Quilt Builder Thinlits™ Dies, Rhinestones, retired Hexagon Punch, Glad®  Press ‘n Seal®

Thanks again for taking the time to stop by and I hope that you will create your own Stampin’ Up! Only project and join us for our “Treats of All Kinds”  challenge!

Tuesday, September 26, 2017

SUO184 Autumn Kitty

Hi Friends!   

It’s time for the #184 “Shape Up!” Challenge at SU-Only Challenges!  We are challenging you to use your favorite punch(s) and/or dies and I decided to use the Cat Punch from the new Holiday Mini.  As soon as I saw this punch, I knew it would be one of my first purchases from the HM- it is so cute and versatile!

I love to watercolor so I paired the Cat Punch with a background create with Autumn Colors and am linking to the INKSpire_Me #318 “Autumn-Halloween Special” Challenge as well as the Word Art Wednesday #300-#301 “Anything Goes” Challenge.

If you have not had a chance to stop by the SU-Only Challenge site to check out the rest of the Design Team projects or the other challenge sites yet, I encourage you to do so- gorgeous inspiration from all!

To create this card:

1). Ink the You’ve Got This floral blossom with Stampin’ Archival™ Basic Black Archival Ink and stamp onto a piece of Very Vanilla cardstock.  Apply Clear Embossing Powder and heat set with the Heat Tool.  Create a mask of the flower, mask the initial image and repeat the steps above for two additional blossoms .

2). Using ink from the ink pads along with an AquaPainter™, watercolor the blossoms and background.  I used Crushed Curry for the flower centers, Cajun Craze and Rich Razzleberry for the petals and Bermuda Bay for the background. I also used Stampin’ Write markers in the same colors to add additional shadows and depth.

3). Once you are satisfied with the watercolor, trim the panel and add the sentiment from Rose Wonder with Stampin’ Archival™ Basic Black Archival Ink and emboss with clear embossing powder.  Add a bit of splatter with the small splatter image from Timeless Textures with Early Espresso Classic Ink.

4). Trim the panel, mount onto Cajun Craze cardstock, trim again and mount onto Very Vanilla cardstock.  Trim once more and mount onto Cajun Craze cardstock.

5). Stamp the floral scroll stamp from Timeless Textures with Versamark™ ink onto a piece of Bermuda Bay cardstock, trim and mount onto Cajun Craze cardstock and mount onto a white card base.

6). Add the stamped floral panel directly to the card front, use the Clear Wink of Stella™ Glitter Pen to add shimmer to the blossoms and the White Gel Pen to add highlights to the flower centers.

7).   Use the Cat Punch with Basic Black cardstock and cut out three cats, layer together and add to the card front with Stampin’ Dimensionals® to finish off the card.

Stamp Sets: You’ve Got This, Rose Wonder, Timeless Textures

Ink/Mediums: Versamark™, Stampin’ Archival™ Basic Black, Classic Ink- Cajun Craze, Crushed Curry, Early Espresso, Rich Razzleberry, Bermuda Bay; Stampin' Write Markers- Cajun Craze, Crushed Curry, Rich Razzleberry; Clear Wink of Stella™, White Gel Pen
Paper: Very Vanilla, Cajun Craze, Bermuda Bay,  Basic Black, Extra Thick Whisper White
Accessories/Tools: Cat Punch, AquaPainter™, Embossing Buddy®, Clear Embossing Powder, Heat Tool
 Thanks again for taking the time to visit and I hope that you will create your own Stampin’ Up! Only project and play along with our “Shape Up!” challenge!

Wednesday, September 20, 2017

TCC78 Hello Baby


Hi Friends!!


I just love all of the fun pastel colors, the sweet stuffed animals and the cat figurine and plate in this sweet inspiration photo that Lesley found for us! I decided to use the new Stampin’ Up! Cat Punch and Quilt Builder Framelit™ Dies to create my Freestyle Collage/Shabby Chic card.

I also incorporated the As You See It #158 "Doily Dreams" Sketch Challenge and the Joy of Sets #006 -“Letter T” Challenge into the design (I used Teeny Tiny Wishes).

If you have not had a chance to do so, I hope you will find the time to check out the rest of the wonderful Design Team cards at The Card Concept as well as the entries at the other challenge sites- fabulous inspiration from all!

To create this card:

1). Trim a piece of Whisper White cardstock, mount onto a piece of Pool Party cardstock, trim again and mount onto a piece of Pink Pirouette cardstock. Mount the entire panel to the Extra Thick Whisper White card base.

2). Die cut a piece of Pool Party cardstock with a stitched rectangle die and mount onto the card front.

3). Create the quilt block using the new Quilt Builder Framelits™- I used retired Stampin’ Up! designer papers- Crushed Curry (from an old hostess pack), Pool Party and Pink Pirouette along with Whisper White cardstock.  I cut four of the quilt dies and pieced all four onto squares of coordinating cardstock (for this card I used Whisper White as the frame and base).  Add a white tea lace doily behind the quilt and adhere the strip of retired Pool Party ¼” stitched satin ribbon with the pink button embellishment.  Mount the entire quilt assembly onto the card front with dimensional foam.

4). Use the Cat Punch to punch out three cats- one from Pink Pirouette cardstock and two from Whisper White cardstock.  Layer the pieces together and mount onto the card front with dimensional foam.

5). Ink the “Hello Babby” sentiment from Teeny Tiny Wishes with archival black ink, stamp onto a piece of Whisper White cardstock and create the fishtail banner with the retired Hexagon Punch (or by hand).  Mount the sentiment onto piece of Pink Pirouette cardstock (allowing just the end to peek out), tuck the end under the Cat Punch and adhere to the card front with dimensional foam.

Stamp Sets:  Teeny Tiny Wishes

Ink/Mediums: Versafine™ Onyx Black Ink

Cardstock/Paper: Whisper White, Extra Thick Whisper White, Pool Party, Pink Pirouette; retired DSP- Crushed Curry, Pool Party, Pink Pirouette

Accessories: Big Shot™, Quilt Builder Framelits™ , Cat Punch, MFT Stitched Rectangle STAX Dies, White Tea Lace Doily, ¼” Pool Party Stitched Satin Ribbon, Pink Pirouette button, Hemp Twine

Thanks again for taking the time to stop by!  I hope I have inspired you today and that you will be able to join us for the #78“Pastel Party” Challenge at The Card Concept! 

Related Posts Plugin for WordPress, Blogger...