Showing posts with label Quilt Builder Framelits. Show all posts

Tuesday, October 24, 2017

SUO186 Triangular Treat Box- Just for You


Hi Friends!   


Since I do not own any current Stampin’ Up! sets that feature coffee, cupcakes, candy, tea or other "sweet treats" , I decided to create a Triangular Treat Box using this tutorial from Splitcoaststampers (see written tutorial here and tutorial video here). 

I wanted to incorporate two of my favorite items from the Holiday Mini Catalog- the Cat Punch and the Quilt Builder Framelits™ Dies.  I had die-cut the "quilts" from pieces of background paper that I used in other cards (fyi- I tend to die cut shapes from cardstock layers that are “hidden” by other layers to reduce the postage costs as well as re-purposing cardstock that would otherwise be wasted:-)).

I am also linking to the Just Us Girls #416 Color Week Challenge (Bermuda Bay is a shade of green, right?) and the International Art & Soul #19 “Not Square or Rectangles” Challenge. 

If you have not had a chance to stop by the SU-Only Challenge site to check out the rest of the Design Team’s samples or the other challenge sites yet, I encourage you to do so- fabulous wonderful inspiration from all!

To create this project:

1). Using the Big Shot™ with the Quilt Builder Framelits™ and die cut four separate  quilt images – one each from Whisper White, Basic Black, Rich  Razzleberry and Bermuda Bay cardstock (I use a piece of Glad®  Press ‘n Seal® (PNS) to hold all of the quilt die pieces together).  Arrange the pieces onto the Basic Black backing square, just peel off each piece of the PNS and adhere to the quilt (I used the Two Way Glue Pen).

2). Using the tutorial linked above for the Triangular Treat Box, score a piece of 3” x 11” Rich Razzleberry cardstock at the 3”, 6” and 9” mark.  Continue with the tutorial to create the bottom from a scrap piece of Rich Razzleberry cardstock and assemble the box.

3). Use the Cat Punch to punch out three cats from Basic Black cardstock, layer the three together to create the cat embellishment.

4). Trim the quilt (my frame around the quilt was a bit “off” so I trimmed it to even up the sides- if you are able to die-cut it perfect, then you may not need to trim- lol!).  Add the assembled quilt to the front of the box.
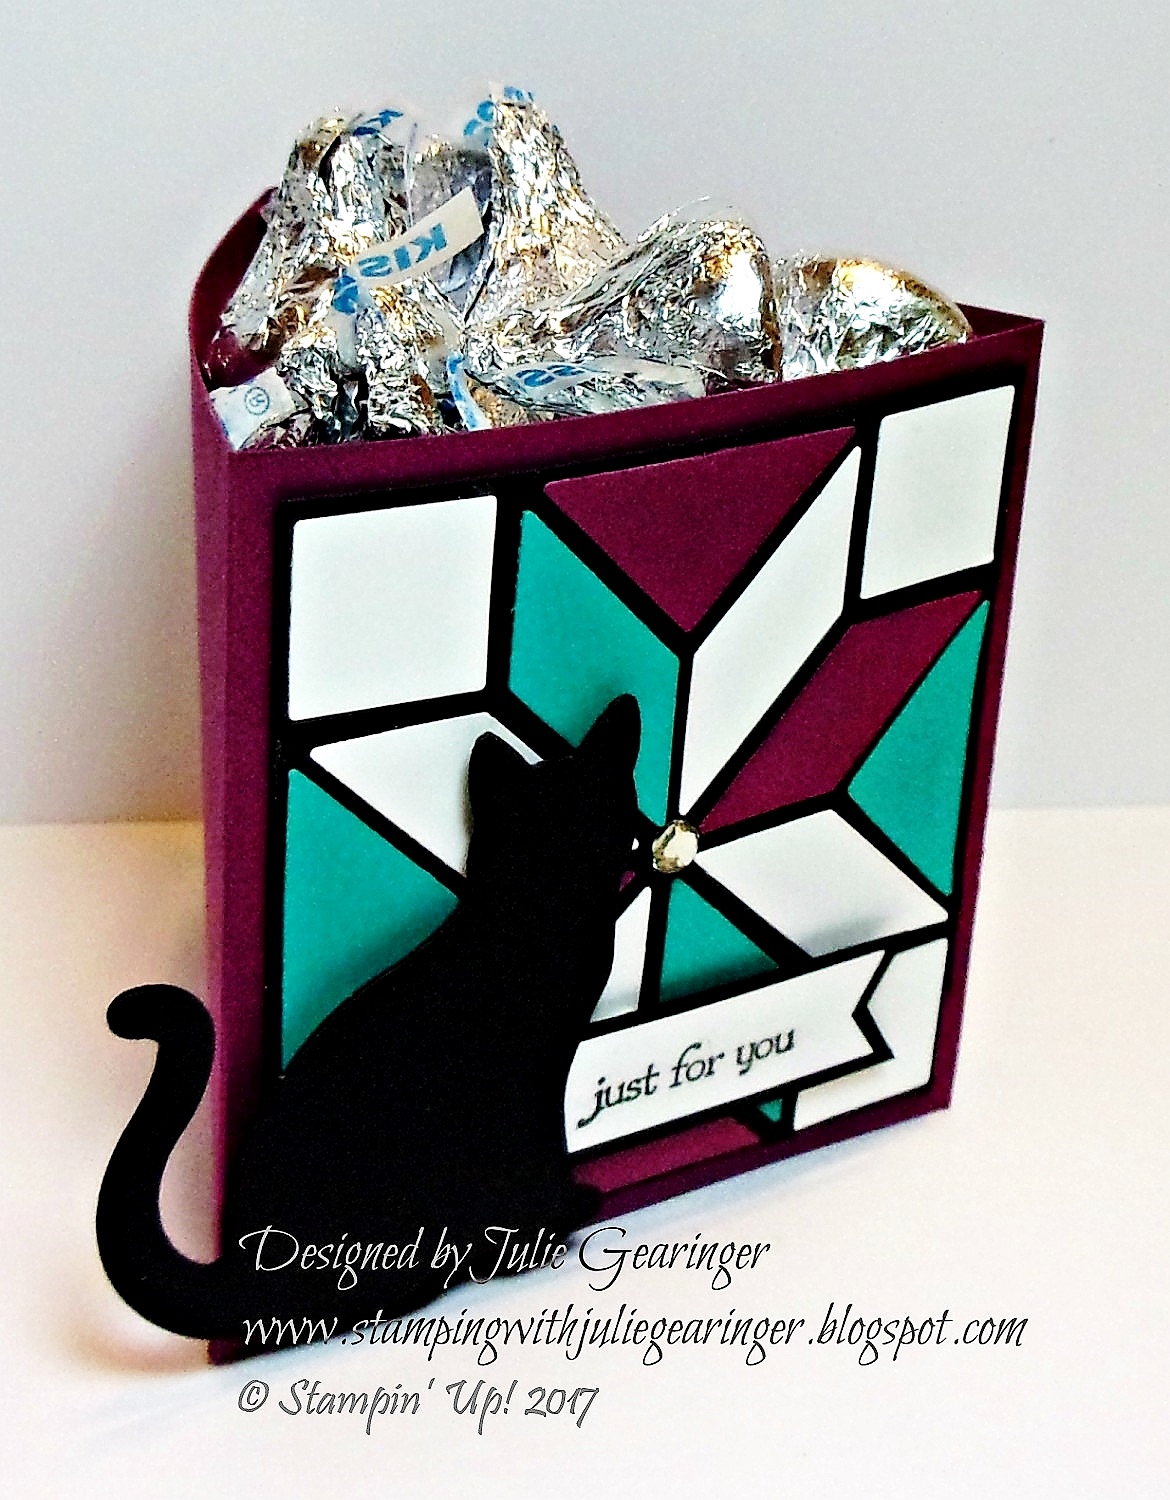

5). Stamp the sentiment from Teeny Tiny Wishes using Stampin’ Archival™ Basic Black Ink onto a scrap piece of Whisper White cardstock, trim and create the banner by hand (I used the retired Hexagon Punch).  Mount onto a piece of Basic Black cardstock and trim around the edges.  Add to the back of the Cat Punch image and mount onto the front of the box with Stampin’ Dimensionals®.

6). Add a Rhinestone to the center of the quilt to finish off the box.  Fill with “Sweet Treats” and enjoy!  A quick and easy treat box for any occasion!

Stamp Sets: Teeny Tiny Wishes

Ink/Mediums: Stampin’ Archival™ Basic Black
Paper: Whisper White, Basic Black, Bermuda Bay, Rich Razzleberry
Accessories/Tools: Big Shot™, Quilt Builder Thinlits™ Dies, Rhinestones, retired Hexagon Punch, Glad®  Press ‘n Seal®

Thanks again for taking the time to stop by and I hope that you will create your own Stampin’ Up! Only project and join us for our “Treats of All Kinds”  challenge!

Tuesday, October 10, 2017

SUO185 Peace, Joy, Love


Hi Friends!   

It’s time for the #185 “Favorite Holiday Item” Challenge at SU-Only Challenges!  

I have quite a few favorite items in our Holiday Catalog (the Cat Punch is my absolute favorite but I already used that for our last challenge:-)) so I decided to incorporate four other favorite items- the Quilt Builder Framelits™ Dies, the Merry Music Specialty Designer Series Paper, the Swirly Snowflake Thinlits™ Dies and the Musical Season Stamp Set.


If you have not had a chance to stop by the SU-Only Challenge site to check out the rest of the Design Team projects or the other challenge sites yet, I encourage you to do so- wonderful inspiration from all!

To create this card:

1). Using the Big Shot™ with the Softly Falling Textured Impressions™ Embossing Folder, emboss a piece of Whisper White cardstock, trim and mount onto a piece of Basic Black cardstock, trim and mount onto the Extra Thick Whisper White card base.

2). Trim a piece of Merry Music Specialty DSP for the vertical panel and mount onto a piece of Basic Black cardstock, trim close to the edge and mount into the card front per the JAI sketch.

3). Use the Big Shot™ with the Quilt Builder Framelits™ and die cut two quilt images from the Merry Music DSP and one from Basic Black cardstock and also cut the background square from Basic Black cardstock. 

 ***FYI ****  Glad® Press ‘n Seal® (PNS) works wonderfully to hold all of the quilt die pieces together as you build your quilt.  Once I die cut the quilt, I put the sticky side of the PNS on the cut side of the die and make sure all of the pieces are adhered to the PNS before I “pop” out the quilt from the die.  To arrange the pieces, just peel off each piece of the PNS and adhere to the quilt (I also used Two Way Glue to adhere the pieces to the quilt frame).

4). Die cut a piece of Whisper White cardstock with the large snowflake border die from the Swirly Snowflake Thinlits™ Dies, trim off a snowflake and tuck under the vertical panel on the card front before mounting the layered quilt with Stampin’ Dimensionals®.

5). De-static a piece of Whisper White cardstock with the Embossing Buddy®, ink the sentiment from the Musical Season stamp set with Stampin’ Archival™ Basic Black ink, apply Stampin’ Emboss® Clear Embossing Powder and heat set with the Heat Tool.  Trim the sentiment, cut the fishtail banners by hand (or use the retired Hexagon Punch as I did), adhere to a scrap piece of Basic Black cardstock and mount onto the card front with Stampin’ Dimensionals®.

6). Add a few Rhinestones to the card (center of the quilt and snowflake, near the sentiment) and finish off the card using Clear Wink of Stella® on the snowflake and quilt pieces.

Stamp Sets: Musical Season

Ink/Mediums: Stampin’ Archival™ Basic Black,; Clear Wink of Stella™
Paper: Whisper White, Basic Black,  Extra Thick Whisper White; Merry Music Specialty DSP
Accessories/Tools: Big Shot™, Quilt Builder Thinlits™ Dies, Swirly Snowflake Thinlits™ Dies, Softly Falling Textured Impressions™ Embossing Folder, Embossing Buddy®, Stampin’ Emboss® Clear Embossing Powder, Heat Tool, Rhinestones, Glad® Press ‘n Seal®

Thanks again for taking the time to stop by! I hope I have inspired you to pull out your  Stampin’ Up! Holiday Catalog items and create a project for our “Favorite Holiday Catalog Product”  challenge!

Wednesday, September 20, 2017

TCC78 Hello Baby


Hi Friends!!


I just love all of the fun pastel colors, the sweet stuffed animals and the cat figurine and plate in this sweet inspiration photo that Lesley found for us! I decided to use the new Stampin’ Up! Cat Punch and Quilt Builder Framelit™ Dies to create my Freestyle Collage/Shabby Chic card.

I also incorporated the As You See It #158 "Doily Dreams" Sketch Challenge and the Joy of Sets #006 -“Letter T” Challenge into the design (I used Teeny Tiny Wishes).

If you have not had a chance to do so, I hope you will find the time to check out the rest of the wonderful Design Team cards at The Card Concept as well as the entries at the other challenge sites- fabulous inspiration from all!

To create this card:

1). Trim a piece of Whisper White cardstock, mount onto a piece of Pool Party cardstock, trim again and mount onto a piece of Pink Pirouette cardstock. Mount the entire panel to the Extra Thick Whisper White card base.

2). Die cut a piece of Pool Party cardstock with a stitched rectangle die and mount onto the card front.

3). Create the quilt block using the new Quilt Builder Framelits™- I used retired Stampin’ Up! designer papers- Crushed Curry (from an old hostess pack), Pool Party and Pink Pirouette along with Whisper White cardstock.  I cut four of the quilt dies and pieced all four onto squares of coordinating cardstock (for this card I used Whisper White as the frame and base).  Add a white tea lace doily behind the quilt and adhere the strip of retired Pool Party ¼” stitched satin ribbon with the pink button embellishment.  Mount the entire quilt assembly onto the card front with dimensional foam.

4). Use the Cat Punch to punch out three cats- one from Pink Pirouette cardstock and two from Whisper White cardstock.  Layer the pieces together and mount onto the card front with dimensional foam.

5). Ink the “Hello Babby” sentiment from Teeny Tiny Wishes with archival black ink, stamp onto a piece of Whisper White cardstock and create the fishtail banner with the retired Hexagon Punch (or by hand).  Mount the sentiment onto piece of Pink Pirouette cardstock (allowing just the end to peek out), tuck the end under the Cat Punch and adhere to the card front with dimensional foam.

Stamp Sets:  Teeny Tiny Wishes

Ink/Mediums: Versafine™ Onyx Black Ink

Cardstock/Paper: Whisper White, Extra Thick Whisper White, Pool Party, Pink Pirouette; retired DSP- Crushed Curry, Pool Party, Pink Pirouette

Accessories: Big Shot™, Quilt Builder Framelits™ , Cat Punch, MFT Stitched Rectangle STAX Dies, White Tea Lace Doily, ¼” Pool Party Stitched Satin Ribbon, Pink Pirouette button, Hemp Twine

Thanks again for taking the time to stop by!  I hope I have inspired you today and that you will be able to join us for the #78“Pastel Party” Challenge at The Card Concept! 

Related Posts Plugin for WordPress, Blogger...