Showing posts with label Summer. Show all posts

Tuesday, August 16, 2016

ODBDSLC277 Happy Summer Days!


Hi Friends! 

Today we are featuring a "reminder" post for the Our Daily Bread Designs “Shining the Light” ODBDSLC277 Sketch Challenge!

You have until September 4th to join us for a chance to be spotlighted for the Shining the Light award or to win a $15 ODBD gift certificate (one random participant will be chosen).  To be spotlighted for the Shining the Light Award, you must use ODBD stamps (or stamps from our sister companies: North Coast Creations or Artistic Outpost). 

For this sketch challenge reminder post, I decided to create a card with a “sneak peek” of some of the ODBD mid-month August Release stamps and dies that will be available tomorrow- Thanks a Melon and Watermelon Dies.   I know that you will love all of the fun images and dies in this new release that will allow you to create all sorts of great cards- stop back tomorrow for all of the details!

I am also incorporating the Inkspirational #115 "Patterned Paper" Challenge into the design- the checkerboard panel is from the ODBD Christmas 2013 6x6 Paper Collection and I created my own "patterned paper" with the Thanks A Melon stamps for the central focal circle :-)

To create this card:

Die cut a piece of white cardstock with the ODBD Flourished Star Pattern Die, mount onto a piece of black cardstock and trim close to the die cut edge.

Die cut a piece of the Christmas 2013 6x6 Paper Collection with the ODBD Double Stitched Rectangle Dies and mount onto the background panel.

Ink the Thanks A Melon watermelon images with an archival black ink and repeatedly stamp onto a piece of white cardstock to create your own “designer paper”.

Color the images with water-based markers, add a bit of glitter with a clear glitter pen and white highlights with a white paint pen, use the ODBD Double Stitched Circle Dies to cut out the main panel circle and the ODBD Watermelon Dies to cut two watermelon slices.

Die cut a piece of white cardstock with the ODBD Doily Die, “age” the doily as well as the die cut focal image circle (by sponging a bit of antique linen distress ink over the panels) and mount the die cut circle focal image onto the doily die cut with dimensional foam.

Die cut a piece of melon cardstock with the ODBD Pierced Square Dies, mount onto a piece of black cardstock, trim close to the edge of the die cut and mount onto the card front.

Die cut and emboss a piece of white cardstock with the ODBD Beautiful Borders Dies, “age” with the antique linen distress ink, add to the card front and adhere the 5/8” Black Satin Triple Ribbon Bow (wrapping the ribbon ends behind the panel).

Stamp the sentiment from Thanks A Melon onto white cardstock with black archival ink, die cut and emboss with the ODBD Layered Lacey Square Dies, “age” with the antique linen distress ink and mount onto to the card front with dimensional foam.

Add the two die cut watermelon pieces to finish off the card.
I hope you will find the time to check out my Design Team Sisters’ fabulous projects:
Chris   ∙  Diana   ∙  Robin

We hope to see your artwork in the ODBDSLC277 Sketch Challenge gallery!

Thanks again for stopping by- I hope you have a wonderful week, my friends!


Saturday, July 23, 2016

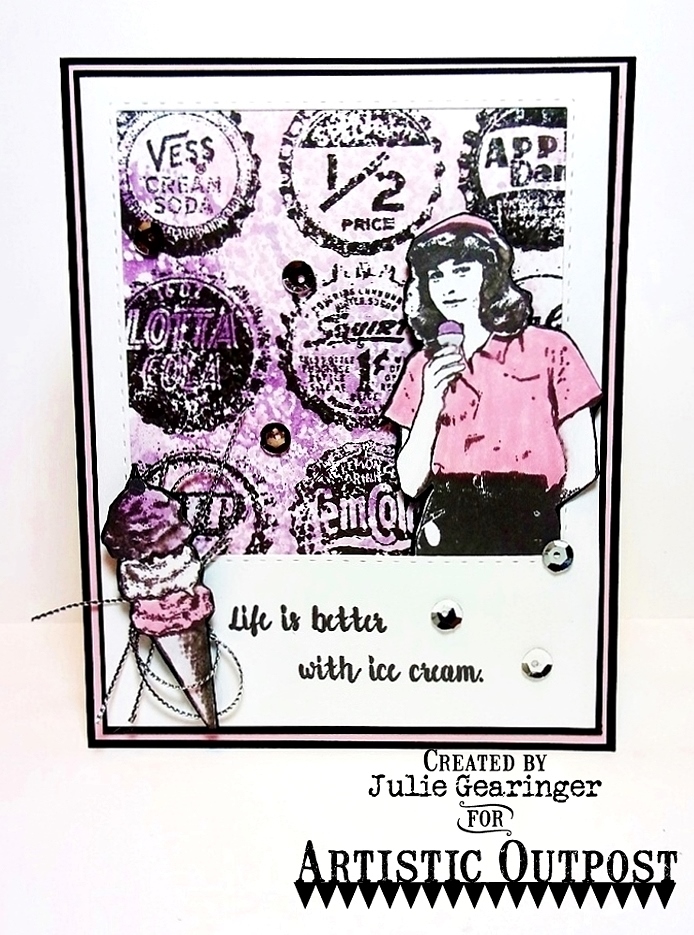
Life is Better with Ice Cream

Hi Friends!! 

I hope all of you are having a great start to the weekend so far!!  

Today it is my turn to highlight a card on the Artistic Outpost blog and I created another quick Mixed Media card using Bottle CapsBackground along with Ice Cream Shoppe from the 2016 Spring Release at ArtisticOutpost.

I decided to incorporate the Splitcoaststampers CAS384 “Cool Treats” Challenge along with the TLC595 “Stamp Selfie” Challenge and the #TGIF65 "Cut It Out" Challenge.

No, this girl image is not me so it is not a true "selfie" (well maybe I looked a little like that 30 years ago-lol!) but I could imagine standing next to a mural in an ice cream shop enjoying a bit of ice cream, how about you?

If you have not already visited the Artistic Outpost blog or the Splitcoaststampers challenge sites yet, I hope you will do so- fabulous inspiration from all!

To create this card:

Stamp the images from Ice Cream Shoppe with gray ink, color with a light pink and plum marker, fussy-cut and mount onto black cardstock, fussy cut once more and apply a thin layer of clear glitter to the ice cream in the large cone. 

Use the modified version of the Smakin’ Acetate Technique to create the backdrop for the Bottle Caps Background- scribble light pink and plum markers onto an opened acetate envelope, lightly spritz with water, close the envelope to "smoosh" the ink around, re-open the envelope and press a piece of white cardstock into the ink.

Stamp the Bottle Caps Background stamp with gray ink onto the splattered background, trim and mount behind a die cut window from white cardstock (using the ODBD Double Stitched Square Dies) along with the girl image popped up with dimensional foam.

Mount onto several layers of light pink and black cardstock before mounting onto the white card base.

Stamp the sentiment from Ice Cream Shoppe with gray ink, adhere the looped silver cord with the ice cream cone along with a few sequins to finish off the card.


Thanks again for stopping by- your visits and comments are such an encouragement to me!  Hugs and have a great week, my friends!


Saturday, June 18, 2016

Life is Better....With Ice Cream :-)


Hi Friends!! 

I hope all of you are having a great weekend so far!!  Today it is my turn to highlight a card on the Artistic Outpost blog and I wanted to share this fun Mixed Media card with you here as well :-)

This card was designed using four of the Artistic Outpost 2016 Spring Release stamps sets from Our Daily Bread Designs- Ice Cream Shoppe, Bottle Caps Background, Harvest and Grunge Elements along with a fun watercolor technique for the Splitcoaststampers Mix-Ability MIX175 “Watercolor Lifting” Challenge (see details here and gallery here).

If you have not had a chance to visit us at the Artistic Outpost blog yet, I hope you will do so- inspiration is posted several days a week by my DT Sisters and they are all so talented!


To create a card:

Using watercolor paper, apply Flirty Flamingo, Melon Mambo, Perfect Plum and Rich Razzleberry- spritz with water and mix the colors.

Dry with the Heat Tool and apply Ranger® Tim Holtz® Distress Ink- Worn Lipstick and Picked Raspberry, dilute with water, dry with the Heat Tool and once dry, repeat the process with Ranger® Tim Holtz® Distress Crayons- Picked Raspberry and Seedless Preserves.

Once the panel is dry, de-static the paper with an Embossing Buddy®, ink the Bottle Caps Background stamp using Versamark™ Ink, apply Stampin’ Emboss® Clear Embossing Powder and heat set with the Heat Tool.

Once the embossing is dry, use a damp paper towel to left the watercolor from the background.

Cut the panel with the Big Shot™ with the Our Daily Bread Designs (ODBD) Double Stitched Rectangle Die.

Trim a piece of Basic Black cardstock a bit larger than the die cut background, mount onto the Extra Thick Whisper White card base and mount the watercolor background panel using dimensional foam.

Ink the images from Harvest and Ice Cream Shoppe along with the Ice Cream Shoppe sentiment onto Whisper White cardstock with Stāz-On® Jet Black Ink.

Color the Harvest and Ice Cream Shoppe images with Stampin’ Write Markers- Sweet Sugarplum, Soft Suede, Tip Top Taupe along with Flirty Flamingo using an AquaPaiinter™ to blend the colors and apply Clear Wink of Stella® to the ice cream images.

Use a clear envelope and scribble Flirty Flamingo and Sweet Sugarplum markers, spritz the ink, cover with another portion of the clear envelope to mix the ink and randomly press portions of the sentiment into the ink. 

Ink the splatter stamp from Grunge Elements with the Smoky Slate Stampin’ Write Marker, stamp onto the sentiment, die cut with ODBD Double Stitched Rectangle Dies.

Fussy-cut the remaining images, mount the fussy cut images along with the sentiment onto Basic Black cardstock, fussy-cut a thin border around all of the images.

Add a looped piece of Silver Cord to the card front and mount the Ice Cream Shoppe images as well as the sentiment with dimensional foam to finish off the card.

I had fun with this Watercolor Lifting Technique and will have to play with this technique again soon :-)

Bottle Caps 

Harvest
Ink: Versamark™, Stāz-On® Jet Black, Stampin’ Write Markers- Sweet Sugarplum, Soft Suede, Tip Top Taupe, Flirty Flamingo, Melon Mambo, Perfect Plum, Rich Razzleberry, Smoky Slate;  Ranger® Tim Holtz® Worn Lipstick and Picked Raspberry Distress Ink and Distress Crayons; Clear Wink of Stella®
Grunge Elements

Paper: Watercolor, Whisper White, Basic Black, Extra Thick Whisper White

Accessories: Big Shot™, ODBD Double Stitched Rectangle Dies, Embossing Buddy®, Stampin’ Emboss® Clear Embossing Powder, Heat Tool, Clear Envelope, Water Spritzer Bottle, Silver Cord

I hope this card may have inspired you to pull out your Artistic Outpost stamps and create a project of your own.  

If so, don’t forget to come play along with the “June Show Us Your AO Art Challenge” – please click here for details.

Thanks again for stopping by- hugs to all of you, my friends!  Now, I'm off to eat some ice cream (low fat, of course, but so delicious) :-)

Sunday, August 23, 2015

If Life Gives You Lemons...


Hi Again Stampers!!

This Clean and Simple (CAS) card was created using the Colour Me...! CMCC85Challenge along with the Simon Says Monday "Citrus with a Twist" Challenge and the CCEE1534Lemonade Challenge.  

I have owned this stamp set for many years and have not inked up this image before- not sure why other than possibly too many stamps and not enough time- lol!!

Again, if you have not already done so, I hope you will find the time to visit the above sites to check out the fantastic Design Team samples as well as their fabulous challenge galleries!

This card was easy to create- stamp the image from the retired Country Comfort set using Stāz-On® Jet Black Ink onto Whisper White cardstock, watercolor with an AquaPainter™ using Stampin’ Write Markers- Daffodil Delight, Melon Mambo and Basic Gray (scribble the marker onto an acrylic block and pick up the ink with the AquaPainter™), add a few shadows with the Sahara Sand Stampin’ Write marker and cut out using the Big Shot™ with curved banner MFT Blueprints 13 Die.

Stamp the splatter stamps from Gorgeous Grunge using Daffodil Delight and Melon Mambo Classic Ink onto a piece of Whisper White cardstock, trim and mount onto a piece of Daffodil Delight cardstock, trim and mount onto the Melon  Mambo card base.

Add the Gold Thread loops and mount the focal image using Stampin’ Dimensionals® to finish off the card.

Stamp Sets: Country Comfort (retired 2004 set), Gorgeous Grunge

Ink: Stāz-On® Jet Black, Daffodil Delight, Melon Mambo; Stampin’ Write Markers- Daffodil  Delight, Melon Mambo, Basic Gray, Sahara Sand

Paper: Whisper White, Daffodil Delight, Melon Mambo

Accessories: Big Shot™,  MFT Blueprints 13 Die, AquaPainter™, Gold Thread


Thanks again for taking the time to stop by- I hope all of you have a wonderful Monday!  

Sunday, July 26, 2015

Amazing Grace- How Sweet the Sound :-)


Hi Stampers!!

I had a chance to stamp this afternoon and decided to create a card for the Our Daily BreadDesigns ODBDSLC247 "Floral Inspiration" Challenge along with the Splitcoaststampers’ CAS307 “Use Your Words” Challenge (see details here and gallery here) and Crafts4Eternity R#236 "Music".

Again, I hope you will take the time to visit the above sites- fabulous Design Team creations as well as gorgeous galleries and inspiration from all! 

I pulled out a few Our Daily Bread Designs (ODBD) stamps and decided to use Christmas Rose for a non-Christmas card :-)

To create this card- 

Stamp the Christmas Rose image five times using Stāz-On® Jet Black Ink  (you do not need the entire image- just the main flower). 

Color the petals with Stampin’ Write Markers- Blushing Bride and Melon Mambo, spritz with water to soften the marker edges, fussy-cut the images and curl the petals upward.

Once the flower images are dry, color the center with the Hello Honey Stampin’ Write marker, add the white highlights with a Faber-Castell® White Pitt Pen marker and set the flowers aside.

Ink the Amazing Grace Hymn stamp using Smoky Slate Classic Ink and stamp on an angle onto Whisper White cardstock.

Trim the background panel and mount onto a piece of Brushed Gold cardstock, trim again and mount onto the Always Artichoke card base.

Ink the sentiment using Stāz-On® Jet Black Ink onto Whisper White cardstock and use the Big Shot™ with the ODBD Vintage Flourish Pattern Die to cut out the sentiment as well as a piece from Brushed Gold cardstock.

Cut the Brushed Gold die cut in half horizontally and mount behind the sentiment (allowing a bit to show as a frame).

Wrap a piece of Gold Thread into a large loop and adhere to the card front (I used a drop of hot glue).

Use the Martha Stewart Leaf Punch to punch out the leaves from Always Artichoke cardstock and adhere behind the flowers.

Mount the framed sentiment to the card front using dimensional foam tape and add the flowers around the sentiment.

Finish off the card with a few  Pearls in the corners and you are done!

FYI- This card was a bit difficult to photograph- the Frost White Shimmer Paint created quite a glare and made the flowers in the photo look different in the color as well as highlight the wrinkles in the paper from curling- oops!

Stamp Sets: Our Daily Bread Designs- How Sweet the Sound, Amazing Grace Hymn, Christmas Rose

Ink: Stāz-On Jet Black, Stampin’ Write Markers- Blushing Bride, Melon Mambo, Hello Honey; Faber-Castell® White Pitt Pen Marker, Frost White Shimmer Paint

Paper: Whisper White, Always Artichoke, Brushed Gold

Accessories: Big Shot™, ODBD Vintage Flourish Pattern Die,  Martha Stewart Leaf Punch, Gold Metallic Thread, Pearls


Thanks again for taking the time to stop by- it is such an encouragement to me!  Have a wonderful day, my friends!

Monday, July 6, 2015

Happy Birthday- Summer Silhouette Style :-)

Hi Stampers! 

I wanted to share another card that I created last night for the CCMC362 Color Challenge at Create with Connie and Mary along with the Seize the Birthday 07/02/15 "Red, White and Blue" Challenge ( Lost Lagoon is sort of blue…but you do not have to do the “topping option” as long as it is a Birthday card) along with the Splitcoaststampers CAS326 Wildflowers Challenge (see details here and gallery here)   :-)
 
If you have not had a chance to do so, I hope you will find the time to visit the above challenge sites to check out the Design Team samples as well as their galleries- fabulous inspiration from all!

This was a nother quick, easy card to create :-) :

Ink the floral stems and leaves with Lost Lagoon Classic Ink and stamp onto Crumb Cake cardstock, add the flower tops with Real Red Classic Ink and add a few highlights with the Gel Pen.

Trim the panel and mount onto a piece of Whisper White cardstock.

Stamp the sentiment using Real Red Classic Ink onto a piece of Lost Lagoon cardstock, trim and mount onto a piece of Whisper White cardstock, trim and mount onto the Real Red card base.

Stamp the lattice border using Real Red Classic Ink onto Whisper White cardstock, trim and mount onto a scrap piece of Real Red cardstock.

Mount the focal image to the card front and add the lattice border layer.

Create a Real Red cardstock bow using the Bow Builder Punch and adhere the Antique Brad to the center (I remove the brad points and use adhesive to adhere the brad to the bow). 

Mount the bow to the card front to finish off the card.

Not sure if I am pleased with this card- it feels like something is missing,- maybe I will add some Pearls before I mail this one :-)

Stamp Sets: Summer Silhouettes, Butterfly Basics

Ink: Lost Lagoon, Real Red; White Gel Pen

Paper: Whisper White, Crumb Cake, Lost Lagoon, Real Red

Accessories: Bow Builder Punch, Antique Brads


Thanks again for stopping by- I hope you all have a marvelous Monday!!

Sunday, July 5, 2015

Summer Fun with A Color, Sketch and Theme Challenge :-)

Hi Again Stampers! 

I hope all of you are enjoying your weekend!  My hubby had to work the whole weekend, so I decided to spend some time designing cards :-)  Any excuse to spend time crafting, right??

I just love the fresh color combination in this week’s Pals Paper Arts PPA258 Color Challenge, so I pulled out my new stamp set, Awesomely Artistic and combined it with the Freshly Made Sketches FM193 Sketch Challenge and the Simon Monday “Summer”Challenge. .

 Flowers and dragonflies definitely remind me of the summer vacations that we would take to rural New Yorl- my grandparents had a cabin on a river and the dragonflies would be flitting around as well as the blossoming summer flowers...I remember as a young child chasing the rabbits and trying to catch one :-)  Oh, to be a kid again- lol!!

If you have not had a chance to do so, I hope you will find the time to visit the above challenge sites to check out the Design Team samples as well as their galleries-wonderful inspiration from all!

This was a quick, easy card to create- stamp the images using Stāz-On® Midnight Blue ink onto Whisper White cardstock, color with Stampin’ Write markers, trim and mount onto Night of Navy and Cucumber Crush cardstock.

Add a few Rhinestones and you are finished!  

Easy, peasy as one of my fellow demonstrators loves to say :-)

Stamp Sets: Awesomely Artistic

Ink: Cucumber Crush, Stāz-On® Midnight Blue; Stampin’ Write Markers- Cucumber Crush, Night of Navy, Watermelon Wonder, White Gel Pen

Paper: Whisper White, Cucumber Crush, Night of Navy

Accessories: Big Shot™, retired Starburst Collection Framelits™, Rhinestones

Thanks again for visiting- if you have any questions, please let me know in the comments.   Hugs and have a wonderful week, my friends!

Sunday, April 19, 2015

Summer Silhouettes- An Assortment, Color and Sketch Challenge :-)


Hi Stampers! 

This card was created using the As You See It AYSI083 Assortment Challenge along with the CMCC67 Colour Me! Challenge and Friday Mashup! FM205 Challenge (used the sketch only).

I hope you will have the time to check out all of the linked sites- fantastic Design Teams and galleries!


To create this card:

Ink the stem image from Summer Silhouettes using Memento™ Tuxedo Black Ink and stamp three times onto a piece of Whisper White cardstock.

Ink the leaves using Pistachio Pudding Classic Ink and repeatedly stamp around the stems (stamping off as you repeat).

Stamp the flower tops using Blushing Bride, repeat with Rose Red Classic Ink and stamp the border using Rose Red Classic Ink.

Ink the large splatter stamp from Gorgeous Grunge using Sahara Sand Classic Ink to  add distressing and cut the entire image out using the Big Shot™ with the Circle Collection Framelits™ (cutting a circle from Rose Red cardstock as well).

Add additional “antiquing” using a Sponge Dauber with Sahara Sand Classic Ink  and mount onto the Rose Red circle.

Use the Distressing Tool to carefully distress the edges of Typeset Designer Series Paper (DSP)- this paper is very thin and the tool can be a bit rough on the edges :-)

Apply Sahara Sand Classic Ink to the edges and interior of the DSP, mount onto a piece of Blushing Bride cardstock, sponge additional Sahara Sand Classic Ink onto the Blushing Bride cardstock and adhere the focal image circle to the card front.

Use the Big Shot™ with the Chevron Textured Impressions™ Embossing Folder to emboss a scrap piece of Pistachio Pudding cardstock, use the Sponge Dauber to apply Sahara Sand Classic Ink to the edges (and embossing) and mount onto a piece of Rose Red cardstock.

Add the crochet lace trim to the bottom and adhere to the card front.

Use the Bow Builder Punch to create a bow from Rose Red cardstock.  Add a strip of Rose Red cardstock to the embossed layer and add the bow.

Stamp the sentiment with Memento™ Tuxedo Black Ink onto Whisper White cardstock, sponge the edges and add the splatter with Sahara Sand Classic Ink.

Stamp the butterflies with Memento™ Tuxedo Black Ink onto a retired piece of Blushing Bride DSP, punch out with the Elegant and Small Butterfly Punches and mount onto the card front.

To finish off the card and for the shiny element of the ASYI083 Assortment Challenge- add the Pearls to the butterfly centers as well as the upper and lower corners of the card and add the Antique Brad to the center of the bow. 

Stamp Sets: Summer Silhouettes, Papillon Potpourri, Gorgeous Grunge, retired Express Yourself (hostess set)

Ink:  Memento™ Tuxedo Black, Blushing Bride, Pistachio Pudding, Rose Red, Sahara Sand; Stampin’ Write Marker- Sahara Sand

Paper:  Whisper White, Blushing Bride, Pistachio Pudding, Rose Red, Typeset Specialty DSP, retired Blushing Bride DSP

Accessories: Big Shot™, Circle Collection Framelits™, Chevron Textured Impressions™ Embossing Folder, Distressing Tool, Punches- Elegant Butterfly, Small Butterfly, Hexagon (for the sentiment banner points), Bow Builder; Sponge Dauber, Pearls, Antique Brad, crochet lace from my stash


Thanks again for stopping by- I will be sharing a few more cards later today, so if you have the time, drop in again soon :-) 

I hope all of you have a wonderful, and hopefully, restful Sunday!
Related Posts Plugin for WordPress, Blogger...