Showing posts with label Express Yourself. Show all posts

Monday, April 11, 2016

By The Tide- Congratulations

Hi Again Friends!

I had fun this weekend stamping images, coloring and fussy-cutting (I know, sounds like fun- right :-)?)!  

Anyway, I decided to put together one more card this evening/ morning and used the fussy-cut Lobster from By The Tide along with the Create with Connie and Mary CCMC401Sketch,  the CC557 Splitcoaststampers’ (SCS) Color Challenge and Alphabet Week 12 “L” Challenge (“L”for Lobster).

I hope you will take the time to visit the above galleries- so much inspiration from the Design Teams as well as the entries!

Other than the fussy-cutting of the lobster, this card was fairly easy to create:

Hard to see in the photo but the lobster is raised up above the panel :-)
Ink the Lobster image from By The Tide using Basic Black Stampin’ Archival Ink and stamp onto Whisper White cardstock.

Heat set the image with the Heat Tool and use an AquaPainter™  with Cherry Cobbler Classic Ink to color the lobster and add additional shadows with the Cherry Cobbler Stampin’ Write Marker.
 
Carefully fussy-cut the image, add Clear Wink of Stella® over the entire Lobster and set aside.

Ink the square stamp from Work of Art with Soft Sky Classic Ink and stamp repeatedly onto a piece of Whisper White cardstock.

Add additional splatter with Timeless Textures and Soft Sky Ink, trim to a square image (I used the Big Shot™ with the Square Framelits™ and mount onto Basic Black cardstock (trimming close to the edge).

Emboss a piece of retired Wild Wasabi Designer Series Paper (DSP) with the Woodgrain Textured Impressions™ Embossing Folder, trim and mount onto a square of Basic Black cardstock (also die cut with the Square Framelits™).

Mount the Soft Sky layered square onto the Wild Wasabi DSP square using dimensional foam and add the Lobster image with dimensional foam as well.

Create the Soft Sky banner using Soft Sky cardstock and the Banner Triple Punch, ink the Timeless Textures stamp with Soft Sky Classic Ink and stamp over the entire banner.

Layer the banner onto a Basic Black banner created in the same manner as above but cut a bit wider.

Create the Wild Wasabi strip in the same manner as the Soft Sky banner (using Wild Wasabi cardstock and ink) and once the banner has been layered, cut it in half.

Use the Big Shot™ with the Woodgrain Textured Impressions™ Embossing Folder to emboss a piece of Whisper White cardstock, trim and mount onto the Basic Black card base.

Mount the banners, the layered Lobster panel and sentiment to finish off the card.

Stamp Sets: By The Tide, Work of Art, Timeless Textures, Express Yourself (retired Hostess Set)

Ink: Basic Black Stampin’ Archival, Cherry Cobbler, Soft Sky, Cherry Cobbler Stampin’ Write Marker, Clear Wink of Stella®

Paper: Whisper White, Basic Black, Soft Sky, Wild Wasabi

Accessories: Big Shot™, Square Framelits™, Woodgrain Textured Impressions™ Embossing Folder, Banner Triple and Hexagon Punch, AquaPainter™


Thanks again for taking the time to visit- hugs and I hope you have a fabulous week!!

Sunday, April 10, 2016

Amazing You- A Color, Sketch and Technique Challenge


Hi Friends!

I had a chance to play around with some ink today and decided to create a Mixed Media card using the Pals Paper Arts PP295 Color Challenge along with the Global Design Project GDP030 Sketch and the Just Us Girls Trend Week JUGS338 “Smooshing”Challenge.

If you have not had a chance to visit the above challenge site galleries yet, again, I highly encourage you to do so- fabulous inspiration from all!

To create this card:

De-static a piece of Basic Black cardstock with the Embossing Buddy®, ink the script image from By the Tide using Versamark™ Ink, stamp onto the prepared cardstock, apply Stampin’ Emboss® White Embossing Powder and heat set with the Heat Tool.

Once the embossing powder has cooled, use the Big Shot™ with the My Favorite Things® (MFT) Stitched Horizontal Strip Dies to cut out the image and mount onto Bermuda Bay cardstock, trim the edges and set aside.

For the background, cut open a clear envelope (I slit the one side, top and bottom of a clear packaging envelope to create an opening like a book), add Bermuda Bay and Cucumber Crush Classic Ink directly to the inside of the clear envelope, spritz with water and “close” the top part of the envelope.

Smoosh the ink inside with your fingers, open the envelope and two pieces of Whisper White cardstock down onto the ink on both sides of the envelope.

Dry the panels with the Heat Tool and set one aside for a future project.

Cut out the “smooshed” background panel with the Big Shot™ using the MFT Blueprints 13 Die (the large stitched rectangle), ink the splatter stamp from Timeless Textures with Crumb Cake Classic Ink and stamp repeatedly onto the panel.

Dilute Black Gesso® with water and use a small paint brush to splatter the Gesso® over the panel.
Use the Big Shot™ with the Memory Box® Delicate Border Die to cut the border and mount onto the background panel.

Stamp the sentiment from the retired Express Yourself hostess stamp set with Versamark™ ink, apply Stampin’ Emboss® Black Embossing Powder and heat set with the Heat Tool.

Adhere the background panel to a piece of Bermuda Bay cardstock, trim and mount onto a piece of Basic Black cardstock, trim and mount onto the Whisper White card base.

Using the Black Stampin’ Archival Ink Pad, stamp the jellyfish image (From Land to Sea) onto Whisper White cardstock, heat set the ink with the Heat Tool and use an AquaPainter™ with Crumb Cake, Bermuda Bay and Cucumber Crush Classic Ink to watercolor the image.

Fussy cut the jellyfish and add Clear Wink of Stella® over the entire image.

Mount the horizontal script panel and jellyfish using dimensional foam.

Add a few Rhinestones to finish off the card.

Stamp Sets:  From Land to Sea, By The Tide, Timeless Textures, Express Yourself (retired Hostess set)

Ink: Versamark™, Bermuda Bay, Crumb Cake, Cucumber Crush, Clear Wink of Stella®

Paper/Cardstock: Whisper White, Basic Black, Bermuda Bay

Accessories:  Big Shot™, MFT Stitched Horizontal Strip Dies, MFT Blueprints 13 Dies,  MB Delicate Border Die, Embossing Buddy®, Stampin’ Emboss® White  and Black Embossing Powder, Heat Tool, Black Gesso®, Rhinestones


Thanks again for taking the time to visit- I hope you have a terrific week, my friends!

Monday, February 8, 2016

SC122 Love You


Hi Friends!!

Woohoo!! I am a Guest Designer for the Stampin’ Celebration SC122 Photo Inspiration Challenge and I decided to create a Mixed Media card using the colors and the heart theme.


I hope you have a chance to visit the gallery at Stampin’ Celebration and check out the rest of the Design Team samples as well as the designs from the other two challenge sites- fabulous inspiration from all!

To create this card:

Apply Gesso® to a piece of Whisper White cardstock (I used a piece of Whisper White cardstock that I had printed some Scripture from Psalms and decided that I was unhappy with my Bible Journaling on that page, so I cut the paper into A2 size panels and this is one of those panels).

Once the gesso has dried, apply Gelatos®- I used a blue metallic, light blue and metallic pink (sorry, the colors were not printed on the outside and I neglected to note them before discarding the packaging- oops!).   

Spread the Gelatos® with your finger (I used a dry paper towel), spritz with water and allow the colors to merge and drip down the paper. 

Dab the colors with a paper towel, re-apply, spritz again and dry with the Heat Tool. 

Add Ranger® Tim Holtz® Worn Lipstick Distress Stain, spritz and dry with the Heat Tool.

Once you are satisfied with the color (I ended up doing several layers), use a Sponge Dauber to apply Melon Mambo Classic Ink over the Memory Box™ Texture Flourish Stencil, trim the panel, mount onto a piece of Melon Mambo cardstock, trim again and mount onto the Whisper White card base.

Here is the background before adding the die cut heart :-)
Adhere a strip of Basic Black cardstock across the upper portion of the panel, add the Basic Black paper bow and Antique Brad.

Use the Big Shot™ with the Bloomin’ Heart Thinlits™ (Stampin’ Up!) to cut a heart from Whisper White cardstock and a few of the flowers from Melon Mambo cardstock.

Also, from the Bloomin’ Heart Thinlits ™ cut two of the large flowers and three of the smaller flowers from Whisper White cardstock.

Mount the Whisper White Bloomin’ Heart die cut to the card front with Stampin’ Dimensionals® and add the Melon Mambo flowers to the Bloomin’ Heart die with with Stampin’ Dimensionals® as well.
 Add Pearls for the centers of the flowers and the heat embossed sentiment banner to finish off the card.

Stamp Sets: Express Yourself (retired Stampin’ Up! Hostess Set)

Ink: Versamark™, Melon Mambo; Ranger® Tim Holtz® Worn Lipstick Distress Stain; Gelatos®

Paper: Whisper White, Basic Black, Melon Mambo

Accessories: Gesso®, Big Shot™,  Bloomin’ Heart Thinlits™, Texture Flourish Stencil (MB), Pearls, Punches-Bow Builder,  Hexagon; Embossing Buddy®, Stampin’ Emboss® Winter White Embossing Powder (retired), Heat Tool

Thanks again for taking the time to visit- I hope you can gather your supplies and join us at the Stampin’ Celebration SC122 Photo Inspiration Challenge!

Friday, November 27, 2015

Nature Silhouettes- A Masculine Birthday Card


Hello Friends!

Happy Belated Thanksgiving to all of you who celebrated Thanksgiving yesterday- we are so blessed and are so thankfu!! 

We were traveling yesterday to be with family and I did not have access to a computer (I decided to take a day away from electronics)- sometimes you just need a day to unwind... we had a great time along with great food!

Today, I had a chance to create a card using the Retro Sketches#191 Sketch along
Splitcoaststampers’ WT559 “Leftovers” Challenge (use your scraps/leftovers :-)). 

If you have not had a chance to visit the above challenge site galleries yet, again, I would encourage you to do so- wonderful inspiration from all!

To create this card:

Create a mask from sticky note paper or scrap paper using the 1 ¼” Circle Punch and place the mask onto a piece of Whisper White cardstock.

Using Sponge Daubers, apply Pumpkin Pie Classic Ink along with Melon Mambo and Rich Razzleberry Classic to create the sky.

Remove the mask, de-static the cardstock with the Embossing Buddy®.

Ink the tree image from the retired Stampin’ Up! Nature Silhouettes stamp set using Versamark™ ink, apply Stampin’ Emboss® Black Embossing Powder and heat set with the Heat Tool. 

Once cooled, repeat the above steps with the deer image.

Trim the stamped panel and mount onto a piece of Whisper White cardstock (this was from my scraps), trim and mount onto the banner panel (again, this was from my scraps cut with the Jumbo Stitched Fishtail Banner Die from My Favorite Things™).

Emboss a scrap piece of retired Rich Razzleberry Designer Series Paper (DSP) with the retired Square Lattice Textured Impressions™ Embossing Folder, trim and mount onto a scrap piece of Basic Black cardstock  (lightly sand with the Sanding Block).

Create the background  layer from Pumpkin Pie DSP using the retired Herringbone Textured Impressions™ Embossing Folder and the corners with the 1 ¼” Circle Punch, layer onto Basic Black cardstock punching the ticket style corners with the 1 ¼” Circle Punch and lightly sand with the Sanding Block.

Add the ribbons to the focal image banner panel (the loops were scrap pieces in my stash) and layer all of the pieces per the sketch.

Stamp the sentiment and create the layered banner with the Hexagon Punch, mount to the card front and add the Pumpkin Pie button to finish off the card.

Stamp Sets:  Nature Silhouettes, Express Yourself (hostess set)- both retired Stampin’ Up!

Ink: Versamark™, Memento™ Tuxedo Black

Paper/Cardstock: Whisper White, Basic Black, Rich Razzleberry, retired Pumpkin Pie and Rich Razzleberry DSP

Accessories:  Big Shot™, MFT Jumbo Stitched Fishtail Banner Dies, retired Herringbone and Square Lattice Textured Impressions™ Embossing  Folders, Embossing Buddy®, Stampin’ Emboss® Black Embossing Powder, Heat Tool, Punches-  1 ¼” Circle, Hexagon; Pumpkin Pie button, ¼” Rich Razzleberry Grosgrain Ribbon, 3/8” Pumpkin Pie Taffeta Ribbon, Antique Pewter Hodgepodge Hardware Ribbon Slide, Sanding Block


This card will be mailed to my Dad who will be celebrating his 81st Birthday in a few days ( (shh...Aunt Pat- do not spill the beans- lol!)) .  Since he lives so far away, we do not get a chance to see each other that often but I hope he likes this card (it reminds me of the days that he used to hunt- he is quite the outdoorsman) :-)


Thanks again for taking the time to stop by- I hope all of you have a fabulous weekend!

Saturday, October 31, 2015

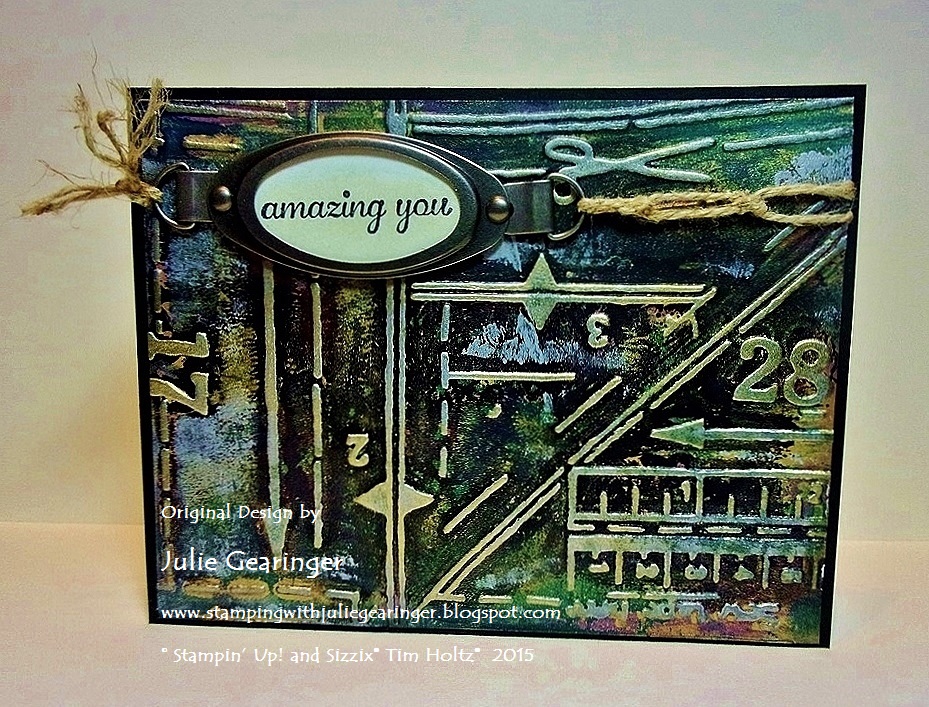
HYCCT1530 Amazing You- Tough As Nails

Hi Again Friends!

This card was created for the Splitcoaststampers’ “Hope You Can Cling To” HYCCT1530 Yvette’s “Tough As Nails” Challenge to create a card with construction related materials or use construction related stamps, etc.

I decided to use a Gelli Arts® print that I had created a while back using acrylic paints, Stampin’ Up! Classic Inks, Encore!™  Ultimate Metallic Ink and the Sizzix® Tim Holtz® Alterations Patterns Embossing Folder.

I sure hope you have a chance to visit the HYCCT1530 gallery and check out all of the wonderful designs for this challenge- very unique and fun!

I have not ventured into the video making aspect of stamping yet but there are many Gelli Arts® Printing Plate videos describing the basics for monoprinting.

I currently own the 6” square Gelli Arts® Printing Plate and have used it primarily with embossing folders for the printing and texture.  

Below are the basic steps I take to create this type of background print.

Using a brayer, roll Gold and Silver paint onto the Gelli® Arts Printing Plate and spread to cover the plate.

Lay a piece of watercolor paper or cardstock onto the Gelli® Arts Printing Plate and lift off, lay another piece onto the Gelli® Arts Printing Plate for the ghost print.

Add a few drops of colored acrylic paint (I used a dark midnight blue, green and mauve), spread the paint with the brayer onto the Gelli® Arts Printing Plate.

Use the Big Shot™ to emboss a piece of thick cardstock with the Sizzix® Tim Holtz™ Alterations™ Pattern Texture Fades Embossing Folder.  

Lay the embossed panel (with the raised part of the embossing downward) onto Gelli® Arts Printing Plate, press into the plate and lift up (this action will remove some of the paint for the print design), lay down one of your prints created in the first steps above onto the Gelli® Arts Printing Plate, press with your hands to lift up and if there is enough paint remaining, press the second print into the paint on the Gelli® Arts Printing Plate, smooth over the back with your fingers and lift again.

FYI- I am using very old Folk Art Deco® Acrylic Paints that I have had for years, so they are thin and dry quickly so I usually can only obtain one print after pressing the embossing folder onto the Gelli® Arts Printing Plate.

You can repeat the steps above to build up more layers but I have found that one or two layers give me enough depth for this type of background, plus you will have a bonus print with the embossing folder panel that you are using as the "stencil" will have enough paint and interest to be a print as well :-)

Once the panel is dry, you should be able to see the outline in the paint of the embossing folder that was used as a stencil, match up the stenciled Gelli® Arts print into the actual embossing folder and re-emboss with the Big Shot™.

Add Encore!™  Ultimate Metallic Gold Ink over the raised embossed areas (I just rub the embossed panel over the ink pad) and set the ink with the Heat Tool.

Trim the completed Gelli® Arts Printing Plate panel, add the hardware label with the brads (representing nails) along with the stamped sentiment and twine and mount onto the Basic Black card front to finish off the card.

To me, the metallic inks with the acrylic paint from the Gelli® Arts Printing Plate make this paper look like metal, the pattern embossing folder reminds me of triangles and other items used in the wood shop along with blueprints (even though this embossing folder was meant to represent dressmaking,  which in itself is a form of construction with “nails”- finger nails that is- lol!):-)

So here is my card for the "Tough As Nails" Challenge- are you playing along yet?

Stamp Sets:  Express Yourself

Ink: Stāz-On® Jet Black, Encore!™ Ultimate Metallic Gold; Ranger® Tim Holtz® Old Paper Distress Ink, Various Acrylic Paints (Folk Art Deco®)

Paper: Whisper White, Basic Black

Accessories: Big Shot™, Sizzix® Tim Holtz™ Alterations™ Pattern Texture Fades Embossing Folder, Gelli Arts® Printing Plate, Brayer, retired Antique Pewter Hodgepodge Hardware, Natural Hemp Twine


Thank again for stopping by- I have a few more challenge cards to post this evening.  

Have a blessed weekend, my friends!

Wednesday, October 7, 2015

HYCCT1506 Happy Anniversary Hearts

Hi Again Friends!


Again, I hope you have a chance to check out the challenge sites- wonderful inspiration from all!

To create this card:

Using My Digital Studio (MDS) print out the three hearts from the Always brush stamp set (reducing in size) onto Whisper White cardstock.

Carefully cut out the hearts, use a Sponge Dauber to apply Real Red Classic Ink to each heart, de-static with the Embossing Buddy®, apply Stampin’ Emboss® Clear Embossing Powder and heat set with the Heat Tool.

Create the background by spritzing a piece of Whisper White cardstock with water and dropping Brusho® Brilliant Red, Purple and Turquoise Crystal Colours over the panel and spritz with water again (actually the background on the card is the result of pressing into the original panel that had excessive powder and water- this background was a bit softer in color and not so saturated...I am still experimenting with Brusho®)

Dry the Brusho® background with the Heat To
Full view to show the background and sketch :-)
ol and stamp the script stamp from the retired Notable Notions using Stāz-On® Jet Black  Ink.

Trim the background panel into thirds and adhere the left and right panel directly onto a piece of Basic Black cardstock.

Mount the center panel onto a strip of Basic Black cardstock and add the horizontal scrap pieces of Basic Black cardstock.

De-static a piece of Basic Black  cardstock with the Embossing Buddy®, stamp the sentiment from the retired hostess set, Express Yourself with Versamark™ ink, apply Stampin’ Emboss® White Embossing Powder and heat set with the Heat Tool.

Adhere the sentiment strip to the center panel and add to the card front using Stampin’ Dimensionals®.

Add the embossed hearts to the card front with Stampin’ Dimensionals® and mount the entire panel onto the Whisper White card base to finish off the card.

Stamp Sets: Express Yourself, Notable Notions (both retired Stampin’ Up!), Always (MDS version)

Ink: Stāz-On® Jet Black, Versamark™, Real Red; Brusho® Crystal Colours- Brilliant Red, Purple,Turquoise

Paper: Whisper White, Basic Black

Accessories: Embossing Buddy®, Stampin’ Emboss® Clear and White Embossing Powder, Heat Tool


Thanks again for visiting- I will be  posting more cards later this morning  :-)  Hugs and have a wonderful Wednesday, my friends!!

Thursday, August 13, 2015

DTGD15jbgreendawn Vintage Happy Birthday

Hi Stampers!!

Even though the official 2015 Dare to Get Dirty Challenge week is now over, I wanted to share another card that I created as a sample maker for my good friend, Stacy’s DTGD15 jbgreendawn Challenge :-)

***FYI*** You can still create cards throughout the year and link to the DTGD15 challenges although the official challenge is over and you would not be eligible for the drawing for any of the vendor prizes  :-)

Again, one major rule of participation in the Dare To Get Dirty Challenges is that the actual challenge details are secret to all except the Fan Club Members…I can share the card but not the details on the actual challenge (unfortunately, any details on this card will reveal the challenge details, so if you have any questions, please let me know in the comment area).  

I am also linking this card to the Splitcoaststampers’ F4A262 “Let’s Get Krafty” Challenge (see gallery here). 

The background panel on this card was created by stamping the En Francais (retired background stamp) using Stāz-On® Jet Black Ink, embossing with the Parisian (Tin Holtz®) Folder that was inked with Ranger® Tim Holtz® Tea Dye Distress Ink before embossing, applying Tea Dye and Picket Fence Distress Stains, then applying with my fingers diluted Frost White Shimmer Paint and finally Gelatos Iced Chai (or Iced Coffee- I forgot to label them). 

Stamp Sets: Express Yourself , En Francais (both SU!); Girl Image from Crafty Individuals CI-065

Paper: Kraft, Basic Black

Ink: Stāz-On® Jet Black, Ranger® Tim Holtz® (TH) Tea Dye Distress Ink, TH Picket Fence & Tea Dye Distress Stain, Frost White & Champagne Mist Shimmer Paint, Gelatos® Iced Chai

Accessories: Big Shot™, MFT Royal Rose Dies, Parisian TH Embossing Folder, MS Leaf Punch, Crochet Lace (from my stash)


Thanks again for visiting! I hope to share a few more of the samples for the DTGD15 hostess challenges shortly.

Sunday, July 26, 2015

Choose Happiness - Feel Better Soon :-)


Hi Stampers!

This weekend I had a chance to play around in my craft room and created a fun Mixed Media card for the As You See It #97 Sketch Challenge using the Colour Me...!#81 "Colour Me Playful" Challenge along with the Friday Mash Up! FM218 "Let's Eat" Challenge (food and/or drink or use markers to color or both- I chose markers to color only :-)). 

If you have not had a chance to visit the above challenge sites yet, again, I would encourage you to do so- wonderful inspiration from all!

To create this Mixed Media card:

Use the Big Shot™ with the Honeycomb Textured Impressions™ Embossing Folder to emboss a piece of Whisper White cardstock, trim the panel and mount onto a piece of Calypso Coral, trim again and mount onto a piece of Blackberry Bliss, trim once more and mount onto the Pink Pirouette card base.

De-static a piece of Vellum and stamp the woodgrain banner image from Choose Happiness several times using Versamark™ ink.  Apply Stampin’ Emboss® White Embossing Powder and use the Heat Tool to heat set.   Once the powder has cooled carefully cut out the banners.

Mount the banners at varying lengths to the upper right hand portion of the card front.  

Ink the flower and stem images from Choose Happiness with Stāz-On® Jet Black Ink and stamp two of the flower images as well as three of the stems onto Whisper White cardstock.

 Use Stampin’ Write Markers to color the images- Pink Pirouette and Calypso Coral for the flowers and Garden Green for the stems (scribbling the Garden Green onto a craft mat and using the AquaPainter™ for the first layer of color, then coloring direct with the marker).  

Spritz the colored images with water to help soften the edges of the marker and “fussy-cut” out the images.  

Use the AquaPainter™ to apply Frost White Shimmer Paint to the petals, and, if needed, the White Gel Pen to highlight the center. 

Stamp the bird, sentiment and border using Blackberry Bliss Classic Ink onto Whisper White cardstock.  Fussy cut out the bird image and set aside.

Trim the border image and sentiment into strips and create the banner point using the Hexagon Punch.  Layer onto Blackberry Bliss cardstock, create the banner points using the Hexagon Punch, layer onto Calypso Coral cardstock and create the banner points once more with the Hexagon Punch.

Mount the banners to the card front per the sketch and add the stems.
Mount the flowers to the corner (using Stampin’ Dimensionals® for the second flower) and add the bird image with Stampin’ Dimensionals® to finish off the card.

Stamp Sets:  Choose Happiness, Express Yourself (retired Hostess set)

Ink: Versamark™, Stāz-On® Jet Black, Blackberry Bliss; Stampin’ Write Markers- Calypso Coral, Garden Green, Pink Pirouette, White Gel Pen

Paper/Cardstock:  Whisper White, Blackberry Bliss, Calypso Coral, Pink Pirouette

Accessories:  Big Shot™, Honeycomb Textured Impressions™ Embossing Folder, Embossing Buddy®, Stampin’ Emboss® White Embossing Powder, Heat Tool, Hexagon Punch, Frost White Shimmer Paint


Thanks again for taking the time to stop by- I will be sharing one more card shortly :-)

I hope you have a wonderful weekend, my friends!
Related Posts Plugin for WordPress, Blogger...