Showing posts with label Work of Art. Show all posts

Thursday, August 3, 2017

Love You More

Hi Friends!

I have been busy this summer trying to organizing my stamping studio and have decided to focus on using some of my older stamps and paper this year (I believe I could create a card every day for years using a different stamp set and still not use all of my stamps :-)). 

I wanted to take a break this evening and decided to pull out the retired Stampin’ Up! Love You More stamp set along with the retired I Am Me designer series paper.  I paired the two with the current Work of Art stamp set to create a quick Clean and Simple (CAS) card.   

Clean and Simple cards are still difficult for me (I tend to be a more Shabby Chic/Mixed Media artist) so to focus my design process, I incorporated the CAS(E) This Sketch #232 Sketch Challenge along with the #93  Keyword Challenge at The Challenge (Simple, Friendship) into the design. 

Since I have a large selection of stamp sets (most of which are retired Stampin' Up!), I find that online challenges help me limit my choices and at least finish a card:-)).  

If you have not had a chance to check out the above challenges yet, I hope you will find the time to do so- great inspiration from all!

This was a very simple card to create:

1). Trim a piece of Whisper White cardstock to approx. 4” x 5 ¼”, mount onto a piece of Basic Gray cardstock, trim close to the edge and mount onto a piece of Real Red cardstock.

2). De-static a scrap piece of Whisper White cardstock with an Embossing Buddy®, stamp the globe image with Versafine™ Onyx Black ink and heat emboss with clear embossing powder.  Once the powder has cooled, color the heart with the Real Red Stampin’ Wrtie Marker and the ocean with the Pool Party Marker.  Fussy-cut the image and use a clear glitter pen to add shimmer to the ocean.

3). Cut a piece of the I Am Me patterned paper, layer onto Basic Gray cardstock and again  onto Real Red cardstock. 

4). Ink the chevron stamp from Work of Art with Pool Party Classic Ink, stamp on an angle onto the card front several times before adhering the layered designer paper panel.  Trim the panel to the edges of the card front and mount the entire card front onto the Extra Thick Whisper White card base.

5). Ink the sentiment from Love You More with Versafine™ Onyx Black ink and heat emboss with clear embossing powder.

6). Mount the fussy cut globe image with dimensional foam onto the card front.

7). Finish off the card by adding a few accents with Nuvo™ Crystal Glossy Black Drops.

Stamp Sets: Love You More, Work of Art

Ink/Mediums: Versafine™ Onyx Black, Pool Party Classic Ink; Stampin’ Write Markers- Pool Party, Real Red; Clear Wink of Stella®

Paper: Whisper White, Basic Gray, Real Red, retired I AM Me DSP

Accessories/Tools: Embossing Buddy®, Clear EP, Heat Tool


Thanks again for taking the time to stop by- hugs and I hope all of you have a wonderful week!

Tuesday, June 20, 2017

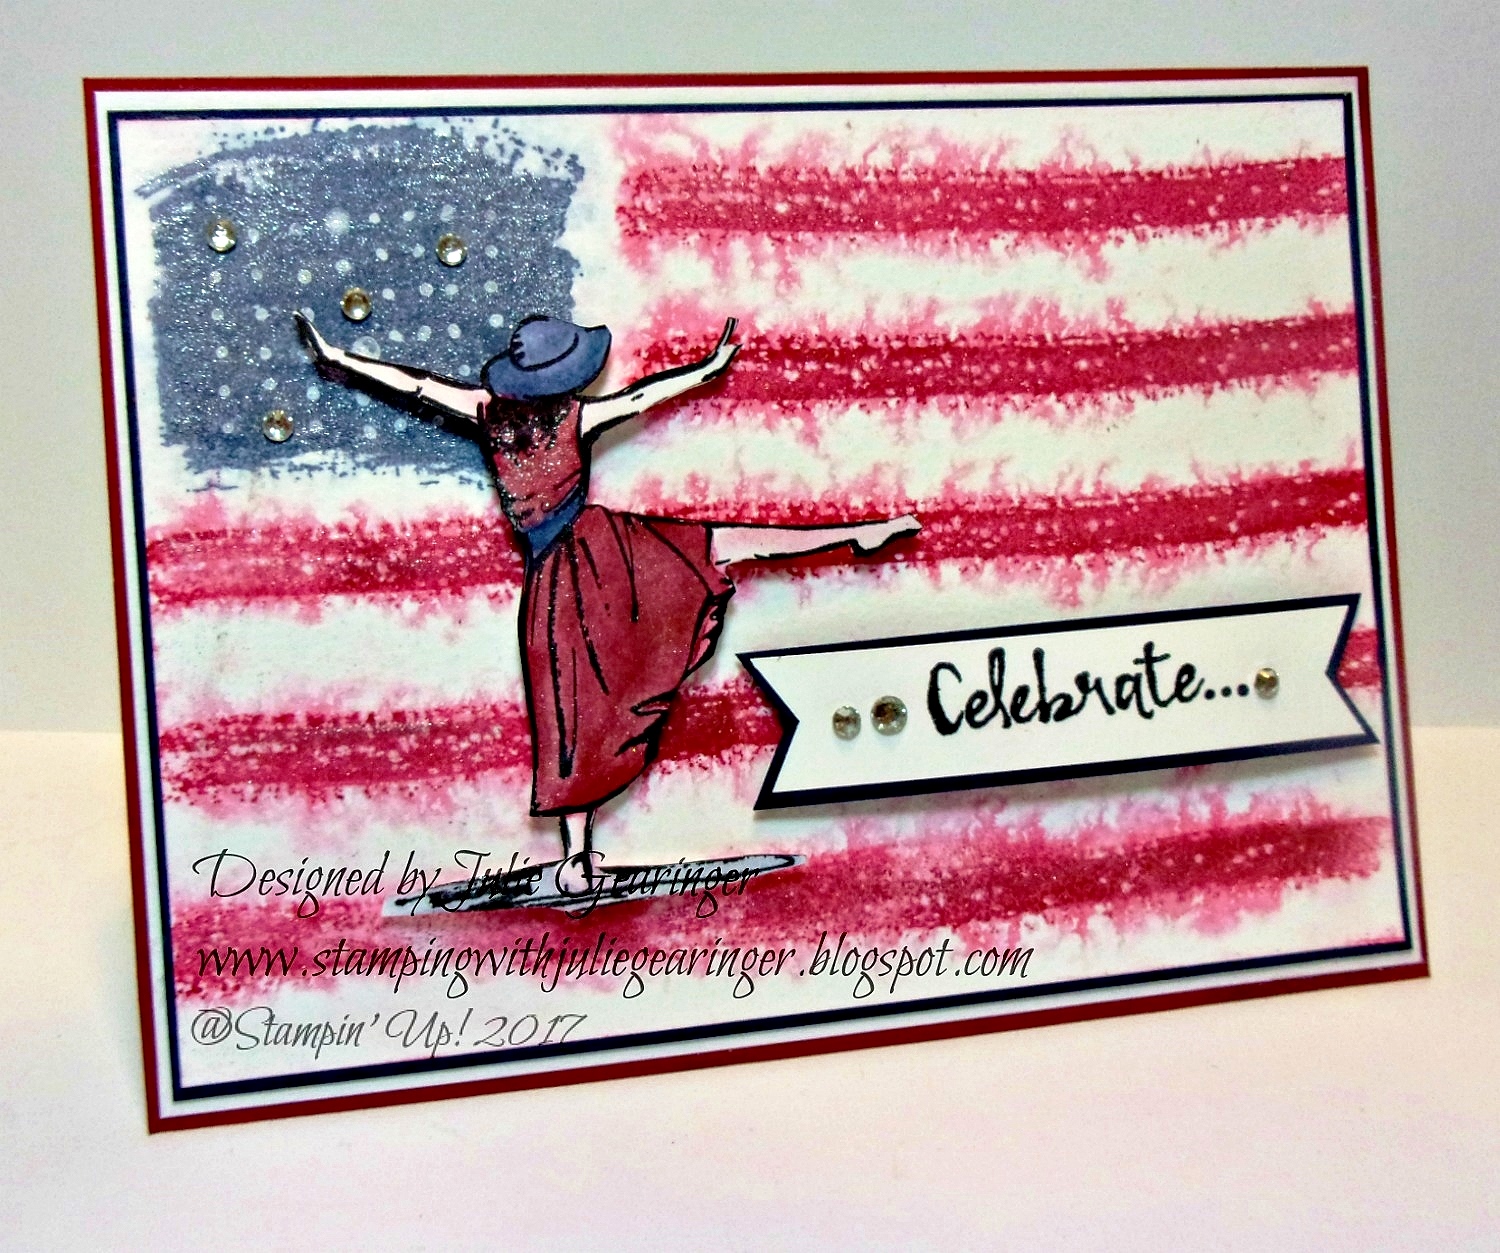
SUO177 Patriotic Celebration


Hi Friends!   

It’s time for the #177 “Patriotic Colors” Challenge at SU! Only Challenges!  I decided to create a flag using a few stamps from Work of Art and paired it with the Beautiful You stamp set.

I am also linking this card to the Happy Little Stampers June Watercolour "Anything Goes (opt. twist masking) " Challenge and the Splitcoaststampers CAS433 "Flag Day" Challenge.

If you have not had a chance to stop by the SU-Only Challenge site to check out the rest of the Design Team projects or the other challenge galleries yet, I encourage you to do so- fabulous inspiration from all!

To create this card:

1). Ink the block image from Work of Art with Night of Navy Classic Ink, stamp off onto scrap paper and stamp onto a piece of Whisper White cardstock.


2). Ink the straight line image from Work of Art with Cherry Cobbler Classic Ink, stamp off onto scrap paper and stamp onto the panel.  Repeat for the additional stripes for the “flag”.  Lightly spritz the panel with water and dry with the Heat Tool.

3). Use the White Gel Pen to add a few white highlights for “stars”, trim the panel and mount onto a piece of Night of Navy cardstock, trim and mount onto a piece of Whisper White cardstock, trim and mount onto a piece of Cherry Cobbler cardstock.  Adhere the entire panel to an Extra Thick Whisper White card base.

4). Ink the Beautiful You girl image with Stampin’ Archival™ Basic Black Ink, stamp onto a piece of Whisper White cardstock and color using a Night of Navy and Cherry Cobbler Stampin’ Write Marker.  Soften the color with an AquaPainter™ and dry with the Heat Tool.  Fussy-cut the image, use a Black Stampin’ Write Marker to outline the edges of the image and mount onto the card front with Stampin’ Dimensionals®.

 5). Ink the sentiment from Beautiful You with Stampin’ Archival™ Basic Black Ink, stamp onto a piece of Whisper White cardstock, trim and create the banner points with the retired Hexagon Punch.  Mount onto Night of Navy cardstock, trim and mount onto the card front with Stampin’ Dimensionals®.

6). Use the Clear Wink of Stella® Glitter Pen to add shimmer to the stripes, star area as well as the dress.  Add a few Rhinestones to finish off the card.

Stamp Sets: Beautiful You, Work of Art

Ink/Mediums: Classic Ink- Cherry Cobbler, Night of Navy;  Stampin’ Archival™ Basic Black; Clear Wink of Stella® Glitter Pen, White Gel Pen
Paper: Whisper White, Extra Thick Whisper White, Cherry Cobbler, Night of Navy
Accessories/Tools: AquaPainter™, Heat Tool, Rhinestones
Thanks again for taking the time to stop by and I hope that you will create your own Stampin’ Up! Only project and play along with our “Patriotic Colors” challenge!

Monday, April 11, 2016

By The Tide- Congratulations

Hi Again Friends!

I had fun this weekend stamping images, coloring and fussy-cutting (I know, sounds like fun- right :-)?)!  

Anyway, I decided to put together one more card this evening/ morning and used the fussy-cut Lobster from By The Tide along with the Create with Connie and Mary CCMC401Sketch,  the CC557 Splitcoaststampers’ (SCS) Color Challenge and Alphabet Week 12 “L” Challenge (“L”for Lobster).

I hope you will take the time to visit the above galleries- so much inspiration from the Design Teams as well as the entries!

Other than the fussy-cutting of the lobster, this card was fairly easy to create:

Hard to see in the photo but the lobster is raised up above the panel :-)
Ink the Lobster image from By The Tide using Basic Black Stampin’ Archival Ink and stamp onto Whisper White cardstock.

Heat set the image with the Heat Tool and use an AquaPainter™  with Cherry Cobbler Classic Ink to color the lobster and add additional shadows with the Cherry Cobbler Stampin’ Write Marker.
 
Carefully fussy-cut the image, add Clear Wink of Stella® over the entire Lobster and set aside.

Ink the square stamp from Work of Art with Soft Sky Classic Ink and stamp repeatedly onto a piece of Whisper White cardstock.

Add additional splatter with Timeless Textures and Soft Sky Ink, trim to a square image (I used the Big Shot™ with the Square Framelits™ and mount onto Basic Black cardstock (trimming close to the edge).

Emboss a piece of retired Wild Wasabi Designer Series Paper (DSP) with the Woodgrain Textured Impressions™ Embossing Folder, trim and mount onto a square of Basic Black cardstock (also die cut with the Square Framelits™).

Mount the Soft Sky layered square onto the Wild Wasabi DSP square using dimensional foam and add the Lobster image with dimensional foam as well.

Create the Soft Sky banner using Soft Sky cardstock and the Banner Triple Punch, ink the Timeless Textures stamp with Soft Sky Classic Ink and stamp over the entire banner.

Layer the banner onto a Basic Black banner created in the same manner as above but cut a bit wider.

Create the Wild Wasabi strip in the same manner as the Soft Sky banner (using Wild Wasabi cardstock and ink) and once the banner has been layered, cut it in half.

Use the Big Shot™ with the Woodgrain Textured Impressions™ Embossing Folder to emboss a piece of Whisper White cardstock, trim and mount onto the Basic Black card base.

Mount the banners, the layered Lobster panel and sentiment to finish off the card.

Stamp Sets: By The Tide, Work of Art, Timeless Textures, Express Yourself (retired Hostess Set)

Ink: Basic Black Stampin’ Archival, Cherry Cobbler, Soft Sky, Cherry Cobbler Stampin’ Write Marker, Clear Wink of Stella®

Paper: Whisper White, Basic Black, Soft Sky, Wild Wasabi

Accessories: Big Shot™, Square Framelits™, Woodgrain Textured Impressions™ Embossing Folder, Banner Triple and Hexagon Punch, AquaPainter™


Thanks again for taking the time to visit- hugs and I hope you have a fabulous week!!
Related Posts Plugin for WordPress, Blogger...