Showing posts with label Beautiful You. Show all posts

Tuesday, August 1, 2017

SUO180 Celebrate- Another Watercolor Tissue Paper Experiment


Hi Friends!   


I have a few birthdays to celebrate in the fall and I decided to play around with the watercolor tissue technique again this time using fall colors (see this post for more details on the technique).

I also will be linking this card to The Paper Players #355Tic-Tac-Toe Challenge (Die-Cut, Banner, Birthday) and the Word Art Wednesday#292-#293 “Anything Goes” Challenge.

If you have not had a chance to stop by the SU-Only Challengesite to check out the rest of the Design Team projects or the other challenge sites yet, I encourage you to do so- wonderful inspiration from all!

To create this card:

1). Using a silicone craft mat, tap the So Saffron, Cajun Craze and Pumpkin Pie Classic Ink pads, lightly spritz with water, use a plastic spoon or palette knife to stir the ink a bit and lay a piece of tissue paper into the ink.  Gently lift up the paper and use the Heat Tool to dry the sheet.  Apply additional ink as needed and once you are satisfied with the results and the panel is thoroughly dried, adhere to a piece of Whisper White cardstock, “scrunching” up the tissue as you adhere it to the Whisper White panel.

2). Once the glue has dried, rub a Versamark™ ink pad over the ridges, apply Gold Stampin’ Emboss® Embossing Powder and heat set with the Heat Tool.

3). Use the Big Shot™ with the Leaflets Framelits™ to cut out the leaf.  Ink the corresponding stamp from Vintage Leaves with Cajun Craze Classic Ink, stamp over the entire leaf (difficult to see in the photo), gently wipe off the ink with a dry paper towel from the embossing and set aside.

Close-up of the Watercolor Tissue Detail
4). Use the Big Shot™ with the Woodland Textured Impressions™ Embossing Folder to emboss a piece of Very Vanilla cardstock, trim the panel, mount onto a piece of Cajun Craze cardstock and adhere to the Extra Thick Whisper White card base.

5). Loop a bit of Gold Metallic Thread onto the card front and add the die cut leaf with Stampin’ Dimensionals®.

6). Heat emboss the sentiment from Beautiful You with Gold Embossing Powder, hand cut the banner points and mount onto the card front with Stampin’ Dimensionals®.

7). Use Clear Wink of Stella® to add shimmer to the birch trees in the background to finish off the card.

Stamp Sets: Beautiful You, Vintage Leaves

Ink/Mediums: Versamark™, Classic Ink- Cajun Craze, Pumpkin Pie, So Saffron; Clear Wink of Stella®
Paper: Very Vanilla, Cajun Craze, Extra Thick Whisper White; Wrapping Tissue Paper
Accessories/Tools: Big Shot™, Leaflets Framelits™, Woodland Textured Impressions™ Embossing Folder, Embossing Buddy®, Stampin’ Emboss® Gold Embossing Powder , Heat Tool, Gold Metallic Thread

Thanks again for taking the time to visit and I hope that you will create your own Stampin’ Up! Only project and play along with our “Birthday Celebrations” challenge!

Tuesday, July 4, 2017

SUO178 Summer Blossoms


Hi Friends!   

It’s time for the #178 “Summer Fun” Challenge at SU-Only Challenges!  I decided to use summer colors- oranges and yellows for my floral card but anything that makes you think of summer would be perfect for our challenge using Stampin’ Up! only products!  We hope that you can join us and that we will see your creation in our gallery. 


If you have not had a chance to stop by the SU-Only Challenge site to check out the rest of the Design Team projects or the other challenge galleries yet, I encourage you to do so- gorgeous inspiration from all!

To create this card:

1). Ink the floral image from Butterfly Basics using Stampin’ Archival™ Basic Black ink and stamp onto a piece of Whisper White cardstock. Using ink from Pumpkin Pie and Crushed Curry Classic ink along with an AquaPainter™, watercolor the blossoms.  Color the leaves with Pear Pizzazz and Wild Wasabi Classic Ink and add deeper color with the coordinating Stampin’ Write Markers and shadows with the Sahara Sand marker.

2). Ink the honeycomb image with Pumpkin Pie Classic Ink, stamp off onto a piece of scrap paper and stamp over the floral image.  Trim the panel and stamp the postmark stamp with Pumpkin Pie in the corner.  Trim the panel and mount onto Basic Black cardstock.

3). To create the second panel, press the Pumpkin Pie and Crushed Curry Classic Ink stamp pads onto a silicone craft mat, lightly spritz with water and lay the piece of paper into the ink, lift up the panel and repeat the step until you are satisfied with the results.  Ink the honeycomb image with Pumpkin Pie Classic Ink and stamp over the panel, trim the panel and mount onto Basic Black cardstock, trim close to the edge.

4). Trim the piece of Whisper White cardstock, mount onto Basic Black cardstock, trim and mount onto the Extra Thick Whisper White card base.

5). De-static a piece of Basic Black cardstock with the Embossing Buddy®, stamp the sentiment from Beautiful You with Versamark™ Ink, apply Stampin’ Emboss® White Embossing Powder, heat set with the Heat Tool and once cooled, trim around the sentiment.

6). Layer the right hand panel (per the sketch) directly to the card front, mount the floral image panel and sentiment to the card front with Stampin’ Dimensionals®. 

7). Use the Clear Wink of Stella® Glitter Pen to add shimmer to the flower petals, add white highlights with the White Gel Pen and  a few Rhinestones to finish off the card.
Stamp Sets: Beautiful You, Butterfly Basics

Ink/Mediums: Classic Ink- Stampin’ Archival™ Basic Black; Classic Ink- Crushed Curry, Pumpkin Pie, Pear Pizzazz, Wild Wasabi, Stampin’ Write Markers- Pumpkin Pie, Wild Wasabi, Sahara Sand; Clear Wink of Stella® Glitter Pen, White Gel Pen
Paper: Whisper White, Extra Thick Whisper White, Basic Black
Accessories/Tools: AquaPainter™, Heat Tool, Rhinestones, Embossing Buddy®, Stampin’ Emboss® White Embossing Powder
Thanks again for taking the time to visit and I hope that you will create your own Stampin’ Up! Only project and play along with our “Summer Fun” challenge!

Tuesday, June 20, 2017

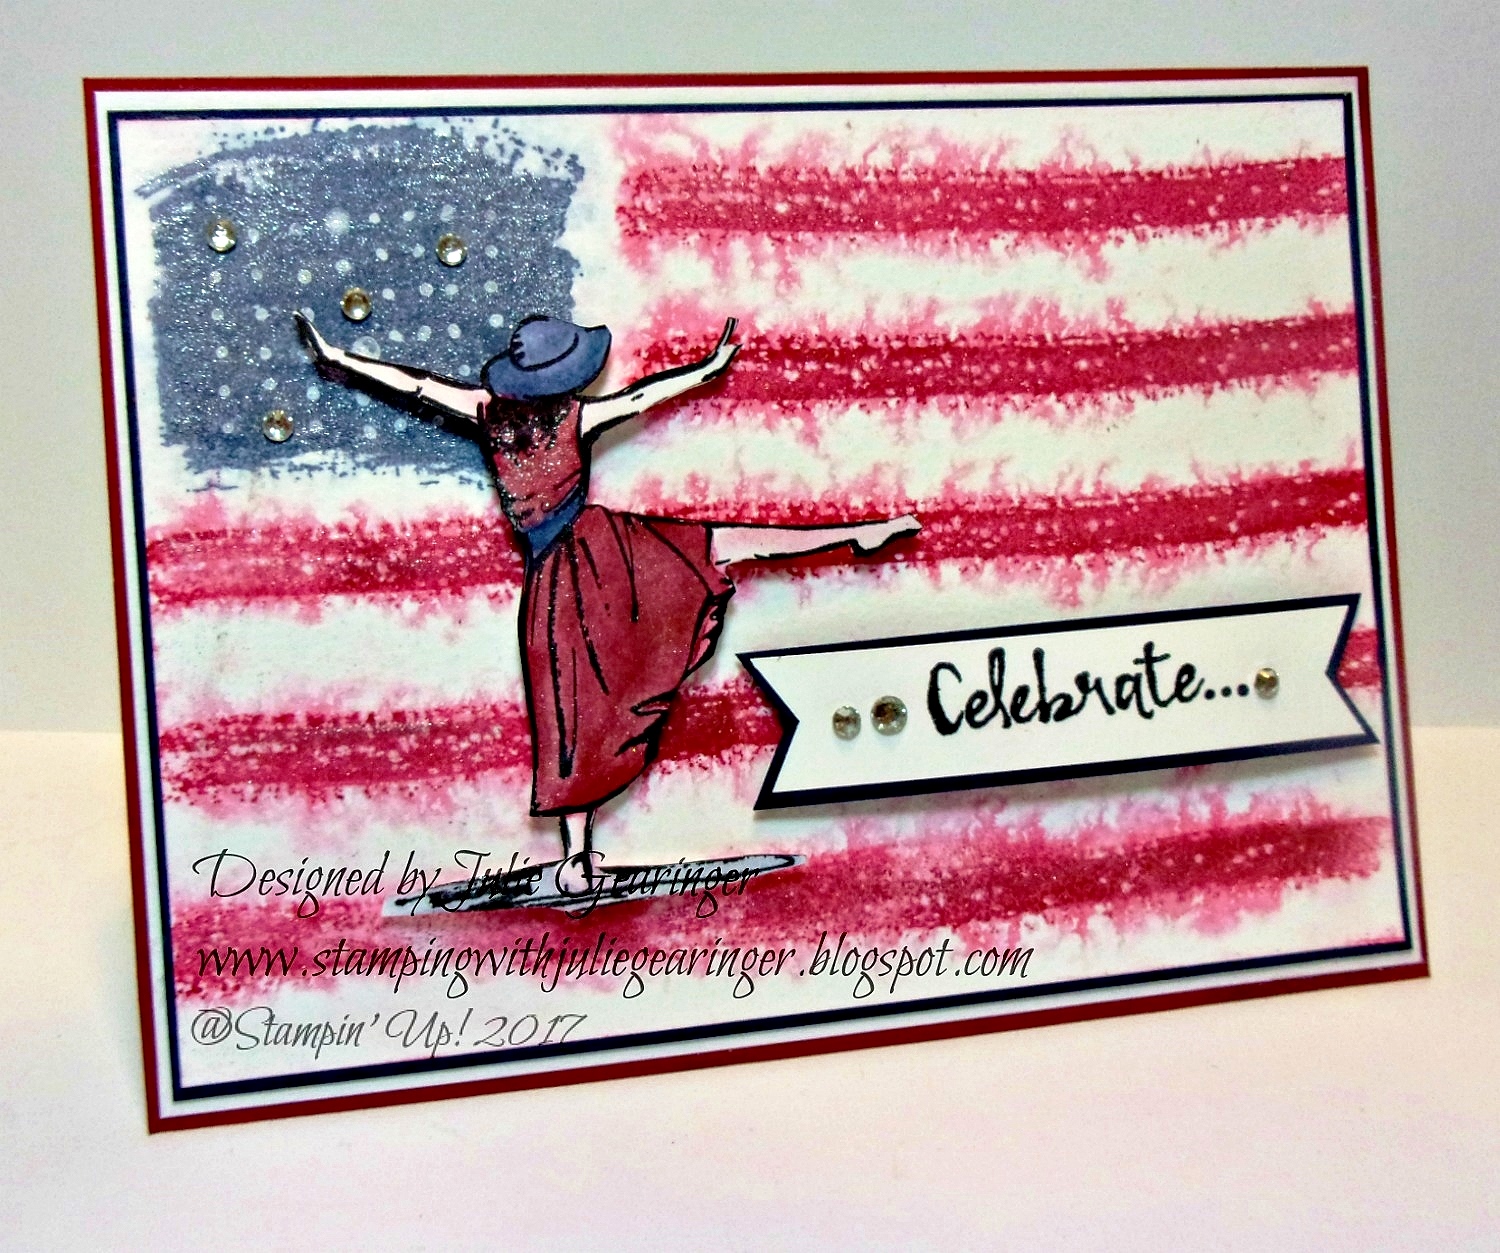
SUO177 Patriotic Celebration


Hi Friends!   

It’s time for the #177 “Patriotic Colors” Challenge at SU! Only Challenges!  I decided to create a flag using a few stamps from Work of Art and paired it with the Beautiful You stamp set.

I am also linking this card to the Happy Little Stampers June Watercolour "Anything Goes (opt. twist masking) " Challenge and the Splitcoaststampers CAS433 "Flag Day" Challenge.

If you have not had a chance to stop by the SU-Only Challenge site to check out the rest of the Design Team projects or the other challenge galleries yet, I encourage you to do so- fabulous inspiration from all!

To create this card:

1). Ink the block image from Work of Art with Night of Navy Classic Ink, stamp off onto scrap paper and stamp onto a piece of Whisper White cardstock.


2). Ink the straight line image from Work of Art with Cherry Cobbler Classic Ink, stamp off onto scrap paper and stamp onto the panel.  Repeat for the additional stripes for the “flag”.  Lightly spritz the panel with water and dry with the Heat Tool.

3). Use the White Gel Pen to add a few white highlights for “stars”, trim the panel and mount onto a piece of Night of Navy cardstock, trim and mount onto a piece of Whisper White cardstock, trim and mount onto a piece of Cherry Cobbler cardstock.  Adhere the entire panel to an Extra Thick Whisper White card base.

4). Ink the Beautiful You girl image with Stampin’ Archival™ Basic Black Ink, stamp onto a piece of Whisper White cardstock and color using a Night of Navy and Cherry Cobbler Stampin’ Write Marker.  Soften the color with an AquaPainter™ and dry with the Heat Tool.  Fussy-cut the image, use a Black Stampin’ Write Marker to outline the edges of the image and mount onto the card front with Stampin’ Dimensionals®.

 5). Ink the sentiment from Beautiful You with Stampin’ Archival™ Basic Black Ink, stamp onto a piece of Whisper White cardstock, trim and create the banner points with the retired Hexagon Punch.  Mount onto Night of Navy cardstock, trim and mount onto the card front with Stampin’ Dimensionals®.

6). Use the Clear Wink of Stella® Glitter Pen to add shimmer to the stripes, star area as well as the dress.  Add a few Rhinestones to finish off the card.

Stamp Sets: Beautiful You, Work of Art

Ink/Mediums: Classic Ink- Cherry Cobbler, Night of Navy;  Stampin’ Archival™ Basic Black; Clear Wink of Stella® Glitter Pen, White Gel Pen
Paper: Whisper White, Extra Thick Whisper White, Cherry Cobbler, Night of Navy
Accessories/Tools: AquaPainter™, Heat Tool, Rhinestones
Thanks again for taking the time to stop by and I hope that you will create your own Stampin’ Up! Only project and play along with our “Patriotic Colors” challenge!

Tuesday, January 3, 2017

SUO 165 New Stuff, New Year- Beautiful You


Hi Friends!   


For my quick CAS card, I decided to use the brand new Occasions Mini Stamp Set, Beautiful You along with the Timeless Textures Stamp Set (from the Idea Book and Catalog).


If you have not had a chance to stop by the SU-Only Challenge site to check out the rest of the Design Team projects or the other challenge sites, I hope you will do so- wonderful inspiration from all!

This was an extremely easy card to create:

1). Ink the Beautiful You image with Stampin’ Archival Basic Black Ink and stamp onto Whisper White cardstock.

2). Using Stampin’ Write Markers- Flirty Flamingo, Pool Party and Smoky Slate with an AquaPainter™, add color to the image.  FYI- I use a silicone mat, scribble the ink onto the mat and pick it up with the AquaPainter™.  Just be careful not to “work” the area too much since the Whisper White cardstock will start to “pill”.

3). Add additional color with the markers directly to the images and use the AquaPainter™ to soften the edges.

4). Ink one of the scribbly wash images from Beautiful You to add additional Pool Party to the area below the dancing image and area for the sentiment.

5). Ink the Beautiful You sentiment with Stampin’ Archival Basic Black Ink and stamp.
6). Add a bit of splatter with the small splatter stamp from Timeless Textures (I inked the stamp with the Pool Party and Smoky Slate SU! markers).

7). Trim the panel, mount onto Flirty Flamingo cardstock, trim again and mount onto Pool Party cardstock before trimming once more and mounting onto the Extra Thick Whisper White card base.

8). Add shimmer to her dress and hat with Clear Wink of Stella® to finish off the card.
Stamp Sets:  Beautiful You, Timeless Textures
Ink: Stampin’ Archival™ Basic Black, Stampin’ Write Markers- Flirty Flamingo, Pool Party, Smoky Slate; Clear Wink of Stella®
Paper/Cardstock: Whisper White, Flirty Flamingo, Pool Party, Extra Thick Whisper White
Accessories: AquaPainter™
 Thanks again for taking the time to visit – I hope that you will create your own Stampin’ Up! Only project and play along with our “New Year, New Stuff” challenge!
Related Posts Plugin for WordPress, Blogger...