Showing posts with label Flag. Show all posts

Saturday, June 26, 2021

One Nation Under God


Hi Friends!

Today I am sharing a Mixed Media Patriotic card designed with the new Red, White & Blue Bundle along with the Old Glory Bundle and other dies/supplies (from Stamp Simply)!


I fell in love with the Old Glory Bundle when it was released last spring and absolutely love the new coordinating Red, White & Blue Bundle, don’t you?  

The flag image, block sentiment stamp plus all of the other sentiments are perfect for so many summer cards!

This week we are celebrating the new Red, White & Blue Bundle release by sharing patriotic cards on the Stamp Simply blog!  I hope you have had a chance to check out the fabulous inspiration from the rest of our Design Team!

I decided to create an easel card since I wanted to use the patriotic map of the USA as well as the flag images. 

As many of you know, I love to participate with online challenges and will be linking this card to the Double D “Signs of Summer” Challenge (I was inspired by the red, white and blue stripes in the little girl's bathing suit as well as the celebratory theme of the parade in the inspiration photo).  

I am also participating in the  Simon Says Wednesday “Red, White and/or Blue” Challenge  and the Word Art Wednesday #497-#498 “Anything Goes” Challenge.  

If you have not had a chance to visit the Stamp Simply blog or the other challenge sites yet, I encourage you to do so- wonderful inspiration from all!

To create this card:


Ink the block image from the Red, White & Blue stamp set with Tim Holtz™ Chipped Sapphire Distress Ink and stamp at the top and the bottom of a 3 ¾” x 5” piece of white cardstock and onto another piece of white cardstock approx. 3 ¾” x 2 ½”.

Once the ink has dried, apply Tim Holtz™ Picket Fence Distress Stain over the entire panel to tone down the color a bit.  Allow to dry and distress the edges of the panels with a distressing tool.

Use a blending brush with Tim Holtz™ Pumice Stone Distress Ink to “age” the panels, mount each onto white cardstock, trim, and mount again onto red cardstock, trim and finally mount onto navy cardstock.

Ink the block image from the Red, White & Blue stamp set with Versafine Onyx Black Ink and stamp onto another piece of 4 ¼” x 5 ½” white cardstock (stamp near the bottom of the panel).

Ink the US map image from the Old Glory stamp set with Versafine Onyx Black Ink and stamp onto the top of the same panel as the flag image (this way you can die-cut both from the same piece of cardstock).

Die cut both images using the coordinating dies and watercolor the images with watercolor pencils (I use Derwent™ and a few Stampin’ Up! – see in the list below).

Create the banner flags from the Echo Park America 6x6 Paper Pad using the smallest banner die from the Fishtail Sentiment Banners and once die cut, split the banner in half (FYI- I used the little strips that you normally cut off the top of the 6x6 paper when you remove it from the pad.  There is a hole in the center, and you can get two of the smallest dies cut into banners, resulting in four when you split them in half).


Gently apply Tim Holtz™ Pumice Stone Distress Ink to “age” the banners with a blending brush. 

Use a glue gun to adhere the banners to a string of knotted patriotic twine and mount on an angle to the large background panel (FYI- I used a glue gun to add a drop of glue to each end of the twine as well as a small amount under the twine in the center to adhere to the panel).

Using Versafine Onyx Black Ink, stamp the “One Nation Under God” and “Always Remember Freedom Isn’t Free” onto white cardstock, apply clear embossing powder and heat set with a heat tool.


Once the embossing has cooled, carefully color the “Nation” in red (I used a sharp red watercolor pencil).  Die cut the “One Nation Under God” sentiment with a medium banner die from the Fishtail Sentiment Banners, distress the paper with the pumice stone distress ink, distress the edges with a distressing tool (or the edge of scissors) and trim off the left-hand side to mount along the main background panel (under the banner).

Cut the “Always Remember Freedom Isn’t Free” sentiment in half, distress the edges and set aside.

Create the easel base from a piece of 4 ¼” x 11” piece of heavy white.  Score at 5 ½” and on one side at 2 ¾”.  Fold along the 5 ½” score line for a tent fold, the fold the 2 ¾” upward to create the base for the main panel. 

Once you have the easel base folded, I tend to trim a bit off the edges (approx. ⅛”).  This way when you mount your front panel and smaller piece at the bottom, the white cardstock will not show.   Please refer to this tutorial at Splitcoaststampers for more details and info on how to create an easel card base.

Adhere the main front panel to the small fold at the top of the easel (I use strong adhesive to adhere this panel).

Add the layered smaller panel at the bottom of the easel with dimensional foam (or chipboard).

Adhere the die cut US map image to the card front with dimensional foam and/or chipboard as well as the flag image at the bottom of the easel.


Adhere the “Always Remember Freedom Isn’t Free” sentiment layers with dimensional foam and/or chipboard onto the lower panel and finish off the card with a few silver rhinestones in the upper right-hand and lower left-hand corners of the flag panel.


Stamp Sets:   Red, White & Blue Bundle, Old Glory Bundle (Stamp Simply)

Ink/Mediums: Versafine Onyx Black Ink, Watercolor Pencils- Derwent® #19- Madder Carmine, #28= Delft Blue; Stampin’ Up! – Daffodil Delight, Early Espresso, Basic Black, Night of Navy; Tim Holtz™ Distress Ink- Chipped Sapphire, Pumice Stone, Picket Fence Distress Stain

Cardstock/Paper: White, Red, Navy; Echo Park America 6x6 Paper Pad


Accessories/Tools: Gemini, Jr., Stamp Simply Steel Dies- The Red, White & Blue Flag, Patriotic Stars & Stripes (Old Glory), Fishtail Sentiment Banners, May Arts Patriotic Twine, Distressing Tool, Blending Brush, Scoring Tool, Embossing Powder Tool, Clear Embossing Powder, Heat Tool, Silver Rhinestones


Also, don't forget that Stamp Simply still has the following special for June (also, a free shipping offer) :


Thanks again for taking the time to stop by and visit! I hope you are having a great summer so far and, for my US friends, as we approach Independence Day, I hope you are thankful for those in our armed forces (and their families) serving currently and in the past.  We know that “Freedom Isn’t Free”. May we always remain “One Nation Under God”.  

Hugs and God Bless, sweet friends!


Wednesday, July 5, 2017

Land of the Free

Hi Friends!!

Today I am sharing yet another Clean and Simple (CAS) patriotic card using the retired Stampin’ Up! Land of the Free. 

I incorporated the Splitcoaststampers CAS436 “Show Your Patriotism” Challenge and the AAA Cards #93 “Words Take Center Stage" Challenge.  I know that the words on this flag image are not large and bold, but to me, they have “power” for sure!

If you have not already had a chance to visit the above challenge sites, I hope you will do so- they both have fabulous Design Teams as well as inspiration in their galleries.

To create this card:

1). Using Stampin’ Write Night of Navy and Cherry Cobbler Markers, color directly onto the Land of the Free stamp and stamp onto Whisper White cardstock.  Die cut the image with the MFT Stitched Rectangle STAX die and mount onto Night of Navy cardstock, trimming close to the edge.

2). Using the Big Shot™, emboss a piece of Whisper White cardstock with the Sizzix™ ©Ellison Star Scroll Embossing Folder, trim and mount onto a piece of Night of Navy cardstock, trim once more before mounting onto the Whisper White card base.


3). Die cut a few stars using the MFT Stitched Star STAX from Cherry Cobbler and Night of Navy cardstock, layer a few stars directly onto the card front, add the flag sentiment along with a few smaller stars with dimensional foam to finish off the card.

Stamp Sets: Land of the Free (retired Stampin’ Up!)

Ink/Mediums: Stampin’ Write Markers- Cherry Cobbler, Night of Navy

Paper: Whisper White, Cherry Cobbler, Night of Navy

Accessories: Big Shot™, MFT™ Stitched Rectangle STAX Dies, MFT™ Stitched Star STAX Dies, Sizzix™ ©Ellison Star Scroll Embossing Folder


Thanks again for taking the time to stop by- hugs and I hope you have a fantastic week!

Tuesday, June 20, 2017

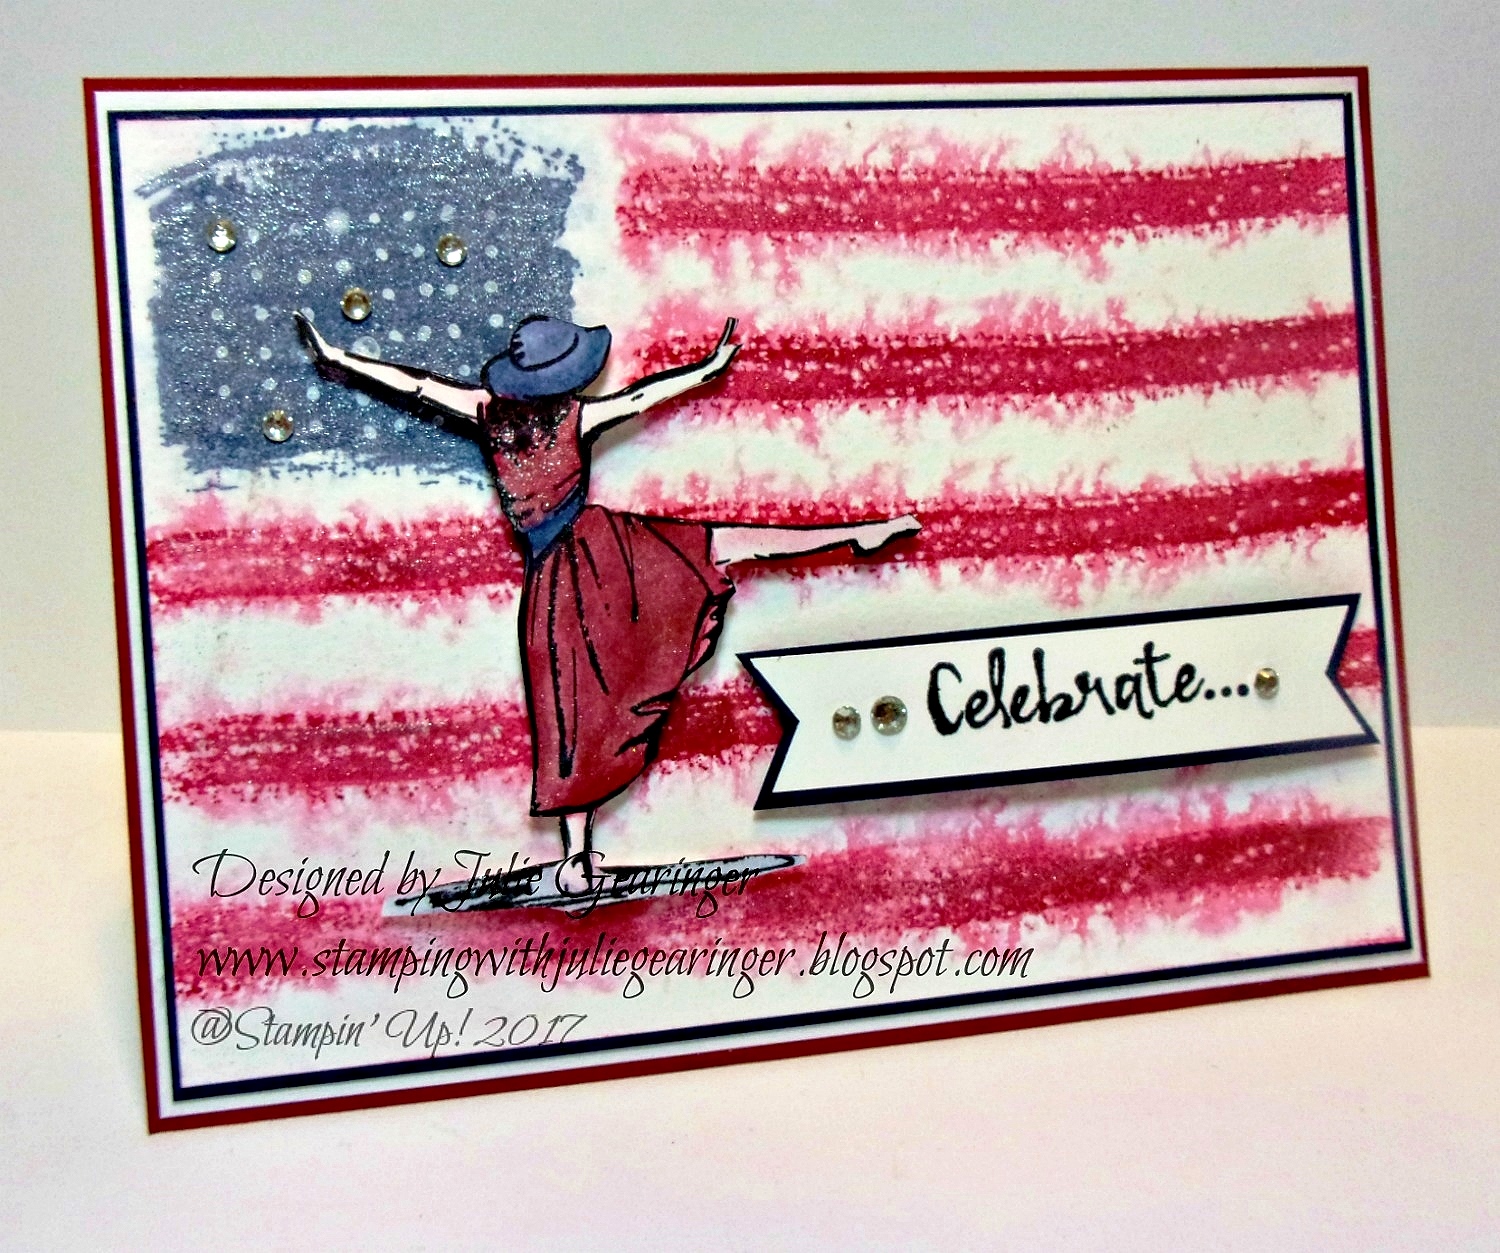
SUO177 Patriotic Celebration


Hi Friends!   

It’s time for the #177 “Patriotic Colors” Challenge at SU! Only Challenges!  I decided to create a flag using a few stamps from Work of Art and paired it with the Beautiful You stamp set.

I am also linking this card to the Happy Little Stampers June Watercolour "Anything Goes (opt. twist masking) " Challenge and the Splitcoaststampers CAS433 "Flag Day" Challenge.

If you have not had a chance to stop by the SU-Only Challenge site to check out the rest of the Design Team projects or the other challenge galleries yet, I encourage you to do so- fabulous inspiration from all!

To create this card:

1). Ink the block image from Work of Art with Night of Navy Classic Ink, stamp off onto scrap paper and stamp onto a piece of Whisper White cardstock.


2). Ink the straight line image from Work of Art with Cherry Cobbler Classic Ink, stamp off onto scrap paper and stamp onto the panel.  Repeat for the additional stripes for the “flag”.  Lightly spritz the panel with water and dry with the Heat Tool.

3). Use the White Gel Pen to add a few white highlights for “stars”, trim the panel and mount onto a piece of Night of Navy cardstock, trim and mount onto a piece of Whisper White cardstock, trim and mount onto a piece of Cherry Cobbler cardstock.  Adhere the entire panel to an Extra Thick Whisper White card base.

4). Ink the Beautiful You girl image with Stampin’ Archival™ Basic Black Ink, stamp onto a piece of Whisper White cardstock and color using a Night of Navy and Cherry Cobbler Stampin’ Write Marker.  Soften the color with an AquaPainter™ and dry with the Heat Tool.  Fussy-cut the image, use a Black Stampin’ Write Marker to outline the edges of the image and mount onto the card front with Stampin’ Dimensionals®.

 5). Ink the sentiment from Beautiful You with Stampin’ Archival™ Basic Black Ink, stamp onto a piece of Whisper White cardstock, trim and create the banner points with the retired Hexagon Punch.  Mount onto Night of Navy cardstock, trim and mount onto the card front with Stampin’ Dimensionals®.

6). Use the Clear Wink of Stella® Glitter Pen to add shimmer to the stripes, star area as well as the dress.  Add a few Rhinestones to finish off the card.

Stamp Sets: Beautiful You, Work of Art

Ink/Mediums: Classic Ink- Cherry Cobbler, Night of Navy;  Stampin’ Archival™ Basic Black; Clear Wink of Stella® Glitter Pen, White Gel Pen
Paper: Whisper White, Extra Thick Whisper White, Cherry Cobbler, Night of Navy
Accessories/Tools: AquaPainter™, Heat Tool, Rhinestones
Thanks again for taking the time to stop by and I hope that you will create your own Stampin’ Up! Only project and play along with our “Patriotic Colors” challenge!

Tuesday, May 26, 2015

SUO123 Sweet Treats- Sheltering Tree Flag Box :-)

Hi Stampers!   

It’s time for the new SUO123 “Sweet Treats” Challenge and I decided to use the Sheltering Tree set along with the new Gift Bag Punch Board to create a patriotic star box in honor of Memorial Day. 

I hope you will find the time to check out all the rest of ourDesign Team ideas and create your own “Sweet Treats” project using Stampin’ Up! Only products !!

To create this “Sweet Treat” holder:
Use the Big Shot™ with the Star Collection Framelits™ to cut two large stars from Cherry Cobbler cardstock.  Use the next size down to cut two stars from Night of Navy cardstock and the next size down for two from Whisper White cardstock.
Create a mask from scrap paper for the “star” portion of the flag and mask the Whisper White star shape. 
Ink the background shape from Sheltering Tree with Cherry Cobbler ink (the one that is normally used behind the sentiments) and stamp on the star image for the stripes of the flag- you will need to re-ink as you stamp.
Once you are finished with the stripes, remove the mask for the star area of the flag, mask the stripes and ink the foliage stamp from Sheltering Tree using Night of Navy Classic Ink and stamp into the “star” area of the flag.
Repeat the above steps for the second white star.
Side view of Gift Bag center and banners :-)
Use the Gift Bag Punch Board to create the smallest size gift bag from Cherry Cobbler cardstock (the bag only needs to be 2” high so I used a 10 ½” x 2” piece of cardstock).  Note- the Gift Bag Punch Board called for a 10” piece for the smallest bag but for some reason, I did not have a flap on the last gusset to adhere so I found that a 10 ½” piece works better for the small bag).
Layer the star shapes together and adhere the small gift bag in the middle (raising the bag up so you cannot see it between the points of the star).
Stamp the Gorgeous Grunge diagonal line stamp with Cherry Cobbler Classic Ink and the Sheltering Tree foliage with Night of Navy Classic Ink onto Whisper White cardstock and punch out with the Banner Punch. 
Punch a few banners from Night of Navy cardstock and adhere the banners to a piece of Natural Linen Thread or Baker’s Twine alternating between the Night og Navy and stamped banners (Note- you will not see the material since the banners will cover it up completely- I used retired Hemp Twine since I had it on hand).
Mount the banner line to the center sides of the box (I used Tombow Adhesive for this step).
Stamp the sentiment using Night of Navy Classic Ink onto Whisper White cardstock, trim and create the banner points with the Banner Punch.
Mount the sentiment using Stampin’ Dimensionals® to finish off the card.
Stamp Sets:  Sheltering Tree, Gorgeous Grunge
Ink: Cherry Cobbler, Night of Navy
Paper/Cardstock: Whisper White, Cherry Cobbler, Night of Navy
Accessories: Big Shot™, Star Collection Framelits™, Banner Punch, Gift Bag Punch Board, retired Hemp Twine
Thanks again for stopping by – I had fun using Sheltering Tree in a different way to create this little treat box and now I just have to find some treats to fill it up!! 

I hope that you will create your own Stampin’ Up! Only project and play along with our “Sweet Treats” challenge!
Related Posts Plugin for WordPress, Blogger...