I thank the Lord Jesus Christ for the talent He has bestowed on all of us!
I have been artistic all of my life and love experimenting with different mediums and techniques. This blog is my creative outlet to share my passion for cardmaking and papercrafting!
Today I am sharing a
patriotic card designed to honor our Veterans for Veteran’s Day, but this card
would be an easy one to create in multiples for Memorial Day or Independence
Day.
If you have not had
a chance to check out the rest of my Sister Design Team cards on the Stamp
Simply blog, or the Word Art
Wednesday challenge site I hope you take the time to do so- so much inspiration
from all!
To create this card:
De-static a piece of
white cardstock with an embossing powder tool.
Stamp the script
background image from TheRed, White and Blue stamp set with Versamark
ink onto the upper top part of the panel, apply gold embossing powder and
heat set with a heat tool.
Repeat the above
steps for the lower half of the panel.
Once the embossing
has cooled, trim the panel, add the strip of Gabriella lace and add a strip
of red seam binding over the top of the lace (wrapping the ends of the seam
binding behind the panel).
Adhere the entire card
front onto a 4 ¼” x 5 ½” piece of red cardstock and mount onto a white card
base.
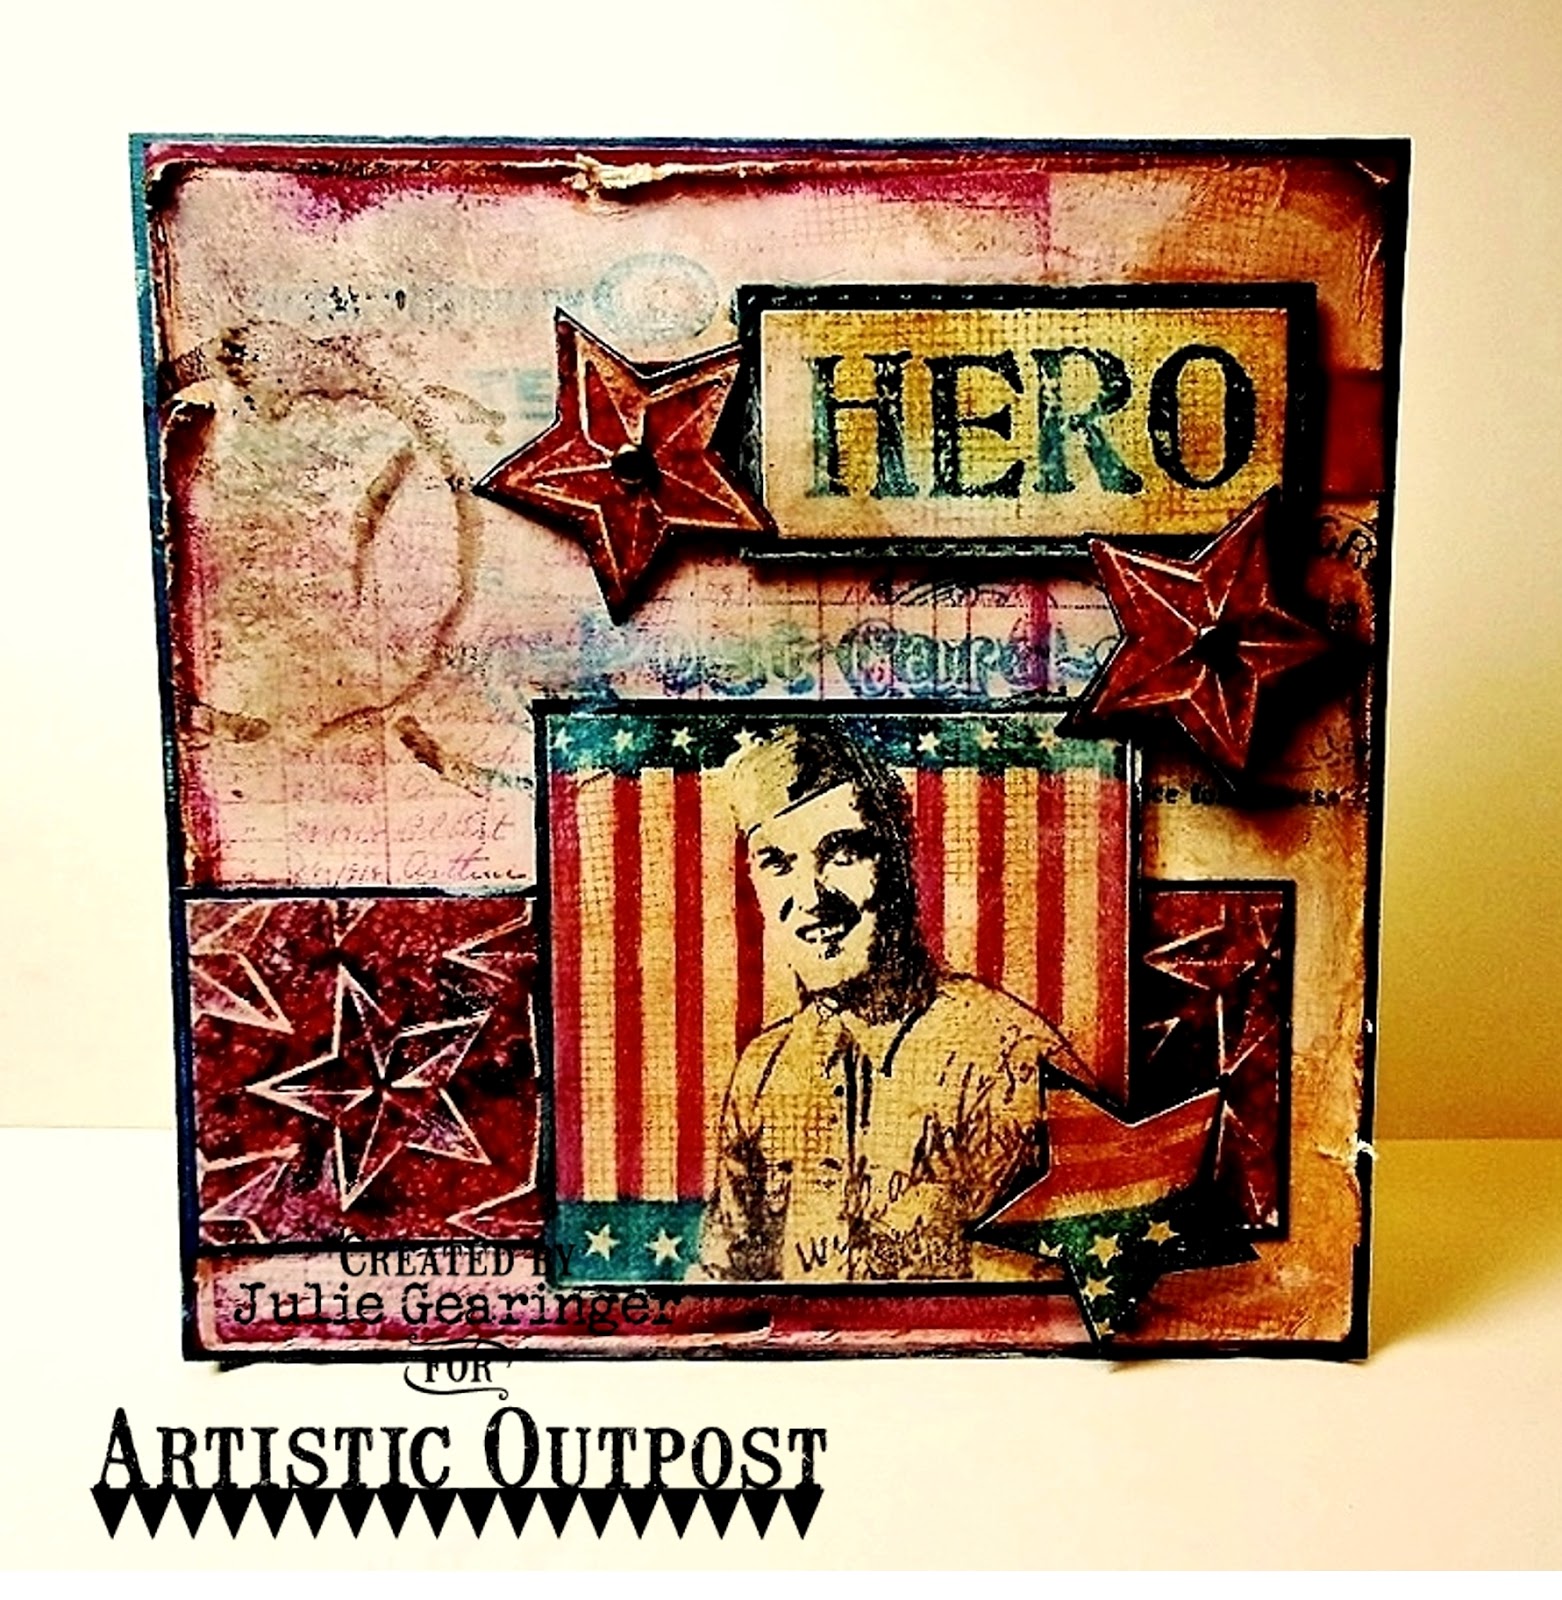
As we approach the Memorial Day
weekend, I wanted to create a card using the Artistic OutpostHero and Grunge Elements stamp sets along with Our Daily Bread Designs Custom Dies and Paper in
honor of those “Heroes” who have lost their lives in service to our
country. May we always remember their
sacrifice for your freedom and mine!
If you have not had a chance to check
out the Artistic Outpost blog or the other challenge sites yet, I encourage you
to do so! Inspiration is posted throughout
the week on the AO Blog/ AO Facebook Page and the challenge galleries have fabulous
samples as well!
To create this card:
1). Ink
the military man image from Hero with hickory smoke distress ink and stamp onto
a piece of white cardstock. Color the
image with navy and cherry water-based markers along with vintage photo and tea
dye distress inks. Add a bit of texture
with the large splatter stamp as well as the smaller corner texture stamp from
Grunge Elements using vintage photo distress ink. Die cut and emboss the image using the Double Stitched Circles Dies and mount onto a circle of navy cardstock (die cut and
embossed with the Circles Dies).
2). Ink
the Hero sentiment with navy ink and stamp onto white cardstock. Add a bit of splatter with the large splatter
stamp from Grunge Elements and distress the paper with tea dye and vintage
photo distress ink. Trim around the sentiment and mount onto navy cardstock.
4). Trim
a piece of the Patriotic Collection 6x6 Paper for the background to 4” x 5 ¼”. Distress the edges with a distressing tool
and apply vintage photo and tea dye distress ink over the entire panel to “antique”
the paper. Once dry, apply a thin layer
of picket fence distress stain to tone down the images a bit and once that
layer has dried, use a star stencil with crackled texture paste to add
additional dimension.
5). Once
the crackled texture paste has dried, apply a thin layer of mod podge over the
entire background as well as the sentiment layer and the die cut focal image
circle layer- allow all to air dry.
6). Mount
a piece of navy cardstock onto the cherry card front, adhere the card front to
the white card base. Add the background
panel and mount the focal image along with the stars and sentiment using
dimensional foam.
Thanks again for taking the time to visit- hugs! I hope you have a blessed Memorial Day week/weekend and never forget the real reason for Memorial Day...
Monday, May 30th is Memorial Day here in the United States and while we may have
picnics and get-togethers this weekend, I pray that we will be
thinking of the sacrifice that was made by the brave men and women who lost
their lives defending our country and the freedom that we enjoy because of
their sacrifice. May we never forget all of our heroes...
He said that he liked the second card design better and I told him, "Great, because it’s too late now" – lol!
To create the
background of this card:
On a 5” square piece
of Whisper White cardstock, stamp the Telegram image from Ephemera Backgrounds (AO)
using Dapper Denim Classic Ink and create a mask to cover the image.
First version (before distressing the background and adding stars)
Ink the Ledger image
from Ephemera Backgrounds (AO) with Cherry Cobbler Classic Ink and stamp over
the masked Telegram image.
Lift the mask, ink
the Postcard image (also from Ephemera Backgrounds (AO) using Dapper Denim Ink
and stamp directly over the ledger image.
Allow the ink to dry
(or use a Heat Tool to speed up the process) and with a sponge applicator,
apply Ranger® Tim Holtz® Tea Dye Distress Ink over the entire panel.
Add Grunge Elements(AO) images using Ranger® Tim Holtz® Tea Dye and Vintage Photo Distress Ink and
distress the edges with the Distressing Tool.
FYI- at this point, I layered the card with the rest of the elements for
version #1.
Another view of the second version :-)
To complete the
background for version #2- Tone down the brightness of the stamping in the
background using a paint brush with Gesso®, allow the Gesso® to dry and ink the
Grunge Elements (AO) with Ranger® Tim Holtz® Vintage Photo Distress Ink (stamping
randomly over some of the images).
Mount the background panel
onto a piece of Cherry Cobbler cardstock, trim and mount onto a piece of Dapper
Denim cardstock, trim and mount onto the Extra Thick Whisper White card base.
To create the rest of
the card:
Directly color onto the Hero (AO) image with Stampin’ Write Markers- Dapper Denim for
the stars, Cherry Cobbler for the
stripes and Basic Gray for the service man, “huff” to moisten the ink and stamp onto a piece of Whisper White
cardstock.
Sponge Ranger® Tim
Holtz® Tea Dye Distress Ink over the image to “antique” the paper and stamp the
grid image from Grunge Elements (AO) using Ranger® Tim Holtz® Tea Dye Distress Ink as well.
Trim the focal image
panel and mount onto Dapper Denim cardstock, trim and add a bit of Gesso® (set
aside to dry).
Sponge Ranger® Tim
Holtz® Tea Dye Distress Ink over the image to “antique” the paper, stamp the
grid image from Grunge Elements (AO) using Ranger® Tim Holtz® Tea Dye Distress Ink and add a bit of Gesso® as
well (just as in the focal image
finishing).
Cut a strip of Cherry
Cobbler cardstock (I actually crimped this strip with the Crimper Tool but you
cannot tell since I added stars to the second version), add the strip to the
background as per the sketch and mount the sentiment with dimensional foam.
To create the stars:
Die cut two stars
from the same piece of Patriotic Collection 6x6 Paper (ODBD) using the ODBD
Sparkling Stars Dies, insert the stars into the Stars Embossing Folder (lining
the die cuts with the stars in the EF), emboss with the Big Shot™ and mount
onto Dapper Denim cardstock.
For the third star, ink
the star and stripe area on the large flag image from Hero (AO) with Stampin’
Write Markers- Dapper Denim and Cherry Cobbler, “huff” to moisten the ink and
stamp onto Whisper White cardstock. Die
cut with ODBD Sparkling Stars Dies and mount onto Dapper Denim cardstock.
Carefully fussy-cut
around each star and add Antique Brass brads to the center of the two embossed
stars.
Mount the stars onto
the card front with dimensional foam to finish off the card.
OK, so which one do you like better? Version #1 (no stars and darker background) or version #2 with the added stars and muted background? Inquiring minds need to know- lol!!
Thanks again for
visiting- hugs and I hope all of you have a safe Memorial weekend!
Happy
4th of July to all of my fellow Americans!! I hope all of you have a great time
celebrating our freedom today and remember that freedom comes at a cost.
I
am so thankful for the men and women in our armed services that help keep our
country free- we are the “Home of the Free Because of the Brave”!
I am so thankful for those brave men and women that have gone before and those that are currently serving- as a nation and individually, we can never thank you enough for keeping our country free!! May the Lord richly bless you and your families...
Again,
I hope you have the time to stop by the above sites to check out the wonderful
inspiration from the Design Teams as well as the other fabulous gallery entries!
As noted in a previous post, I am trying to limit my actual blog posting time since creating the blog posts can take more time than creating the cards- lol!! If you have any questions, please note in the comments - I read all of your comments and appreciate each and every one of you takes the time to comment...you are all such an encouragement to me!! ***
With
a few markers scribbled onto acrylic blocks, I spritzed the blocks with water to watercolor
the focal image, added a bit of texture with embossing and layering- quick and easy!
Stamp
Sets: Not Forgotten, Land of the Free
(both Our Daily Bread Designs)
Ink: Stāz-On® Jet Black, Stampin’ Write Markers- Crumb Cake,
Pool Party, retired Midnight Muse and Poppy Parade
Paper: Whisper White,
Pool Party, retired Midnight Muse and Poppy Parade cardstock and DSP
In the past few weeks Graphic 45 has been highlighting their retiring 2014 Design Team members with "Fond Farewell" posts and I fell in love with all of the designer projects but especially Ginger Ropp's Easy Instagram Mini Waterfall Album (I have created at least ten of
these this week- they are so addictive!!) :-)
If you have not visited either challenge site yet, I encourage
you to do so- marvelous inspiration from all!
Using the instructions from the video, score a 12x12 piece of
Night of Navy cardstock (I used a retired textured piece from my stash)- score
at 3”, 6” and 9”, turn and score at 4” and 8”.
Using the Stampin’ Up! Paper Trimmer, trim on the 3” and 6”
score lines to the 4” score line.
Turn the paper and trim along the uncut side of the paper
along the 4” score line to the 9” score (again, using Ginger Ropp’s video
instruction).
Fold the 3” and 6” trimmed score panels as directed on the video
and complete the photo folio per the video instructions – I found that it was a
bit easier to also add an additional score line of approx. 1/8” or so, to the
left of the first 3” score line to allow for the bulk.
Decorate the panels as you desire… fyi- I did a few strips of designer paper on some of the panels and adhered on the two
sides only to allow a photo or other panel to be inserted under the strip... this is what I love about this mini book- it
can be decorated in any way you choose :-)
To decorate the panels:
Cover: Add the piece of lace onto the front cover and mount the red
grosgrain ribbon (I used ribbon from my stash and wrapped the ribbon around the
album adhering with Scor Tape®).
Adhere the 2 ¾” x 3 ¾” piece of striped paper from the
Authentique® Pride Collection over the ribbon and lace.
Add the scrap piece of textured Night of Navy cardstock (approx. ¼” x 3 ¾”) over the edge of the
lace.
Add the two scrap pieces of red starred patterned paper to the
sides.
Stamp the flag image from the Our Daily Bread Designs (ODBD) Old
Flag Background using Stāz-On® Jet Black Ink and color with an AquaPainter™
using Night of Navy and retired Poppy Parade Classic Ink (I used Poppy Parade
versus Real Red to match the paper).
Trim a portion of the background (save the rest for another
project) and stamp the Gorgeous Grunge large splatter stamp using Ranger® Tim
Holtz® Tea Dye Distress Ink.
Sponge Ranger® Tim Holtz® Old Paper Distress Ink over the
entire image to antique the paper.
Mount onto a piece of Night of Navy cardstock, trim again and
mount onto a piece of Poppy Parade cardstock.
Stamp the sentiment from Land of the Free (ODBD) using Stāz-On®
Jet Black Ink and color with Stampin’ Write
Markers- Night of Navy and retired Poppy Parade (I used Poppy Parade
versus Real Red to match the paper).
Trim the sentiment, distress with the same inks as the Old Flag
background panel, mount onto a piece of Night of Navy cardstock, trim again and
mount onto a piece of Poppy Parade cardstock.
Add the scrap pieces of the star pattern paper and insert the
pewter brads.
Mount the sentiment to the focal image panel and adhere the
entire panel to the front cover.
Behind the front cover: Mount the 2 ¾” x 3 ¾” red music
panel from the Authentique® Pride Collection to the back of the front cover.
Stamp the image from Not
Forgotten (ODBD) using using Stāz-On® Jet Black Ink onto a piece of Whisper
White cardstock and color with the AquaPainter™ with Night of Navy and Poppy
Parade Classic Ink adding shadows using the Sahara Sand Stampin’ Write Marker.
Trim and mount onto Night of Navy
cardstock, trim and mount onto Poppy Parade cardstock and distress the panel by
sponging Ranger® Tim Holtz® Old Paper Distress Ink over the edges and image.
Mount the focal image to the panel.
Balance of pages: Mount the 2 ¾” x 3 ¾” pieces of
the Authentique® Pride Collection to the “pages” or panels.
Using scrap strips of the papers,
adhere to the edges only to create the straps to hold photos or business size
cards (I plan to use some of these albums for Bible Verse memorization by
printing the verses on business size cardstock).
I did add one sentiment on the
opposite “page” from the Not Forgotten image using the verse from the same
stamp set (colored with Stampin’ Write markers and “antiqued” with Ranger® Tim
Holtz® Old Paper Distress Ink, cut out with the Big Shot™ and the Chalk Talk
Collection Framelits™ and mounted onto an additional Chalk Talk frame from
Night of Navy and Poppy Parade cardstock).
The entire album takes a few
hours to create, but again, fair warning, they are very addictive!
Stamp Sets: Old Flag
Background, Land of the Free, Not Forgotten (all Our Daily Bread Designs), Gorgeous
Grunge (Stampin’ Up!)
It’s time for the new SUO123 “Sweet Treats” Challenge and I
decided to use the Sheltering Tree set along with the new Gift Bag Punch Board to
create a patriotic star box in honor of Memorial Day.
Use the Big Shot™ with the
Star Collection Framelits™ to cut two large stars from Cherry Cobbler
cardstock. Use the next size down to cut
two stars from Night of Navy cardstock and the next size down for two from
Whisper White cardstock.
Create a mask from scrap
paper for the “star” portion of the flag and mask the Whisper White star
shape.
Ink the background shape
from Sheltering Tree with Cherry Cobbler ink (the one that is normally used
behind the sentiments) and stamp on the star image for the stripes of the flag-
you will need to re-ink as you stamp.
Once you are finished with
the stripes, remove the mask for the star area of the flag, mask the stripes
and ink the foliage stamp from Sheltering Tree using Night of Navy Classic Ink
and stamp into the “star” area of the flag.
Repeat the above steps for
the second white star.
Side view of Gift Bag center and banners :-)
Use the Gift Bag Punch
Board to create the smallest size gift bag from Cherry Cobbler cardstock (the
bag only needs to be 2” high so I used a 10 ½” x 2” piece of cardstock). Note- the Gift Bag Punch Board called for a
10” piece for the smallest bag but for some reason, I did not have a flap on
the last gusset to adhere so I found that a 10 ½” piece works better for the
small bag).
Layer the star shapes
together and adhere the small gift bag in the middle (raising the bag up so you
cannot see it between the points of the star).
Stamp the Gorgeous Grunge
diagonal line stamp with Cherry Cobbler Classic Ink and the Sheltering Tree
foliage with Night of Navy Classic Ink onto Whisper White cardstock and punch
out with the Banner Punch.
Punch a few banners from
Night of Navy cardstock and adhere the banners to a piece of Natural Linen
Thread or Baker’s Twine alternating between the Night og Navy and stamped
banners (Note- you will not see the material since the banners will cover it up
completely- I used retired Hemp Twine since I had it on hand).
Mount the banner line to
the center sides of the box (I used Tombow Adhesive for this step).
Stamp the sentiment using
Night of Navy Classic Ink onto Whisper White cardstock, trim and create the
banner points with the Banner Punch.
Mount the sentiment using
Stampin’ Dimensionals® to finish off the card.
Stamp Sets: Sheltering Tree, Gorgeous Grunge
Ink: Cherry Cobbler, Night
of Navy
Paper/Cardstock: Whisper
White, Cherry Cobbler, Night of Navy
Accessories: Big Shot™, Star
Collection Framelits™, Banner Punch, Gift Bag Punch Board, retired Hemp Twine
Thanks again for stopping
by – I had fun using Sheltering Tree in a different way to create this little
treat box and now I just have to find some treats to fill it up!!