Showing posts with label Window Frames Framelits. Show all posts

Tuesday, February 17, 2015

CAS An Open Heart Sympathy


Hi Stampers!


Again, if you have not visited the challenge sites yet, I hope you will find time to do so- terrific Design Team designs and as well as their galleries!!

To create this card:

Ink the bird image and branch from An Open Heart using Memento™ Tuxedo Black Ink and stamp onto a sticky note.  

Cut the images out to use as masks and stamp the bird image using Memento™ Tuxedo Black Ink onto Whisper White cardstock. 

Mask the bird and stamp the branch image from An Open Heart using Memento™ Tuxedo Black Ink, mask the stamped branch image and re-ink and stamp the branch once more.

Keep the bird mask in place, create a mask for the horizon line and ink the branch image from Summer Silhouettes using Sahara Sand Classic Ink and stamp repeatedly.

Remove the masks and color the images using the Sahara Sand and Hello Honey Stampin’ Write markers.

Ink and stamp the Gorgeous Grunge diagonal line stamp using Hello Honey Classic Ink.

Use a Black Stampin’ Write Marker to add the horizon line and with the retired Color Spritzer Tool to add additional interest to the background.

Use the Big Shot™ with the Window Frames Collection Framelit™ to cut out the image along with another frame from Basic Black cardstock.   Cut the Basic Black cardstock frame in half and mount behind the focal image.

Use the Big Shot™ to emboss a piece of Sahara Sand cardstock with the Stylish Stripes Textured Impressions™ Embossing Folder, trim and mount onto a piece of Basic Black cardstock.  Trim and mount onto the Whisper White card base.

Mount the focal image to the card front using Stampin’ Dimensionals®.

Ink the sentiment from Bloom with Hope using Memento™ Tuxedo Black Ink and stamp onto Whisper White cardstock.  Use the Hexagon Punch to add the banner ends and mount onto a piece of Basic Black cardstock (using the Hexagon Punch to add the banner ends as well).

Mount onto the card front using Stampin’ Dimensionals® and add the Rhinestones to finish off the card.

Stamp Sets: An Open Heart, Gorgeous Grunge, Bloom with Hope, Summer Silhouettes

Ink:  Memento™ Tuxedo Black Ink, Stampin’ Write Markers- Basic Black, Hello Honey and Sahara Sand

Paper: Whisper White, Basic Black, Sahara Sand

Accessories: Big Shot™, Window Frame Collections Framelits™, Stylish Stripes Textured Impressions™ Embossing Folder, Hexagon Punch, retired Color Spritzer Tool, Rhinestones, sticky note paper


 Thanks again for stopping by- I hope all of you are having a wonderful Tuesday!!

Monday, July 21, 2014

Seahorse Thinking of You - Another Color and Sketch Challenge

Hi Stampers! 

Here is a card that I created using the CCMC312 Color Challenge along with the SC497Splitcoaststampers Sketch Challenge. 
 
I hope you will find the time to visit both challenge sites- great inspiration from all!


To create this card:

Ink the script stamp from By the Tide using Sahara Sand Classic Ink and stamp repeatedly onto a piece of Whisper White cardstock.  


Stamp the seahorse from By The Tide over the script using Blackberry Bliss Classic Ink and stamp onto Whisper White cardstock. 

Stamp another seahorse onto a sticky note (or scrap paper) to create a mask, mask the image that you stamped on the Whisper White cardstock.  Ink the coral stamp from By the Tide using Hello Honey Classic Ink and stamp over the masked seahorse image.

 Ink the Nantucket stamp from By The Tide using Blackberry Bliss Classic Ink and stamp off onto scrap paper before stamping onto the cardstock.

Add a bit of distressing using the Gorgeous Grunge splatter stamp with Sahara Sand Classic Ink.  

Use the Big Shot™ with the Window Frames Collection Framelits™ to cut out the image along with the same size window from a piece of Blackberry Bliss cardstock.

Cut the Blackberry Bliss window framelit™ in half and layer behind the seahorse image.  

Use a Sponge Dauber to lightly sponge Hello Honey Classic Ink around the edges- oops!  I had to do this step since I accidentally had some ink from coloring a white button (that I decided not to use) and had a few yellow smudges on the outside of image- duh! :-) 

Ink the World Map background stamp using Sahara Sand Classic Ink and stamp onto a piece of Sahara Sand cardstock, trim and mount onto a piece of Blackberry Bliss cardstock, trim and mount  onto the Whisper White card base.

Use the Big Shot™ with the retired Adorning Accent Edgelit™ and cut a piece of the Moonlight Designer Series Paper (DSP) along with a piece of Blackberry Bliss cardstock. 

Trim the Moonlight panel and mount onto the Blackberry Bliss layer.  Sponge a bit of Hello Honey Classic Ink around the edges as well :-)

Add the 3/8” Hello Honey Stitched Satin Ribbon bow to the center and adhere the layered seahorse image per the sketch.

Ink the sentiment using Blackberry Bliss Classic Ink and stamp along the bottom.
Color the Pearls using the Dark Daffodil Delight Blendabilities™ marker and add to the lower portion of the DSP layer to finish off the card.

Stamp Sets: By The Tide, World Map, Gorgeous Grunge,  Kind and Caring Thoughts (retired hostess set)

Ink: Blackberry Bliss, Hello Honey, Sahara Sand

Paper: Whisper White, Blackberry Bliss, Sahara Sand, Moonlight DSP

Accessories: Big Shot™, Window Frames Collection Framelits™, Adorning Accents Edgelits™ (retired),  3/8” Hello Honey Stitched Satin Ribbon, Sponge Dauber, Sticky Note or Mask,  Pearls


Thanks again for stopping by- I hope you have a great week!

Tuesday, July 1, 2014

SUO100 Celebrating Our First 99 Challenges :-)


Hi Stampers! 

Wow!!  We are celebrating our 100th SU-Only Challenge and we love for you to choose one of our past 99 Challenges and participate in our “Celebrating our First 99 Challenges" and this card also qualifies for the Paper Players Tic Tac Toe Challenge (Birthday, Patterned Paper, Pearls) :-) 

I decided to use the SUO70 Butterflies theme for my card and I cannot wait to see what you decide to choose:-)    Stop by and check out our Design Team projects and hope to see your project in the gallery!

I love using My Digital Studio (MDS) images and coloring them with our Stampin’ Blendabilites™ so I decided to use several retired stamp images that are still currently available in MDS- again, love using MDS for cards!!

To create this project:
In My Digital Studio (MDS), open a blank 8.5 x 11 custom page and insert the French Foliage script image (enlarge a bit), flowers from Touch of Nature (re-sizing each to different sizes), sentiment from Feeling Sentimental and butterflies from Wonderful Wings (re-sizing the images).  Print the images out onto Whisper White cardstock (I use a Kodak inkjet-works great for MDS and cardmaking)..
Cut the French Foliage script image out using the Big Shot™ with the Window Frames Collection Framelits™ cutting a frame the same size from Basic Black cardstock.  Cut the frame in half and mount behind the script image background.
 Using the Stampin’ Blendabilities™ , color the flowers using the Coastal Cabana, Rich Razzleberry and Daffodil Delight Collections , color the butterflies with the Daffodil Delight, Pumpkin Pie and Coastal Cabana Collections and carefully “fussy-cut” the images.  Add a few highlights using the Chalk Marker.   
Use the 1” Square Punch to punch out the squares from the Back to Black Designer Series Paper (DSP) and mount onto the 5 ½” square Basic Black card base.  
Cut a White Tea Lace Paper Doily in half, adhering half of the doily to the lower part of the frame and mount the second half behind the right hand side of the frame.
Mount the frame onto the card front using Stampin’ Dimensionals®.  Add a strip of Rich Razzleberry cardstock to cover the edge of the paper doily, mount the sentiment layer using Stampin’ Dimensionals® and add the Antique Brad to the corner. 
Adhere the flowers and butterflies to the card front and add the Pearls to finish off the card.
Stamp Sets: Wonderful Wings, Touch of Nature, Feeling Sentimental, French Foliage (all MDS versions)
Ink: Printer Ink- Basic Black, Blendabilities™ Collections- Rich Razzleberry, Coastal Cabana, Daffodil Delight and Pumpkin Pie; Chalk Marker
Paper/Cardstock:  Whisper White, Basic Black, Back to Black DSP
Accessories:  Big Shot™, Window Frames Collection Framelits™, Hexagon Punch, Pearls, Antique Brad, White Tea Lace Paper Doily

Thanks again for stopping by - I hope you have a chance to join in on our “Blast from the Past” Challenge!  Have a blessed week!!

Saturday, June 28, 2014

Summer Silhouette Sympathy- Another CAS with a Fun Color Palette!

Hi Again Stampers!!

Here is another card that I created using one of the background panels from my crafting session the other evening using the colors from the Splitcoaststampers CAS278 Clean and Simple Challenge card using the Color Crawl Palette Challenge(use at least three colors).

Again, I hope you have a chance to visit their site and check out the Design Team samples and other entries- the gallery is full of great designs!

To create this card:

Ink the Positively Chevron background stamp using Sponge Daubers with Coastal Cabana, Island Indigo and Pistachio Pudding Classic Ink.  Lay a piece of Whisper White cardstock over the stamp and press lightly in various areas to achieve a random pattern (repeat with additional pieces of Whisper White cardstock). 

Ink the stem image from World of Dreams using Early Espresso Classic Ink and the sentiment from Love & Sympathy using Island Indigo Classic Ink- stamp both onto the front of the card. 

Use a Stampin’ Spritzer with Water to spritz over the background stamp area (being careful not to allow the ink to spread around the stamped areas). 

Ink the stem image from World of Dreams using Early Espresso Classic Ink and the sentiment from Love & Sympathy using Island Indigo Classic Ink- stamp both onto the front of the card. 

Once dried, mask around the stem area and sentiment using a scrap piece of paper or sticky note and using a Sponge Dauber, apply Coastal Cabana Classic Ink around the masked areas.   

Ink the splatter stamp from Gorgeous Grunge using Island Indigo Classic Ink and randomly stamp over the background.
 
Use the Big Shot™ with the Window Frames Collection Framelits™ to cut out the image along with another framelit™ from Early Espresso cardstock.  

Use the Big Shot™ with the Chevron Textured Impressions™ Embossing Folder to emboss a piece of Whisper White cardstock along with a piece of Early Espresso cardstock. 

Adhere the Whisper White background to the Island Indigo card base and add the vertical strips of embossed Early Espresso cardstock.

Cut the Early Espresso Window Frame in half and adhere behind the stamped image.  Add to the front of the card using Stampin’ Dimensionals®.

Add a few Pearls to finish off the card. 

Stamp Sets: Summer Silhouettes, Love & Sympathy, Gorgeous Grunge, Postively Chevron

Ink: Coastal Cabana, Island Indigo, Pistachio Pudding, Early Espresso

Paper: Whisper White, Early Espresso, Island Indigo

Accessories: Big Shot™, Window Frames Collection Framelits™, Chevron Textured Impressions™ Embossing Folder, Sponge Daubers, Masking Material, Stampin’ Spritzer, Pearls


Thanks again for stopping by- I hope you have a blessed weekend!

Monday, June 2, 2014

By The Tide- An Experiment in Glue Art :-)


Hi Stampers!!

I wanted to try another new technique and decided to use this week’s Splitcoaststampers MIX70 Glue Art Challenge and SC490 Sketch along with the FabFri42 Color Challenge.

Again, I hope that you will find the time to visit each site and see all of the different designs and inspiration!

To create this card:

Spritz water onto a piece of Watercolor Paper and use an AquaPainter™ with Coastal Cabana and Pool Party Classic Ink to cover the entire piece- dry with the Heat Tool.

Once dried, apply Crisp Cantaloupe Classic Ink with the AquaPainter™ and spritz with water, dry with the Heat Tool.

Ink the coral stamp image from By The Tide using Crisp Cantaloupe Classic Ink and stamp over the Crisp Cantaloupe area of the card front.  Ink the script stamp using Summer Starfruit Classic Ink over the Pool Party/Coastal Cabana area of the card front.

 Apply Hot Glue over the Crisp Cantaloupe area to mimic additional coral, once dried, apply Gold Encore™ Ink over the glue to highlight the “coral”.

Ink the seahorse, fish and Nantucket images from By The Tide using Tuxedo Memento™ Black Ink onto Whisper White cardstock.  Use Sponge Daubers with Pool Party, Crisp Cantaloupe and Coastal Cabana Classic Ink to color the images.   Fussy cut the images out and set aside.

Cut out the central focal image using the Big Shot™ with the Window Frame Collection Framelits™ and also cut another window frame from Coastal Cabana and Basic Black cardstock.  

Cut the Coastal Cabana and Basic Black frames in half horizontally and layer behind the focal image. 

Use the Big Shot™ with a Square Lattice Textured Impressions™ Embossing Folder to emboss a piece of Crisp Cantaloupe cardstock and mount onto a piece of Coastal Cabana cardstock and again onto the Basic Black card base.

Another view of the glue art
Add the layer of Soho Subway Designer Series Paper (DSP) onto a piece of Coastal Cabana and Basic Black cardstock.   Also add another layer using the remaining piece of Watercolor Paper with the glue (cut from the focal image piece), mounted onto a piece of Coastal Cabana and Basic Black cardstock as well.

Sponge Pool Party Classic Ink onto one half of a White Tea Lace Paper Doily onto the side of the focal image and add to the side of the focal image mounting the entire focal image onto the card front using Stampin’  Dimensionals®. 

Add the layered Nantucket image, seahorse and set of fish to the card front. 

Stamp the sentiment from Wetlands using Tuxedo Memento™ Black Ink onto Whisper White and stamp the script stamp using Summer Starfruit over the sentiment as well as the Nantucket image using Pool Party. 

Use a Sponge Dauber with Crisp Cantaloupe Classic Ink and punch out with an XL Oval Punch, layer onto a piece of Coastal Cabana and Basic Black cardstock punched also with the XL Oval Punch.

Add the knotted piece of retired Hemp Twine and add the sentiment to the front of the card using Stampin’ Dimensionals®. 

 Stamp Sets:  By The Tide, Wetlands

Ink: Coastal Cabana, Crisp Cantaloupe, Pool Party, Summer Starfruit, Tuxedo Memento™ Black Ink

Paper: Watercolor Paper, Basic Black,  Coastal Cabana, Crisp Cantaloupe, Soho Subway DSP

Accessories: Big Shot™, Square Lattice Textured Impressions™ Embossing Folder, Windows Frame Collection Framelits™,  XL Oval and ¾” Circle Punch, White Tea Lace Paper Doily, Hot Glue, AquaPainter™, retired Hemp Twine


Thanks again for taking the time to visit- I hope you have a great Monday!!

Sunday, April 20, 2014

He Is Risen Indeed!! Happy Resurrection Sunday!


Happy Resurrection Sunday!!  

We had a lovely service this morning celebrating our Risen Lord and Savior, Jesus Christ!!   I am so thankful that Jesus came to earth as a man, paid the penalty for our sins upon the cross and rose again on the third day!! He is Risen, He is Risen Indeed!!

I wanted to share one more Easter card that I created using the DD99 “Black Tie” Challenge (Basic Black and Rich Razzleberry) and the SplitcoaststampersTLC477 “What’s the Point” Technique Challenge along with a bit of a more stylized cross from the set, Crosses of Hope.  

To create this card:

Open a blank document in My Digital Studio (MDS) and position the cross from Crosses of Hope and re-size.  Also position the “Easter” sentiment from Well Scripted and the “Happy” from Fabulous Phrases.  Print onto a 8 ½ x 11” piece of Whisper White cardstock.

Use a Circle Collection Framelit™ as a guide and using the pointillism technique, create the background (I used a Pilot V5 gel pen).  Carefully cut the cross from the lower edge to the center area, bend up a bit to position the Circle Framelit™ and use the Big Shot™ to cut out the circle around the cross.

Use a Rich Razzleberry Stampin’ Write marker to color the cross and use the Pilot V5 pen to create additional depth in the black areas of the cross. 

Use a Sponge Dauber with Rich Razzleberry Classic Ink to color the background around the cross.

Use the Big Shot™ with the Framed Tulips Textured Impressions™ Embossing Folder to emboss a piece of Whisper White cardstock, trim and mount onto a piece of Basic Black cardstock and adhere the cardfront onto the Rich Razzleberry card base.

Use the Big Shot™ with the Paper Doily Sizzlit L™ to cut out a doily from Whisper White cardstock and the Window Frame Collection Framelits™ to cut out the window frame from a piece of Basic Black cardstock. 

Adhere the cross to the window frame and doily and add to the card front using Stampin’ Dimensionals®.

Punch the sentiment out using the XL Oval Punch and adhere to a Basic Black XL Oval piece – adhere behind the window frame and add to the card front with Stampin’ Dimensionals®. 

To finish off the card, add Rhinestones to the cross, sentiment and the retired Frosted Finishes Embellishment to the center. 

Stamp Sets:  Crosses of Hope, Well Scripted, Fabulous Phrases (all MDS versions)

Ink: Printer Ink- Black, Rich Razzleberry, Stampin’ Write Marker- Rich Razzleberry
Paper: Whisper White, Basic Black, Rich Razzleberry

Accessories: Big Shot™, Circle Collection and Window Frames Collection Framelits™, Paper Doily Sizzlit L™, Framed Tulip Textured Impressions™ Embossing Folder, XL Oval Punch, Sponge Dauber, Rhinestones, retired Frosted Finishes embellishment, Pilot V5 Pen


Thanks again for stopping by- I hope all of you have a fabulous Resurrection Sunday and wonderful week!!

Wednesday, February 12, 2014

A Spring Color Combination- Feel Better Soon

Hi again Stampers!
Here is the second card that I created for this week’s SUO#90 Punch Parade Challenge using this week’s DD89 Subtly Yours Dynamic Duos colors.  I decided to incorporate some of my favorite elements along with the punches- embossing folders, watercolor, background stamps and ribbon.   
Again, if you have not had the time to stop by the SU-Only Challenges or Dynamic Duos sites yet, we would love to have you visit and take part in our challenges.  
To create this card:
Use the Big Shot™ along with the Honeycomb Textured Impressions™ Embossing Folder to emboss a piece of Pistachio Pudding cardstock (ink the interior of the embossing folder first with Pistachio Pudding Classic Ink). Trim the panel and mount onto a piece of Basic Black cardstock.
Using the AquaPainter™ with ink from the Pistachio Pudding Classic Ink pad, apply the ink in a random pattern on a piece of Whisper White cardstock.  While it is still damp, lightly stamp the En Francais background stamp using Basic Black Classic Ink (putting uneven pressure to achieve a variegated look).    
Cut the background along with another frame from Basic Black cardstock using the Big Shot™ with the Window Frames Collection Framelits™.  Cut the Basic Black frame in half horizontally and layer behind the background piece allowing a bit to show at the top and bottom.   Trim off the lower portion of the window frame panel and adhere the top portion of the window frame to the embossed honeycomb layer.
Cut a Tea Lace Paper Doily in half and adhere below the window frame.  Add the other portion of the window frame, along with the sentiment from Express Yourself (punched out with the XL Oval Punch and layered onto another piece punched with the same punch). 
Add the 5/8” Basic Black double ribbon bow and adhere the tails of the bow behind the panel.  Mount the entire panel onto a Whisper White card base.
Stamp the flowers from Flower Shoppe using Basic Black Classic Ink and punch out with the Pansy Punch (or by hand).  Color the flowers using the AquaPainter™ and Blushing Bride Classic Ink- add a few additional shadows with the Blushing Bride Stampin’ Write marker and use the Chalk Marker to add highlights to the flower centers.
Stamp the butterflies using Basic Black Classic Ink onto a piece of Whisper White cardstock, add a bit of Blushing Bride Classic Ink using the AquaPainter™ and count out using the Elegant Butterfly Punch.
Adhere the flowers, butterflies and Vintage Brad using Mini Glue Dots or I used a Hot Glue Gun (since I had mine ready to go from a previous project).  Add the Pearls to the center of the butterflies and along the sentiment to finish off the card.  

Stamp Sets: Flower Shop, Papillon Potpourri, En Francais, Express Yourself

Ink: Basic Black, Blushing Bride, Pistachio Pudding; Blushing Bride Stampin’ Write Marker;  Chalk Marker

Paper/Cardstock:  Whisper White, Basic Black, Pistachio Pudding

Accessories: Big Shot™, Honeycomb Textured Impressions™ Embossing Folder, Window Frames Collection Framelits™, Punches- Elegant Butterfly, Pansy, XL Oval; Tea Lace Paper Doily, Antique Brad, Pearls, AquaPainter™, retired 5/8” Basic Black Satin Ribbon


Thanks again for stopping by!  Hope all of you have a safe and warm Thursday!!

Saturday, November 23, 2013

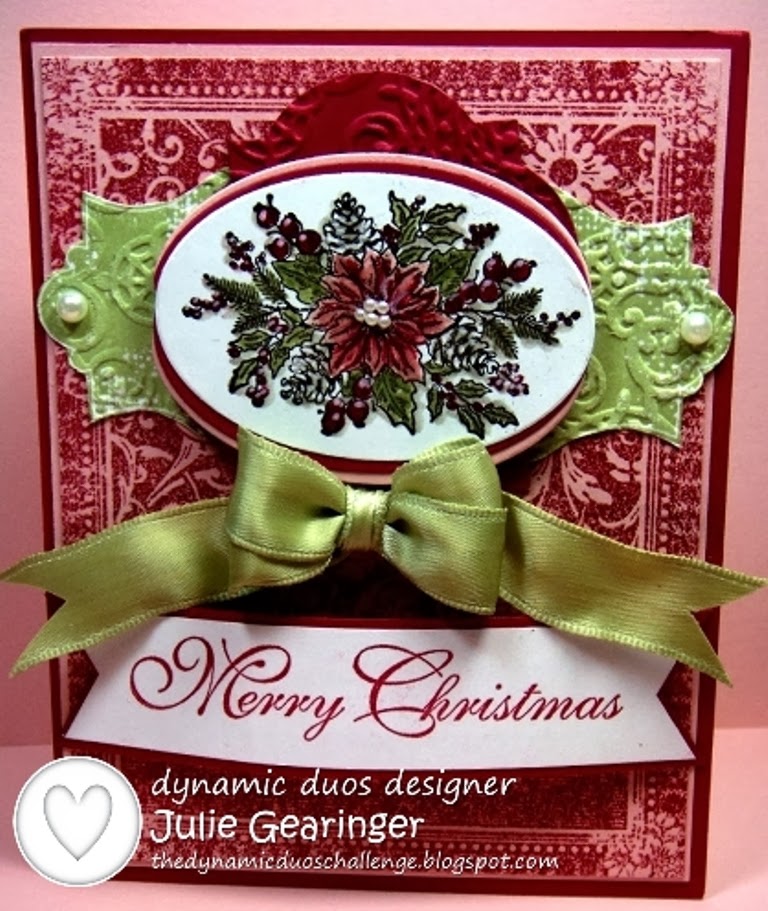
DD80 Triple Threat Christmas

Hi Stampers!  

This week’s Dynamic Duos DD80 “Triple Threat” Challenge uses Blushing Bride, Raspberry Ripple and Pear Pizzazz.   Again, I hope you will find the time to visit the rest of the fabulous Design Team projects- they rocked the challenge this week!!   


Since Christmas is almost here, I decided to create another Christmas card design :-)

To create this card:

I decided to dig into my retired stamp collection and use the poinsettia image from one of the Christmas sets from years ago – My Favorite Frame (Holiday Frame).

Stamp the image using Early Espresso Classic Ink onto Whisper White cardstock and color using Stampin’ Write markers- Blushing Bride and Raspberry Ripple for the petals and berries, Pear Pizzazz for the leaves.  Add a few highlights with the Chalk Marker (this marker will be carried over in the upcoming Occasions Mini- yea!)

Use the Big Shot™ with the Ovals Collection Framelits™ to cut out the image and mount onto a piece of Blushing Bride and Raspberry Ripple cardstock (also cut from the same oval framelit™). 

With the Big Shot™ and the Window Frames Collection Framelits™, cut a window frame from Raspberry Ripple cardstock and emboss with the retired Lacy Brocade Textured Impressions™ Embossing Folder- cut in half by hand in the middle horizontally.

Stamp the label image from Everything Eleanor onto a piece of Whisper White cardstock.  Emboss using the Big Shot™ with the retired Lacy Brocade Textured Impressions™ Embossing Folder and cut around the outline by hand and cut in half vertically in the middle.

Ink the background stamp, Ex Libris with Raspberry Ripple Classic Ink and stamp onto a piece of Blushing Bride cardstock.  Trim to 4 1/8” x 5 3/8”.  Mount onto a piece of Raspberry Ripple cardstock.

Stamp the sentiment from Greetings of the Season using Raspberry Ripple Classic Ink onto Whisper White cardstock and cut the banner points using the Hexagon Punch.  Layer onto a piece of Raspberry Ripple cardstock and mirror cut the points with the Hexagon Punch as well :-)

Layer onto the card base the Everything Eleanor label (with the center spread apart to reach the edges of the card) and add the Window Frame (again spread apart) to cover the split areas of the Pear Pizzazz label at the top and bottom.  Add the Poinsettia focal image and sentiment using Stampin’ Dimensionals®.

Add the double satin ribbon bow and Pearls to finish off the card.  

Stamp Sets:  Greetings of the Season, Ex Libris, Everything Eleanor, retired Favorite Frame (Holiday)

Ink: Early Espresso, Blushing Bride, Pear Pizzazz, Raspberry Ripple, Stampin’ Write 

Markers- Blushing Bride, Pear Pizzazz, Raspberry Ripple, Chalk Marker

Paper: Whisper White, Blushing Bride, Raspberry Ripple

Accessories:  Big Shot™, retired Lacy Brocade Textured Impressions™ Embossing Folder, Window Frames and Ovals Collection Framelits™, Hexagon Punch, Pearls, satin ribbon from my stash


Thanks again for stopping by!  I hope all of you will have a chance to visit us at The Dynamic Duos andplay along in our DD80 “Triple Threat” this week!!  

Wednesday, November 6, 2013

Touch of Nature- Another Card using the DD77 Color Challenge :-)


Hi Stampers!!

I hope all of you are having a fabulous Wednesday!!  I wanted to share another card that I created using this week’s  DD77 Dynamic Duos “Bright and Sassy” colors- if you would like to join in on our challenge, it is not too late (the challenge ends tomorrow at 12 noon PST)!

I created this card from scraps, previously printed images and punched/die cut items :-)   I like to reduce the bulk of my cards by using punches or dies to cut out the layers that will be hidden and use for future projects.  I recently took the time to organize all of these scraps by type (i.e.  2 ½” Circles, Chalk Talk, etc.), so it is now much easier to use them on a daily basis- love my scraps!

To create this card:

Using My Digital Studio (MDS), print out the flower image from the stamp brush set, Touch of Nature onto Whisper White cardstock and color using Stampin’ Write markers in Real Red, Bermuda Bay and Sahara Sand (for the shadows).   Use the Chalk Marker to create the highlights around the center of the flower.

Use the Big Shot™ and the Oval Collections Framelits™ to cut out the flower, add the 2 ½” Circle of Basic Black cardstock (previously embossed with the Square Lattice Textured Impressions™ Embossing Folder). 

Mount the flower image onto a Window Frames Framelit™ cut from Bermuda Bay cardstock and again onto a Chalk Talk Framelit™ cut from Basic Black cardstock. 

Add the 5/8” Real Red Satin Ribbon Bow (retired) along with the sentiment from the MDS brush set, Simple Friendship (printed onto Whisper White cardstock and punched with the retired Small Oval Punch).

Use the Big Shot™ with the Chevron Textured Impressions™ Embossing Folder to emboss a piece of Whisper White cardstock, trim and mount onto a piece of Bermuda Bay cardstock and again onto a piece of Real Red cardstock and adhere to the Basic Black card base. 

Add the focal image panel using Stampin’ Dimensionals® to finish off the card.

I decided to leave this card as clean as I could- I really had to resist the urge to add Pearls or Rhinestones- lol!!

Stamp Sets:  Touch of Nature, Simple Friendship (both MDS)


Ink: Printer Ink- Black, Stampin’ Write Markers- Real Red, Bermuda Bay, Sahara Sand, Chalk Marker

Paper: Whisper White, Basic Black, Bermuda Bay, Real Red                                                   

Accessories: Big Shot™, Framelits™- Chalk Talk, Window Frames; Textured Impressions™ Embossing Folders- Chevron, Square Lattice, Punches-2 ½” Circle, Small Oval (retired), 5/8” Real Red Satin Ribbon (retired)

Thanks again for stopping by!   If you have not done so yet, I hope you will have a chance to enter your project into our DD77 DynamicDuos Color Challenge- we would love to see your creations! 

Have a wonderful evening- God Bless!

Related Posts Plugin for WordPress, Blogger...