Showing posts with label Thinking of You. Show all posts

Monday, August 24, 2015

The Wilderness Awaits- Thinking of You :-)


Hi Again Stampers!!

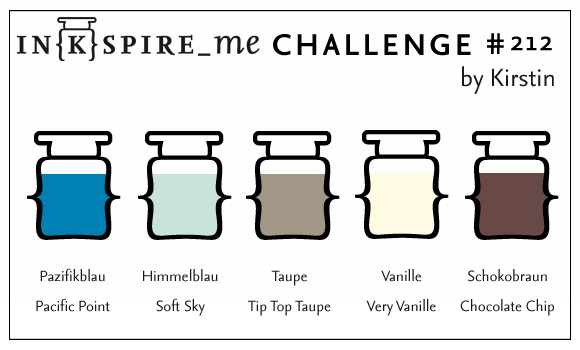
This card was created using the Create with Connie and Mary CCMC369 Sketch Challenge along with the Just Add Ink JAI276 "Cards for Males" Challenge and the IN{K}SPIRE_Me#212 Color Challenge (oops! just realized I used Whisper White versus Very Vanilla- hope I will not be disqualified :-))

I am trying to use up some of my retired stash of DSP, ribbons and hardware so the embellishments along with the Designer Series Paper (DSP) are retired...

If you have not already done so, I hope you will find the time to visit the above sites to check out the great Design Team samples as well as their wonderful galleries!

To create this card:

Stamp the elk image from The Wilderness Awaits using Stāz-On® Jet Black Ink onto Whisper White cardstock, watercolor with an AquaPainter™ using Stampin’ Write Markers- Soft Sky and Pacific
Point for the sky area, Tip Top Taupe and Chocolate Chip for the elk and stones. 

Cut the image out with the Big Shot™ and the Oval Collections Framelits™, cutting another oval the same size from Chocolate Chip cardstock as well.

Split the Chocolate Chip oval in half and adhere behind the focal image.

Add a few more stones to the bottom of the image using the Basic Black Stampin’ Write Marker.

Use the Big Shot™ with the Woodgrain Textured Impressions™ Embossing Folder to emboss a piece of retired Sweater Weather Soft Sky DSP, trim and mount onto a piece of Tip Top Taupe cardstock, trim and mount onto Chocolate Chip cardstock, trim and mount onto Pacific Point cardstock, trim once more and mount onto the Chocolate Chip card base.

Add the panels of retired DSP mounted onto Chocolate Chip along with the banners created with the Banner Triple Punch (per the sketch).

Stamp the sentiment using Stāz-On® Jet Black Ink onto Whisper White cardstock and punch out with the Word Window Punch.
Mount the sentiment along with the focal image to the card front using Stampin’ Dimensionals®.

Trim a piece of retired Pacific Point Striped Grosgrain Ribbon, fray the ribbon, cut a piece of retired 5/8” Chocolate Chip Satin Ribbon in half, fold and adhere both behind the focal image.

Fray a piece of retired Hemp Twine and tie onto the retired Antique Pewter Hodgepodge Hardware Clip- add the clip to the focal image to finish off the card.

Stamp Sets: The Wilderness Awaits, Teeny Tiny Wishes

Ink: Stāz-On® Jet Black; Stampin’ Write Markers- Soft Sky, Pacific Point, Tip Top Taupe, Chocolate Chip

Paper: Whisper White, Pacific Point, Tip Top Taupe, Chocolate Chip; retired Sweater Weather DSP, retired Pacific Point DSP (from Hostess Level I Pack)

Accessories: Big Shot™,  Ovals Collection Framelits™, AquaPainter™, Banner Triple Punch, retired items- Hemp Twine, 5/8" Pacific Point Striped Grosgrain Ribbon,  5/8” Chocolate Chip Satin Ribbon, Antique Pewter Hodgepodge Hardware Clip


Thanks again for taking the time to stop by- I hope all of you have a marvelous day!

Thursday, August 13, 2015

Vintage Golf with Graphic 45 Good Ol' Sport

Hi Again Stampers!   

Here is the second card that I created for the CCEE1532 “NationalGolf Month” Theme Challenge and I also incorporated the Splitcoaststampers’ SC548 Sketch Challenge (see gallery here). 

Again, as I mentioned in my previous post, I do not own any golf stamps so I decided to incorporate Graphic 45™ Good Ol’ Sport Collection Designer Paper.  It may be a bit difficult to see but the lady in the front has some golf clubs so I hope this will qualify as a golf themed card :-)

If you have not visited the above challenge sites yet, I encourage you to do so- tremendous inspiration from all!

This card was fairly simple to create:

Use the retired  Distressing Tool to distress the edge of the Newsworthy Designer Paper, mount onto Basic Black cardstock, trim and mount onto Wild Wasabi cardstock, trim and mount onto the Cajun Craze card base and apply Ranger® Tim Holtz® Tea Dye Distress Ink to “antique” the paper with a sponge applicator. 

Trim the Touchdown cutaway and mount onto Basic Black cardstock and add the retired Baked Brown Sugar Thick Baker’s Twine to the corners.

Stamp the sentiment from Teeny Tiny Wishes using Memento™ Tuxedo Black Ink onto Very Vanilla cardstock, punch out with the retired Word Window Punch, add the banner ends using the Hexagon Punch and apply Ranger® Tim Holtz® Tea Dye Distress Ink to “antique” the paper.

Mount the sentiment onto Basic Black cardstock, trim and create the banner points with the Hexagon Punch and adhere to the focal image panel.

Create the angled panel (per the sketch) using the reverse side of the Graphic 45™ Newsworthy Designer Paper layered onto Basic Black, Wild Wasabi and Cajun  Craze cardstock.

Add a scrap piece of embossed Wild Wasabi cardstock layered onto Basic Black to the center.

Add the angled layer to the card front and mount the focal image using Stampin’ Dimensionals® to finish off the card.

Again, quick and easy since the Graphic 45™ paper does most of the work for you!!
Stamp Sets: Teeny Tiny Wishes
Ink:  Memento™ Tuxedo Black Ink, Ranger© Tim Holtz® Tea Dye Distress Ink
Paper/Cardstock:  Very Vanilla, Basic Black, Cajun Craze, Wild Wasabi; Good Ol’ Sport (Graphic 45™)
Accessories:  Big Shot™, retired Square Lattice Textured Impressions™ Embossing Folder, Hexagon Punch, retired Distressing Tool, Sponge Applicator, retired Baked Brown Sugar Thick Baker’s Twine

Thanks again for visiting- I hope all of you have a fantastic day and I will be sharing a few more cards later this evening  :-)

Sunday, July 12, 2015

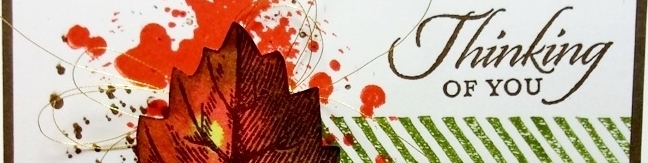
Vintage Leaves- Thinking of You


Hi Again Stampers! 

I wanted to share another card that I created this past weekend using the Stampin’ Royalty SR285 Color Challenge along with the CCEE1528 “Cheer Up the Lonely” Challenge and the Splitcoaststampers' TLC536 "Splatter It Up" Challenge (see details here and gallery here).  

If you have not had a chance to do so, I hope you will find the time to visit the above challenge sites to check out the Design Team samples as well as their galleries- fantastic inspiration from all!

To create this card:

Using Old Olive and Tangelo Twist Classic Ink, pat your craft mat and spritz the ink with water.  

Take a piece of Watercolor Paper and swirl face down through the wet ink allowing the ink to run and merge, repeat and allow to dry.

Ink the leaf image from the new set, Vintage Leaves using Soft Suede Classic Ink and stamp onto the background piece of Watercolor Paper- carefully cut out the leaf image by hand.

Stamp the sentiment from Wetlands onto the Very Vanilla card front using Soft Suede Classic Ink, add the striped border from Gorgeous Grunge using Old Olive Classic Ink and the splatters with Tangelo Twist and Soft Suede Classic Ink.

Trim the panel and mount onto the Soft Suede card base.

Add a bit of Gold Metallic Thread and mount the leaf using Stampin’ Dimensionals® to finish off the card.

Quick and easy- I will need to make a few more of these for my stash :-)

Stamp Sets: Vintage Leaves, Gorgeous Grunge, Wetlands

Ink: Soft Suede, Old Olive, Tangelo Twist

Paper: Watercolor, Very Vanilla, Soft Suede

Accessories: Gold Metallic Thread, Water Spritzer Bottle


Thanks again for visiting- I hope all of you have a great evening!

Friday, June 12, 2015

Masculine Praying for You- Prayers for a Dear Friend


Hi Stampers!!

This week’s PP248 Paper Players Theme is "Masculine", so I wanted to share a card that I created for a dear friend that is experiencing pain with some undiagnosed health issues.

I also incorporated the Splitcoaststampers’ CC526 Color Challenge (see details here and gallery here) and SC534 Sketch Challenge (see details here and gallery here).

We are praying that the doctors will be able to identify the source of the pain and be  able to give him some relief.

Again, if you have not already done so, I hope you will find the time to visit the above sites to check out the wonderful Design Team samples as well as the galleries!

To create this card:

Stamp the Geese and Trees (Impression  Obsession®) focal image using Stāz-On® Jet Black Ink onto Whisper White cardstock.

 Using an AquaPainter™, apply Tempting Turquiose, Rose Red and Island Indigo Classic Ink to the sky area (brushing some across the moon to resemble clouds).

Use a Faber-Castell® Pitt Pen Black Marker to darken the branches (and fill in the “snow” that is on the branches from the original image- the pointellism in the background is part of the stamp :-)).  

Apply a bit of gray to the geese with a Stampin’ Up! retired watercolor pencil.

Trim the image and mount onto a piece of Basic Black cardstock.

Use the Crimper Tool to crimp a piece of retired Designer Series Paper (DSP)  and distress the edges with the Distressing Tool.

Tear the bottom and roll up by hand- distressing with your fingernail, adhere the distressed panel onto a piece of Basic Black cardstock, trim the panel again and mount onto the Whisper White card base.

Add the focal image panel using Stampin’ Dimensionals®.

Stamp the sentiment from My Favorite Things® Sympathy using Stāz-On® Jet Black Ink onto Whisper White cardstock, create the banner points with the Hexagon Punch and mount onto a piece of Basic Black cardstock (creating matching banner points with the Hexagon Punch as well).

Ink the large splatter stamp from Gorgeous Grunge using Stāz-On® Jet Black Ink, stamp off onto a scrap piece of paper and stamp onto the sentiment.

Use the AquaPainter™ to apply diluted Tempting Turquoise over the sentiment and mount the sentiment using Stampin’ Dimensionals® to finish off the card.

Stamp Sets: Gorgeous Grunge, Geese and Trees (I/O), Sympathy (MFT)

Ink: Stāz-On® Jet Black, Classic Ink- Tempting Turquoise, Rose Red, Island Indigo; Faber-Castell® Black Pitt Pen Marker, Stampin’ Up! Gray Watercolor Pencil

Paper: Whisper White, Basic Black, retired World Spectacular DSP
Accessories: Crimper Tool, Distressing Tool, AquaPainter™, Hexagon Punch  


Thanks again for visiting- have a wonderful weekend, my friends!

Thursday, April 16, 2015

By the Tide- Thinking of You a Color, Sketch and Theme Challenge :-)


Hi Stampers! 

I had a chance to stamp late Wednesday evening (into morning) and decided to design a card using the Paper Players PP240 Color Challenge with the Freshly Made Sketches FMS183 Sketch and the theme from the Splitcoaststampers Way to Use It WT525 "Elements- Earth, Wind, Fire and Water" Challenge (see details here and gallery here).
 
If you have not had a chance to do so, I hope you will find the time to visit all of the above sites- they have wonderfully diverse Design Team samples as  well  as inspiration from their galleries!

To create this card:

Using Stāz-On® Jet Black Ink, stamp the seahorse and fish image from By The Tide onto Whisper White cardstock.
   
Use  Stampin’ Write Markers to color the images- Strawberry Slush and Coastal Cabana for the seahorse, Pistachio Pudding, Coastal Cabana and Strawberry Slush for the fish.

Fussy-cut the images and add a few white highlights to the fish using the Faber-Castell® White Pitt Pen marker.

Ink the coral image using Strawberry Slush Classic Ink and stamp repeatedly onto a piece of Whisper White cardstock. 

Ink the script image using Pistachio Pudding and repeatedly stamp the script stamp as well.


Use Coastal Cabana Classic Ink to stamp the Nantucket Inn image onto the panel  (my stamp originally was not completely clean so I had to add a  bit of Strawberry Slush Classic Ink with the AquaPainter™ and add shadows with the Sahara Sand Stampin’ Write Marker to hide the error- now you know- lol!! :-))

Stamp the large splatter stamp from Gorgeous Grunge using Coastal Cabana Classic Ink (to mimic water bubbles) :-)

Trim the panel and mount onto a piece of Strawberry Slush cardstock, trim again and mount onto a piece of Whisper White cardstock, trim once more and mount onto the Coastal Cabana card base.

Stamp the sentiment using Stāz-On® Jet Black Ink onto Whisper White cardstock.

“Huff” onto the script stamp to re-moisten the Pistachio Pudding Classic Ink and repeatedly stamp over the sentiment.

Create the banner points using the Hexagon Punch and mount onto a piece of Strawberry Slush cardstock (creating the points on this layer as well with the punch). 

Add two additional layers of Pistachio Pudding and Coastal Cabana cardstock along with the scrap piece of Strawberry Slush on the right hand side.

Re-moisten the ink on the splatter stamp (by “huffing on it”) and stamp over all layers.

Mount the sentiment, seahorse and fish image using Stampin’ Dimensionals®.

Add the Rhinestones to finish off the card.

Stamp Sets: By The Tide, Wetlands, Gorgeous Grunge

Ink: Stāz-On® Jet Black Ink, Classic Ink- Coastal Cabana, Pistachio Pudding, Strawberry Slush;  Stampin’ Write Markers- Coastal Cabana, Pistachio Pudding, Strawberry Slush; Faber-Castell® White Pitt Pen marker

Paper: Whisper White, Coastal Cabana, Pistachio Pudding, Strawberry Slush

Accessories: Rhinestones, Hexagon Punch


Thanks again for stopping by- have a terrific Thursday, my friends!

Wednesday, April 15, 2015

Sending Wishes Your Way- A Salvaged Watercolor Experiment :-)


Hi Stampers!

I had a chance to play in my craft room this evening and decided to create a card for the Create with Connie and Mary CCMC350 Color Challenge and the Splitcoaststampers SC535 Sketch Challenge – I modified the oval portion of the sketch to be the flower/sentiment (see details here and gallery here). 

This card looked totally different a few hours ago- I had watercolored the entire panel with a Night of Navy background over the printed images but could not achieve a high enough light to dark ratio, so I decided to go an entirely different route (I refused to give up :-) )

This is what I love about stamping- the challenge of making something out of a mistake- lol!!

Again, I hope you have the time to stop by the above sites to check out the wonderful inspiration from the Design Teams as well as the other gallery entries!

To create this card:

Using My Digital Studio (MDS),  position the floral image and sentiment from Butterfly Basics and print out onto Whisper White cardstock (since this set was mostly line art images, I only purchased it in the MDS version but you could stamp the actual stamp with Stāz-On Jet Black Ink).  

Using an AquaPainter™ along with the Classic Ink pads from the color challenge, apply color from the Calypso Coral pad to the flower petals (along with a bit of Crushed Curry) and Night of Navy to the background and over the sentiment- spritzing with water, drying with the Heat Tool and re-applying additional ink.

Add detail using the corresponding Stampin’ Write markers, spritzing and allowing the ink to run- again, just have fun!!

If you are lucky, you can use this one layer panel for your card, but if you are like me, “fussy-cut” the flower image and punch out the sentiment using the Note Punch.  Add additional color with the Stampin’ Write markers and add white highlights to the flower with the White Gel Pen.

Mount the sentiment onto another Note Punch from Night of Navy cardstock- you cannot see this layer but it helps to stabilize the Whisper White cardstock.

Ink the Dictionary background stamp using Crushed Curry Classic Ink and stamp onto a piece of Very Vanilla cardstock (place the inked stamp face up on your table, lay the Very Vanilla cardstock down onto the stamp and use your fingers to "walk" the paper randomly over the stamp image). 

Add the strips of retired Crushed Curry Designer Series Paper (DSP) along with Night of Navy and Calypso Coral cardstock scraps to create the center and left hand border (per the sketch).

Trim the panel and mount onto a piece of Night of Navy cardstock, trim again and mount onto a piece of Calypso Coral cardstock, trim once more and mount onto the Night of Navy card base.

Add the sentiment and fussy cut flower using Stampin’ Dimensionals®.

Use the Bow Builder Punch to create the Night of Navy cardstock bow, adhere to the card front and add the retired Calypso Coral button to finish off the card.

Stamp Sets:  Butterfly Basics (MDS version), Dictionary

Ink: Printer Ink- Black; Classic Ink- Calypso Coral, Crushed Curry, Night of Navy; Stampin’ Write Markers- Calypso Coral, Crushed Curry, Night of Navy ; White Gel Pen

Paper:  Whisper White, Calypso Coral, Night of Navy, retired Crushed Curry DSP

Accessories: AquaPainter™, Heat Tool, Punches- Bow Builder and Note, retired Calypso Coral button

Thanks again for visiting- stop by in the am to see the new Card Concept challenge

Hugs to you, my friends!!

Thursday, April 9, 2015

Prayers Are With You- A Sketch, A Color and A Masculine Theme Challenge


Hi Stampers! 

I had a chance to stamp last night and created a quick easy card using the Freshly Made Sketches FMS181 Sketch (tilted the panel in the opposite direction) along with the Splitcoaststampers CAS319 “Make It Masculine!” Challenge (see the details here and gallery here) and the CC525 Bingo Game Color Challenge- I used the bottom horizontal column (see the details here and gallery here). 

If you have not had a chance to do so, I hope you will find the time to visit all of the above sites- they have fabulous Design Team samples and wonderful inspiration from their galleries!

To create this card:

Using Cajun Craze Classic Ink, stamp the rooster and weather vane from My Favorite Things (MFT) Life’s Direction onto a piece of Soft Sky cardstock.

Add shadows with the Smoky Slate Stampin; Write marker. 

Use the Big Shot™ with the MFT Stitched Rectangles Die to cut out the image.

Create the honeycomb background with the Stampin’ Write Soft Sky Marker and the Mini Punchenella Stencil from Balzar Designs® , add the retired Pewter Brad and mount the panel onto a piece of Cajun Craze cardstock (you could use a Sponge Dauber with Soft Sky Classic Ink versus the marker but I used what I had closest to me at the time :-)) 

Use the Big Shot™ along with the Woodgrain Textured Impressions™ Embossing Folder to emboss a piece of retired Merry Moments Designer Series Paper (DSP), trim and mount onto a piece of Cajun Craze cardstock.

Adhere a piece of retired Old Olive DSP to the top of the panel and cover the seam with a scrap piece of Cajun Craze cardstock and mount the background panel onto the Soft Sky card base.

Stamp the sentiment from MFT Sympathy using Cajun Craze Classic Ink onto a piece of Vellum, allow the ink to dry and trim the vellum along with a matching piece of Soft Sky cardstock.

Adhere the Soft Sky layer to a piece of Cajun Craze cardstock and add the vellum sentiment using retired Pewter Brads in the corners.

Mount the focal image along with the sentiment to the card front using Stampin’ Dimensionals® to finish off the card.

Stamp Sets: MDT Life’s Direction and Sympathy

Ink: Cajun Craze Classic Ink, Stampin’ Write Soft Sky and Smoky Slate Markers

Paper: Soft Sky, Cajun Craze, Vellum , retired Merry Moments and Old Olive DSP

Accessories: Big Shot™, MFT Stitched Rectangle Die, retired Pewter Brads, Mini Punchenella Stencil from Balzar Designs®


Thanks again for stopping by- have a wonderful evening, my friends!

Wednesday, April 1, 2015

Thinking of You- A New Technique for a Mixed Media, Technique and Masculine Challenge :-)

Hi Stampers!!

I decided to spend some time in my craft room today and created a card using the Splitcoaststampers Mix-Ability MIX 113 “It’s Hip to be Square” Challenge (see details here and gallery here) along with the As You See It AYSI080 "Try A NewTechnique" Challenge and the Friday Mashup FM202 "Sketch or Masculine" Challenge.

Not sure of the name of this technique- you stamp onto graph paper and color the squares...I just had to try it :-)  Normally you would use a large outline stamp, but I just received this stamp a while back  and had not inked it up yet...

Again, I hope you will take the time to visit the above sites- fabulous Design Team creations as well as gorgeous galleries and inspiration from all! 

To create this card:

Ink the Impressions Obsession image using Stāz-On Jet Black Ink and stamp onto a piece of graph paper.

Using Stampin’ Write markers- Pool Party, Coastal Cabana, Lost Lagoon and Bermuda Bay, color the squares in the sky. 

Using a Derwent® Watercolor Pencil- French Grey and Silver Grey, color the squares of the moon as well as the bodies of the geese.

Use an AquaPainter™ to apply diluted Frost White Shimmer Paint to the moon, rinse the brush and blend some of the marker background on the sky.

When dry, darken some of the branches and the feathers using a Faber-Castell Black Pitt Pen marker and add a few white highlights to the branches with a Faber-Castell White Pitt Pen Marker. 

Trim the image and mount onto a piece of Basic Black cardstock.

Use the Big Shot™ to emboss a piece of Bermuda Bay cardstock with the Woodgrain Textured Impressions™ Embossing Folder, trim and mount onto a piece of Basic Black cardstock, trim and mount onto the Whisper White card base.

Mount a piece of Whisper White cardstock onto a piece of Basic Black cardstock, adhere to the card front.

Mount the focal image to the Whisper White “frame” using Stampin’ Dimensionals®.

Stamp the sentiment with Stāz-On Jet Black Ink onto Whisper White cardstock, trim and create the banner points with the Hexagon Punch.  

Mount onto a piece of Basic Black cardstock (also creating the banner points with the Hexagon Punch) and adhere to the card front using Stampin’ Dimensionals®.

Add the retired Basic Black button (with a piece of Bermuda Bay cardstock as “thread” in the center) to finish off the card.

Stamp Sets: Moon Lake (sentiment), Geese and Tree  (I/O)

Ink: Stāz-On Jet Black Ink, Stampin’ Write Markers- Bermuda Bay, Coastal Cabana, Lost Lagoon, Pool Party; Faber-Castell Black and White Pitt Pen markers

Paper: Whisper White, Basic Black, Bermuda Bay

Accessories: Big Shot™, Woodgrain Textured Impressions™ Embossing Folders, Hexagon Punch, AquaPainter™, Frost White Shimmer Paint, retired Basic Black button


Thanks again for taking the time to stop by- it is such an encouragement to me!  Have a fabulous Easter week, my friends!

Sunday, March 22, 2015

CAS Pleasant Poppies- A Floral Sympathy Card


Hi Stampers! 

As I created this weekend, I wanted to participate in CASOLOGY#138 Blossom Challenge incorporating the Hand Stamped Sentiments HSSSC207 Color Challenge and the Splitcoaststampers CAS313 Think Spring Challenge (see details here and gallery here).    

I decided to create a very Clean and Simple (CAS) card, then “stepped” it up a bit with additional layering and embossing for a Clean and Layered (CAL) card (see the next post here for the “stepped-up” version) :-).

Again, if you have not stopped by any of the above sites yet, I hope you will have time to do so- fabulous Design Team samples and so much inspiration!!

To create the CAS version:

Open a blank document in My Digital Studio (MDS), position the Pleasant Poppies background stamp image (re-sizing if necessary) and print out onto Whisper White cardstock.

Color the poppy image using Stampin’ Write markers- Blushing Bride for the petals, Wild Wasabi for the stems and Crumb Cake for shadows. 

Carefully cut out the flowers (“fussy-cut”) and add a few white highlights using a White Gel Pen.

Ink the sentiment using Blackberry Bliss Classic Ink and stamp onto a piece of Whisper White cardstock.  Trim the panel and mount onto a piece of Blackberry Bliss cardstock, trim and mount onto the Blushing Bride card base.

Add the flowers using Stampin’ Dimensionals® to finish off the card.

Stamp Sets:  Pleasant Po
ppies (MDS version), Thoughts & Prayers

Ink: Printer Ink- Black, Blackberry Bliss Classic Ink, Stampin’ Write Markers- Blushing Bride, Wild Wasabi, Crumb Cake; White Gel Pen

Paper: Whisper White, Blackberry Bliss, Blushing Bride

Accessories: Stampin’ Dimensionals®


Thanks again for stopping by-the next post will show the “stepped up” version :-)  I hope all of you have a wonderful, relaxing Sunday!!

Related Posts Plugin for WordPress, Blogger...