Showing posts with label Sweater Weather. Show all posts

Monday, August 24, 2015

The Wilderness Awaits- Thinking of You :-)


Hi Again Stampers!!

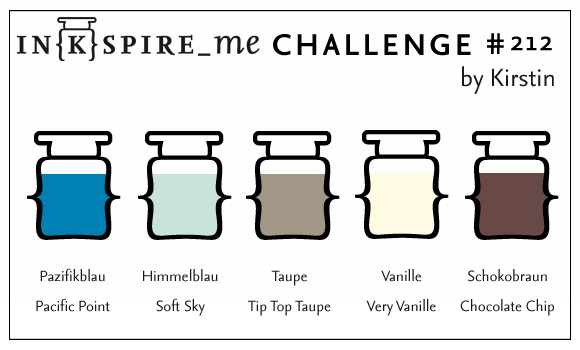
This card was created using the Create with Connie and Mary CCMC369 Sketch Challenge along with the Just Add Ink JAI276 "Cards for Males" Challenge and the IN{K}SPIRE_Me#212 Color Challenge (oops! just realized I used Whisper White versus Very Vanilla- hope I will not be disqualified :-))

I am trying to use up some of my retired stash of DSP, ribbons and hardware so the embellishments along with the Designer Series Paper (DSP) are retired...

If you have not already done so, I hope you will find the time to visit the above sites to check out the great Design Team samples as well as their wonderful galleries!

To create this card:

Stamp the elk image from The Wilderness Awaits using Stāz-On® Jet Black Ink onto Whisper White cardstock, watercolor with an AquaPainter™ using Stampin’ Write Markers- Soft Sky and Pacific
Point for the sky area, Tip Top Taupe and Chocolate Chip for the elk and stones. 

Cut the image out with the Big Shot™ and the Oval Collections Framelits™, cutting another oval the same size from Chocolate Chip cardstock as well.

Split the Chocolate Chip oval in half and adhere behind the focal image.

Add a few more stones to the bottom of the image using the Basic Black Stampin’ Write Marker.

Use the Big Shot™ with the Woodgrain Textured Impressions™ Embossing Folder to emboss a piece of retired Sweater Weather Soft Sky DSP, trim and mount onto a piece of Tip Top Taupe cardstock, trim and mount onto Chocolate Chip cardstock, trim and mount onto Pacific Point cardstock, trim once more and mount onto the Chocolate Chip card base.

Add the panels of retired DSP mounted onto Chocolate Chip along with the banners created with the Banner Triple Punch (per the sketch).

Stamp the sentiment using Stāz-On® Jet Black Ink onto Whisper White cardstock and punch out with the Word Window Punch.
Mount the sentiment along with the focal image to the card front using Stampin’ Dimensionals®.

Trim a piece of retired Pacific Point Striped Grosgrain Ribbon, fray the ribbon, cut a piece of retired 5/8” Chocolate Chip Satin Ribbon in half, fold and adhere both behind the focal image.

Fray a piece of retired Hemp Twine and tie onto the retired Antique Pewter Hodgepodge Hardware Clip- add the clip to the focal image to finish off the card.

Stamp Sets: The Wilderness Awaits, Teeny Tiny Wishes

Ink: Stāz-On® Jet Black; Stampin’ Write Markers- Soft Sky, Pacific Point, Tip Top Taupe, Chocolate Chip

Paper: Whisper White, Pacific Point, Tip Top Taupe, Chocolate Chip; retired Sweater Weather DSP, retired Pacific Point DSP (from Hostess Level I Pack)

Accessories: Big Shot™,  Ovals Collection Framelits™, AquaPainter™, Banner Triple Punch, retired items- Hemp Twine, 5/8" Pacific Point Striped Grosgrain Ribbon,  5/8” Chocolate Chip Satin Ribbon, Antique Pewter Hodgepodge Hardware Clip


Thanks again for taking the time to stop by- I hope all of you have a marvelous day!

Tuesday, October 22, 2013

SUO82 Harvest Blessings All Season Long

Hi Stampers! 

The SUO82 SU-Only Challenge is “Harvest” and I decided to use two of my favorite sets from the Holiday Mini- Truly Grateful and Harvest of Thanks.

I hope you will stop by to visit the SU-Only Challenge site and check out the rest of the Design Team!!  If you have a chance, we would love to see your “Harvest” card using Stampin’ Up! Only products :-)

Start by stamping the wheat image and Harvest of Thanks image onto Very Vanilla cardstock using Early Espresso Classic Ink.   Color the images using Stampin’ Write Markers in Crushed Curry, Tangerine Tango, Soft Sky, Sahara Sand and Early Espresso.  Use the Early Espresso marker with the Color Spritzer Tool (retired) to add a bit of distressing.

Use the Big Shot™ to cut out the wheat image using the Ovals Collection Framelits™ (also cut the same size oval from Early Espresso cardstock- split this oval in half horizontally).  Layer behind the wheat image so that part of the frame shows – split area is at the side of the image. 

Hand cut the Harvest of Thanks image and cut the lower part with the “All Season Long” by hand and curve around the image.

Use the Big Shot™ with the Apothecary Accents Framelits™ to cut a piece of Early Espresso cardstock and cut the label in half.   Adhere the upper part of the Harvest of Thanks image onto the label and the lower half of the label, adhere behind the curved part of the label. 

Add the Harvest of Thanks image to the upper part of the wheat oval image and the curved “All Season Long” at the bottom of the wheat image.

Add the split Decorative Label (in Early Espresso cardstock) on the sides of the oval and adhere this panel to the embossed Sweater Weather DSP panel (with the Big Shot™ and Square Lattice Textured Impressions™ Embossing Folder).

Mount onto an Early Espresso layer and again onto the Crushed Curry card base.  Add the Tangerine Tango Candy Dots to finish off the card.

Stamp Sets: Truly Grateful, Harvest of Thanks

Ink: Early Espresso, Stampin’ Write Markers- Early Espresso, Crushed Curry, Tangerine Tango, Soft Sky, Sahara Sand  

Paper/Cardstock:  Very Vanilla, Crushed Curry, Early Espresso, Sweater Weather DSP

Accessories: Big Shot™,  Ovals Collection and Apothecary Accents Framelits™, Square Lattice Textured Impressions™ Embossing Folder, Tangerine Tango Candy Dots, Color Spritzer Tool

Thanks again for stopping by to visit-  I hope you can join us for our Harvest Challenge!

Tuesday, September 24, 2013

SUO80 Welcome Little One!!

Hi Stampers! 

The SUO80 Stampin’ Up! Only Challenge is “Welcome Baby”- to create a baby card or project using Stampin’ Up! Only products- hope you can join us and drop by to visit to see the rest of the Design Team projects. 

As I reviewed my current SU! stamps, I realized that I do not own any baby type stamps (will need to rectify that :-) so I decided to turn to My Digital Studio (MDS).  The retired rubber stamp set, Two by Two is still available as a digital download and I also had the Nursery Necessities on MDS  :-)

To create this card:

In My Digital Studio (MDS), open a blank 8.5 x 11 custom page and insert the stamp image from Two by Two  and the sentiment from Nursery Necessities- resize the image and print the image using your computer printer. 

Using Stampin’ Write markers in So Saffron, Pink Pirouette, Chocolate Chip, Soft Suede, Sahara Sand and Pool Party to color the image.   Use the Chalk Marker to create a few highlights in the water and on the elephant ears/head :-)

Use the Big Shot™ with the Deco Labels Framelits™ to cut out the label behind the focal image from Sweater Weather Designer Series Paper (DSP) and another one from Pool Party cardstock.  Cut the Pool Party label in half vertically and adhere behind the Sweater Weather DSP layer. 

Cut the Two by Two image out with the Big Shot™ and the Circle Collection Framelits™.  Add the “Welcome Little One” sentiment over the Congratulations on the stamped image, along with the Pool Party Candy Dot. 
  
Layer the Gumball Green Polka Dot DSP from Epic Day This and That onto a piece of Pool Party cardstock, add the focal image using Stampin’ Dimensionals®.  Adhere the ½” Pool Party Seam Binding Triple Ribbon Bow along with the Naturals button (use a very small strip of Pool Party cardstock to mimic thread in the button). 

Stamp Sets:  Two by Two, Nursery Necessities  (both MDS)   
  
Ink: Printer Ink- Black, Stampin’ Write Markers- So Saffron, Pink Pirouette, Pool Party, Sahara Sand, Soft Suede, Chocolate Chip

Cardstock: Whisper White, Pool Party, Sweater Weather DSP, Epic Day This and That DSP

Accessories:  Big Shot™, Circle Collection and Deco Labels Framelits™,  ½” Pool Party Seam Binding Ribbon, Pool Party Candy Dots


Thanks again for visiting- I hope you will have time to create a SUO “Welcome Baby” project of your own and join in on the fun

Wednesday, September 18, 2013

Beary Best Wishes- A CAS Card for the Paper Players

Hi Stampers!

One thing I love about weekly challenges is that sometimes you have to “go outside of your comfort zone” and the Clean and Simple (CAS) Paper Players PP163 Kid’s Card Challenge did just that for me  (if you have the time, check out all of the great ideas the Design Team created along with the other entrants- another reason to love weekly challenges :-))

My husband and I work with over sixty kids during the school year in our Awana ministry program at church (grades 3-6) but it seems as though I do not own many stamps specifically geared towards “kids” cards. 

In reviewing my stash, I decided to pull out a few favorite retired sets, Beary Merry Christmas and the sentiment from Beary Best.    I love the colors from our Sweater Weather Designer Series Paper and Splitcoaststampers CC444  Color Challenge  was the perfect match for the fall/neutral color combo (Very Vanilla, Chocolate Chip, Cajun Craze, Crushed Curry and Tangerine Tango). 

To create this card:

Stamp the bear image using Early Espresso Classic Ink onto Very Vanilla cardstock and carefully watercolor using the AquaPainter™ (this will give the image an “antiqued” appearance and I find that Early Espresso works better for watercolor than Chocolate Chip) :-)

Using Stampin’ Write markers add a bit of color to the horn (Crushed Curry), mane and Tail (first with Tangerine Tango and shadows of Cajun Craze), saddle and harness (Tangerine Tango).

Use the Big Shot™ with the Circles Collection Framelits™ to cut out the image and cut another frame from Cajun Craze cardstock (cutting the Cajun Craze layer in half vertically to adhere behind the focal image). 

Stamp the sentiment using Early Espresso Classic Ink and stamp a few stars from Simply Stars using Crushed Curry Classic Ink- again, cut out the sentiment using the Big Shot™ with the Circles Collection Framelits™ cutting a second frame from Cajun Craze as in the above step.

Layer both the focal image and sentiment with Stampin’ Dimensionals®  to a piece of Sweater Weather DSP (mounted onto Very Vanilla and a Cajun Craze card base).

Add the 5/8” Satin Ribbon Triple Bow to finish off the card. 

Stamp Sets:  Beary Merry Christmas and Beary Best (retired), Simply Stars

Ink: Early Espresso, Stampin’ Write Markers- Cajun Craze, Crushed Curry, Sahara Sand, Tangerine Tango

Paper:  Very Vanilla, Cajun Craze, Sweater Weather DSP

Accessories:  Big Shot™, Circle Collection Framelits™, AquaPainter™, 5/8” Satin Ribbon (from my stash)

Thanks again for stopping by- I hope all of you have a wonderful Wednesday ("Hump Day" it is- that one was for you Debi- lol!! )


Tuesday, July 30, 2013

Harvest of Thanks- A GateFold for the Pals Paper Arts!


Hi Again Stampers! 
 
I wanted to create one more card this evening and even though I am too late for the deadline, I just loved the Pals Paper Arts PPA165 Sketch  and decided to create a GateFold card :-)    I hope that you will find the time to visit their site- they now have two different Design Teams and they rotate each week for a new challenge, so again, tons of inspiration!!

This sketch seemed perfect for a Gate Fold card- so to create this card:

GateFold- Open 
Ink up the large label stamp from Harvest of Thanks using Stampin’ Write markers in Chocolate Chip, Crushed Curry, Tangerine Tango and Wild Wasabi and stamp onto Whisper White cardstock.  

Use the Distressing Tool to distress the edges and a Sponge Dauber with Crumb Cake to antique the paper. 

Use the Big Shot™ with the Apothecary Accents Framelits™ to cut out the image and also cut a piece from Chocolate Chip.   Cut the Chocolate Chip layer in half horizontally to layer behind the focal image.

Use the Big Shot™ with the Circle Framelits™ to cut a circle from the Sweater Weather Designer Series Paper and also a circle the same size using Chocolate Chip cardstock.  Cut the Chocolate Chip circle in half and layer behind the DSP circle and adhere the focal image label.

Use the Simpy Score™ Tool to create the GateFold from Whisper White cardstock and layer Chocolate Chip cardstock on the two gate folds in the front  (on second thought, I should have created the card base using Chocolate Chip cardstock- hindsight is 20/20 :-)))… Adhere a piece of embossed Sweater Weather DSP on both sides (Soft Sky Polka Dot pieces using the Square Lattice Textured Impressions™ Embossing Folder) .

Card in Closed Position 
Use the Dotted Scallop Ribbon Border Punch to punch out a piece from Chocolate Chip cardstock and attach to the bottom of a piece of Crushed Curry DSP (again from Sweater Weather), distress with the Distressing Tool and add to the right hand panel per the sketch.

Add the Chocolate Chip DSP panel in the center of the card as well as a piece along the lower right hand panel (distress as well) along with the Antique Brad and Gratitude sentiment (stamped in Chocolate Chip onto Whisper White and cut with the Big Shot™ and  the Bitty Banners Framelits™ to finish off the card.

Stamp Sets: Harvest of Thanks

Ink: Chocolate Chip, Stampin’ Write Markers- Chocolate Chip, Crushed Curry, Tangerine Tango, Wild Wasabi

Paper/Cardstock:  Whisper White, Chocolate Chip, Sweater Weather DSP

Accessories: Big Shot™, Apothecary Accents Framelits™, Circle Framelits™, Bitty Banner Framelits™, Dotted Scallop Ribbon Border Punch, Distressing Tool, Sponge Dauber, Antique Brad


Thanks again for visiting and I hope you have a terrific Tuesday!!
Related Posts Plugin for WordPress, Blogger...