Showing posts with label Oval Collection Framelits. Show all posts

Monday, April 27, 2015

PP242 Sail Away


Hi Again Stampers! 

This card was created using the Paper Players PP242 Sketch Challenge along with the Splitcoaststampers Ways to Use It WT515 “Use an Oval” Challenge (see details here and gallery here) and the USEIT2015 Challenge (see gallery here). 

If you have not had a chance to do so, I hope you will find the time to visit the above sites- they have wonderful Design Team samples as well as inspiration from their galleries!

I decided to use a retired stamp, Sail Away in a digital image from My Digital Studio (MDS)  that I had previously printed and in my stash J

To create this card:

Print or stamp the Sail Away image onto Whisper White cardstock, cut with the Big Shot™ with the Ovals Collection Framelits™ and cut another oval from Basic Black cardstock.

Color the image with an AquaPainter™ along with Stampin’ Up! Watercolor Pencils and Pacific Point Classic Ink. 

Create a mask from scrap paper for the moon and ocean horizon line,  lightly sponge Melon Mambo Classic Ink onto the background and dilute with an AquaPainter™.

Add a few white highlights using Faber-Castell White Pitt Pen marker.

Trim the High Tide Designer Series Paper (DSP) and mount onto a piece of Basic Black cardstock, add a scrap strip of Basic Black cardstock to cover the seam.

Create the banner strips of I Am Me and High Tide DSP using the Hexagon Punch and mount onto Basic Black cardstock (punching the banner points with the Hexagon Punch as well).   

Mount the banner strips onto the card front and add the focal image using Stampin’ Dimensionals®.

Stamp the sentiment from Moon Lake using Memento™ Tuxedo Black Ink onto Whisper White cardstock, punch out using the Word Window  Punch, create the banners using the Banner Punch and mount onto Basic Black cardstock.

Using a few scraps from the same DSP, create the banner points using the Banner Punch and adhere behind the sentiment.

Mount the sentiment and add the retired Antique Copper Hodgepodge Hardware clip to finish off the card.

Stamps:  Sail Away (MDS version), Moon Lake

Ink: Memento™ Tuxedo Black Ink, Melon Mambo, Pacific Point,  Printer Ink- Black

Paper: Whisper White, Basic Black, Real Red, I Am Me and High Tide DSP

Accessories: Big Shot™, Ovals Collection Framelits™,  AquaPainter™, Sponge Dauber, Punches- Hexagon, Banner; retired Antique Copper Hodgepodge Hardware


Thanks again for visiting…the new SU-Only Challenge starts tomorrow morning- hope you can drop by again soon! 

Monday, September 15, 2014

Galations 2:20 Christ Lives in Me - Bible Verse Memory Album

Hi Again Stampers! 

Here is page six of the heart album that I created for the SplitcoaststampersDivine Design Bible Verse BVC14 Challenge.  The initial post located here describes the steps for the cover of the album along with a few more details on the basic steps for each page of the album…

The verses used are free digital images from Word Art Wednesday (downloaded into My Digital Studio (MDS) and printed onto Very Vanilla cardstock).
Page Six:
“I have been crucified with Christ, it is no longer I who live, but Christ lives in me”  Galatians 2:20
In addition to the steps taken in the first post (adhere the retired Beau Château DSP to the Heart Chipboard Album page, stamp the bees from Nature Walk using Early Espresso Classic Ink onto the upper part of the heart, “antique” using  Ranger™ Tim Holtz® Tea Dye and Vintage Photo Distress Stain- I love how the distress stain made the lower half look like embossed leather since this piece of the DSP is so light in color) add the 5/8” strip of Early Espresso Satin Ribbon.
Use the Big Shot™ with the Oval Collection Framelits™ to cut out the verse and also cut an additional label from Early Espresso cardstock.  Cut the Early Espresso label in half horizontally and adhere behind the sentiment. 
Distress with Ranger™ Tim Holtz® Tea Dye and Vintage Photo Distress Stain along with the Gorgeous Grunge splatter stamp using Soft Suede Classic Ink.   Adhere to the Early Espresso layer and add a distressed White Tea Lace Paper Doily to the back of the verse.   Mount the entire verse to the heart page using Stampin’ Dimensionals®.
Ink the butterfly from Papillon Potpourri using Early Espresso Classic Ink onto Pink Pirouette cardstock and stamp two butterflies.  Punch out using the Elegant Butterfly Punch, add to the heart panel and add the string Pearls to the centers of the butterflies.
Add the rolled flowers (created with the 1 ¾” Scallop Circle Punch from Pink Pirouette cardstock and Baja Breeze Designer Series Paper along with leaves using the Bird Builder Punch from Early Espresso cardstock) to finish off the panel.
Stamp Sets:  Nature Walk, Gorgeous Grunge, Papillon Potpourri, Verse- free Digital Image from Word Art Wednesday
Ink: Memento™ Tuxedo Black Ink, Early Espresso and Soft Suede Classic Ink; Printer Ink- Black, Ranger™ Tim Holtz® Tea Dye and Vintage Photo Distress Stain
Paper: Very Vanilla, Early Espresso, Pink Pirouette, retired Baja Breeze DSP, retired Beau Château DSP
Accessories:  Big Shot™, Oval Collection Framelits™, White Tea Lace Paper Doily, Punches: Elegant Butterfly, 1 ¾” Scallop Circle, Bird Builder; Pearls

Thanks again for visiting- I will post the instructions for 7 and 8 shortly...I hope you have a chance to stop by again soon!  Have a great evening, my friends- God Bless!

Monday, July 28, 2014

PP206 Mr. Moose is Thinking of You :-)

Hi Stampers! 

I love this week's  PP206 Sketch atThe Paper Players and decided to create a masculine card using the Walk in the Wild stamp set ( I have not had Mr. Moose out in a while :-))  

I hope you will have a chance to visit The Paper Players site and check out all of the wonderful Design Team samples!!

To create this card:

With the Big Shot™ and the Ovals Collection Framelits™, cut out an oval from Whisper White cardstock as well as one the same size from Early Espresso.

Ink the moose stamp using Memento™ Tuxedo Black Ink and stamp onto the Whisper White oval cut in the above step.

Color the body of the moose with the Stampin’ Write Crumb Cake marker and follow with the Crumb Cake Blendabilities™ Collection.   Color the grass with the Old Olive Blendabilities™ Collection and the sky with the light Night of Navy Blendabilities™ marker.  *** FYI-  I also re-touched up the moose using a fine tip black gel pen once I finished all of the coloring noted above ***

 Lightly sponge the image with a Sponge Dauber and Crumb Cake Classic Ink.   Apply additional distressing using the Color Spritzer Tool with the Stampin’ Write Early Espresso marker.

Mount a piece of Park Lane Designer Series Paper (DSP) onto a piece of Old Olive cardstock and adhere to the Early Espresso card base.

Mount a piece of retired Venetian Romance DSP onto a piece of Early Espresso cardstock, trim and mount onto a piece of Old Olive cardstock.    Add this panel to the card front using Stampin’ Dimensionals®.

Ink the sentiment from the retired set, Kind and Caring Thoughts (I love the font on this set) and stamp onto a piece of Whisper White cardstock.   Use the Hexagon Punch to create the banner points and adhere to a piece of Early Espresso cardstock (also using the Hexagon Punch to create the points).

Create two banners using Park Lane DSP mounted onto Early Espresso cardstock (as described above). 

 Lightly sponge Crumb Cake Classic Ink over all three banners and add the banners to the card front per the sketch.

Create the diagonal panel over the focal image using scraps of cardstock and DSP- weave through a retired Antique Copper Hodgepodge Hardware ribbon slide and hand cut the curves to match the oval frame.

Use the retired Photo Corner Punch to create a small corner from Old Olive cardstock and adhere in the lower right hand corner, adding an Early Espresso Candy Dot™ to finish off the card.

Stamp Sets: Walk in the Wild, Kind and Caring Thoughts (retired)

Ink: Memento™ Tuxedo Black, Crumb Cake, Early Espresso, Stampin’ Blendabilities™- Crumb Cake, Old Olive and Night of Navy Collections, Stampin’ Write Marker- Crumb Cake

Paper/Cardstock:  Whisper White, Early Espresso, Old Olive, Park Lane DSP, retired Venetian Romance DSP

Accessories: Big Shot™, Ovals Collection Framelits™, Sponge Dauber, Hexagon Punch, retired Photo Corner Punch, Early Espresso (Neutrals) Candy Dot™, Antique Copper Hodgepodge Hardware (retired)


Thanks again for stopping by- I hope all of you have a marvelous Monday!! 

Saturday, January 25, 2014

DD87 True Friends


Hi Stampers! 

This week’s DD87 “Black Tie” Dynamic Duo Challenge combines BasicBlack with Melon Mambo and  I incorporated the Splitcoaststampers SC471 Sketch Challenge along with this week's colors.  These colors remind me of several friends who just love pink and so I created this card  with them in mind :-)  I also incorporated the Splitcoaststampers SC471 Sketch Challenge along with this week's colors

Again, I hope that you will find the time to stop by and check out the rest of the Dynamic Duos Design Team projects and create a project of your own using this week’s colors - we would love to have you join us!!


To create this quick, easy “hybrid” card:

Using My Digital Studio (MDS), open a new blank 8.5x11 document and insert the stamp brush set from Friendly Words.  Re-size a bit and print out onto Whisper White cardstock.  Use the Big Shot™ with the Oval Collection Framelits™ to cut out the sentiment and cut out another oval using Basic Black cardstock.  Split the Basic Black oval in half to adhere behind the sentiment layer.

Using Melon Mambo Classic Ink, stamp the flower from Flower Shop onto Whisper White cardstock.  Cut out by hand and using the Sanding Block, lightly sand the edges.  Use the Pansy Punch to punch out a piece of Basic Black cardstock and mount the stamped flower onto the Basic Black punched flower using Mini Glue Dots.

Use the Big Shot™ with the Pretty Prints Textured Impressions™ Embossing Folder to emboss the top half of a piece of Whisper White cardstock, trim to approx. 3 3 ¾” x 5” and set aside.

Use the Big Shot™ with the Needlepoint Border Textured Impressions™ Embossing Folder to emboss a piece of Whisper White cardstock (emboss twice) and cut apart leaving a portion of the Whisper White to adhere to the next layer.

Adhere the Needlepoint embossed border to a piece of Basic Black cardstock (I use just a scrap strip at the top).  Adhere a piece of Melon Mambo Designer Series Paper (DSP) to two strips of Basic Black cardstock at the top and bottom (or an entire panel of Basic Black cardstock- I have so many scraps that I try to use them first).  Add the second Needlepoint embossed layer to complete the background panel. 

Adhere the Melon Mambo DSP/embossed panel to the Pretty Print embossed panel and mount onto a piece of Basic Black cardstock, trim to approx. 1/8” around the edges and mount onto a piece of Melon Mambo cardstock and again onto the Whisper White card base.

Use the Big Shot™ with the Square Framelits™ to cut out a piece of Whisper White cardstock and a larger square of Basic Black cardstock.   Add a few Basic Black leaves (created with the Bird Builder Punch) using Mini Glue Dots to the Whisper White square.  Add the stamped flower punched piece and adhere to the square as well with Mini Glue Dots. 

Add the sentiment oval layer onto the card and the floral square using Stampin’ Dimensionals®.  

Create the little polka dot banner using the new Banner Punch (I used a retired SU! background paper) and adhere the little heart along with the Pearl.  Add to the upper corner of the card.

Adhere the entire panel to the Whisper White card base and add the Pearls to finish off the card.
Stamp Sets: Flower Shop, Friendly Words (MDS version)
Ink: Melon Mambo, Printer Ink- Black
Paper/Cardstock:  Whisper White, Basic Black, Melon Mambo Designer Series Paper (DSP), retired background paper
Accessories: Big Shot™, Square and Oval Collections Framelits™, Needlepoint and Pretty Print Textured Impressions™ Embossing Folders, Punches- Bird Builder, Pansy, Banner, Pearls

Thanks again for visiting- I hope you will find the time to join us at the Dynamic Duos this week! 

Tuesday, October 22, 2013

SUO82 Harvest Blessings All Season Long

Hi Stampers! 

The SUO82 SU-Only Challenge is “Harvest” and I decided to use two of my favorite sets from the Holiday Mini- Truly Grateful and Harvest of Thanks.

I hope you will stop by to visit the SU-Only Challenge site and check out the rest of the Design Team!!  If you have a chance, we would love to see your “Harvest” card using Stampin’ Up! Only products :-)

Start by stamping the wheat image and Harvest of Thanks image onto Very Vanilla cardstock using Early Espresso Classic Ink.   Color the images using Stampin’ Write Markers in Crushed Curry, Tangerine Tango, Soft Sky, Sahara Sand and Early Espresso.  Use the Early Espresso marker with the Color Spritzer Tool (retired) to add a bit of distressing.

Use the Big Shot™ to cut out the wheat image using the Ovals Collection Framelits™ (also cut the same size oval from Early Espresso cardstock- split this oval in half horizontally).  Layer behind the wheat image so that part of the frame shows – split area is at the side of the image. 

Hand cut the Harvest of Thanks image and cut the lower part with the “All Season Long” by hand and curve around the image.

Use the Big Shot™ with the Apothecary Accents Framelits™ to cut a piece of Early Espresso cardstock and cut the label in half.   Adhere the upper part of the Harvest of Thanks image onto the label and the lower half of the label, adhere behind the curved part of the label. 

Add the Harvest of Thanks image to the upper part of the wheat oval image and the curved “All Season Long” at the bottom of the wheat image.

Add the split Decorative Label (in Early Espresso cardstock) on the sides of the oval and adhere this panel to the embossed Sweater Weather DSP panel (with the Big Shot™ and Square Lattice Textured Impressions™ Embossing Folder).

Mount onto an Early Espresso layer and again onto the Crushed Curry card base.  Add the Tangerine Tango Candy Dots to finish off the card.

Stamp Sets: Truly Grateful, Harvest of Thanks

Ink: Early Espresso, Stampin’ Write Markers- Early Espresso, Crushed Curry, Tangerine Tango, Soft Sky, Sahara Sand  

Paper/Cardstock:  Very Vanilla, Crushed Curry, Early Espresso, Sweater Weather DSP

Accessories: Big Shot™,  Ovals Collection and Apothecary Accents Framelits™, Square Lattice Textured Impressions™ Embossing Folder, Tangerine Tango Candy Dots, Color Spritzer Tool

Thanks again for stopping by to visit-  I hope you can join us for our Harvest Challenge!

Wednesday, October 2, 2013

Sun Ripened- Two Cards for The Friday Mashup!

Hi Stampers!

I was able to sneak in a few moments in my craft room and decided to create a card for this week’s FM129 Inspiration from Mom Challenge at The FridayMashup!  

I decided to “mash it up” and use the colors and the fruit inspiration and pulled out another one of my neglected, retired sets- Sun Ripened.   

I love the fruit images in this retired set and while I had it out, stamped two sets of each image and colored them in the same manner as described below with the FM129 colors.  I decided to set four of the images aside for later use- love to do this for quick, easy cards in the future :-)

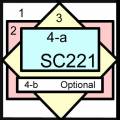
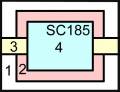
For these two cards, I utilized a few of the SplitcoaststampersSketch Challenges (SC221 and SC185)-   Again, I hope you will take a moment to check out both sites – great inspiration and ideas from all :-)

To create the watercolored panels for both cards:

Stamp the raspberry image using Early Espresso Classic Ink onto Whisper White cardstock and carefully watercolor using the AquaPainter™ without ink at first- the Early Espresso line images will give you a antiqued almost sepia look and then lightly add a bit of Cherry Cobbler Classic Ink over the berry images. 

Color the images using the Stampin’ Write markers- So Saffron for the leaves and Sahara Sand for the shadows and add the highlights using the Chalk Marker.

Use a Sponge Dauber with Crumb Cake ink to “antique” the paper and add a bit of Early Espresso over the edges.  Use the Color Spritzer Tool with an Early Espresso Stampin’ Write marker to add additional distressing. 

Assemble the first card:

Use the Big Shot™ with the Ovals Collection Framelits™ to cut out the image along with another oval the same size from Cherry Cobbler and Early Espresso cardstock.  Cut the Cherry Cobbler and Early Espresso frames in half horizontally to layer behind the focal image.

Using the Big Shot™, emboss a piece of So Saffron Designer Series Paper (DSP) with the Pretty Print Textured Impressions™ Embossing Folder and a piece of Early Espresso DSP with the Beautiful Baroque Textured Impressions™ Embossing Folder.  Lightly sand with the Sanding Block to slightly distress the paper.

Create the layers per the SC221 Sketch, add to the Early Espresso card base.  Adhere the focal image/panel and add the 5/8” triple Satin Ribbon bow along with the sentiment and Pearls to finish off the card.


To assemble the second card:

Punch a 1” Square Punch to punch out the berry image, mount onto a piece of Early Espresso cardstock.  Add the 5/8” triple Satin Ribbon bow and mount again onto a piece of Cherry Cobbler cardstock.

Adhere a piece of Early Espresso DSP to a piece of Cherry Cobbler cardstock for the central rectangle and mount the raspberry panel image onto the DSP layer.

Use the Big Shot™ along with the Hexagon Textured Impressions™ Embossing Folder to emboss a piece of So Saffron cardstock- sponge a bit of Crumb Cake over the embossed image.

Add the 5/8” Satin Ribbon strips, mount the focal image over the strips of ribbon and mount the entire panel onto a piece of Cherry Cobbler cardstock.  Mount onto the Early Espresso card base and add the sentiment from Wetlands along with the Pearls to finish off the card.

Stamp Sets:  Sun-Ripened (retired), Wetlands, Teeny Tiny Wishes  

Ink: Early Espresso, Cherry Cobbler, Crumb Cake; Chalk Marker, Stampin’ Write Markers- So Saffron, Sahara Sand

Paper:  Whisper White, Cherry Cobbler, Early Espresso, Designer Series Paper- So Saffron, Early Espresso

Accessories:  Big Shot™, Ovals Collection Framelits™, Textured Impressions™ Embossing Folders- Pretty Print, Honeycomb, Beautiful Baroque, Sponge Daubers, Pearls, AquaPainter™, Color Spritzer Tool, Punches- 1” Square, Large Oval, Modern Lable, Word Window;  5/8” Satin Ribbon (from my stash)


Thanks again for stopping by- I hope all of you have a great Wednesday!!

Thursday, August 15, 2013

Winter Memories for the PP158 Paper Players

Hi Stampers! 

I hope all of you are enjoying your week so far!  I needed to have a crafting break today so I decided to create a card for The Paper Players PP158 Color Challenge along with another design for my August commitment to the CCC13 Splitcoaststampers Christmas Card Challenge.  If you have not had a chance to visit The Paper Players site yet, please take a moment to do so- love their Design Team samples!  

I decided to use My Digital Studio (MDS) again to create another Christmas card and utilize traditional card making techniques for this “hybrid” card.   This version is a bit "clean” for my normal style- I have updated with two other versions - see below :-) 

Original version- see below for revised vintage style  and update with White Gel Pen :-)
To create this card:

Open MDS and insert the stamp brush set images from Winter Memories along with the sentiment from More Merry Messages.  Print the images onto an 8 ½ x 11 piece of Whisper  White cardstock using Black Printer Ink.

Color the images with Stampin’ Write markers as follows:

Crisp Cantaloupe for the sleigh and bow, Pear Pizzazz for the wreath, Strawberry Slush for the cardinals and highlighting the ribbon and bow, Sahara Sand for highlighting the wood behind the sleigh, add a few areas for the shadows and a layer over the sleigh and follow with another layer of Crisp Cantaloupe.

"Clean" with the White Gel Pen :-)
With the Big Shot™ with the Oval Collection Framelits™, cut an oval in a Strawberry Slush cardstock layer.  Emboss with the Petals-A-Plenty Textured Impressions™ Embossing Folder and add the focal image behind the oval.

Layer this panel onto Whisper White cardstock and then again onto a Pear Pizzazz card base. 

Trim the sentiment, add the banner points with the 1” Square Punch and layer onto a piece of Pear Pizzazz cardstock and add to the card front using Stampin’ Dimensionals®. 

Use the Big Shot™ with the Northern Frost Decorative Strip (retired) to cut snowflakes from the Whisper White cardstock, add to the card front using Mini Glue Dots™ and finish off the card with Pearls.
Stamp Sets:  Winter Memories, More Merry Messages (all MDS)

Ink: Printer Ink- Black, Stampin’ Write Markers- Crisp Cantaloupe, Pear Pizzazz, Strawberry Slush

Cardstock: Whisper White, Pear Pizzazz, Strawberry Slush

Accessories:  Big Shot™, Ovals Collection Framelits™, Northern Frost Decorative Strip (retired), Petals-A-Plenty Textured Impressions™ Embossing Folder, 1” Square Punch, Pearls

***  UPDATED VERSION *** 
Vintage- in addtion to the White Gel Pen, Sponging and Distressing :-)

I decided to revise the other three cards to a more vintage style by inking the folder prior to embossing with Crumb Cake Classic Ink as well as adding Crumb Cake over the main image, snowflakes and sentiment, distressing the edges and add some White Gel Pen highlights.  

If you have a chance, let me know which you prefer- the "clean" version or the vintage?  


Thanks again for taking the time to stop by- have a great week!
Related Posts Plugin for WordPress, Blogger...