Showing posts with label Beautifully Baroque EF. Show all posts

Wednesday, November 4, 2015

TCC43 Thanks For All You Do


Hi Friends!!

It is time for The Card Concept #43 "Thank Fall" Challenge- don’t you just love all of the texture and antique touches in this inspiration photo? 

I felt inspired by the steel buckets along with the gold and white accents so I decided to incorporate a Gelli Arts® Printing Plate monoprint that I created using a fun embossing folder technique for my Mixed Media card.

The Card Concept is a bi-weekly challenge that has an inspiration photo along with a number of design styles that you can choose from to create your card- Clean and Simple, Clean and Graphic, Clean and Layered, Shabby Chic, Freestyle Collage, Classy and Elegant and Mixed Media.   

I hope you will check out my fellow Design Team projects as well as find some time to gather your supplies together and come join in on the fun!! 


To create this card:

Apply white acylic paint with a brayer onto the Gelli® Arts Printing Plate (GA plate), spread to cover the plate, lay a piece of watercolor paper or cardstock onto the plate and lift off, lay another piece onto the plate for the ghost print.

Add a few drops of colored acrylic paint (I used a dark blue, gold and silver), spread with the brayer and then lay an embossed piece of thick cardstock (embossed with the retired Stampin’ Up! Beautifully Baroque Textured Impressions™ Embossing Folder) onto the GA plate, left up (this will remove some of the paint for the print design), lay down one of your prints created in the first steps above, press into the paint and lift up, lay another print, press and lift again.

FYI- I am using very old Folk Art Deco® Acrylic Paints that I have had for years, so they are thin and dry quickly.

You can repeat the steps to build up more layers but I have found that one or two layers give me enough depth for this type of background.

Once the panel is dry, you should be able to see the outline in the paint of the embossing folder that was used as a stencil, line up the paper into the actual embossing folder and re-emboss with the Big Shot™.

Add Encore!™ Silver and Gold Metallic Ink over the raised embossed areas and set with the Heat Tool.

Cut the panel to 4 ½” x 5 ½” and use the Big Shot™ with the My Favorite Things™ (MFT) Square Grid Cover Up.

Lay the grid over a piece of Whisper White cardstock and apply adhesive behind each of the squares only, once finished with all of the squares, lift up the grid.

Trim the panel, mount onto a piece of Basic Gray cardstock, trim again and mount onto a piece of More Mustard cardstock,
Add a piece of white crochet lace along with the 5/8” Gold Triple Satin Ribbon Bow.

Cut one wreath from More Mustard cardstock using the Big Shot™ with the Memory Box™ Tupelo Circle Wreath Die, cut the die in half and mount onto the card front with Antique Brads.

Stamp the sentiment from the retired Stampin’ Up! Absolutely Fabulous using Stāz-On® Jet Black Ink onto Whisper White cardstock, trim the sentiment and add the banner points with the Hexagon Punch.

To finish off the card, add the stamped sentiment with dimensional foam.

Stamp Sets:  Absolutely Fabulous

Ink: Stāz-On® Jet Black, Encore™ Metallic Silver and Gold; Acrylic Paint- Soft White, Midnight Blue, Gold, Silver

Paper: Whisper White, Basic Gray, retired More Mustard; Watercolor

Accessories: Gelli® Arts Printing Plate, Big Shot™, MFT Square Grid Cover Up Die, Tupelo Die (MB),  Hexagon Punch, 5/8” Gold Satin Ribbon, White Crochet Lace, Antique Brads

Thanks again for stopping by- I hope you have a wonderful week and come play along with us at The CardConcept!

Sunday, November 1, 2015

HYCCT1531A Romantic Rose- Thinking of You

Hi Again Friends!


I decided to pull out a long ago retired stamp, Romantic Rose for this card (this stamp has not seen ink in years but it is a classic for sure).

This card was fairly easy to create- stamp the rose image using Stāz-On® Jet Black Ink onto Watercolor Paper and paint the color with an AquaPainter™ using Melon Mambo, Mossy Meadow and Wisteria Wonder Classic Ink.

Add additional water and keep layering color until you are satisfied with the results.
 
Add white accents with a fine tip brush and White Titanium Acrylic Paint.

Use the Big Shot™ with the MFT Blueprints 20 Die to cut out the image, mount onto Mossy Meadow cardstock, add the sentiment and Wisteria Wonder Seam Binding bow and mount the panel onto the card front using dimensional foam.

I hope you will have time to visit the galleries linked above and check out all of the gorgeous inspiration!


Stamp Sets:  Romantic Rose, Kind & Caring Thoughts (retired Stampin’ Up!)

Ink: Stāz-On® Jet Black, Melon Mambo, Mossy Meadow, Wisteria Wonder Classic Ink and Stampin’ Write Markers; Titanium White Acrylic Paint

Paper: Watercolor, Very Vanilla, Mossy Meadow

Accessories: Big Shot™, retired Beautifully Baroque Textured  Impressions™ Embossing Folder, AquaPainter™, Water Spritzer Bottle, Hexagon Punch, 3/8” Wisteria Wonder Seam Binding, Pearls


Thanks again for stopping by- I will be sharing a few more of the final Hope You Can Cling To Challenge cards this evening!  Have a great week, my friends!

Monday, January 26, 2015

White On White- A Technique and A Sketch Challenge

Hi Stampers!

I had a chance to stamp this evening and decided to create a card using the CCMC339 Create with Connie and Mary Sketch along with the Splitcoaststampers TLC518 White on White Technique Challenge (see details here and gallery here). 

If you have not had a chance to visit the above challenge sites yet, again, I would encourage you to do so- great inspiration from all!

To create this card:

Using the Embossing Buddy® to de-static a piece of Whisper White cardstock. 

Ink the Perfect Peacock image using Versamark™ ink and stamp onto the prepared cardstock. 

Apply Stampin’ Emboss® White Embossing Powder and heat with the Heat Tool.

Color between the white embossed lines using Stampin’ Write markers (you can lightly wipe off the excess over the embossing), fussy-cut out the bird image and set aside.

Use the Big Shot™ with the Beautifully Baroque Textured Impressions™ Embossing Folder to emboss a piece of Whisper White cardstock. 

Trim the embossed panels to strips and mount onto a piece of Whisper White cardstock and add the strips of ¼” Island Indigo Sycamore Street Ribbon (retired SAB).

Mount the panel onto the Whisper White card base using Stampin’ Dimensionals®. 

Add the peacock image using Stampin’ Dimensionals® and adhere the Frosted Sequins with added Rhinestones in the center.

Stamp the sentiment using Island Indigo Classic Ink and punch out with the Word Window Punch. 

Adhere the sentiment to the card front to finish off the card.

Stamp Sets:  Perfect Peacock, Teeny Tiny Wishes

Ink: Versamark™,  Island Indigo, Stampin’ Write Markers- Blushing Bride, Crushed Curry, Island Indigo, Marina Mist, Pear Pizzazz, Strawberry Slush

Paper/Cardstock:  Whisper White

Accessories:  Big Shot™, Beautifully Baroque Textured Impressions™ Embossing Folder, Embossing Buddy®, Stampin’ Emboss® White  Embossing Powder, Heat Tool, Word Window Punch, ¼” Island Indigo Sycamore Street Satin Ribbon, Frosted Sequins, Rhinestones


Thanks again for visiting-have a terrific Tuesday, my friends!

Saturday, February 8, 2014

DD89 Soft & Subtle Birthday

Hi Stampers! 

This week’s DD89 “Subtly Yours” Dynamic Duo Challenge combines the new In-Color Pistachio Pudding with Blushing Bride.  Such a soft, pretty color combination reminds me of spring and with the crazy weather this past week, we could use a bit of spring :-)

I decided to include chevrons for this birthday card and participate in the Seize the Birthday "Chevrons and Birthday" challenge as well (if you have not already done so, click here to check out their Design Team and entries) :-)
  
Again, I hope that you will find the time to stop by and check out the rest of the Dynamic Duos Design Team projects and create one of your own using this week’s colors - we would love to have you join us!!


To create this card:

Using the hostess set, Simply Sketched, stamp the floral image with Basic Black Classic Ink onto a piece of Whisper White cardstock and color with Stampin’ Write markers- Blushing Bride for the petals and Pistachio Pudding for the stem.   Add a few shadows using the Sahara Sand Stampin’ Write marker and the highlights with the Chalk Marker.

Use the Big Shot™ with the Designer Frames Textured Impressions™ Embossing Folder to emboss the image (lining up within the embossing folder).  Carefully cut out around the outside of the frame.

Mount the embossed frame onto a label created from the Deco Labels Framelits™ and the 2 ½” Circle Punch (first cut the Deco Label Framelit™ from Basic Black cardstock using the Big Shot™, cut in half vertically (through the rounded portion), split apart a bit and add the 2 ½” Circle punched from Basic Black to cover the rounded part of the Deco Label and give it a bit more width).

Use the Big Shot™ to emboss a piece of Pistachio Pudding cardstock with the Beautifully Baroque Textured Impressions™ Embossing Folder and a piece of Whisper White cardstock using the Chevron Textured Impressions™ Embossing Folder. 

Cut both pieces to position onto a piece of Basic Black cardstock, trim and mount onto the Whisper White card base (the Basic Black layer hides the Whisper White card base completely from the front).

Add ½ of a Tea Lace Paper Doily and cover the edges of the doily with a strip of Blushing Bride cardstock.  Add the focal image using Stampin’ Dimensionals®. 

To create the sentiment label:  Stamp the sentiment using Basic Black Classic Ink onto Whisper White cardstock and punch out with the XL Oval Punch.  Punch two additional XL Oval shapes from Basic Black cardstock, adhere the two Basic Black ovals together spreading apart a bit so that the sentiment will have a “frame” and adhere the sentiment.  Punch a piece of Basic Black cardstock using the Mosaic Punch, cut in half and add behind the sentiment layer.   Adhere the sentiment using Stampin’ Dimensionals® on the lower portion and regular adhesive where the sentiment attaches to the Deco Label focal image (leaving room for the paper bow).

Create the paper bow- Punch two Large Ovals from Blushing Bride cardstock and use the Bone Folder to break up the fibers and curl the paper.  Adhere the two ovals in half and use a Mini Glue Dot to hold the edges of the bow, adhere to a small strip of scrap Blushing Bride cardstock.   Cut two strips of Blushing Bride cardstock for the “tails” and use the Hexagon Punch to create the points.  Add to the back of the bow and adhere the Antique Brad to the center (I cut off the brad ends before adhering to the bow).

Add the bow to the card front to finish off the card.


Stamp Sets:  Simply Sketched
Ink: Basic Black, Stampin’ Write Markers- Blushing Bride, Pistachio Pudding, Sahara Sand; Chalk Marker
Paper/Cardstock:  Whisper White, Blushing Bride, Pistachio Pudding
Accessories: Big Shot™, Designer Frames, Beautifully Baroque and Chevron Textured Impressions™ Embossing Folders, Deco Label Framelits™, Punches- XL Oval, Large Oval, Mosaic, Hexagon, 2 ½” Circle, Tea Lace Paper Doily, Antique Brad

Thanks again for taking the time to visit- I hope you can join in the fun with our DD89 Dynamic Duos “Subtly Yours” Challenge!

Monday, October 21, 2013

Friend to Friend- A Fun Color and Sketch Combo


Hi Stampers!!

I decided to try the bright, fun colors from this week’s CQC211 ColourQ Challenge and actually ended up creating two cards- this is my first attempt and also incorporates the fabulous CCMC273 Create with Connie andMary Sketch Challenge.
 
If you have not had a chance to visit either site yet, I would highly recommend stopping by and checking out all of the different Design Team projects as well as the many other ideas from the weekly participants.

To create this quick CAS card:

Stamp the sentiment from Teeny Tiny Wishes using Basic Black Classic Ink onto Whisper White cardstock and punch out using the Word Window Punch.

Using the Big Shot™ emboss a piece of Whisper White cardstock with the Chevron Textured Impressions™ Embossing Folder and use the 2 ½” XL Circle Punch to punch out eh circle element for the sketch. Adhere to a piece of Basic Black cardstock and again to a piece of Strawberry Slush and finally onto the Basic Black card base.

Punch the flower from an embossed piece of Strawberry Slush cardstock (using the Beautifully Baroque Textured Impressions™ Embossing Folder) and the Pansy Punch to punch out a piece of embossed Whisper White cardstock (using the Perfect Polka Dots Textured Impressions™ Embossing Folder).

Attach the flower layers together, add the Pumpkin Pie button to the center and add the Lucky Limeade leaves (from the Bird Builder Punch).  

Mount the flower in the center of the circle per the sketch to finish off the card.

Stamp Sets:  Teeny Tiny Wishes

Ink: Basic Black

Paper: Whisper White, Basic Black, Strawberry Slush, Lucky Limeade (retired)

Accessories: Big Shot™, Textured Impressions™ Embossing Folders- Beautifully Baroque, Perfect Polka Dots, Chevron; Punches- Bird Builder, Blossom, Pansy, Word Window, 2 ½” XL Circle, Pumpkin Pie button


Thanks again for stopping by- I will be posting the other card using this same color combo shortly…

Tuesday, October 8, 2013

Kitty Cat Prayers- A Card from Scraps :-)

Hi Again Stampers! 

When I created the card for the last post (SUO81 Make Something Masculine), I had stamped the leaves using Sponge Daubers, “fussy-cut” them out and sponged additional ink onto the images.  

When I removed the stamped images up from my Whisper White scrap, I noticed that the sponging had created a very unique pattern, so the ‘’hoarder” in me kept this piece of paper to create another card using the FabFri28 Colors :-).

To create this card:
After creating the reverse mask pattern with the leaves and Sponge Daubers (Old Olive, Tangerine Tango and Rich Razzleberry), cover the leaves with a loose "mask" and use the Color Spritzer Tool with Basic Black Stampin’ Write marker to add a bit more interest.
Trim the sponged panel and mount onto Basic Black cardstock.  Either stamp the sentiment using Basic Black Classic Ink or print using My Digital Studio (MDS)- I had this sentiment in my "stash" of printed images as well :-)
Use the Big Shot™ along with the Beautifully Baroque Textured Impressions™ Embossing Folder to emboss a piece of Whisper White cardstock.  Layer onto Basic Black cardstock and add the focal image. 
Use the Big Shot™ to cut the non-Stampin’ Up! cat die cut from Basic Black cardstock and stamp the lacy flower from Mixed Bunch using the Illuminate inkpad and adhere the the cat over the sentiment. 
Attach the 5/8” Basic Black triple Satin Ribbon bow using Mini Glue Dots and adhere the entire panel to the Whisper White card base.  Add Pearls to the corners to finish off the card.

Stamp Sets: Gently Falling, Thoughts and Prayers (MDS), Mixed Bunch

Ink: Printer Ink- Black, Old Olive, Rich Razzleberry, Tangerine Tango, Illuminate, Black Stampin' Write Marker

Paper/Cardstock:  Whisper White, Basic Black

Accessories: Big Shot™, Beautifully BaroqueTextured Impressions™ Embossing Folder, Sponge Daubers, Pearls, 5/8” Basic Black Satin Ribbon (retired), Color Spritzer Tool (retired), Non-SU! Cat Die Cut


Thanks again for stopping by- have a great Tuesday!!

Wednesday, October 2, 2013

Sun Ripened- Two Cards for The Friday Mashup!

Hi Stampers!

I was able to sneak in a few moments in my craft room and decided to create a card for this week’s FM129 Inspiration from Mom Challenge at The FridayMashup!  

I decided to “mash it up” and use the colors and the fruit inspiration and pulled out another one of my neglected, retired sets- Sun Ripened.   

I love the fruit images in this retired set and while I had it out, stamped two sets of each image and colored them in the same manner as described below with the FM129 colors.  I decided to set four of the images aside for later use- love to do this for quick, easy cards in the future :-)

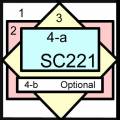
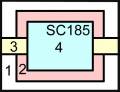
For these two cards, I utilized a few of the SplitcoaststampersSketch Challenges (SC221 and SC185)-   Again, I hope you will take a moment to check out both sites – great inspiration and ideas from all :-)

To create the watercolored panels for both cards:

Stamp the raspberry image using Early Espresso Classic Ink onto Whisper White cardstock and carefully watercolor using the AquaPainter™ without ink at first- the Early Espresso line images will give you a antiqued almost sepia look and then lightly add a bit of Cherry Cobbler Classic Ink over the berry images. 

Color the images using the Stampin’ Write markers- So Saffron for the leaves and Sahara Sand for the shadows and add the highlights using the Chalk Marker.

Use a Sponge Dauber with Crumb Cake ink to “antique” the paper and add a bit of Early Espresso over the edges.  Use the Color Spritzer Tool with an Early Espresso Stampin’ Write marker to add additional distressing. 

Assemble the first card:

Use the Big Shot™ with the Ovals Collection Framelits™ to cut out the image along with another oval the same size from Cherry Cobbler and Early Espresso cardstock.  Cut the Cherry Cobbler and Early Espresso frames in half horizontally to layer behind the focal image.

Using the Big Shot™, emboss a piece of So Saffron Designer Series Paper (DSP) with the Pretty Print Textured Impressions™ Embossing Folder and a piece of Early Espresso DSP with the Beautiful Baroque Textured Impressions™ Embossing Folder.  Lightly sand with the Sanding Block to slightly distress the paper.

Create the layers per the SC221 Sketch, add to the Early Espresso card base.  Adhere the focal image/panel and add the 5/8” triple Satin Ribbon bow along with the sentiment and Pearls to finish off the card.


To assemble the second card:

Punch a 1” Square Punch to punch out the berry image, mount onto a piece of Early Espresso cardstock.  Add the 5/8” triple Satin Ribbon bow and mount again onto a piece of Cherry Cobbler cardstock.

Adhere a piece of Early Espresso DSP to a piece of Cherry Cobbler cardstock for the central rectangle and mount the raspberry panel image onto the DSP layer.

Use the Big Shot™ along with the Hexagon Textured Impressions™ Embossing Folder to emboss a piece of So Saffron cardstock- sponge a bit of Crumb Cake over the embossed image.

Add the 5/8” Satin Ribbon strips, mount the focal image over the strips of ribbon and mount the entire panel onto a piece of Cherry Cobbler cardstock.  Mount onto the Early Espresso card base and add the sentiment from Wetlands along with the Pearls to finish off the card.

Stamp Sets:  Sun-Ripened (retired), Wetlands, Teeny Tiny Wishes  

Ink: Early Espresso, Cherry Cobbler, Crumb Cake; Chalk Marker, Stampin’ Write Markers- So Saffron, Sahara Sand

Paper:  Whisper White, Cherry Cobbler, Early Espresso, Designer Series Paper- So Saffron, Early Espresso

Accessories:  Big Shot™, Ovals Collection Framelits™, Textured Impressions™ Embossing Folders- Pretty Print, Honeycomb, Beautiful Baroque, Sponge Daubers, Pearls, AquaPainter™, Color Spritzer Tool, Punches- 1” Square, Large Oval, Modern Lable, Word Window;  5/8” Satin Ribbon (from my stash)


Thanks again for stopping by- I hope all of you have a great Wednesday!!
Related Posts Plugin for WordPress, Blogger...