Showing posts with label Perfect Peacock. Show all posts

Monday, April 4, 2016

Perfect Peacock- A CAS Mixed Media Card

Hi Friends!

I hope you are having a wonderful weekend so far!  It was extremely windy here on the East Coast this past week (especially last night) and even though March went out like a "lion", April is continuing to "roar" :-)

I decided to play around today with Mixed Media and created a Clean and Simple (CAS) Mixed Media card this evening for the #167 CAS Colours and Sketches "The Double" Challenge along with the Simon Says Wednesday “Anything Goes” Challenge and the Splitcoaststampers’ Mix-Ability MIX165 “Winging It” Challenge.

If you have not had a chance to visit the above challenge site galleries yet, again, I would encourage you to do so- wonderful inspiration from all!

FYI- If this card is not CAS to you, it is to me....limited layers and embellishments and originally this card was more "clean" with a white background around the peacock, but when I placed the lower layer onto the card front (and smoothed it with my bone folder to adhere the dimensional foam) the Dark Brown Embossing Powder (EP) streaked (since I did not wipe off the excess water before adhering to the card front- duh!)... 

Anyway, I salvaged the card with the brown wash and texture behind the peacock to hide the error, so it is not as CAS as I had hoped :-)  

To create this card:

De-static a piece of Whisper White cardstock with the Embossing Buddy®, ink the Perfect Peacock using Versamark™ Ink, stamp onto the prepared cardstock, apply Stampin’ Emboss® Dark Brown Embossing Powder (retired) and heat set with the Heat Tool.

Once the embossing powder has cooled, color the peacock using the AquaPainter™ with Stampin’ Write Markers (scribble the markers onto an acrylic block to use as a palette)- Daffodil Delight for the flowers, Pacific Point for the peacock and the Chocolate Chip (direct to the image) for the stems and leaves.

Use the Daffodil Delight marker directly to the centers of the peacock feathers and the Pacific Point marker over the Daffodil Delight for the very middle of the “eye” on the peacock feathers.

Use the Chocolate Chip marker with the AquaPainter™ for the wash around the image, loosely mask the peacock and repeatedly stamp the Timeless Texture image   over the background (I just used the Chocolate Chip marker to ink the stamp).

Trim the peacock image, cut off the lower portion and mount onto Pacific Point cardstock.

Emboss a piece of Chocolate Chip cardstock with the Boho Chic Textured Impressions ™ Embossing Folder, trim and mount onto a piece of Whisper White cardstock.

Trim the layered Whisper White panel and mount onto the Pacific Point card base.
Stamp the sentiment from the retired Blessed by God stamp set using the Chocolate Chip marker as ink and stamp onto a piece of Whisper White cardstock.

Mount the peacock image along with the sentiment using dimensional foam.

To finish off the card, add Clear Wink of Stella® to the peacock feathers and use a White Gel Pen to add highlights to the flower centers.

Stamp Sets:  Perfect Peacock, Timeless Textures, Blessed by God (retired)

Ink: Versamark™, Stampin’ Write Markers- Chocolate Chip, Daffodil Delight, Pacific Point; Clear Wink of Stella®, White Gel Pen

Paper/Cardstock: Whisper White, Chocolate Chip, Pacific Point

Accessories:  Big Shot™, Boho Chic Textured Impressions™ Embossing  Folder, Embossing Buddy®, Stampin’ Emboss® Dark Brown Embossing Powder (retired), Heat Tool, AquaPainter™

I think this card would work as an encouragement for someone who may be going through a tough time whether general life issues/job loss, an illness, recovering from surgery or as a sympathy card- what do you think?


Thanks again for taking the time to stop by- hugs and have a blessed week, my friends!

Thursday, May 28, 2015

Perfect Peacock Thanks- A Sketch, Color and Photo Inspiration Challenge :-)


Hi Stampers! 

I have been busy creating Thank You cards this week and wanted to share this one that was designed using the FMS188 Freshly Made Sketches Challenge along with  the CQC292 ColourQ Challenge and Just Us Girls #294 Photo Week Challenge.

If you have not had a chance to do so, I hope you will find the time to visit all three of the challenge sites- each one has a fantastic Design Team as well as inspiration from their galleries!

To create this card:

Trim a piece of Whisper White cardstock and mount onto a piece of Tangerine Tango cardstock, trim and mount onto the Coastal Cabana card base.

Ink the Perfect Peacock stamp using Stāz-On® Jet Black Ink and stamp onto Whisper White cardstock.

Color the upper two thirds of the image using an AquaPainter™ with Classic Ink from the Coastal Cabana, Daffodil Delight, Strawberry Slush and Tangerine Tango pads and use the same colors in Stampin’ Write Markers to add definition.  ***Note- I used Daffodil Delight first, then Coastal Cabana for the leaves :-)) ***

Add a few white highlights with the White Gel Pen and shadows with the Sahara Sand Stampin’ Write Marker.

Cut the panel for the sketch and mount onto Tangerine Tango cardstock, trim and mount onto Coastal Cabana cardstock.

Create the banners from retired Eastern Elegance and Quatrefancy Designer Series Paper (DSP) using the Hexagon and Banner Punches for the banner points. 

Mount onto Tangerine Tango cardstock and create matching points with the punches and adhere behind the peacock panel.

Stamp the sentiment onto Whisper White cardstock using Stāz-On® Jet Black Ink, punch out with the Word Window Punch and create the banners with the Banner Punch.

Adhere  the sentiment to a knotted piece of Coastal Cabana Thick Baker's Twine and mount onto the peacock focal image panel (I used Hot Glue for both of these steps:-)).

Mount the focal image panel onto the card front using Stampin’ Dimensionals® to finish off the card.

Stamps: Perfect Peacock, Teeny Tiny Wishes

Ink: Coastal Cabana, Daffodil Delight, Strawberry Slush, Tangerine Tango; Stampin’ Write Markers- Coastal Cabana, Daffodil Delight, Sahara Sand, Strawberry Slush, Tangerine Tango; White Gel Pen

Paper: Whisper White, Coastal Cabana, Tangerine Tango; retired Eastern Elegance and Quatrefancy DSP

Accessories: AquaPainter™, Punches- Banner and Hexagon, Coastal Cabana Thick Baker’s Twine


Thanks again for visiting- I will share a few more cards throughout the week.  I hope you have a fabulous weekend, my friends!!

Tuesday, May 12, 2015

SUO122 Fun Floral Peacock :-)


Hi Stampers!   

It’s time for the new SUO122 “Fun Flowers” Challenge and I decided to use a neglected newer stamp set, Beautiful Bunch along with Perfect Peacock  :-) 

I decided to incorporate the Around the World AW40 Color Challenge with a modified version of the Splitcoaststampers’ SC523 Sketch (see details here and gallery here), the MIX119 Texture Challenge (see details here and gallery here) and the Just Us Girls JUGS292 Embossing Challenge.

I hope you will find the time to check out all of the challenge sites and create your own “Fun Flowers” project using Stampin’ Up! Only products !!

To create this card:
Use the Embossing Buddy® to de-static a piece of Whisper White cardstock, stamp the Perfect Peacock image using Versamark™ Ink , apply  Stampin’ Emboss® White Embossing Powder and heat with the Heat Tool.
Color using Stampin’ Write markers- Tempting Turquoise, Blushing Bride and Real Red, spritz with water and rub gently with a paper towel to remove the ink from the embossed area.  Reapply the markers as needed and when dry, carefully “fussy-cut” the peacock and set aside.
Using Stāz-On® Jet Black Ink, stamp the four to five flowers onto Whisper White cardstock. 
Color the flowers with the AquaPainter™ using Blushing Bride, Real Red and Tempting Turquoise Classic Ink, add additional details with Stampin’ Write Markers in the same colors and spritz with water.  Add a few white highlights to the flower centers using the White Gel Pen.
Once the flowers are dry, carefully “fussy-cut” and cut the flowers in half.
Adhere a piece of Tempting Turquoise Designer Series Paper (DSP) to a piece of Real Red cardstock, emboss using the Big Shot™ with the retiring Beautifully Baroque Textured Impressions™ Embossing Folder and lightly sand with the Sanding Block.
Emboss a piece of Blushing Bride cardstock using the Big Shot™ with the retiring Beautifully Baroque Textured Impressions™ Embossing Folder and adhere to a piece of Real Red.
“Dry fit” the two embossed panels on the Whisper White cardstock background, use a pencil to note the intersection at the bottom, remove the panels and stamp the sentiment from the soon-to-be retired set, Blooming with Kindness using Stāz-On® Jet Black Ink.
Trim the sentiment panel, mount onto a piece of Real Red cardstock, trim and adhere the entire panel onto the Tempting Turquoise card base.
Add the vertical Tempting Turquoise panel directly to the card front and adhere the Blushing Bride embossed panel using Stampin’ Dimensionals®.  
Position the peacock (do not adhere yet) and fit the flowers around the peacock until you are satisfied with the layout. 
Adhere the flowers to the peacock on the edges and mount the entire assembly  using Stampin’ Dimensionals® (doubling the thickness of the Dimensionals® on the left hand side of the card to take in account the height of the Blushing Bride layer).
Add the two flower halves on the Blushing Bride panel to finish off the card.
Stamp Sets:  Perfect Peacock, Beautiful Bunch, Blooming with Kindness
Ink: Stāz-On® Jet Black Ink, Blushing Bride, Real Red, Tempting Turquoise; Stampin’ Write Markers- Blushing Bride, Real Red, Tempting Turquoise , White Gel Pen
Paper/Cardstock: Whisper White, Blushing Bride, Real Red, Tempting Turquoise ; Tempting Turquoise DSP
Accessories: Big Shot™, Beautifully Baroque Textured Impressions™ Embossing Folder, Embossing Buddy®, Heat Tool, Stampin’ Emboss® White Embossing Powder, AquaPainter™, Sanding Block

Thanks again for taking the time to visit – I hope that you will create your own Stampin’ Up! Only project and play along with our “Fun Flowers” challenge!

Monday, January 26, 2015

White On White- A Technique and A Sketch Challenge

Hi Stampers!

I had a chance to stamp this evening and decided to create a card using the CCMC339 Create with Connie and Mary Sketch along with the Splitcoaststampers TLC518 White on White Technique Challenge (see details here and gallery here). 

If you have not had a chance to visit the above challenge sites yet, again, I would encourage you to do so- great inspiration from all!

To create this card:

Using the Embossing Buddy® to de-static a piece of Whisper White cardstock. 

Ink the Perfect Peacock image using Versamark™ ink and stamp onto the prepared cardstock. 

Apply Stampin’ Emboss® White Embossing Powder and heat with the Heat Tool.

Color between the white embossed lines using Stampin’ Write markers (you can lightly wipe off the excess over the embossing), fussy-cut out the bird image and set aside.

Use the Big Shot™ with the Beautifully Baroque Textured Impressions™ Embossing Folder to emboss a piece of Whisper White cardstock. 

Trim the embossed panels to strips and mount onto a piece of Whisper White cardstock and add the strips of ¼” Island Indigo Sycamore Street Ribbon (retired SAB).

Mount the panel onto the Whisper White card base using Stampin’ Dimensionals®. 

Add the peacock image using Stampin’ Dimensionals® and adhere the Frosted Sequins with added Rhinestones in the center.

Stamp the sentiment using Island Indigo Classic Ink and punch out with the Word Window Punch. 

Adhere the sentiment to the card front to finish off the card.

Stamp Sets:  Perfect Peacock, Teeny Tiny Wishes

Ink: Versamark™,  Island Indigo, Stampin’ Write Markers- Blushing Bride, Crushed Curry, Island Indigo, Marina Mist, Pear Pizzazz, Strawberry Slush

Paper/Cardstock:  Whisper White

Accessories:  Big Shot™, Beautifully Baroque Textured Impressions™ Embossing Folder, Embossing Buddy®, Stampin’ Emboss® White  Embossing Powder, Heat Tool, Word Window Punch, ¼” Island Indigo Sycamore Street Satin Ribbon, Frosted Sequins, Rhinestones


Thanks again for visiting-have a terrific Tuesday, my friends!

Monday, September 1, 2014

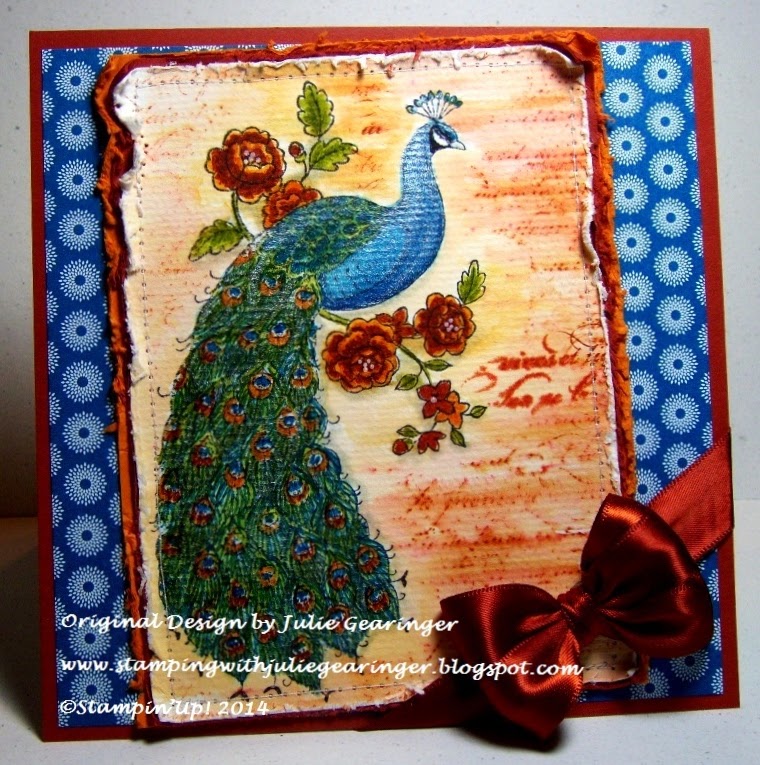
Perfect Peacock- A Color and Sketch Challenge


Hi Stampers!

Happy Labor Day!  Hope all of you are able to take this day to rest and for those of you who have to “labor” at work outside the home, I hope you are compensated well and can take time off soon.

I wanted to create a card using the CQC256 ColourQ Challenge along with the PPA217 Pals Paper Arts Sketch and I decided to do a masking/watercolor technique.   It was a bit difficult to photograph this card with the shimmer :-)

Again, I hope you will take the time (if you have not done so already) to visit both sites and check out all of the fabulous Design Team samples as well as the wonderful examples and inspiration from their galleries!!

To create this card:

Using Memento™ Tuxedo Black Ink, stamp the Perfect Peacock stamp onto a piece of watercolor paper.

Using an AquaPainter™, apply Pacific Point and Old Olive Classic Ink to the peacock image,  Pumpkin Pie to the flowers and Old Olive to the leaves.

Ink the retired background stamp, En Francais using Cajun Craze Classic Ink .  Mask the peacock using scrap paper or a sticky note and stamp the background with light pressure around the peacock.

Apply a light wash of Pumpkin Pie to the background- the script stamp images will soften and blend with the Pumpkin Pie wash.

Use Stampin’ Write Markers to highlight and darken the colors of the peacock image- for the feathers use Pacific Point, Old Olive, Pumpkin Pie and Cajun Craze and for the flowers and leaves, Cajun Craze along with Old Olive.   Use the Chalk Marker to add a few white highlights to the flower centers.

Use the Distressing Tool to distress the edges of the stamped panel and adhere to a piece of Cajun Craze cardstock using a sewing machine.  Mount the panel onto a piece of Pumpkin Pie cardstock and distress the edges of the Pumpkin Pie layer as well.

Mount a piece of retired International Bazaar Designer Series Paper (DSP) onto a Cajun Craze panel (5.5” x 5.5”  square).   Add the focal image panel to the card front and adhere the 5/8” Triple Ribbon Satin Bow to the corner.

Mount the entire card front onto the Whisper White card base,  
To finish off the card, add additional shimmer to the peacock using an AquaPainter™ with Frost White Shimmer Paint.

Stamp Sets: Perfect Peacock, En Francais (retired)

Ink:  Memento™ Tuxedo Black Ink, Old Olive, Pacific Point, Pumpkin Pie, Cajun Craze; Stampin’ Write Markers- Pacific Point, Old Olive, Pumpkin Pie, Cajun Craze; Chalk Marker

Paper: Whisper White, Cajun Craze, Pumpkin Pie, International Bazaar DSP (retired), Watercolor Paper

Accessories: AquaPainter™, Distressing Tool, Frost White Shimmer Paint (retired), 5/8” Satin Ribbon (from my stash)


Thanks again for visiting- I hope all of you have a wonderful Labor Day! 
Related Posts Plugin for WordPress, Blogger...