Showing posts with label Hexagon Punch. Show all posts

Friday, January 15, 2016

Snowman's Gift- A New Digital Stamp from Sweet 'n Sassy Stamps

Hi Friends!

I hope all of you are having a wonderful week so far!  Today, Sweet ‘n Sassy Stamps is releasing several new digital (“digi”) stamps and I had a chance to create two cards with some of the new digi stamps (fyi- I will be posting each card in a separate blog post so I can link to the various challenges, etc. .:-))

This card showcases the  Snowman’s Gift Digital Stamp for the main image, the sentiment is from the new Snowman Soup Sentiments Digital Set and I used the Winter Blessings Clear Stamp Set for the snowflakes in the background.   

Isn’t this image adorable?  A cute little bunny giving this sweet snowman a carrot for his nose..what a gift for sure!

I also decided to incorporate the SC571 Sketch from Splitcoaststampers’ (SCS) for the layout.   If you have not visited the Sweet ‘n Sassy Stamps (SNSS) site or the SC571 gallery yet, I hope you will find time to do so- fabulous samples from the SNSS Design Team as well as the SCS gallery!!

To create this card:

Open a Word Document and insert the Snowman’s Gift Digital Stamp image along with the sentiment image from Snowman Soup Digital Sentiments.

Re-size as needed (click here for a fabulous video tutorial from Korin Sutherland, owner of Sweet ‘n Sassy Stamps on how to re-size and crop digital images in Word).

Print the images out onto Whisper White cardstock and color with a water brush and markers.

Mask the images and sponge Pool Party Classic Ink around the “sky” and stamp the Winter Blessing snowflakes.

Use a Black Marker to draw the horizon line, trim the panel and stitch to a piece of Early Espresso cardstock using a zigzag stitch with the sewing machine.

Stitch a piece of Pool Party to a piece of Early Espresso cardstock with a smaller zigzag stitch and stamp a few more snowflakes from Winter Blessing.

Use the Big Shot™ with the retired Square Lattice Textured Impressions™ Embossing Folder to emboss a piece of retired Designer Series Paper (DSP) and use the zigzag stitch to attach it to a piece of Early Espresso cardstock.

Mount the embossed sewn panel onto the Whisper White card base, add the Pool Party background panel to the card front and mount the Snowman’s Gift focal image panel to the front using dimensional foam.

Stamp a few snowflakes from Winter Blessing with Pool Party Classic Ink over the sentiment, trim and create the banner points by hand or with a punch.  Mount onto Early Espresso cardstock, create the banner points and add the snowflake charm with silver cord.

Mount the sentiment to the card front with dimensional foam to finish off the card.


Ink: Printer Ink- Black, Pool Party, Stampin’ Write Markers- Cucumber Crush, retired Going Gray, Melon Mambo, Pink Pirouette, Pumpkin Pie, Sahara Sand, Soft Sky


Paper: Whisper White, Early Espresso, Pool Party, retired DSP

Accessories:  Big Shot™, retired Square Lattice Textured Impressions™ Embossing Folder, Sewing Machine, White Thread, Hexagon Punch, Snowflake Charm, Silver Cord, Water Brush

There are several things that I love about working with digital stamps- of which, you can re-size the images and color just like a regular stamp plus they do not take up any space in your craft room! A "win-win" for me :-)

I hope you will take the time to check out the rest of the new Sweet ‘n Sassy Stamps Digital Release and have fun designing with your new digital stamps!

Thanks again for stopping by, I will be back shortly with my second card :-)

Thursday, August 27, 2015

Six Sided Sampler- CAS Hello Sweet Friend


Hi Stampers!!

This Clean and Simple (CAS) card was created using the FabFri71 Color Challenge (yes, this is the second card I created using these colors) along with the Addicted to Stamps #159 CAS Challenge and the F4A287 “Odd Time of Year”Splitcoaststampers’ Challenge (option #2 has an odd # of stamps being used :-)).

While I had the Fab Friday colors out, I decided to create one more card – this time using the CAS style versus Vintage :-)

Again, if you have not already done so, I hope you will find the time to visit the above sites to check out their wonderful Design Team samples as well as their galleries!

To create this card:

Option #1- Stamp the sentiment onto a piece of Whisper White cardstock using Blackberry Bliss Classic Ink.  Trim the panel and mount onto Blackberry Bliss cardstock, trim again and mount onto the Tip Top Taupe card base.

Ink the stamp images from Six Sided Sampler using the challenge colors- Blackberry Bliss, Delightful Dijon, Old Olive, Tangelo Twist and Tip Top Taupe.

Punch out the hexagon shapes using the Hexagon Punch and arrange onto the card front using Stampin’ Dimensionals®.


Option #2- Using Delightful Dijon Classic Ink stamp the butterfly onto Whisper White cardstock, punch out with the Elegant Butterfly Punch and adhere to the card front along with the Rhinestones to finish off the card.

So which one do you prefer- with or without the butterfly?

Stamp Sets: Six Sided Sampler, Papillon Potpourri

Ink: Blackberry Bliss, Delightful Dijon, Old Olive, Tangelo Twist and Tip Top Taupe

Paper: Whisper White, Blackberry Bliss, Tip Top Taupe

Accessories: Hexagon Punch; Elegant Butterfly Punch and Rhinestones- option #2


Thanks again for taking the time to visit- I hope all of you have a fantastic day!

Thursday, May 28, 2015

Perfect Peacock Thanks- A Sketch, Color and Photo Inspiration Challenge :-)


Hi Stampers! 

I have been busy creating Thank You cards this week and wanted to share this one that was designed using the FMS188 Freshly Made Sketches Challenge along with  the CQC292 ColourQ Challenge and Just Us Girls #294 Photo Week Challenge.

If you have not had a chance to do so, I hope you will find the time to visit all three of the challenge sites- each one has a fantastic Design Team as well as inspiration from their galleries!

To create this card:

Trim a piece of Whisper White cardstock and mount onto a piece of Tangerine Tango cardstock, trim and mount onto the Coastal Cabana card base.

Ink the Perfect Peacock stamp using Stāz-On® Jet Black Ink and stamp onto Whisper White cardstock.

Color the upper two thirds of the image using an AquaPainter™ with Classic Ink from the Coastal Cabana, Daffodil Delight, Strawberry Slush and Tangerine Tango pads and use the same colors in Stampin’ Write Markers to add definition.  ***Note- I used Daffodil Delight first, then Coastal Cabana for the leaves :-)) ***

Add a few white highlights with the White Gel Pen and shadows with the Sahara Sand Stampin’ Write Marker.

Cut the panel for the sketch and mount onto Tangerine Tango cardstock, trim and mount onto Coastal Cabana cardstock.

Create the banners from retired Eastern Elegance and Quatrefancy Designer Series Paper (DSP) using the Hexagon and Banner Punches for the banner points. 

Mount onto Tangerine Tango cardstock and create matching points with the punches and adhere behind the peacock panel.

Stamp the sentiment onto Whisper White cardstock using Stāz-On® Jet Black Ink, punch out with the Word Window Punch and create the banners with the Banner Punch.

Adhere  the sentiment to a knotted piece of Coastal Cabana Thick Baker's Twine and mount onto the peacock focal image panel (I used Hot Glue for both of these steps:-)).

Mount the focal image panel onto the card front using Stampin’ Dimensionals® to finish off the card.

Stamps: Perfect Peacock, Teeny Tiny Wishes

Ink: Coastal Cabana, Daffodil Delight, Strawberry Slush, Tangerine Tango; Stampin’ Write Markers- Coastal Cabana, Daffodil Delight, Sahara Sand, Strawberry Slush, Tangerine Tango; White Gel Pen

Paper: Whisper White, Coastal Cabana, Tangerine Tango; retired Eastern Elegance and Quatrefancy DSP

Accessories: AquaPainter™, Punches- Banner and Hexagon, Coastal Cabana Thick Baker’s Twine


Thanks again for visiting- I will share a few more cards throughout the week.  I hope you have a fabulous weekend, my friends!!

Monday, March 16, 2015

FM200 Birthday Butterfly- A CAS Mixed Media Card


Hi Stampers! 

I had a chance to play around in my craft room this evening and decided to create another quick Mixed Media card for the 200th Challenge at the Friday Mash Up!  using the FM1 "Butterflies" with the FM5 "Nature with Embossing" Challenges  (plus- I was able to Mash It Up! for both challenges as well- woohoo! :-)) along with the Splitcoaststampers "Free For All" F4A254 "True Free for All" Challenge (here are the challenge details and the gallery is here)

If you have not had a chance to do so, I hope you will find the time visit both challenge sites to see the terrific Design Team samples as well as the wonderful inspiration from the galleries!

To create this quick card:

Apply the Sweet Sadie Washi Tape strips to a piece of Whisper White cardstock and use the Big Shot™ to emboss with the Honeycomb Textured Impressions™ Embossing Folder.

Trim the panel and mount onto a piece of Rich Razzleberry cardstock, trim and mount onto a piece of Whisper White cardstock, trim and mount onto the Basic Black card base.

Using My Digital Studio (MDS), position the Swallowtail image (reduce in size) as well as the greeting from Wetlands and print out onto Whisper White cardstock.

Color the butterfly using Stampin’ Write Markers- Daffodil Delight, Crisp Cantaloupe, Pear Pizzazz and Rich Razzleberry. 

Use a Faber-Castell® Black Pitt Pen Marker to darken the black areas of the butterfly, carefully “fussy-cut” the image and apply Mod Podge® with a foam brush.

Use a Faber-Castell® White Pitt Pen marker to add the white highlights to the wings.
Trim the sentiment and create the banner using the Hexagon Punch. 

Mount the sentiment onto a piece of Rich Razzleberry cardstock,  punch the banner points with the Hexagon Punch, mount again onto a piece of Basic Black cardstock and punch the banner points once more.

Stamp the large splatter stamp from Gorgeous Grunge using Rich Razzleberry Classic Ink over the embossed background panel and mount the sentiment using Stampin’ Dimensionals®.

To finish the card, use Stampin’ Dimensionals® under the wing tips of the butterfly (to give the wings dimension) and Tombow® Mono-Adhesive under the body to securely fasten to the card front.

Stamp Sets: Swallowtail and Wetlands (MDS versions), Gorgeous Grunge

Ink: Rich Razzleberry, Printer Ink- Black; Stampin’ Write Markers- Crisp Cantaloupe, Daffodil Delight, Pear Pizzazz, Rich Razzleberry; Faber-Castell® Black and White Pitt Pen Markers

Paper: Whisper White, Basic Black, Rich Razzleberry

Accessories: Big Shot™, Honeycomb Textured Impressions™ Embossing Folder, Foam Paint Brush, Mod Podge®, Sweet Sadie Washi Tape Collection, Hexagon Punch


Thanks again for visiting- have a fabulous Monday, my friends!!

Monday, January 26, 2015

Feminine Birthday- A Color and A Sketch Challenge :-)

Hi Stampers! 

I had a chance to spend some time in my craft room this past weekend and decided to create a card using the CQC276 ColourQ Challenge along with the PPA237 Pals Paper Arts Sketch (flipped the sketch).

If you have not had time to do so, I hope you will have a chance to visit the challenge sites and check out the gorgeous Design Team projects as well as the other entrants- again, wonderful inspiration from all!

To create this card:
Ink the Established Elegance dress form image using Chocolate Chip Classic Ink and stamp onto a piece of Very Vanilla cardstock.  Carefully cut (‘fussy-cut”) around the image and set aside. 
To create the horizontal collage strip, stamp onto a piece of Retro Fresh Designer Series Paper (DSP) using some of the remaining images in the Established Elegance stamp set with Coastal Cabana, Chocolate Chip, Crumb Cake and Strawberry Slush Classic Ink. 
Trim the collage panel and mount onto a piece of Chocolate Chip cardstock, trim and mount onto a piece of Strawberry Slush cardstock.
Adhere the collage panel to a piece of Very Vanilla cardstock, trim and mount onto piece of Chocolate Chip cardstock, trim again and mount onto a piece of Coastal Cabana cardstock, trim once more and mount onto the Strawberry Slush card base.
Add the fussy-cut dress form image to the card front using Stampin’ Dimensionals®.
Stamp the sentiment using Chocolate Chip Classic Ink onto Very Vanilla cardstock, create the banner ends using the Hexagon Punch, trim and mount onto Chocolate Chip cardstock and creating the banner again with the Hexagon Punch.
Adhere the sentiment banner to the card front using Stampin’ Dimensionals®.
Create the bow from Coastal Cabana cardstock using the Bow Builder Punch.
Create the rolled flowers using Strawberry Slush cardstock- the small rose is created with the ⅞” Spiral Circle Punch and the large rose with the 1 ¼” Scallop Circle Punch- punch the scallop circles, hand cut a wavy spiral from the outside of the scallop circles toward the centers, crimp both pieces with the Crimper Tool, use the Bone Folder to curl the edges of the petals a bit, roll up from the outside edge and adhere using Tombow Multi-Purpose Adhesive or a Hot Glue Gun.
Add the small rose to the waist area of the dress form and the larger rose to the center of the paper bow. 
Adhere the bow to the card front and add the Pearls to the corners to finish off the card. 
Stamp Sets: Established Elegance, Bloom with Hope
Ink: Chocolate Chip, Coastal Cabana, Crumb Cake, Strawberry Slush
Paper/Cardstock:  Very Vanilla, Chocolate Chip, Coastal Cabana, Strawberry Slush;  retired Retro Fresh DSP
Accessories: Punches: Bow Builder, Hexagon, ⅞” Spiral Circle, 1 ¼” Scallop Circle; Pearls

Thanks again for stopping by- I hope all of you have a great week!!

Monday, January 19, 2015

CAS Christmas Horn


Hi Again Stampers!!

I am have a relaxing weekend (stamping is such great therapy! :-)) and was able to create one more Clean and Simple (CAS) Christmas card for the CASOLOGY #129 NBUS (“Never Before Used Schtuff”) Challenge along with the CC513 Color Challenge (Basic Gray, Bermuda Bay, Strawberry Slush with the dessertof using something new) and the Jingle Belles “Bring In the New!” Challenge. 

This year I am hoping to complete at least four different Christmas card designs each month and have decided to try to create more CAS cards so that they are easier to mail :-)    I purchased the Holiday Horn stamp on clearance this past fall and have not used it before today- so this is my "NBUS" and "new" item :-)

Hopefully you will find the time to visit each of the sites/galleries- check out the Design Team samples as well as the other entries (great job by all!)...

To create this card:

Ink the Holiday Horn and the sentiment using Memento™ Tuxedo Black Ink onto Whisper White cardstock.  

Color the horn image using Stampin’ Write markers- Bermuda Bay for the pine and holly, Strawberry Slush for the berries and ribbon,  Basic Gray for the horn and Crumb Cake to add shadows around the horn and foliage. 

Trim the panel to size and mount onto Strawberry Slush cardstock, trim again and mount onto Basic Gray cardstock.

Use the Big Shot™ with the retired Lacy Brocade Textured Impressions™ Embossing Folder to emboss a piece of Whisper White cardstock, trim and mount onto a piece of Strawberry Slush cardstock, trim again and mount onto Basic Gray cardstock.

Adhere the embossed layered panel onto the Whisper White card base and add the focal image using Stampin’ Dimensionals®.

Create banner points for the sentiment using the Hexagon Punch, adhere to a piece of Basic Gray cardstock, trim and create banner points using the Hexagon Punch again. 

To finish off the card, mount the sentiment onto the card front using Stampin’ Dimensionals®.

Stamp Sets:  Christmas Blessings (Stampin’ Up!), Holiday Horn (Inkadinkadoo)

Ink: Memento™ Tuxedo Black Ink, Stampin’ Write Markers- Basic Gray, Bermuda Bay, Crumb Cake, Strawberry Slush

Paper: Whisper White, Basic Gray , Strawberry Slush

Accessories: Big Shot™, retired Lacy Brocade Textured Impressions™ Embossing Folder, Hexagon Punch


Thanks again for taking the time to visit- have a blessed week, my friends!

Tuesday, December 30, 2014

SUO113 Feathers with Project Life® by Stampin’ Up!®

Hi Stampers! 

This card was created for the new SUO113 “Project Life byStampin’ Up!®” Challenge.   I hope you enjoy this card (I wanted to show how versatile the Project Life® by Stampin' Up!® collections can be)- they are not just for scrapbooking :-)   

FYI- I will be sharing another card created for this challenge later this week :-)

I hope you will find the time to check the rest of the DesignTeam projects and create your own project to join in on the fun!

To create this Clean and Simple (CAS) card:
Trim and mount the Project Life® by Stampin’ Up!® card from the Everyday Adventure collection to a piece of Melon Mambo cardstock, trim again and mount onto the Basic Black card base.
Ink the Four Feathers images using Memento™ Tuxedo Black Ink and stamp onto Whisper White cardstock.   Use the Big Shot™ with the matching Feathers Framelits™ to cut out the feather images and mount onto the card front using Stampin’ Dimensionals®.
Ink the sentiment from Happy Hooray with Memento™ Tuxedo Black Ink and stamp onto Whisper White cardstock.  
Punch the sentiment out with the Hexagon Punch and mount onto another hexagon punched from Melon Mambo cardstock (split the Melon Mambo hexagon in half and mount behind the sentiment).   Add the sentiment to the card front using Stampin’ Dimensionals®.
Using the new Bow Builder Punch, create the bow from Melon Mambo cardstock, add the Basic Black button to the center and mount the bow to the top of the feathers. 
Adhere the Rhinestones to the background to finish off the card.
Stamp Sets: Four Feathers, Happy Hooray
Ink: Memento™ Tuxedo Black
Paper/Cardstock:  Project Life® by Stampin’ Up!® Everyday Adventure, Melon Mambo, Basic Black
Accessories:  Big Shot™, Feather Framelits™,  Bow Builder and Hexagon Punch, Rhinestones, Basic Black button

Thanks again for taking the time to stop by – I hope that you will join in on in on the fun with your Stampin’ Up! Only creations and create your own “Project Life® by Stampin’ Up!®”project!

Sunday, August 24, 2014

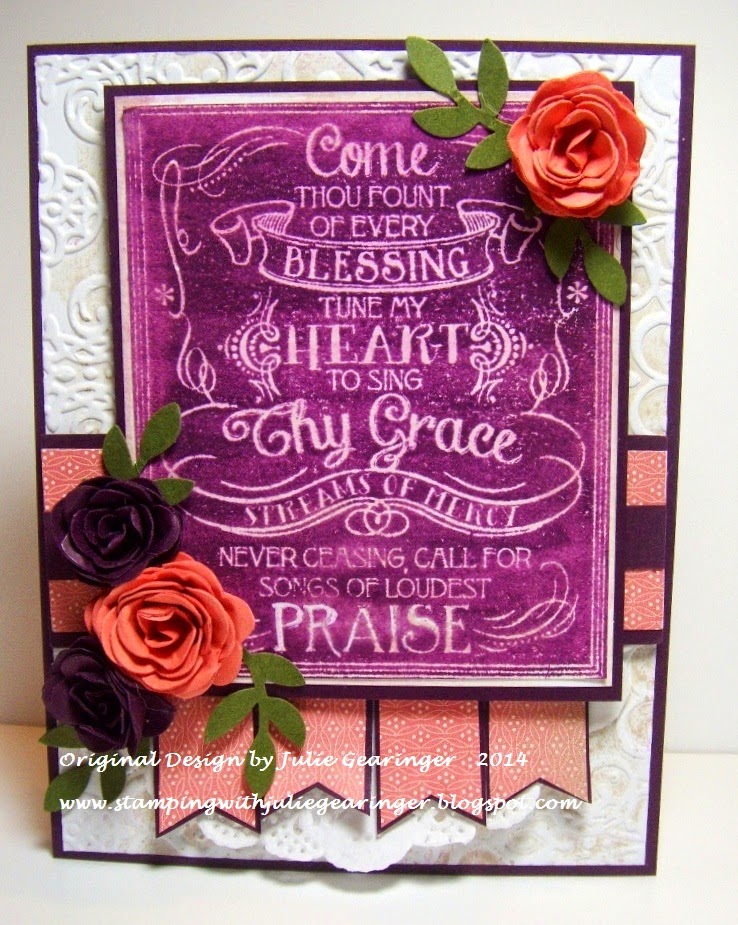
Every Blessing- Two Challenges in One :-)


Hi Stampers! 

I had a great time creating this past week and this card was created for the Just Add Ink JAI228 Color Challenge along with the Our DailyBread Designs ODBDSLC212 Sketch Challenge.
  
I know some of you have arrived from these challenge sites, but if not, I encourage you to visit the linked pages above and check out the wonderful Design Team projects as well as their fabulous galleries- you will definitely be inspired!

To create this card:
Use the Big Shot™ with the retired Lacy Brocade Textured Impressions™ Embossing Folder to emboss a piece of Whisper White cardstock (I inked the interior of the embossing folder before embossing the paper with Ranger© Tim Holtz® Antique Linen Distress Stain). 
Trim the embossed panel and mount to the Blackberry Bliss card base.
Stamp the Chalkboard Hymn stamp with Blackberry Bliss Classic Ink onto Whisper White cardstock, trim the panel and mount onto Whisper White cardstock and mount onto Blackberry Bliss cardstock. Apply Ranger© Tim Holtz® Antique Linen Distress Stain over the image to antique the paper a bit. 
Add a piece of Calypso Coral print of retired Everyday Enchantment Designer Series Paper (DSP) to a piece of Blackberry Bliss cardstock.  Add a strip of Blackberry Bliss cardstock across the center of the panel and mount onto the card front.
Mount ½ of a White Tea Lace Paper Doily below the horizontal strip onto the card front.
Create the banners from the same print of retired Everyday Enchantment DSP- use the Hexagon Punch for the banner points and mount onto Blackberry Bliss cardstock (creating banners with the punch as well).  
Add the banners to the back of the focal image and mount the focal image to the card front using Stampin’ Dimensionals®.
Create the rolled flowers from Blackberry Bliss and Calypso Coral cardstock using the 2 ⅜” and 1 ¾” Scallop Circle Punches.   Spiral cut by hand a wavy line from the outside of the scallop toward the center and roll up to create the rose (here is a basic tutorial from Splitcoaststampers). 
Use the Bird Builder Punch with Mossy Meadow cardstock to create the leaves.
Add the roses and the leaves to the card front to finish off the card.
Stamp Sets: Chalkboard Hymns (ODBD)
Ink: Blackberry Bliss, Ranger© Tim Holtz® Antique Linen Distress Stain
Paper/Cardstock:  Whisper White, Blackberry Bliss, Calypso Coral, Mossy Meadow, retired Everyday Enchantment DSP
Accessories: Big Shot™, retired Lacy Brocade Textured Impressions™ Embossing Folder, Punches: Hexagon, Bird Builder, Scallop Circle- 2 ⅜”, 1 ¾”, White Tea Lace Paper Doily

Thanks again for stopping by- I hope all of you have a great Sunday!!

Tuesday, February 11, 2014

SUO90 Vintage Thank You- Seven Punches for Punch Parade :-)

Hi Stampers! 

It’s that time again, a new SU-Only Challenge!!  The SUO90 Challenge is Punch Parade and normally I would have opted for a traditional punch art card but decided to be a bit more deceptive with my punches :-)

Can you guess that I have incorporated seven punches in this card – do you see them all? Yes, there are a total of seven different punches along with an embossing folder used for this vintage card.  


To create this card: 
  
Use the Postage Stamp Punch and punch out nine postage stamp pieces from Basic Black cardstock- adhere to a piece of Whisper White cardstock. 

Use the 1” Square Punch to punch out nine 1” squares from a piece of the Afternoon Picnic Designer Series Paper (DSP) and adhere to the postage stamp pieces created in the above step.

Distress the pieces using the AquaPainter™ to apply diluted retired Tea Stain Vintage Ink to “antique” the DSP and perimeter of the Whisper White cardstock. Once dry, emboss the entire panel using the Big Shot™ with the Square Lattice Textured Impressions™ Embossing Folder and mount onto a piece of Basic Black cardstock.

Stamp the tea party image using Basic Black Classic Ink and color with the Crushed Curry, Blushing Bride and Pistachio Pudding Stampin’ Write Markers.  Add a bit of distressing using the AquaPainter™ to apply diluted retired Tea Stain Vintage Ink and cut out the image using the Big Shot™ with the Ovals Collections Framelits™.  

Cut another oval from Basic Black cardstock using the same size oval framelit, cut the Basic Black oval in half (horizontally) and layer behind the tea party image.

Use the new Scalloped Tag Punch to create a tag from Basic Black cardstock and add the layered oval focal image onto the bottom of the tag.

Stamp the sentiment from Wetlands using Basic Black onto Whisper White cardstock, distress with the Tea Stain Vintage Ink and Gorgeous Grunge splatter image using Baked Brown Sugar Classic Ink.  Cut the banner using the Hexagon Punch and mount onto a layer of Basic Black cardstock (trimming the Basic Black to create a frame for the banner sentiment).

Mount the banner sentiment above the tea cup (covering up the original sentiment on the focal image stamp) and set aside to create the rolled flowers.
To create the rolled flowers:  
The larger roses were created with the 2 3/8” Scallop Circle-punch two from Raspberry Ripple and one from Blushing Bride cardstock.  Starting on the outside, cut a wavy spiral towards the center, crimp twice with the retired Crimping Tool and start to roll up from the outside edge toward the center.  Again, hold in place using the Hot Glue Gun or Tombow Multi-Purpose Adhesive.  If needed, here is a basic written tutorial at Splitcoaststampers for the rolled roses. 
Take the same steps as above for the smallest roses (three from Blushing Bride cardstock and one from Raspberry Ripple cardstock)- use the 1 ¾” Scallop Circle Punch to punch out the roses from the cardstock and use the same instructions above for completing the roses.  Distress the roses a bit with the AquaPainter™ to apply diluted retired Tea Stain Vintage Ink to the petals. 
Use a Sponge Dauber with this ink as well to “distress/antique” the leaves as well. Use the Bird Builder Punch to punch out the leaves from Pistachio Pudding cardstock.
Add the Tea Lace Paper Doily to the card front (sponge a bit of the Tea Stain Vintage Ink onto the doily, use the retired Crimper Tool to crimp a scrap piece of Basic Black and adhere this layer over the cut edge of the doily.
Add the piece of Tea Lace Paper Doily to the top of the tag and the dots along the edge using the Chalk Marker.   Mount the focal tag image to the card front using Stampin’ Dimensionals® and use Mini Glue Dots, or I have been using my Hot Glue Gun- it has been resurrected!,  to add the leaves first, then the roses to around the edge and top of the tag. 
Add the strand of pearls to the crimped Basic Black Layer to finish off the card.
So there you have it, seven punches, one card - new Scalloped Tag, 2 3/8” Scallop Circle, 1 ¾” Scallop Circle, Bird Builder, Postage Stamp, 1” Square and Hexagon. 
Stamp Sets: Tea Party, Gorgeous Grunge
Ink: Basic Black, Baked Brown Sugar, retired Tea Stain Vintage Ink, Stampin’  Write markers- Blushing Bride, Crushed Curry, Pistachio Pudding, Chalk Marker
Paper/Cardstock:  Whisper White, Basic Black, Afternoon Picnic DSP
Accessories: Big Shot™, Square Lattice Textured Impressions™ Embossing Folder, Tea Lace Paper Doily, Pearls, AquaPainter™, Crimper Tool, Sponge Dauber, Punches- Scalloped Tag, 2 3/8” Scallop Circle, 1 ¾” Scallop Circle, Bird Builder, Postage Stamp, 1” Square and Hexagon
I had fun creating this vintage ”Punch Parade” card and hope that we will see your creation using SU! Punches in the gallery!   Have a great week and have fun stamping!

Tuesday, July 23, 2013

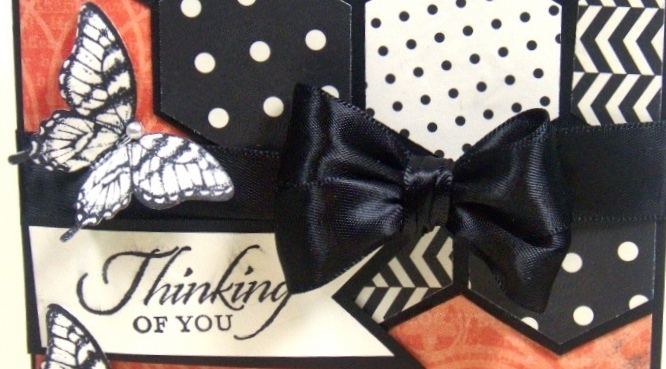
Thinking of You- A Sketch and Color Challenge

Hi Again Stampers!!

I am having a great time in my stamping room today so I think this may be a record for posts in one day for me..

While my hubby watches his baseball games, I decided to create a card using the HSSSC164Sketch at Hand Stamped Sentiments (I flipped the sketch over) and the DD62 Challenge Colors from The Dynamic Duos.  

Again, if you have not visited these sites yet- stop by and check out all of the inspiration!!

To create this quick CAS card:

Using the hexagon punch, punch out various pieces from the Modern Medley Designer Series Paper (DSP).  Adhere the hexagons per the sketch onto Basic Black cardstock and carefully trim around the outer edge by hand.

Adhere this panel onto a piece of Calypso Coral DSP from Epic Day This and That.  Add the 5/8” Basic Black Satin Ribbon bow along with the banner sentiment. 

Mount the entire panel onto Basic Black cardstock and add the butterflies and pearls to finish off the card.

Stamp Sets:  Papillon Potpourri, Wetlands

Ink: Basic Black

Paper: Very Vanilla, Basic Black, Epic Day This and That DSP, Modern Medley DSP

Accessories:  Punches- Elegant Butterfly, Hexagon, 1” Square, Pearls, 5/8” Basic Black Satin Ribbon (retired)

I think I will have to make this card again in a different color combo- it was definitely quick and easy!!  


Thanks again for stopping by and I hope you have a wonderful Wednesday!!
Related Posts Plugin for WordPress, Blogger...