Showing posts with label CCC15. Show all posts

Tuesday, November 24, 2015

ODBDSLC264 In The Highest


Hello Friends!


With Thanksgiving here in the United States this week, I decided to create a very easy card with the new In The Highest stamp set using gold embossing and a few layers of the Christmas Collection 2013 6x6 Paper.

I am also linking this card to the Alphabet Challenge "T for 'Tis the Season" Challenge and the Just Us Girls #320 "Red, Green and Gold" Challenge :-)

Our Daily Bread Designs- In The Highest, Christmas 2013 Paper Collection
To create this card, ink the In The Highest stamp set using an embossing ink and emboss with gold embossing powder.  

Trim the panel and mount onto brushed gold cardstock, trim and mount onto burgundy cardstock, trim again and mount onto green cardstock.

Layer the Christmas Collection 2013 6x6 papers onto a piece of burgundy cardstock, trim and add the layered central panel with the gold satin ribbon.

Mount the entire panel onto the green card base.

Add the embossed sentiment panel with dimensional foam and add the gold satin ribbon bow to finish off the card.


It truly has been a blessing to design along this fabulous DT Team for the last few months (this is my final Guest DT spot with ODBD)...
If you have not had a chance to do so, I hope you will check out my DT sisters:

To see all the projects created for ODBDSLC264 or to join the challenge click here.  You have until December 6, 2015 (two weeks to play along this time) at 8:00 pm EDT. By participating in the challenge, you have a chance to win a $15 ODBD Gift Certificate good towards the purchase of stamps in the “stamps column” on the ODBD website, or to be spotlighted on the ODBD Blog at our next challenge. The random prize winner will be posted on our next challenge post. Please do not post on Flicker as many of us do not have the ability to comment on your cards nor can we spotlight your cards on the blog.

As we celebrate Thanksgiving here in the United States,  I want to thank all of you who visit my blog and the encouragement you are to me!!  

So thankful for many things but most of all, for knowing Jesus as my personal Savior!  I pray that you know Him as well personally and can have the peace that surpasses all understanding :-)

Thanks again for stopping by, we hope to see your artwork in the Shining the Light ODBDSCL264 Challenge gallery!  

Have a wonderfully blessed Thanksgiving week - hugs to you, my friends!

Monday, November 23, 2015

Power Poppy Poinsettia- Merry Christmas Vintage Stocking


Hi Again Friends!!


 Again, if you have not already visited the above sites, I hope you will take a moment to do so- tremendous inspiration from all!

To create this card:

Ink the stocking image from the Power Poppy Poinsettia stamp set using Memento™ Tuxedo Black Ink onto Very Vanilla cardstock (also stamp another image onto a piece of sticky note paper or scrap paper to create a mask).

Mask the stocking image, ink the retired Musical Score background stamp using Crumb Cake Classic Ink and lay the stamped image face down onto the background stamp pressing the inked stamp to the paper with your fingers in a random pattern.

Color the image using Stampin’ Write Markers- Pink Pirouette, Crumb Cake, Tip Top Taupe, Melon Mambo and Sahara Sand, blending with an AquaPainter™.

Add shadows with the Sahara Sand Stampin’ Write Marker, trim the panel and mount onto Early Espresso cardstock, trim again and mount onto Pink Pirouette cardstock.

Stamp the sentiment with Memento™ Tuxedo Black Ink and add shadows with the Sahara Sand Stampin’ Write Marker.

Add the ivory crochet lace along with the 1” Dark Brown Satin Ribbon.

Mount onto the Early Espresso card base and add the Pink Pirouette and Melon Mambo retired buttons with Natural Linen Thread along with the Pearls to finish off the card.

Stamp Sets:  Poinsettia (Power Poppy), Musical Score (retired Stampin’ Up! background stamp)

Ink:  Memento™ Tuxedo Black, Crumb Cake; Stampin’ Write Markers- Pink Pirouette, Crumb Cake, Tip Top Taupe, Melon Mambo and Sahara Sand

Paper: Very Vanilla, Early Espresso, Pink Pirouette

Accessories: AquaPainter™, retired Pink Pirouette, Melon Mambo buttons, Natural Linen Thread, Pearls, Ivory Crochet Lace Trim (from my stash)


Thanks again for visiting- I hope you have a wonderful week, my friends!

Saturday, November 21, 2015

Wishing You An Old-Fashioned Christmas


Hello Friends!


If you have not already checked out the CAS-ual Chic CCC05 Challenge or Splitcoaststampers' CCC15 Christmas Card galleries yet, I would encourage you to do so- fabulous inspiration from all!

To create this card:

Use the Embossing Buddy® to de-static a piece of Very Vanilla cardstock, ink  the main  image from Old-Fashioned Christmas using Versamark™ Ink and stamp onto the prepared cardstock.

Apply Stampin’ Emboss® Gold Embossing Powder and heat set with the Heat Tool.

Once the embossing powder has cooled, ink the Winter Blessings stamp set using Ranger® Tim Holtz® Old Paper Distress Ink and stamp over the image.

Lightly wipe off the ink from the embossed image using a paper towel and add additional Ranger® Tim Holtz® Old Paper Distress Ink over the entire image to “antique the paper, trim and mount onto retired More Mustard cardstock, trim and mount onto Cherry Cobbler cardstock. 

Add the burgundy triple ribbon bow to the corner of the panel and adhere the Snowflake Elements wooden snowflake to the center of the bow (I “painted” the snowflake using a Metallic Gold Sharpie®).
Repeat the same steps as above for embossing and layering the sentiment panel.

Ink the Winter Blessings stamp set using Ranger® Tim Holtz® Old Paper Distress Ink and stamp onto another piece of Very Vanilla cardstock, add the strips of designer paper, distress the edges with a Distressing Tool and sew the panel with a zigzag stitch onto a piece of More Mustard cardstock.

“Antique” the panel with Ranger® Tim Holtz® Old Paper Distress Ink and mount the stitched panel onto the Cherry Cobbler card base.
Mount the focal image along with the sentiment using dimensional foam and add the Pearls to the center of the wooden snowflake and edges of the sentiment to finish off the card.

Ink: Versamark™, Ranger® Tim Holtz® Old Paper Distress Ink, Metallic Gold Sharpie® Marker

Paper: Very Vanilla, Cherry Cobbler, retired More Mustard; Misc. Designer Paper (from my stash)

Accessories:  Sewing Machine, Thread, Distressing Tool, Sponge Daubers, Embossing Buddy®, Heat Tool, Stampin’ Emboss® Gold Embossing Powder, 5/8” Burgundy Wired Ribbon (from my stash), Snowflake Elements, Pearls

Thanks again for taking the time to visit- hugs and have a blessed week, my friends!

Tuesday, November 17, 2015

ODBDSLC263 Away In A Manger


Hello Friends!


Don't you just love this gorgeous photo?  All  of the rich colors along with the beautiful navity scene around the fireplace inspired me to pull out the Away In A Manger set for my card this week.  The rich traditional colors of gold, burgundy and green were my inspiration for this Christmas card :-)
 

Our Daily Bread Designs Stamps- Away In A Manger, Dies- BohoBackgrounds Dies,
Lovely Leaves Dies, Paper- Christmas Collection 2013 6x6 
To create this card:

Ink the Away in the Manger main stamp image using an embossing ink and emboss with gold embossing powder.  Trim the stamped panel and mount onto gold foil cardstock.

Layer two pieces of the Christmas 2013 Collection 6x6 paper onto a piece of Hunter Green cardstock.

Cut and emboss the Boho Backgrounds Die from gold foil paper and adhere to the Christmas 2013 Collection panel, trim to size.

Add the Gold Satin Ribbon strip and mount the panel onto a piece of burgundy cardstock, trim and mount onto the white card base.

Distress the white cardstock with Old Paper Distress Ink with a sponge dauber on the main focal image and edges of the card base.

Cut the pine boughs from hunter green cardstock with the Lovely Leaves Dies, adhere the branches to a small circle cut from hunter green cardstock.

Add the focal image along with the pine branches to the card front using dimensional foam.

To finish off the card, adhere the gold satin bow and pearl to the center of the star.

I absolutely love designing alongside the talented ODBD Design Team and I hope you will check out the rest of the ODBD DT Projects:

To see all the projects created for ODBDSLC263 or to join the challenge click here.  You have until November 22, 2015 at 8:00 pm EDT. By participating in the challenge, you have a chance to win a $15 ODBD Gift Certificate good towards the purchase of stamps in the “stamps column” on the ODBD website, or to be spotlighted on the ODBD Blog at our next challenge. The random prize winner will be posted on our next challenge post. Please do not post on Flicker as many of us do not have the ability to comment on your cards nor can we spotlight your cards on the blog.


I am so thankful for your visit and we hope to see your artwork in the Shining the LightODBDSLC263 Challenge gallery!  Have a wonderfully blessed week - hugs to all of you, my friends!

Saturday, November 14, 2015

CAS Watercolor Winter Christmas Wishes


Hi Friends!!

Here is another Clean and Simple (CAS) card that I was able to create this weekend for the Colour..Me #97 "Striking" Challenge along with the CAS(E)This Sketch #149 Sketch Challenge and the Addicted toStamps and More #170 Photo Inspiration Challenge.


Again, if you have not already visited the above sites, I hope you will take a moment to do so- wonderful inspiration from all!

To create this card:

Ink the holly branch from the retired set, Watercolor Winter and sentiment from Endless Wishes using Stāz-On® Jet Black Ink and stamp onto a piece of Whisper White cardstock.

Color the holly branch image with the Real Red and Old Olive Stampin’ Write Markers, spritz with water.

Use the Simply Scored™ Scoring Tool to score along the sides of the stamped images.

Ink the thick splatter stamp from Gorgeous Grunge with Old Olive Classic Ink and stamp off onto a scrap piece of paper before stamping onto the panel, lightly spritz with water.

Adhere the dried panel to a piece of Real Red cardstock, trim and adhere to the Whisper White card base.

Stamp the poinsettia image using Stāz-On® Jet Black Ink and stamp onto a piece of Whisper White cardstock.

Color the poinsettia using the Real Red Stampin’ Write Marker, spritz  with water and once dry, carefully fussy-cut the image.

Color the center using the Delightful Dijon Stampin’ Write Marker, add white accents with a paint brush using Titanium White Acrylic Paint.

Mount the flower to the card front to finish off the card.

Stamp Sets:  Watercolor Winter (retired), Endless Wishes, Gorgeous Grunge


Ink:  Stāz-On® Jet Black, Old Olive; Stampin’ Write Markers- Real Red, Old Olive; Titanium White Acrylic Paint

Paper: Whisper White, Real Red

Accessories: Simply Scored™, Water Spritzer Bottle, Paint Brush


Thanks again for stopping by- have a wonderful weekend, my friends!

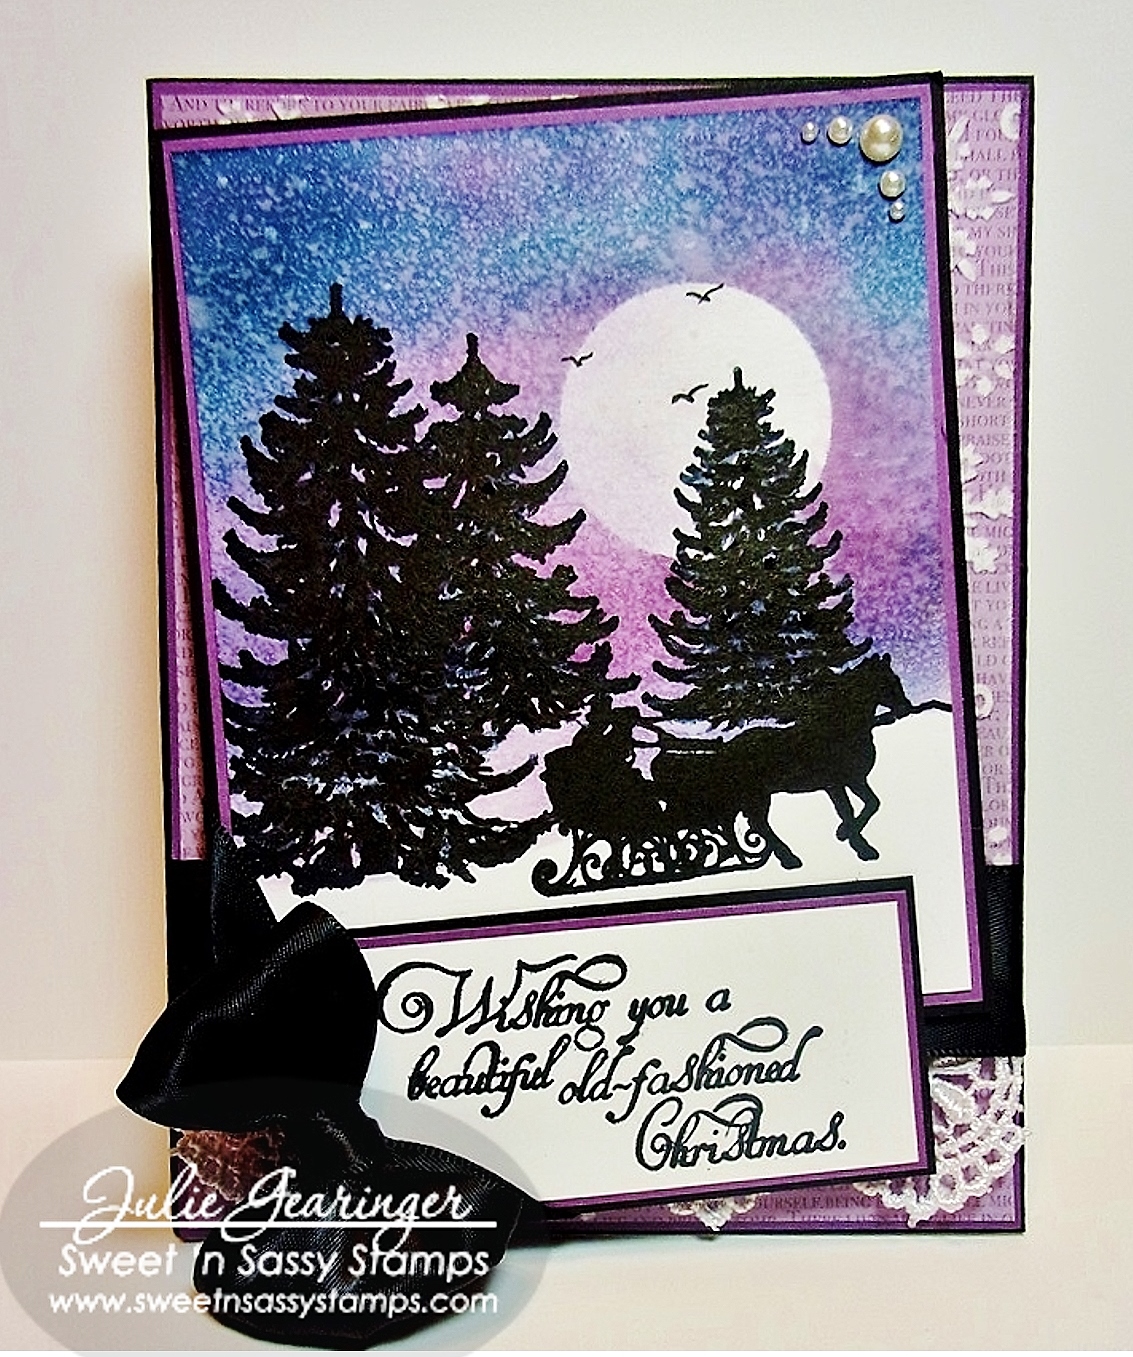
Old-Fashioned Christmas

Hello Friends!

We are still celebrating Sweet ‘n Sassy Stamps’ 8th Birthday all month long in November with lots of fun surprises!  You can check out all the details HERE!  

Don't forget to follow along on Instagram (@sweetnsassystamps) and Facebook for daily inspiration plus a few giveaways throughout the month!

This card was created with the Old-Fashioned Christmas stamp set featured as today’s "throwback" stamp set on the Sweet ‘n Sassy Stamps (SNSS) blog.

This is a very easy card to create using a masking technique- please see the step by step instructions on the SNSS blogpost.

Stamp Sets:  Old Fashioned Christmas

Ink: Versamark™, Stampin’ Up!- Perfect Plum, Wild Wisteria, Midnight Muse

Paper: Stampin’ Up! Whisper White, Basic Black, Perfect Plum; Perfect Plum Designer Series Paper (retired)

Accessories:  Big Shot™, Darice® Snowflake Embossing Folder, MISTI™, Sanding Block, 5/8” Black Satin Ribbon, Pearls, Micron™ Pen, Titanium White Acrylic Paint

Thanks again for stopping by- have a blessed weekend, my friends!

Saturday, October 31, 2015

JUGS317 One Layer Poinsettia Christmas


Hi Friends!!


It’s time for the new Just Us Girls #317 “One Layer” Challenge and I decided to create a quick Christmas card using Heat Embossing along with Watercolor.

This is my last challenge as a Guest Designer for October and I have truly loved designing with these talented ladies :-)

I hope you will have a chance to check out the rest of the fabulous Just Us Girls Design Teamprojects, pull out your supplies and join in on the fun!   

It was a bit difficult to photograph this card since the panel seems
to warp a bit with the watercoloring but it is flatter IRL :-)
To create this card:

Score a 4.25” x 11” piece of Naturals White cardstock and de-static the front panel using the Embossing Buddy®, stamp the poinsettia and leaf images from the retired set, Joyful Christmas using Versamark™ Ink, apply Stampin’ Emboss White Embossing Powder and heat set with the Heat Tool.

Color using an AquaPainter™ with Cherry Cobbler and Mossy Meadow Classic Ink.  Add additional color using the same colors in Stampin’ Write Markers- spritz with water and allow the colors to run a bit.

Carefully dry the panel with the Heat Tool and once dried, use the Daffodil Delight  Stampin’ Write markers to color the center.

Here is a straight frontal view- again the curve of the lens seems
to accentuate the paper curve from the watercoloring :-)
Stamp the sentiment from the retired set, Christmas Blessings using Stāz-On® Jet Black Ink and add splatters using Gorgeous Grunge with Stāz-On® Jet Black Ink as well.

Quick and easy- perfect for Christmas!


Stamp Sets:  Joyful Christmas, Christmas Blessings (both retired Stampin’ Up!)

Ink: Versamark™, Stāz-On® Jet Black Ink, Cherry Cobbler, Mossy Meadow; Stampin’ Write Markers- Cherry Cobbler, Mossy Meadow, Daffodil Delight

Paper: Naturals White

Accessories: Embossing Buddy®, Stampin’ Emboss® White Embossing Powder, Heat Tool, AquaPainter™


Thanks again for visiting- I hope you have a wonderful week and come play along with us at Just Us Girls!

Wednesday, October 28, 2015

HYCCT1525 Christmas Blessings To You

Hi Friends!!


Again, if you have not had a chance to do so, I hope you will find the time to visit the above galleries- wonderful inspiration from all!!

This was a quick, easy card to create- ink and stamp the images with Versamark™ onto Whisper White cardstock, emboss with White Embossing Powder and watercolor with Cherry Cobbler, Mossy Meadow and More Mustard.

Fussy cut the poinsettias and position onto the die cut More Mustard panel, mount onto the embossed Whisper White panel and layer onto More Mustard and Cherry Cobbler cardstock.

Another view to show that there is very little
dimension so less postage is needed as well :-)
Add the stamped sentiment with dimensional foam and you are finished!

Stamp Sets:  Joyful Christmas, Christmas Blessings (both retired Stampin’ Up!)

Ink: Versamark™, Cherry Cobbler, Mossy Meadow, retired More Mustard Classic Ink and Stampin' Write Markers

Paper: Whisper White, Cherry Cobbler, More Mustard

Accessories: Big Shot™, MFT Blueprints 13 Die, Hexagon Punch, AquaPainter™, Water Spritzer Bottle, retired Petals-A-Plenty Textured Impressions™ Embossing Folder


Thanks again for taking the time to stop by- I will be posting more of the Hope You Can Cling To Challenge cards shortly!

Wednesday, October 21, 2015

CMCC94 Silent Night


Hi Friends!!

Woohoo!  It is time for the new Colour Me...! CMCC94 "Colour Me Subtle" Challenge and I decided to use masking to create a wintery scene for one of my Splitcoaststampers' CCC15 Christmas Challenge designs along with the CAS336 "Under the Stars" Challenge.  

I hope you will have a chance to check out the rest of the Design Team projects and create your own project to join in on the fun!! 

To create this card:

Create a few masks from sticky note paper for the moon and hills.
Place the notes onto a piece of Whisper White cardstock, use Sponge Daubers to apply Pumpkin Pie, Watermelon Wonder and Elegant Eggplant Classic Ink to the sky area.

Use an AquaPainter™ to apply a bit of ink over the moon.
Move the masks for the snow banks and lightly apply Pumpkin Pie Classic Ink to create a few shadows.

Ink the Wonderland and Lovely As A Tree images using Stāz-On® Jet Black Ink, mask the snow banks and stamp the trees to the scene. 

Add the sentiment at the bottom of the panel using Stāz-On® Jet Black Ink, trim the panel and mount onto a piece of Elegant Eggplant cardstock, trim again and mount onto Watermelon Wonder cardstock, trim once more and mount onto the Elegant Eggplant card base.

Using a Faber-Castell® White Pitt Pen marker, add the snowflakes to the sky and over the snow banks.

Add a few Rhinestones to finish off the card.

Stamp Sets:  Woodland, Lovely As A Tree

Ink: Stāz-On® Jet Black Ink; Elegant Eggplant, Pumpkin Pie, Watermelon Wonder; Faber-Castell® White Pitt Pen Marker

Paper: Whisper White, Elegant Eggplant, Watermelon Wonder
Accessories: Sponge Daubers, Masking Paper, Rhinestones

OK- not sure if this card is very subtle since I find the colors to be quite dramatic together :-)  I did have fun creating this nighttime scene and hope you will find the time to join in  and come play along with us at Colour Me...!

Thanks again for visiting-  hugs and have a blessed week, my friends!
Related Posts Plugin for WordPress, Blogger...