Showing posts with label Winter Blessings (SNSS). Show all posts

Wednesday, December 14, 2016

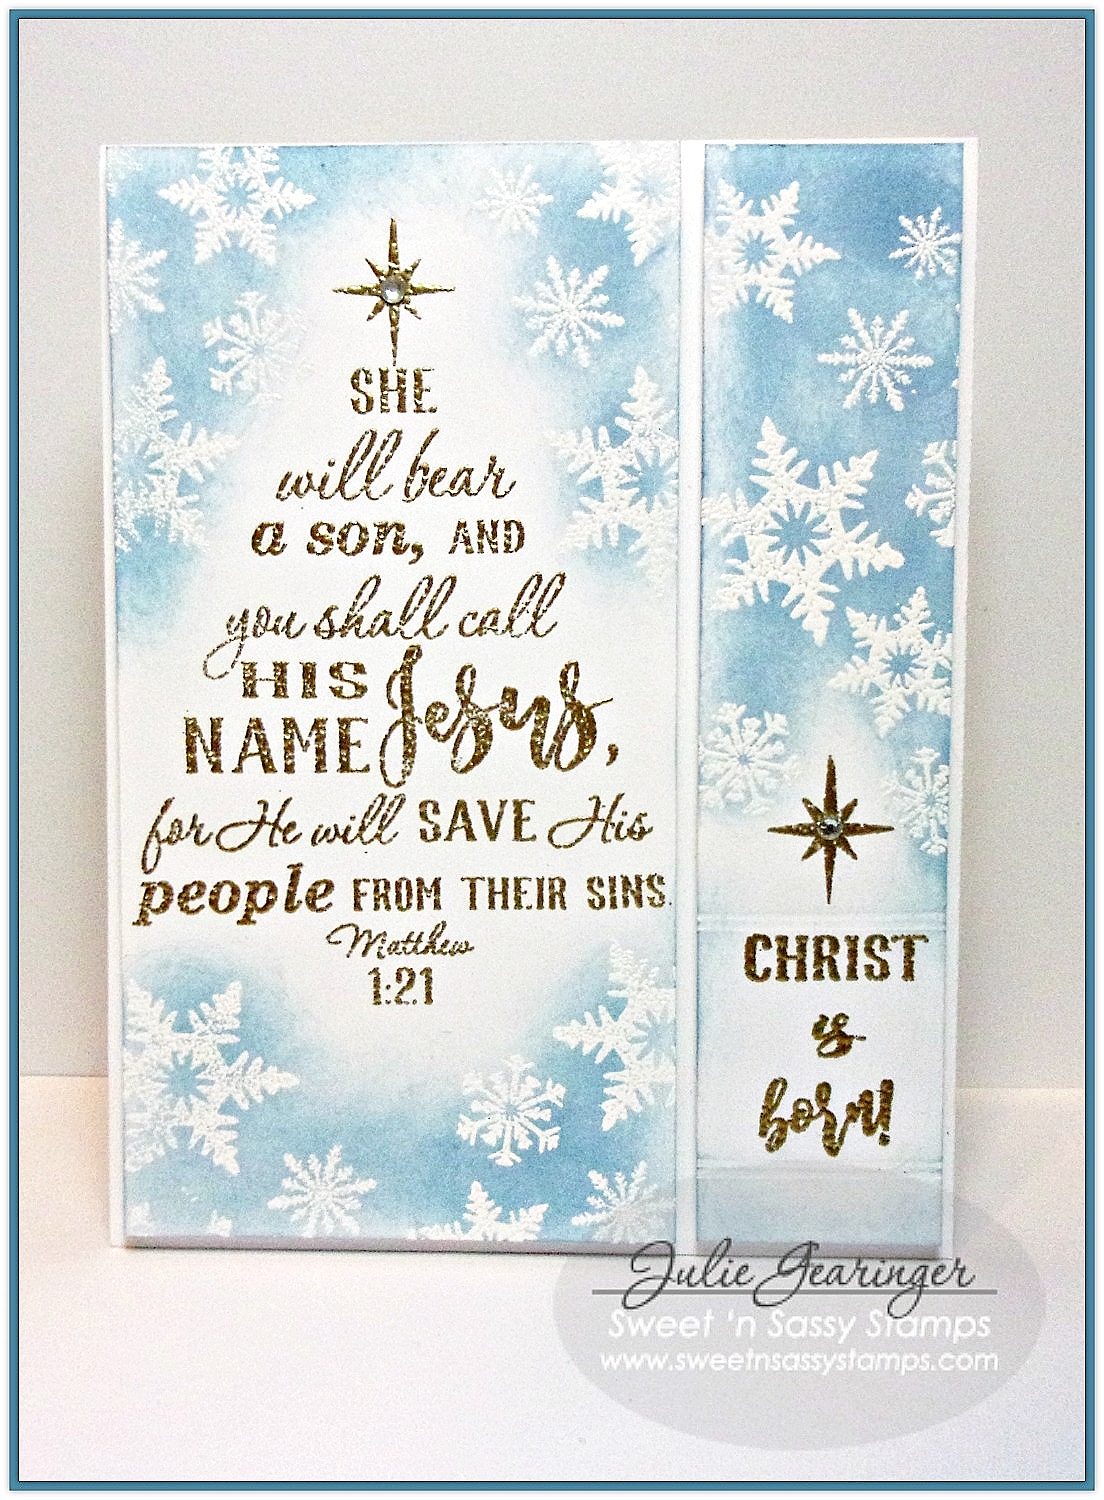
You Shall Call His Name Jesus


Hi Friends!  

This Clean and Simple (CAS) Christmas card is the "stepped up" version of the original design for the Splitcoaststampers’ SC623 Sketch Challenge  and I am also linking to the CAS MIX-Up for December and the Simon Says Monday "Let There Be Snow" Challenge.

I decided to keep the card very simple and created two versions- this post has version #1 and both versions use Sweet ‘n Sassy Stamps Clear Stamp Sets, Scripture Tree and Winter Blessings.

In addition  to checking out the above challenge sites, if you have not stopped by the Sweet ‘n Sassy Stamps blog or FB page yet, I hope you will take the time to do so- fabulous inspiration is posted each week from the SNSS Creative Team!
To create this card:

1).  De-static a piece of white cardstock with an embossing static tool, ink the SNSS Scripture Tree Clear Stamp main tree image with embossing ink and stamp onto the upper left hand portion of the panel.

2). Apply gold embossing powder and heat set with a heat tool.

3). Repeat the same steps above with placing the individual word images from SNSS Scripture Tree Clear Stamp Set, stamping and embossing on the lower right hand side of the trimmed piece of the panel.

4). Ink just the star from the SNSS Scripture Tree image with embossing powder, apply gold embossing powder and heat set.

5). Once the powder has cooled, score double lines above and below the sentiment area (hard to see in the photo).

6). De-static both panels again with an embossing static tool, arrange various snowflakes from the SNSS Winter Blessings Clear Stamp Set, ink with embossing powder and stamp around the panels.

7).  Apply white embossing powder over the stamped snowflakes and heat set with a heat tool.

8). Use a sponge dauber with Tumbled Glass Distress Ink to sponge over the snowflake areas and lightly wipe with a paper towel to remove the excess ink from the embossing.

9). Adhere the panels to the white card base with dimensional foam (leaving a space in the center per the sketch) and add rhinestones to the stars to finish off the card.

Quick and easy!!  This version has a bit more color than the all white version (see here in this post). 

Thanks again for taking the time to visit-hugs and I hope you have a fabulous week, sweet friends!


Christ Is Born!


Hi Friends! 

This Clean and Simple (CAS) Christmas card was designed for the Splitcoaststampers’ SC623 Sketch Challenge along with the AAA Cards "CAS Game #79 Christmas" Challenge and the Double “D” Challenges “Dreaming of a White Christmas”.

 
I decided to keep the card very simple and created two versions- this post has version #1 and both versions use Sweet ‘n Sassy Stamps Clear Stamp Sets, Scripture Tree and Winter Blessings.

In addition  to checking out the above challenge sites, if you have not stopped by the Sweet ‘n Sassy Stamps blog or FB page yet, I hope you will take the time to do so- fabulous inspiration is posted each week from the SNSS Creative Team!

To create this card:

1).  De-static a piece of white cardstock with an embossing static tool, ink the SNSS Scripture Tree Clear Stamp main tree image with embossing ink and stamp onto the upper left hand portion of the panel.

2). Apply gold embossing powder and heat set with a heat tool.

3). Repeat the same steps above with placing the individual word images from SNSS Scripture Tree Clear Stamp Set, stamping and embossing on the lower right hand side of the trimmed piece of the panel.

4). Ink just the star from the SNSS Scripture Tree image with embossing powder, apply gold embossing powder and heat set.

5). Once the powder has cooled, score double lines above and below the sentiment area (hard to see in the photo).

6). De-static both panels again with an embossing static tool, arrange various snowflakes from the SNSS Winter Blessings Clear Stamp Set, ink with embossing powder and stamp around the panels.

7).  Apply white embossing powder over the stamped snowflakes and heat set with a heat tool.

8). Adhere the panels to the white card base with dimensional foam (leaving a space in the center per the sketch) and add rhinestones to the stars to finish off the card.

Quick and easy!!  I added just another step to the “stepped up” version and will post that shortly.


Thanks again for stopping by to visit-hugs and I hope you have a great week!


Friday, July 22, 2016

Old Fashioned Christmas in July


Hi Sweet Friends!

Woohoo!  Today we are celebrating “Christmas In July” with Sweet ‘n Sassy Stamps!  We have a fabulous blog hop for you with examples from our wonderful SNSS Creative Team showcasing some of the great Christmas stamps from Sweet ‘n Sassy Stamps!

I have included all of the participating SNSS Creative Team blogs at the end of this post- just simply click on their name to “hop” along in the blog hop. This same list will be on each person's blog, so no need to hit the back button. Just look for the next blog in the line-up and off you go!

Also, if you have the time, please be sure to leave a comment on each blog along the way ( in other words, give us some “love” :-)) and Sweet ‘n Sassy Stamps will be drawing a winner from all of the blog comments and that person will receive a FREE Christmas stamp set (in stock) of their choosing from the Sweet ‘n Sassy Stamps line!

And to make this weekend even sweeter, Sweet ‘n Sassy Stamps will be offering all of their Christmas stamps at 15% off through the weekend – when shopping, please add the code CMASJULY when you check out for the discount.

So woohoo!!  Time to celebrate Christmas in July and we hope we have inspired you to start on your Christmas cards :-)


I am using Old-Fashioned Christmas for the main images along with Parisian Postcard, Light of Christmas and Winter Blessings as well as the Ticket Dies for the tag sentiment.  

I think that the Old-Fashioned Christmas clear stamp is perfect for a "shabby chic"/vintage style cards as well as Clean and Simple cards and will share a simpler card in the future.  

To create this card:

Stamp the main focal image from Old-Fashioned Christmas onto vanilla cardstock using Walnut Stain Distress Ink, mask the snow banks with scrap paper and lightly sponge Tea Dye Distress Ink onto the “sky” area.

Ink and sporadically stamp the Light of Christmas stamp set with Walnut stain as well as the Parisian Postcard images and Winter Blessings snowflakes (masking the stamp image from Parisian Postcard before stamping the snowflakes).

Distress the edges with a distressing tool and ink, mount onto espresso cardstock (distressing the edges as well).

Add a bit of Clear Wink of Stella® to the snow banks (difficult to see in the photograph).

Ink the sentiment from Old-Fashioned Christmas along with snowflakes from Winter Blessings with Walnut Stain Distress Ink, stamp onto vanilla cardstock, die cut with the Ticket Dies and sponge with Tea Dye Distess Ink (also cut a Ticket Die from espresso cardstock, split in the middle and mount behind the stamped tag).

Add the tag to the distressed panel with dimensional foam, adhere the triple satin ribbon bow along with the ribbon and lace in the corner.

Mount onto the layered card front to finish off the card.

That's all there is to this card :-)  Alright, maybe not as simple as some but I did have a great time creating it!  Now, off to the blog hop- have a great time!!


Wednesday, December 30, 2015

Christmas Wishes


Hi Friends!

I hope you are having a great week so far!  

I know that Christmas is over but I wanted to share a card that I created using the Sugar Pea Designs SPDSS34 Sketch along with the Power Poppy Dec15 “Rewind” Challenge (I chose “Shabby & Chic”).  I like to create Christmas cards all year long so I have them ready to mail at Christmas (although I am still always a bit late getting them in the mail- working on this for sure :-)).

If you have not had a chance to check out the above challenge sites, I hope you will find the time to do so- gorgeous Design Team samples and inspiration from all!

To create this card:

Stamp the titmouse image from Sweet ‘n Sassy (SNSS) Peace of God  stamp set using Stāz-On® Jet Black Ink onto Whisper White cardstock (stamping another image onto a piece of sticky note paper for a mask).

Color the titmouse image using an AquaPainter™ with Smoky Slate and Hello Honey Classic Ink (also using a Smoky Slate Stampin’ Write marker for shadows on the feathers) and Pear Pizzazz with Old Olive for the leaves.

Color the berries with a Real Red Stampin’ Write Marker and add highlights with Titanium White Acrylic Paint.

Once the ink and paint has dried, mask the bird image and use a Sponge Dauber with Pear Pizzazz Classic Ink to stencil the background.

Ink the snowflakes from the Winter Blessings (SNSS) stamp set with Smoky Slate Classic Ink, stamp off and stamp onto the background.

Use a 1 ¾” Circle Punch to round the corners and a sewing machine with a zig zag stitch to adhere the panel to a piece of Basic Gray cardstock (rounding the corners of the Basic Gray cardstock as well and distressing with the Distress Tool).

Use the Big Shot™ with the Boho Chic Textured Impressions™ Embossing Folder to emboss a piece of retired Designer Series Paper, distress the edges with the Distressing Tool and lightly sand with the Sanding Block.

Use a zigzag stitch to adhere this background panel to the Basic Gray card front.

Stamp the sentiment from We Three Kings (SNSS) onto Whisper White cardstock, create the banner points with the Hexagon Punch and mount onto a piece of Basic Gray cardstock.

Create the horizontal panel from a scrap piece of Real Red cardstock (mounted onto scrap strips of Basic Gray cardstock) along with the Doily Borders Die (SNSS) Die cut from Whisper White cardstock.

Add the snowflake embellishment with the Silver Cord over the horizontal panel.

Add the titmouse focal image panel and mount the layered red strip at the top.

Add the sentiment with dimensional foam to finish off the card.


Ink: Stāz-On® Jet Black, Smoky Slate, Hello Honey, Old Olive, Pear Pizzazz, Stampin’ Write Markers- Smoky Slate

Paper: Whisper White, Basic Gray, Real Red; retired Stampin’ Up! DSP

Accessories: Big Shot™, Doily Borders Dies (SNSS), Boho Chic Textured Impressions™ Embossing Folder, AquaPainter™, Sewing Machine, Snowflake Embellishment, Punches- 1 ¾” Round, Hexagon, Silver Cord


Thanks again for taking the time to stop by- hugs and have a blessed day, my friends!

Wednesday, December 2, 2015

TCC45- Christmas Blessings


Hi Friends!!

It is time for The Card Concept #45 "Let It Snow" Inspiration Challenge- I love this color combination for Christmas and I chose to use the colors as well as the snowflakes for my Mixed Media card design.

I am also going to link this card to the Fusion “Blue Christmas” Challenge and the Paper Players PP273 “Tic-Tac-Toe” Challenge (snowflake, blue, ribbon).

Just a reminder that the Card Concept is a bi-weekly challenge that has an inspiration photo along with a number of design styles that you can choose from to create your card- Clean and Simple, Clean and Graphic, Clean and Layered, Shabby Chic, Freestyle Collage, Classy and Elegant and Mixed Media.   

I hope you can find some time to gather your supplies together and come join in on the fun- this will be our last challenge before Christmas :-)


To create this card:

Using a foam brush, apply Gesso® to a piece of designer paper (this is a great way to use up the patterns that you are not fond of) and once dry, apply a combination of Ranger® Tim Holtz® Chipped Sapphire Distress Stain along with Faber-Castell® Gelatos® (not sure of the color- I think it is Blueberry).

This process is a bit difficult to describe and basically you keep building up the background color until you are pleased with the results.

Use the large splatter stamp from Gorgeous Grunge with White Craft Ink to add a bit of splatter to the background (difficult to see in the photo).

Once the color had dried, de-static with the Embossing Buddy® and stamp the retired Festive Flurry snowflake image using Versamark™ ink, apply Stampin’ Emboss® Winter White Embossing Powder and heat set with the Heat Tool.

Close up of the easel closed :-)
When the embossing has cooled, ink the Sweet ‘n Sassy Stamps (SNSS) Winter Blessings stamp using Night of Navy Classic Ink and stamp over the snowflake and background.

Trim the panel and hand cut the V-shape per the sketch.

Mount the lower panel onto a card front using Night of Navy cardstock.

Mount the upper panel onto a piece of Night of Navy cardstock (trimming to a “V”), add the ½ White Tea Lace Paper Doily behind the upper panel along with the 3/8” Denim Ribbon and mount onto the card front with dimensional foam.

Ink the sentiment from the retired Stampin’ Up! More Merry Messages using Versamark™ ink, apply Stampin’ Emboss® Winter White Embossing Powder and heat set with the Heat Tool.

Create the easel card from Extra Thick Whisper White cardstock (I used the Splitcoaststampers Tutorial here), stamp the sentiment from the retired Our Daily Bread Designs (ODBD) His Gift stamp set using Night of Navy Classic Ink , add the strip of Night of Navy cardstock with dimensional foam (cut the strip with the My Favorite Things (MFT) Horizontal Stitched Strip Die, edge with the MFT Die-namics Faux Crochet Die from Whisper White cardstock along with the 3/8” Denim Ribbon and stamp snowflakes from the Winter Blessings set (SNSS)  with White Craft Ink).

Adhere the card front to the easel and finish off the card with the retired Frosted Finishes Embellishment and Rhinestones.

Stamp Sets:  Festive Flurry, More Merry Messages (retired Stampin’ Up!); Gorgeous Grunge (Stampin’ Up- current), Winter Blessings (current SNSS), His Gift (retired ODBD)

Ink: Versamark™, White Craft;  Ranger® Tim Holtz® Chipped Sapphire Distress Stain along with Faber-Castell® Gelatos® (Blueberry),

Paper: Extra Thick Whisper White, Night of Navy; retired DSP (cannot see this since covered with Gesso®).

Accessories: Gesso®, Big Shot™, MFT Stitched Horizontal Strip Dies, MFT Die-namics Faux Crochet Die, Embossing Buddy®, Stampin’ Emboss® Winter White Embossing Powder, Heat Tool, 3/8” Denim Ribbon, Frosted Finishes Embellishments, Rhinestones


Thanks again for stopping by- I hope you have a wonderful week and come play along with us at The CardConcept!

Saturday, November 21, 2015

Wishing You An Old-Fashioned Christmas


Hello Friends!


If you have not already checked out the CAS-ual Chic CCC05 Challenge or Splitcoaststampers' CCC15 Christmas Card galleries yet, I would encourage you to do so- fabulous inspiration from all!

To create this card:

Use the Embossing Buddy® to de-static a piece of Very Vanilla cardstock, ink  the main  image from Old-Fashioned Christmas using Versamark™ Ink and stamp onto the prepared cardstock.

Apply Stampin’ Emboss® Gold Embossing Powder and heat set with the Heat Tool.

Once the embossing powder has cooled, ink the Winter Blessings stamp set using Ranger® Tim Holtz® Old Paper Distress Ink and stamp over the image.

Lightly wipe off the ink from the embossed image using a paper towel and add additional Ranger® Tim Holtz® Old Paper Distress Ink over the entire image to “antique the paper, trim and mount onto retired More Mustard cardstock, trim and mount onto Cherry Cobbler cardstock. 

Add the burgundy triple ribbon bow to the corner of the panel and adhere the Snowflake Elements wooden snowflake to the center of the bow (I “painted” the snowflake using a Metallic Gold Sharpie®).
Repeat the same steps as above for embossing and layering the sentiment panel.

Ink the Winter Blessings stamp set using Ranger® Tim Holtz® Old Paper Distress Ink and stamp onto another piece of Very Vanilla cardstock, add the strips of designer paper, distress the edges with a Distressing Tool and sew the panel with a zigzag stitch onto a piece of More Mustard cardstock.

“Antique” the panel with Ranger® Tim Holtz® Old Paper Distress Ink and mount the stitched panel onto the Cherry Cobbler card base.
Mount the focal image along with the sentiment using dimensional foam and add the Pearls to the center of the wooden snowflake and edges of the sentiment to finish off the card.

Ink: Versamark™, Ranger® Tim Holtz® Old Paper Distress Ink, Metallic Gold Sharpie® Marker

Paper: Very Vanilla, Cherry Cobbler, retired More Mustard; Misc. Designer Paper (from my stash)

Accessories:  Sewing Machine, Thread, Distressing Tool, Sponge Daubers, Embossing Buddy®, Heat Tool, Stampin’ Emboss® Gold Embossing Powder, 5/8” Burgundy Wired Ribbon (from my stash), Snowflake Elements, Pearls

Thanks again for taking the time to visit- hugs and have a blessed week, my friends!

Sunday, November 15, 2015

May the Spirit of Christmas Fill Your Heart


Hello Friends!

I had a chance to create a few cards this weekend and this card was created using the Wplus9 Get Sketchy! #4 Sketch Challenge along with the My FavoriteThings #33 Color Challenge.
 
If you have not had a chance to visit the above challenge site galleries yet, again, I would encourage you to do so- wonderful inspiration from all!

To create this card:

Ink the Wplus9 Design Studio Pretty Patches: Tree stamp using Always Artichoke Classic Ink and the trunk with Smoky Slate Classic Ink stamping together onto Whisper White cardstock.

Ink the heart stamp with Cherry Cobbler Classic Ink and stamp onto the center of the tree image.

Use the Big Shot™ with the coordinating die to cut out the tree image and set aside.

Cut the wavy panel from Always Artichoke cardstock using the Lawn Fawn (LF) Stitched Hillside Borders Die.

De-static the stitched wavy panel as well as a piece of Whisper White cardstock with the Embossing Buddy®.

Ink the various snowflakes from Sweet ‘n Sassy Stamps (SNSS) Winter Blessings using Versamark™ ink, apply Stampin’ Emboss® White Embossing Powder and heat set with the Heat Tool. 

Once the embossing powder has cooled, ink the Stampin’ Up! Watercolor Wash background stamp with Smoky Slate Classic Ink, spritz with water, blot the inked background lightly with a paper towel, stamp over the snowflakes on the Whisper White embossed panel and lightly wipe off the ink from the snowflakes with a paper towel.

Mount the wavy stitched embossed panel to the embossed Whisper White panel and trim, mount onto Cherry Cobbler cardstock, trim again and mount onto the Always Artichoke card base.

Stamp the sentiment from the Wplus9 Pretty Patches: Tree set using Cherry Cobbler Classic Ink and stamp onto Whisper White cardstock.

Use the Big Shot™ with the My Favorite Things (MFT) Stitched Rectangle STAX Die to cut out the sentiment and mount onto a piece of Cherry Cobbler cardstock, trimming to frame the stitched rectangle layer.

Add the looped Silver Cord to the card front wrapping a few strands around the sentiment layer and mount the tree with the sentiment to the card front using dimensional foam.

Stamp and die cut another heart using Cherry Cobbler Classic Ink, mount onto the sentiment panel and add the Rhinestones to the hearts as well as the snowflakes to finish off the card.

Stamp Sets:  Pretty Patches: Trees (Wplus9), Winter Blessings (Sweet ‘n Sassy Stamps), Watercolor Wash (Stampin’ Up!)

Ink: Versamark™, Cherry Cobbler, Smoky Slate

Paper/Cardstock: Whisper White, Always Artichoke, Cherry Cobbler

Accessories:  Big Shot™, Wplus9 Pretty Patches: Trees Dies, MFT Stitched Rectangle STAX Dies, LF Stitched Hillside Borders Die, Embossing Buddy®, Stampin’ Emboss® White Embossing Powder, Heat Tool, Silver Cord, Rhinestones


Thanks again for taking the time to stop by- I hope all of you have a wonderful week!

Monday, November 9, 2015

Happy 8th Birthday Sweet 'n Sassy Stamps!


 Hello Friends!

Woohoo!!  Today we are celebrating Sweet ‘n SassyStamps 8th Birthday with a fun Design Team blog hop!   Check out the Design Diva's links below to visit all of their blogs and leave a comment (we have a Birthday Prize drawing as well- see more details below) :-)

Domestic USPS -
use codeBDAYFREESHIP
In addition to the blog hop, we have another SWEET deal for you- all orders of $30 or more receive FREE SHIPPING!! (please use code BDAYFREESHIP during checkout- offer ends Thursday, November 12,2015).  NOTE: Free shipping is for Domestic First Class through the USPS.  Happy shopping!

I decided to share a card that I designed using the fun Snowman Soup Stamp Set along with WinterBlessings for a warm, winter celebration card!   FYI- I am also linking this card to the Splitcoaststampers' F4A298 "Coffee Please" Challenge (I rarely drink coffee but love hot cocoa in the winter) :-)

To create this card:

Sweet 'n Sassy Stamps- Snowman Soup, Winter Blessings
Ink the Snowman Soup image using Memento™ Tuxedo Black Ink and stamp onto Very Vanilla cardstock.

Color the hat, coat and mug with a water brush and retired Stampin’ Up!  More Mustard and Midnight Muse Classic Ink, use Stampin’ Write Markers for the scarf and mittens (Pear Pizzazz), the carrot nose (Pumpkin Pie) and Sahara Sand for the shadows.

You can cut the image out with the coordinating Snowman Soup Dies (I have these on my wish list so I  fussy-cut the image) and set aside.

Ink a portion of the Winter Blessings stamp with retired More Mustard Classic Ink and stamp onto retired More Mustard cardstock.

Trim the More Mustard stamped panels and stitch a rectangle with a zigzag stitch onto Midnight Muse cardstock, trim carefully and mount onto a piece of More Mustard cardstock.

Add the Snowman Soup image to the panel using dimensional foam and adhere the 5/8” Gold Satin Triple Ribbon Bow.

Adhere a piece of My Mind’s Eye™ Asparagus™ Designer Paper to a piece of More Mustard cardstock with a zigzag stitch on the sewing machine, trim carefully and mount onto the Midnight Muse card base.

Add the horizontal strips of stamped More Mustard panels mounted onto Midnight Muse with the zigzag stitch and mount the entire panel onto the card base (I generally use white but you can use any color you choose since you will not see this base from the front of the card).

Stamp the sentiment with Memento™ Tuxedo Black Ink onto a scrap piece of Very Vanilla cardstock, huff onto the previously inked portion of the Winter Blessings stamp, lay the sentiment down to stamp a bit of the background onto the panel, trim and create the flag by hand or with a punch.

Adhere the snowflake charm with gold thread to the card front (making sure that the end will be behind the sentiment- I use Hot Glue for this step) and mount the sentiment to the card front using dimensional foam.

Add the focal image panel to the card and finish off with a few Pearls to the corners of the card and a Rhinestone to the center of the snowflake charm.

I hope you enjoy this fun card!  I would love to see your comments and hope you have time to visit and comment on all of my DT Sister's blogs for our Special 8th Birthday Blog Hop!  Don't  forget to comment for a chance to win this fabulous Birthday Party Prize!!


Linky Code:
Snowman Soup

Stamp Sets: Snowman Soup, Winter Blessings  (SNSS)

Ink: Memento™ Tuxedo Black Ink, Stampin’ Up! Classic Ink- retired More Mustard and Midnight Muse; Stampin’ Write Markers- Pear Pizzazz, Sahara Sand, Pumpkin Pie

Winter Blessings
Paper: Stampin’ Up! Very Vanilla, retired More Mustard and Midnight Muse cardstock; My Mind’s Eye™ Asparagus™ Designer Paper

Accessories: Sewing Machine, Hexagon Punch, Snowflake Charm, Pearls, Rhinestone, 5/8” Gold Satin Ribbon

Hugs and have a blessed week, my friends!
Related Posts Plugin for WordPress, Blogger...