Showing posts with label CAS Mix-Up Challenge. Show all posts

Friday, December 15, 2017

The Curtain Call- December 15 {Pines}


Hi Friends!

Woohoo! Today I am the Guest Designer for the12/15 Curtain Call “Pines” Inspiration Challenge!   I am so honored to have won their recent Acorn Challenge and part of winning, you are invited to Guest Design.  

Also, this is the final challenge at The Curtain Challenge- I hope you will be able to join in on the fun!

I decided to create a Clean and Simple (CAS) Mixed Media Christmas card- I love Christmas and did not have a chance to create a card this season with the retired Ornamental Pine stamp set (Stampin’ Up!).  

The Ornamental Pines stamp set is one of my favorite sets and I paired it with the retired Greetings of the Season stamp set (also SU!).


 If you have not had a chance to check out the Curtain Call or other challenge sites yet, I hope you will take the time to do so- gorgeous inspiration from the Design Teams as well as their galleries!
To create this card:

1). Ink the Ornamental Pine image using distress inks- Walnut Stain for the branch, Peeled Paint and Forest Moss for the pine needles, spritz lightly with water before stamping onto a piece of Whisper White cardstock.  Repeat the process for the pine needles on the corner and sprinkle a bit of water over the image. 

2). Once the stamped image has dried, die cut with the MFT Jumbo Stitched Fishtail STAX Dies.  Add additional pine needles using the edge of a bone folder using Peeled Paint Distress Ink along with a few branches using watercolor pencils.

3). De-static the die cut focal image with an embossing powder tool, stamp the sentiment from the Greetings of the Season stamp set with archival black ink (I had this ink on my desk, you could use Versamark™), apply gold embossing powder and heat set with a heat tool.

3). Die cut a piece of Whisper White cardstock using the largest die from the MFT Stitched A2 Rectangle STAX Set 1 Dies, mount onto a white card base.

4). Die cut a piece of designer paper with the MFT Horizontal Strip Dies, cut the die in half before mounting onto the card base.

5). Add the looped gold cord to the card front before mounting the die cut focal image panel with dimensional foam.

6). Finish off the card by adding “snow” with an extra fine white paint pen, a few clear sequins (with a hint of pink) and a few drops of white gloss Nuvo™ Crystal Drops.

Stamp Sets: Ornamental Pine, Greetings of the Season (both retired Stampin’ Up!)

Ink/Mediums: Versafine™ Onyx Black, Tim Holtz® Distress Ink- Walnut Stain, Peeled Paint, Forest Moss; Dark Green Watercolor Pencils, Sharpie® Extra Fine White Paint Pen, Nuvo™ White Gloss Crystal Drops

Cardstock/Paper: Whisper White, This and That Epic Day DSP (retired SU!)

Accessories: Big Shot™, MFT Dies- Jumbo Stitched Fishtail STAX, Stitched A2 Rectangle STAX Set 1, Horizontal Strip Dies; Gold Cord, Clear Sequins

Thanks again for visiting- I hope all of you have a very blessed week and Merry Christmas!

Friday, August 4, 2017

Thoughts & Prayers- Nothing is Worth More than This Day

Hi Friends!!

Woohoo! I had a chance to create another Clean and Simple (CAS) Mixed Media card using an alcohol ink technique on vellum last night. One thing I forgot to do was work in a well ventilated room- lol! I must remember that for the next time :-)

I created this card for the August CAS Mixed-Media challenge and chose to use vellum versus Yupo® paper (I have the Yupo® as well as Glossy cardstock but neither one was in the area where I actually stamp right now, so I pulled out a piece of vellum instead) and the Simon Says Wednesday "Splatter It" Challenge.

My design style normally does not lean toward CAS cards but lately I have been trying to participate in CAS challenges and force myself to think CAS.  I am having so much fun with this style and who knows? I may be converted soon- lol!!

If you have not already had a chance to visit the above challenge sites yet, I hope you will do so- wonderful inspiration from their Design Teams as well as in their galleries!

OK, I have to admit, this card was an experiment so I did try a few different things ( I refused to give up :-)) :

1). Using alcohol inks for the “smoosh” technique (***Note- epic fail on vellum but it is part of this card ) place a few drops of Ranger® Adirondack™ Alcohol Inks- Ginger, Latte and Terra Cotta onto a silicone craft mat, spritz with alcohol blending solution and lay the piece of vellum into the ink. Immediately lift up the vellum, allow the inks to merge and blend.  The problem I had with this method on vellum was that I had too much of the ink on the mat (and too similar of colors) so the colors became one brown color (I decided to wipe it off the vellum and start over...)

2). Using  Spectrum Noir™ Alcohol Markers, color with the large flat nib back and forth over the panel- GB5 Yellow at the top, OR1 Orange in the center and the DG4 at the bottom. Once the marker has dried (only a few moments), spritz a bit of alcohol blending solution over the panel and allow that to dry.

3). Trim the vellum, de-static the alcohol marker ink side with an Embossing Buddy®, stamp the tree from Thoughts & Prayers using Versafine™ Onyx Black Ink, apply Clear Embossing Powder and carefully heat set with the Heat Tool.

4). Using the Big Shot™ with the MFT Stitched Rectangle STAX, cut the frame from Basic Black cardstock and adhere the vellum panel to the frame.  Mount the entire frame onto a piece of So Saffron cardstock (I had this piece in my stash already die cut with the same rectangle die).

5). On a piece of Whisper White cardstock, stamp the sentiment from the retired Summer Afternoon stamp set with Memento™ Tuxedo Black Ink at the bottom, trim the panel and mount onto a piece of Basic Black cardstock.  Adhere the entire background onto the white card base and add the vellum panel.

6). Die cut the cat from Basic Black cardstock with the Poppystamps™ Sitting Cat Die (I also had this die cut ready in my stash)- mount onto the card front with dimensional foam to finish off the card.

Stamp Sets: Thoughts & Prayers, Summer Afternoon (current and retired Stampin’ Up!)

Ink/Mediums: Versafine™ Onyx Black; Alcohol Inks, Spectrum Noir™ Alcohol Markers- GB5, OR1, DG4

Paper: Whisper White, Basic Black, Vellum

Accessories/Tools:  Big Shot™, MFT Stitched Rectangles STAX Dies, Poppystamps™ Sitting Cat Die, Embossing Buddy®, Stampin’ Emboss® Clear Embossing Powder, Heat Tool


Thanks again for stopping by- hugs and I hope all of you have a fabulous weekend!

Saturday, July 22, 2017

Dragonfly Dreams- Tissue Paper Watercolor


Hi Friends!!

Wow, this week has been so busy!  I have been wanting to try the Tissue Watercolor Technique for the CASMix-Up July Challenge and finally had a chance this evening!  

 I used Loll’s tips from her wonderful video (here) and decided to try her technique with the addition of heat embossing as well.

I also incorporated the CAS(E) This Sketch #231 Challenge, the Splitcoaststampers CC642 Color Challenge and the Addicted to Stamps and More #251 “Anything Goes” Challenge into the design.

If you have not already had a chance to visit the above challenge sites, I hope you will do so- so much inspiration from their Design Teams as well as in their galleries!

To create this card:

1). Using Tranquil Tide and Soft Sky Classic Ink, tap the pads onto a silicone craft mat, spritz with water, use a plastic spoon (or palette knife) to mix the ink a bit and lay a piece of tissue paper into the ink (smooshing very gently with your fingers to moisten all of the tissue).  Carefully lift up the tissue paper and set onto a paper towel to dry.  My first layer was a bit light so I added additional ink until I was satisfied with the color.

2). Using a craft glue, spread the glue over an entire piece of white cardstock, squishing the tissue a bit to create more ridges and allow the panel to dry (I did use a heat tool to speed up the process- I am so impatient!).  De-static the panel with an Embossing Buddy®, gently rub the Versamark™ ink pad over the ridges, apply Silver Embossing Powder and heat set with the Heat Tool.

3). De-static a piece of Whisper White cardstock with the Embossing Buddy®, ink the splatter image from Dragonfly Dreams and the sentiment from Rose Wonder with Versamark™ ink and stamp onto the panel.  Apply Silver Embossing Powder and heat set with the Heat Tool.  Trim the panel and mount onto the Extra Thick Whisper White card base.

4). Create the banner from Silver Foil using the Big Shot™ with the MFT Blueprints 16 Dies, cut in half and adhere to the card front.

5). Die cut the tissue panel with a medium frame from the retired MFT Fancy Ticket STAX dies and mount onto the card front with dimensional foam.

Close uo of the tissue background 
6). Stamp the dragonfly image from Dragonfly Dreams using archival black ink onto white cardstock, heat set the ink and watercolor with Tranquil Tide and Pool Party Classic Ink.  Die cut with the Detailed Dragonfly Thinlits™, mount onto the card front and use dimensional foam below the wings.

7). To finish off the card, apply shimmer to the wings using a Spectrum Noir™ Clear Glitter Pen and add a few drops around the sentiment and on the tissue panel with Nuvo™ Gray Mist Jewel Drops.
I wish the shimmer showed better in the photo- this card definitely shines IRL :-)

Also, I have to say that I absolutely love this tissue paper technique- thanks Loll for the fabulous instructions!   I am so thrilled that I decided to try this (I have a few scraps from this panel for another card) plus I am looking forward to playing around with different colors and inks in the future!  Loll, you have definitely converted me- lol!

Stamp Sets: Dragonfly Dreams, Rose Wonder (both current Stampin’ Up!)

Ink/Mediums: Versafine™ Onyx Black Ink, Versamark™ Ink, Classic SU! Ink- Tranquil Tide, Pool Party; Nuvo™ Grey Mist Jewel Drops, Spectrum Noir™ Clear Glitter Pen

Paper: Whisper White, Extra Thick Whisper White, Silver Foil, Tissue Paper

Accessories:  Big Shot™, Detailed Dragonfly Thinlits™, MFT Blueprints 16 Dies, retired MFT Fancy Ticket STAX Dies, Embossing Buddy®, Stampin’ Emboss® Silver Embossing Powder, Heat Tool


Thanks again for visiting- hugs and I hope all of you have a wonderful weekend!

Wednesday, May 24, 2017

TCC74 Congrats!


Hi Friends!

It’s time for The Card Concept #74 “Freshly Elegant” Challenge!  Wow, I love the elegance of this photo with the pinks, black striped pillow and Eiffel Tower bookends as well as the lips, ampersands and all of the gold! 

I am also participating on the  CAS Mix-Up May Challenge - Stamping, Splatter and Your Choice (Watercolor, Washi Tape, Nuvo Crystal Drops) and the Inkspirational #135 "Urban" Challenge.

If you have not had a chance to do so, I hope you will find the time to check out the rest of the wonderful Design Team cards at The Card Concept- gorgeous inspiration from all!

To create this card:

1). Apply Spun Sugar and Festive Berry Distress Stain onto a craft mat, lightly spritz with water and place a piece of white cardstock into the ink.  Dry with a Heat Tool, re-apply as needed to achieve the result you desire.

2). Trim the panel to 4” x 5 ¼”, add the various Washi Tape pieces to the lower portion of the card front.  Mount onto a piece of black cardstock and adhere to a white card base.

3). Using the large splatter stamp from Gorgeous Grunge, stamp onto the card front with Spun Sugar Distress Ink and the smaller splatter stamp with archival black ink.

4). Die cut the Eiffel Tower and the Congrats sentiment from black cardstock and again from gold foil.  Layer the gold foil on top of the black cardstock, mount the sentiment directly onto the card front and use dimensional foam to mount the Eiffel Tower.

5). To finish off the card, add Pale Gold Nuvo Crystal Drops to the card (a few were “smooshed” to create a splatter effect as well). 

Stamp Sets:  Gorgeous Grunge (Stampin’ Up!)

Ink/Mediums: Archival Black Ink; Distress Stains- Spun Sugar, Festive Berries; Spun Sugar Distress Ink; Pale Gold Nuvo Crystal Drops

Paper: Whisper White, Basic Black

Accessories: Big Shot™, MFT Die-namics™ Eiffel Tower Die,  Tim Holtz® Celebration Words: Script Dies, Washi Tape- retired Stampin’ Up!


Thanks again for taking the time to stop by!  I hope all of you have a wonderful week and you will be able to join us for the #74 “Freshly Elegant” Challenge at The Card Concept!

Sunday, May 14, 2017

Psalm 46:1 -God is Our Refuge and Strength


Hi Friends!

I have another quick CAS Mixed Media card to share using the Floral Greetings (Graciellie Designs) and Peaceful Peonies Clear Stamp Sets (NinaB Designs)- both available from Sweet ‘n Sassy Stamps.  

 
Again, if you have not had a chance to visit the challenge sites or SNSS Blog/FB Page yet, I encourage you to do so- wonderful inspiration from all!

To create this card:

1). Ink the floral image from Floral Greetings Clear Stamp Set using embossing ink and stamp onto white cardstock.  Heat emboss the image with black embossing powder and once the embossing has cooled, use a water brush to watercolor the image with water-based markers (Watercolor Wonder, Mint Macaron, Tip Top Taupe and Delightful Dijon).

2). Create a watercolor wash for the background with Tumbled Glass Distress Ink and add a few splatters.

3). Trim the panel and mount onto the black card base.

4). Heat emboss the sentiment from the Peaceful Peonies Clear Stamp Set with white embossing powder onto black cardstock, once cooled, create the banner points by hand.

5). Mount the sentiment onto the card front with dimensional foam.

6). To finish off the card, use a clear glitter pen to add shimmer to the flower petals and a Sharpie® Extra Fine White Paint Pen to add highlights to the flower centers.

Thanks again for stopping by- hugs and I hope all of you have a fabulous week!  

Wednesday, December 14, 2016

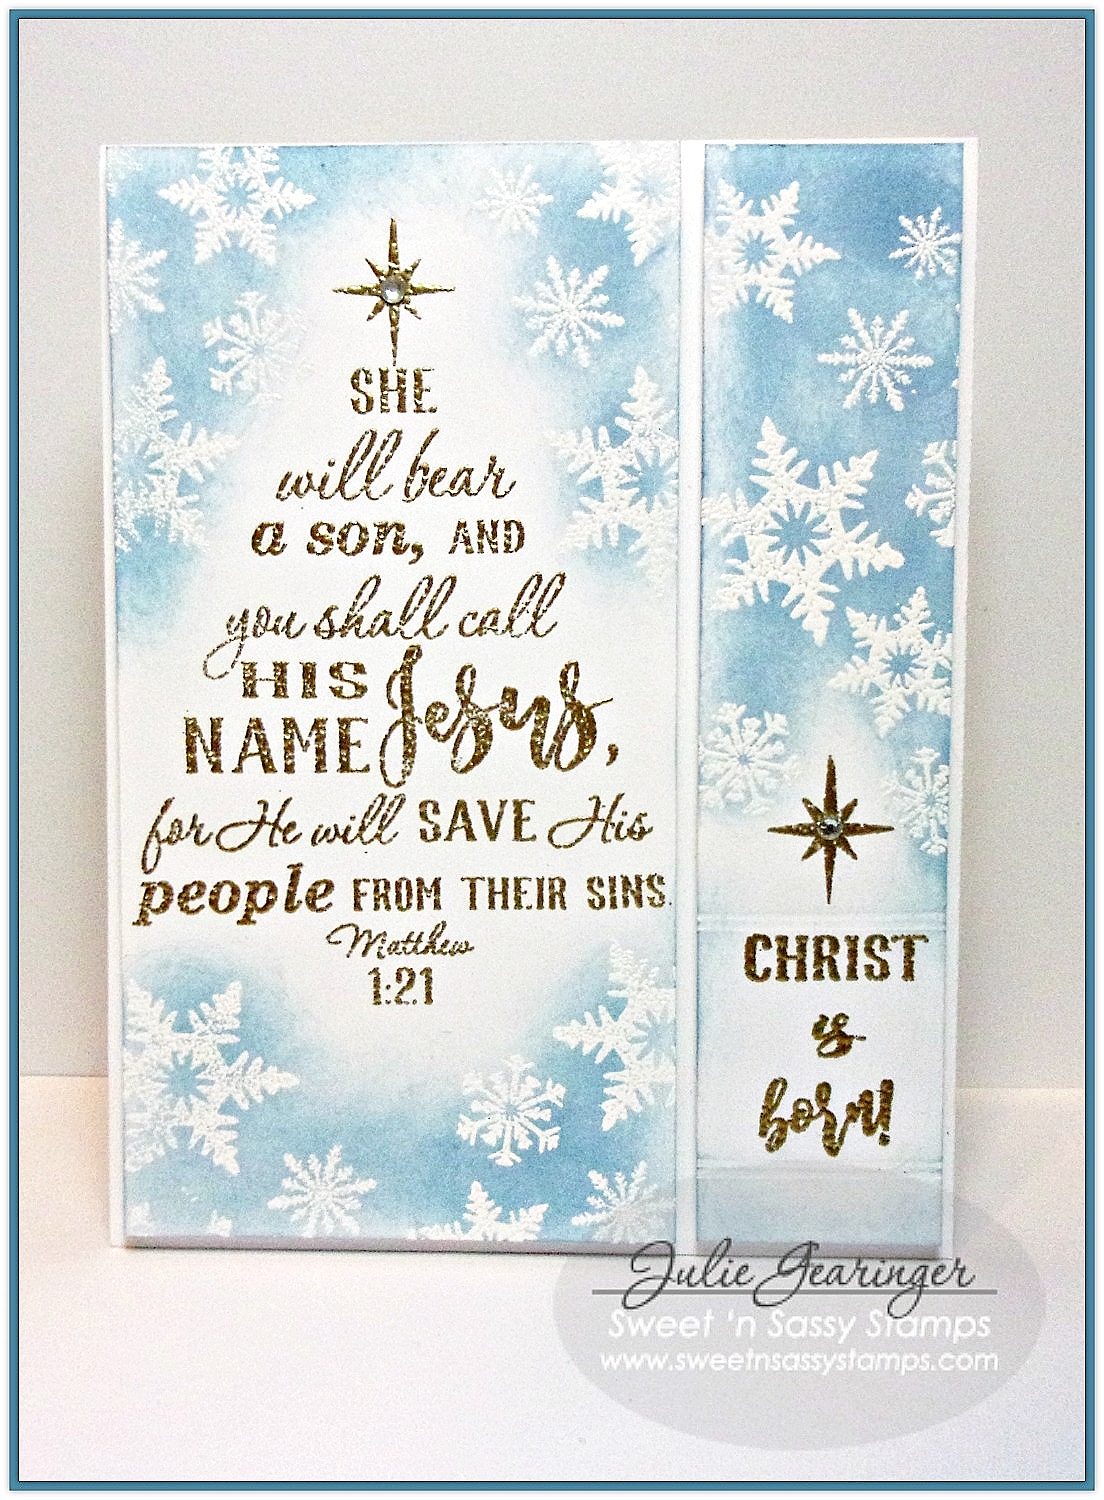
You Shall Call His Name Jesus


Hi Friends!  

This Clean and Simple (CAS) Christmas card is the "stepped up" version of the original design for the Splitcoaststampers’ SC623 Sketch Challenge  and I am also linking to the CAS MIX-Up for December and the Simon Says Monday "Let There Be Snow" Challenge.

I decided to keep the card very simple and created two versions- this post has version #1 and both versions use Sweet ‘n Sassy Stamps Clear Stamp Sets, Scripture Tree and Winter Blessings.

In addition  to checking out the above challenge sites, if you have not stopped by the Sweet ‘n Sassy Stamps blog or FB page yet, I hope you will take the time to do so- fabulous inspiration is posted each week from the SNSS Creative Team!

To create this card:

1).  De-static a piece of white cardstock with an embossing static tool, ink the SNSS Scripture Tree Clear Stamp main tree image with embossing ink and stamp onto the upper left hand portion of the panel.

2). Apply gold embossing powder and heat set with a heat tool.

3). Repeat the same steps above with placing the individual word images from SNSS Scripture Tree Clear Stamp Set, stamping and embossing on the lower right hand side of the trimmed piece of the panel.

4). Ink just the star from the SNSS Scripture Tree image with embossing powder, apply gold embossing powder and heat set.

5). Once the powder has cooled, score double lines above and below the sentiment area (hard to see in the photo).

6). De-static both panels again with an embossing static tool, arrange various snowflakes from the SNSS Winter Blessings Clear Stamp Set, ink with embossing powder and stamp around the panels.

7).  Apply white embossing powder over the stamped snowflakes and heat set with a heat tool.

8). Use a sponge dauber with Tumbled Glass Distress Ink to sponge over the snowflake areas and lightly wipe with a paper towel to remove the excess ink from the embossing.

9). Adhere the panels to the white card base with dimensional foam (leaving a space in the center per the sketch) and add rhinestones to the stars to finish off the card.

Quick and easy!!  This version has a bit more color than the all white version (see here in this post). 

Thanks again for taking the time to visit-hugs and I hope you have a fabulous week, sweet friends!


Related Posts Plugin for WordPress, Blogger...